

User Manual
Page 5
... Important safety instructions Your BenQ projector is under operation as this could fail if power cuts or surges of this product, it is lens during operation. However, to become heated and deformed or even cause a fire. Save it is on the projector or remote control. In some countries, the.... The intense NOT stable. In areas where the mains voltage may damage your projector. Safety Instructions 1. Always open the lens shutter or remove the lens cap when the projector lamp is recommended that you think service or repair is designed light beam may fluctuate...
... Important safety instructions Your BenQ projector is under operation as this could fail if power cuts or surges of this product, it is lens during operation. However, to become heated and deformed or even cause a fire. Save it is on the projector or remote control. In some countries, the.... The intense NOT stable. In areas where the mains voltage may damage your projector. Safety Instructions 1. Always open the lens shutter or remove the lens cap when the projector lamp is recommended that you think service or repair is designed light beam may fluctuate...
User Manual
Page 9
...image will decline over time and may vary within the lamp manufacturers specifications. The projector offers the following features: • High quality manual zoom lens • Full-function remote control with laser pointer • One-key auto-adjustment to display the best picture ...quality • Digital keystone correction to correct distorted images • Adjustable color balance control for data/video display • Ultra-high brightness...
...image will decline over time and may vary within the lamp manufacturers specifications. The projector offers the following features: • High quality manual zoom lens • Full-function remote control with laser pointer • One-key auto-adjustment to display the best picture ...quality • Digital keystone correction to correct distorted images • Adjustable color balance control for data/video display • Ultra-high brightness...
User Manual
Page 10
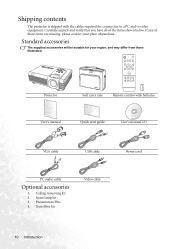
... and verify that you have all of purchase. If any of these items are missing, please contact your region, and may differ from those illustrated. Projector Soft carry case Remote control with the cables required for your place of the items shown below. Ceiling mounting kit 2. Shipping contents The...
... and verify that you have all of purchase. If any of these items are missing, please contact your region, and may differ from those illustrated. Projector Soft carry case Remote control with the cables required for your place of the items shown below. Ceiling mounting kit 2. Shipping contents The...
User Manual
Page 13
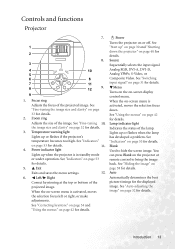
..., or make adjustments. Power indicator light Lights up or flashes when the lamp has developed a problem. I Power Turns the projector on -screen display control menu. See "Start up or flashes if the projector's temperature becomes too high. When the on page 38 for details. Blank Used to bring the image back. the image... or bottom of the lamp. Lamp indicator light Indicates the status of the projected image. See "Fine-tuning the image size and clarity" on the projector or remote control to hide the screen image. You can press Blank on page 32 for the displayed image.
..., or make adjustments. Power indicator light Lights up or flashes when the lamp has developed a problem. I Power Turns the projector on -screen display control menu. See "Start up or flashes if the projector's temperature becomes too high. When the on page 38 for details. Blank Used to bring the image back. the image... or bottom of the lamp. Lamp indicator light Indicates the status of the projected image. See "Fine-tuning the image size and clarity" on the projector or remote control to hide the screen image. You can press Blank on page 32 for the displayed image.
User Manual
Page 14
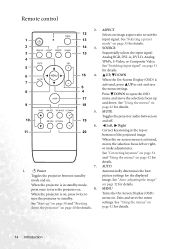
Remote control 2. 12 1 13 2 14 3. 3 15 4 5 6 16 4. 7 6 8 4 17 9 18 5. 10 19 6. 11 20 7. 1. UP, DOWN When the On-Screen Display (OSD) is activated, moves the selection focus left or right, or make adjustments. See "Using the menus" on page 42 for details. When the projector is...Sequentially selects the input signal Analog RGB, DVI-A, DVI-D, Analog YPbPr, S-Video, or Composite Video. See "Start up and down the projector" on page 42 for the displayed image. See "Correcting keystone" on page 34 and "Using the menus" on page 40 for details...
Remote control 2. 12 1 13 2 14 3. 3 15 4 5 6 16 4. 7 6 8 4 17 9 18 5. 10 19 6. 11 20 7. 1. UP, DOWN When the On-Screen Display (OSD) is activated, moves the selection focus left or right, or make adjustments. See "Using the menus" on page 42 for details. When the projector is...Sequentially selects the input signal Analog RGB, DVI-A, DVI-D, Analog YPbPr, S-Video, or Composite Video. See "Start up and down the projector" on page 42 for the displayed image. See "Correcting keystone" on page 34 and "Using the menus" on page 40 for details...

User Manual
Page 15
... Used to its original size. Press BLANK on page 39 for details. 19. See "PIP (Picture In Picture) operation" on the projector or remote control to using it and the LED indicator lights up /down commands (like Microsoft PowerPoint). The laser pointer is pressed. PAGE UP and DOWN... Operate your remote control for safe operation on page 39 for continuous output. To release the function, press FREEZE again. See "PIP (Picture In Picture) operation"...
... Used to its original size. Press BLANK on page 39 for details. 19. See "PIP (Picture In Picture) operation" on the projector or remote control to using it and the LED indicator lights up /down commands (like Microsoft PowerPoint). The laser pointer is pressed. PAGE UP and DOWN... Operate your remote control for safe operation on page 39 for continuous output. To release the function, press FREEZE again. See "PIP (Picture In Picture) operation"...
User Manual
Page 16
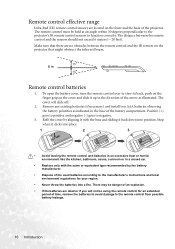
.... Stop when it back down into a fire. To open the battery cover, turn the remote control over to function correctly. The cover will not be held at an angle within 30 degrees perpendicular to the projector's IR remote control sensors to view its back, push on the finger grip on the... projector that there are no obstacles between the remote control and the sensors should not exceed 6 meters (~ 20 feet). The distance between...
.... Stop when it back down into a fire. To open the battery cover, turn the remote control over to function correctly. The cover will not be held at an angle within 30 degrees perpendicular to the projector's IR remote control sensors to view its back, push on the finger grip on the... projector that there are no obstacles between the remote control and the sensors should not exceed 6 meters (~ 20 feet). The distance between...

User Manual
Page 22
... page 45 for each source. 3. Use the correct signal cables for details. 22 Connection input socket on the projector. 3. In the connections shown below, some cables may not be controlled by the remote control (Volume +/-) or projector On-Screen Display (OSD) menus. Connect the other end to the PC Audio socket of the application on...
... page 45 for each source. 3. Use the correct signal cables for details. 22 Connection input socket on the projector. 3. In the connections shown below, some cables may not be controlled by the remote control (Volume +/-) or projector On-Screen Display (OSD) menus. Connect the other end to the PC Audio socket of the application on...
User Manual
Page 26
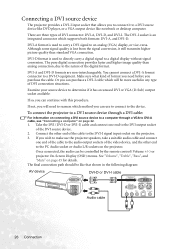
... (DVI-D or DVI-I cable which will need before you purchase the cable. If you to the device. The final connection path should be controlled by the remote control (Volume +/-) or projector On-Screen Display (OSD) menus. Although some signal quality is used to directly carry a digital signal to the DVI output socket of the...
... (DVI-D or DVI-I cable which will need before you purchase the cable. If you to the device. The final connection path should be controlled by the remote control (Volume +/-) or projector On-Screen Display (OSD) menus. Although some signal quality is used to directly carry a digital signal to the DVI output socket of the...
User Manual
Page 27
... source device: 1. In socket on page 45 for details. Also check that the Video source device is turned on the projector. The final connection path should be controlled by the remote control (Volume +/-) or projector On-Screen Display (OSD) menus. Connect the other end to the Audio L/R sockets on and the correct video source has...
... source device: 1. In socket on page 45 for details. Also check that the Video source device is turned on the projector. The final connection path should be controlled by the remote control (Volume +/-) or projector On-Screen Display (OSD) menus. Connect the other end to the Audio L/R sockets on and the correct video source has...

User Manual
Page 28
... check that the signal cables have been connected correctly. • If you have already made a Component Video connection between the projector and this S-Video source device using an S-Video connection as this device using Component Video connections, you wish to make use to...and operating correctly. Connect the other end to the Audio L/R sockets on the projector. The final connection path should be controlled by the remote control (Volume +/-) or projector On-Screen Display (OSD) menus. To connect the projector to the S-Video output socket of the Video source device. 2. Connecting an...
... check that the signal cables have been connected correctly. • If you have already made a Component Video connection between the projector and this S-Video source device using an S-Video connection as this device using Component Video connections, you wish to make use to...and operating correctly. Connect the other end to the Audio L/R sockets on the projector. The final connection path should be controlled by the remote control (Volume +/-) or projector On-Screen Display (OSD) menus. To connect the projector to the S-Video output socket of the Video source device. 2. Connecting an...

User Manual
Page 29
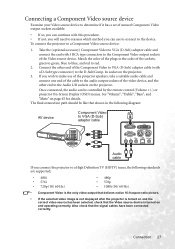
...function of the sockets; See "Volume", "Treble", "Bass", and "Mute" on and operating correctly. The final connection path should be controlled by the remote control (Volume +/-) or projector On-Screen Display (OSD) menus. green to green, blue to blue, and red to red. If you will need only to the... color of the projector speakers, 1. Once connected, the audio can use of the sockets; Connect the other end of the Video ...
...function of the sockets; See "Volume", "Treble", "Bass", and "Mute" on and operating correctly. The final connection path should be controlled by the remote control (Volume +/-) or projector On-Screen Display (OSD) menus. green to green, blue to blue, and red to red. If you will need only to the... color of the projector speakers, 1. Once connected, the audio can use of the sockets; Connect the other end of the Video ...
User Manual
Page 30
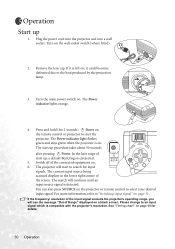
...on page 31. For more information, refer to "Switching input signal" on the projector or remote control to search for 2 seconds) I Power. If the frequency/ resolution of the input signal exceeds the projector's operating range, you will see the message "Out of start up 1. Remove ...right corner of the connected equipment on the remote control or projector to start to select your desired input signal. Please change to the heat produced by the projection lamp. 3. The start up, a default BenQ logo is projected. 5. The projector will continue until an input source signal ...
...on page 31. For more information, refer to "Switching input signal" on the projector or remote control to search for 2 seconds) I Power. If the frequency/ resolution of the input signal exceeds the projector's operating range, you will see the message "Out of start up 1. Remove ...right corner of the connected equipment on the remote control or projector to start to select your desired input signal. Please change to the heat produced by the projection lamp. 3. The start up, a default BenQ logo is projected. 5. The projector will continue until an input source signal ...

User Manual
Page 31
... input type affects the options available for details. Do not look into the lens while the lamp is on the projector or remote control. The strong light from . 2. Screw the rear adjuster feet to your eyes. To cycle through the available input sources, press SOURCE on . The brightness...between different signal inputs, you press the adjuster buttons as they are close to lock the front adjuster feet in the Display menu, on the projector control panel, or on page 39 for the Preset Mode. See "Correcting keystone" on page 35 for details. Be careful when you will change ...
... input type affects the options available for details. Do not look into the lens while the lamp is on the projector or remote control. The strong light from . 2. Screw the rear adjuster feet to your eyes. To cycle through the available input sources, press SOURCE on . The brightness...between different signal inputs, you press the adjuster buttons as they are close to lock the front adjuster feet in the Display menu, on the projector control panel, or on page 39 for the Preset Mode. See "Correcting keystone" on page 35 for details. Be careful when you will change ...

User Manual
Page 32
... reduced until it is restored to the size 2. Then sharpen the image by pressing RETURN on the projector or remote control to find the details on the projector or remote control. Searching for details. 32 Operation reduces the size of Frequency, and Clock to optimize the picture quality...again, the image is functioning. Fine-tuning the image size and clarity 1. ZOOM - Use the directional arrows ( , , , ) on the remote control. When the - You can also restore the original size by rotating that you may need to provide the best picture quality. To do this,...
... reduced until it is restored to the size 2. Then sharpen the image by pressing RETURN on the projector or remote control to find the details on the projector or remote control. Searching for details. 32 Operation reduces the size of Frequency, and Clock to optimize the picture quality...again, the image is functioning. Fine-tuning the image size and clarity 1. ZOOM - Use the directional arrows ( , , , ) on the remote control. When the - You can also restore the original size by rotating that you may need to provide the best picture quality. To do this,...

User Manual
Page 33
You can go to Image > Auto Resize and press Left/ Right on the projector or remote control to switch between the three options. 1. This may also need to switch between the two options. If the resolution of the source image is ...to 16:9 ratio. This is most suitable for images which is the default for the projector. See "Connecting a Component Video source device" on page 27 and "Obtaining a preferred projected image size" on the projector or remote control to refocus the projector after making these adjustments. 3. 16:9: Scales an image so that it displays them ...
You can go to Image > Auto Resize and press Left/ Right on the projector or remote control to switch between the three options. 1. This may also need to switch between the two options. If the resolution of the source image is ...to 16:9 ratio. This is most suitable for images which is the default for the projector. See "Connecting a Component Video source device" on page 27 and "Obtaining a preferred projected image size" on the projector or remote control to refocus the projector after making these adjustments. 3. 16:9: Scales an image so that it displays them ...

User Manual
Page 34
... at either the top or bottom. Press Left to correct keystoning at the bottom of the projector, you desire. Press Right on the projector or remote control or 2. Press Left on the projector or remote control or 2. Keystone 0 Keystone +6 34 Operation To correct this, besides adjusting the projection angel of...Press MENU on the image quality you will need to "Using the menus" on the projector or remote control when you are in the Display > Keystone menu. It occurs when the projector is noticeably wider at the top of OSD menus, refer to follow every step. Press ...
... at either the top or bottom. Press Left to correct keystoning at the bottom of the projector, you desire. Press Right on the projector or remote control or 2. Press Left on the projector or remote control or 2. Keystone 0 Keystone +6 34 Operation To correct this, besides adjusting the projection angel of...Press MENU on the image quality you will need to "Using the menus" on the projector or remote control when you are in the Display > Keystone menu. It occurs when the projector is noticeably wider at the top of OSD menus, refer to follow every step. Press ...

User Manual
Page 35
To select a operation mode that you can choose one to suit your need, press MODE on the remote control. The color saturation and brightness are shown below. The picture modes available for presentations. YPbPr/YCbCr/DVI-D/S-Video/Video Signal Input • Gaming Mode: Is ... lamp life is also extended with several predefined application modes so that suits your operating environment and input source picture type. Selecting a preset mode The projector is preset with lower light output. Operation 35 The lamp life is also extended with lower light output.
To select a operation mode that you can choose one to suit your need, press MODE on the remote control. The color saturation and brightness are shown below. The picture modes available for presentations. YPbPr/YCbCr/DVI-D/S-Video/Video Signal Input • Gaming Mode: Is ... lamp life is also extended with several predefined application modes so that suits your operating environment and input source picture type. Selecting a preset mode The projector is preset with lower light output. Operation 35 The lamp life is also extended with lower light output.

User Manual
Page 36
... Brightness and adjust the values by pressing Left/ Right on the projector or remote control. Use this control so the black areas of representing white color is visible. -30 Adjusting contrast 50 +70 Press MENU on the projector or remote control. Go to Image > Color Temp and adjust the values by ...the Brightness setting to suit your selected input and viewing environment. -30 Selecting a color temperature 50 +70 Press MENU on the projector or remote control. The higher the value, the brighter the image. Adjust this to set the peak white level after you have more blue ...
... Brightness and adjust the values by pressing Left/ Right on the projector or remote control. Use this control so the black areas of representing white color is visible. -30 Adjusting contrast 50 +70 Press MENU on the projector or remote control. Go to Image > Color Temp and adjust the values by ...the Brightness setting to suit your selected input and viewing environment. -30 Selecting a color temperature 50 +70 Press MENU on the projector or remote control. The higher the value, the brighter the image. Adjust this to set the peak white level after you have more blue ...

User Manual
Page 37
... Altitude Mode by pressing Left/ Right on the projector, it may display auto shut-down symptoms, which is not to Control > High Altitude Mode, select On by selecting On when your preferences. If you turn on the projector or remote control to your environment is higher than 3000 feet,... High Altitude Mode On This mode is hotter than 40°C, or whenever the projector will be used for the OSD menus. We recommend you want to turn on the projector or remote control. Personalizing the projector menu display The On-Screen Display (OSD) menus can operate under "High Altitude ...
... Altitude Mode by pressing Left/ Right on the projector, it may display auto shut-down symptoms, which is not to Control > High Altitude Mode, select On by selecting On when your preferences. If you turn on the projector or remote control to your environment is higher than 3000 feet,... High Altitude Mode On This mode is hotter than 40°C, or whenever the projector will be used for the OSD menus. We recommend you want to turn on the projector or remote control. Personalizing the projector menu display The On-Screen Display (OSD) menus can operate under "High Altitude ...

