User Manual
Page 3
... Maintenance 21 Lamp Information 21 Table of Contents Important Safety Instructions 1 Introduction 4 Projector Features 4 Shipping Contents 5 Optional Accessories 5 Projector Descriptions 6 Front View 6 Left View 6 Back View 6 External Control Panel 7 Adjuster 8 Remote Control Description 8 Your Remote Control at a Glance 8 Remote Control Effective Range 9 Remote Control Features 9 Installing or Replacing Batteries 10 Installation 11 Screen Size 11 Connecting...
... Maintenance 21 Lamp Information 21 Table of Contents Important Safety Instructions 1 Introduction 4 Projector Features 4 Shipping Contents 5 Optional Accessories 5 Projector Descriptions 6 Front View 6 Left View 6 Back View 6 External Control Panel 7 Adjuster 8 Remote Control Description 8 Your Remote Control at a Glance 8 Remote Control Effective Range 9 Remote Control Features 9 Installing or Replacing Batteries 10 Installation 11 Screen Size 11 Connecting...
User Manual
Page 8
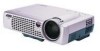
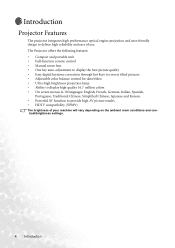
... and user-friendly design to provide high AV picture results. • HDTV compatibility (YPbPr) The brightness of use. The Projector offers the following features: • Compact and portable unit • Full-function remote control • Manual zoom lens • One key auto-adjustment to display the best picture quality • Easy digital...
... and user-friendly design to provide high AV picture results. • HDTV compatibility (YPbPr) The brightness of use. The Projector offers the following features: • Compact and portable unit • Full-function remote control • Manual zoom lens • One key auto-adjustment to display the best picture quality • Easy digital...
User Manual
Page 9
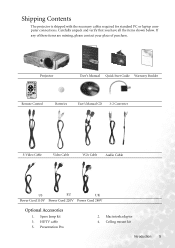
Macintosh adaptor 4. Carefully unpack and verify that you have all the items shown below. Spare lamp kit 3. Presentation Pro 2. HDTV cable 5. Projector PDUBisge2ir2t'a2sl0MP/raPoujBne2ca1tlo2r0 User's Manual Quick Start Guide Warranty Booklet Remote Control Batteries User's Manual CD 3-2 Converter S-Video Cable Video Cable VGA Cable Audio Cable US EU UK Power Cord 110V...
Macintosh adaptor 4. Carefully unpack and verify that you have all the items shown below. Spare lamp kit 3. Presentation Pro 2. HDTV cable 5. Projector PDUBisge2ir2t'a2sl0MP/raPoujBne2ca1tlo2r0 User's Manual Quick Start Guide Warranty Booklet Remote Control Batteries User's Manual CD 3-2 Converter S-Video Cable Video Cable VGA Cable Audio Cable US EU UK Power Cord 110V...
User Manual
Page 10
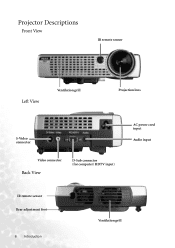
Projector Descriptions Front View IR remote sensor Left View Ventilation grill Projection lens S-Video connector Video connector Back View D-Sub connector (for computer/ HDTV input) AC power cord input Audio input IR remote sensor Rear adjustment foot 6 Introduction Ventilation grill
Projector Descriptions Front View IR remote sensor Left View Ventilation grill Projection lens S-Video connector Video connector Back View D-Sub connector (for computer/ HDTV input) AC power cord input Audio input IR remote sensor Rear adjustment foot 6 Introduction Ventilation grill
User Manual
Page 11
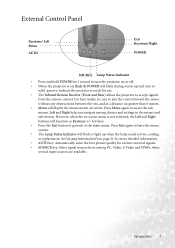
... on , Back-lit POWER will flash or light up and turn the projector on or off. • When the projector is ready for use. • The Infrared Remote Receiver (Front and Rear) allows the projector to accept signals from among choices and settings in the menus and sub-menus...SOURCE key: Select signal sources from the remote control. Introduction 7 External Control Panel Keystone/ Left Menu AUTO Exit Keystone/ Right POWER SOURCE Lamp Status Indicator • Press and hold POWER for 1 second to turn to solid green to indicate the projector is on screen. Press Exit again to ...
... on , Back-lit POWER will flash or light up and turn the projector on or off. • When the projector is ready for use. • The Infrared Remote Receiver (Front and Rear) allows the projector to accept signals from among choices and settings in the menus and sub-menus...SOURCE key: Select signal sources from the remote control. Introduction 7 External Control Panel Keystone/ Left Menu AUTO Exit Keystone/ Right POWER SOURCE Lamp Status Indicator • Press and hold POWER for 1 second to turn to solid green to indicate the projector is on screen. Press Exit again to ...

User Manual
Page 12
To stow the adjuster, depress the adjuster button to where it is equipped with a quick-release adjuster foot and button for adjusting its tilt angle. 1. Adjuster The projector is . 2. back to release the release button and push the adjuster adjuster. The adjuster will drop into posi- tion and be locked. 3 1 2 Remote Control Description Your Remote Control at a Glance SOURCE AUTO POWER EXIT KEYSTONE MENU BLANK MUTE PIP VIDEO PIP S-VIDEO ZOOM IN ZOOM OUT FREEZE RETURN VOLUME 8 Introduction Lift the projector up and press the 3.
To stow the adjuster, depress the adjuster button to where it is equipped with a quick-release adjuster foot and button for adjusting its tilt angle. 1. Adjuster The projector is . 2. back to release the release button and push the adjuster adjuster. The adjuster will drop into posi- tion and be locked. 3 1 2 Remote Control Description Your Remote Control at a Glance SOURCE AUTO POWER EXIT KEYSTONE MENU BLANK MUTE PIP VIDEO PIP S-VIDEO ZOOM IN ZOOM OUT FREEZE RETURN VOLUME 8 Introduction Lift the projector up and press the 3.
User Manual
Page 13
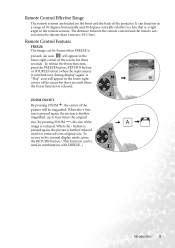
...button (when the input source is reduced. To return to the remote sensors. The distance between the remote control and the remote sensors must be used in a range of the image is switched over during display) again. Remote Control Effective Range The remote sensors are located on the front and the back of the ...frozen when FREEZE is released. ZOOM IN/OUT + By pressing ZOOM , the center of the picture will appear in the lower right corner of the projector. It can be magnified. Remote Control Features FREEZE The image can function in combination with FREEZE. ) Introduction 9
...button (when the input source is reduced. To return to the remote sensors. The distance between the remote control and the remote sensors must be used in a range of the image is switched over during display) again. Remote Control Effective Range The remote sensors are located on the front and the back of the ...frozen when FREEZE is released. ZOOM IN/OUT + By pressing ZOOM , the center of the picture will appear in the lower right corner of the projector. It can be magnified. Remote Control Features FREEZE The image can function in combination with FREEZE. ) Introduction 9

User Manual
Page 18
to correct keystoning at the top of the image. To do this , press KEYSTONE +/- (hot key) on the control panel of the projector or on the remote control. Auto Adjustment In some cases, you may have to the best picture quality. 14 Operation Press - Digital Keystone Correction Keystoning is when the projected ... quality manually. Press + to correct keystoning at either the top or bottom. To correct this , press the AUTO key on the control panel of the projector or on the remote control, then adjust the sliding bar labeled Keystone, as needed.
to correct keystoning at the top of the image. To do this , press KEYSTONE +/- (hot key) on the control panel of the projector or on the remote control. Auto Adjustment In some cases, you may have to the best picture quality. 14 Operation Press - Digital Keystone Correction Keystoning is when the projected ... quality manually. Press + to correct keystoning at either the top or bottom. To correct this , press the AUTO key on the control panel of the projector or on the remote control, then adjust the sliding bar labeled Keystone, as needed.
User Manual
Page 19
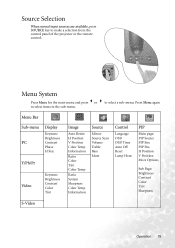
... to select a sub-menu. Menu System Press Menu for the main menu and press 3or 4 to make a selection from the control panel of the projector or the remote control. Menu Bar Sub-menu PC Display Keystone Brightness Contrast Phase H Size Y/Pb/Pr Video Keystone Brightness Contrast Color Tint Image Auto Resize H Position...
... to select a sub-menu. Menu System Press Menu for the main menu and press 3or 4 to make a selection from the control panel of the projector or the remote control. Menu Bar Sub-menu PC Display Keystone Brightness Contrast Phase H Size Y/Pb/Pr Video Keystone Brightness Contrast Color Tint Image Auto Resize H Position...
User Manual
Page 28
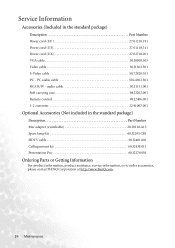
... or Getting Information For product information, product assistance, service information, or to order accessories, please contact BENQ Corporation at http://www.BenQ.com. 24 Maintenance audio cable 50.J1311.001 Soft carrying case 98.J2202.001 Remote control 98.J2406.001 3-2 converter 22.91007.001 Optional Accessories (Not included in the standard package...
... or Getting Information For product information, product assistance, service information, or to order accessories, please contact BENQ Corporation at http://www.BenQ.com. 24 Maintenance audio cable 50.J1311.001 Soft carrying case 98.J2202.001 Remote control 98.J2406.001 3-2 converter 22.91007.001 Optional Accessories (Not included in the standard package...
User Manual
Page 29
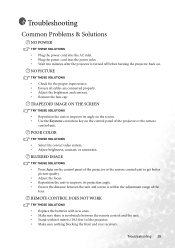
...• Adjust brightness, contrast, or saturation. BLURRED IMAGE TRY THESE SOLUTIONS • Press Auto on the control panel of the projector or the remote control unit to get better picture quality. • Adjust the focus. • Reposition the unit to improve its projection angle.... • Ensure the distance between the remote control and the unit. • Stand within the adjustment range of the projector or the remote control unit. Troubleshooting 25 REMOTE CONTROL DOES NOT WORK TRY THESE SOLUTIONS • Replace the batteries with new...
...• Adjust brightness, contrast, or saturation. BLURRED IMAGE TRY THESE SOLUTIONS • Press Auto on the control panel of the projector or the remote control unit to get better picture quality. • Adjust the focus. • Reposition the unit to improve its projection angle.... • Ensure the distance between the remote control and the unit. • Stand within the adjustment range of the projector or the remote control unit. Troubleshooting 25 REMOTE CONTROL DOES NOT WORK TRY THESE SOLUTIONS • Replace the batteries with new...

