
User Manual
Page 4
... Replacing the lamp 44 Temperature information 46 Indicators...47 Safety instructions for ceiling mounting of your BenQ projector 49 Troubleshooting 50 Specifications 51 Projector specifications 51 Timing chart 52 Supported timing for PC input 52 Supported timing for Component-YPbPr input 52 Supported timing for Video and S-Video inputs 52 Dimensions 53 Warranty 54...
... Replacing the lamp 44 Temperature information 46 Indicators...47 Safety instructions for ceiling mounting of your BenQ projector 49 Troubleshooting 50 Specifications 51 Projector specifications 51 Timing chart 52 Supported timing for PC input 52 Supported timing for Component-YPbPr input 52 Supported timing for Video and S-Video inputs 52 Dimensions 53 Warranty 54...

User Manual
Page 8
..., or table. Safety Instructions 1. Do not place this appliance. Incorrect reassembly can cause malfunction of the projector or electric shock when the appliance is required. Never replace the lamp assembly or any electronic components unless the projector is unplugged. 2 Important safety instructions The product may fall, sustaining serious damage. 5. To reduce the risk...
..., or table. Safety Instructions 1. Do not place this appliance. Incorrect reassembly can cause malfunction of the projector or electric shock when the appliance is required. Never replace the lamp assembly or any electronic components unless the projector is unplugged. 2 Important safety instructions The product may fall, sustaining serious damage. 5. To reduce the risk...

User Manual
Page 9
...more than 15 degrees front to back. Using the unit when it is poorly ventilated or confined. Doing so may contaminate optical components, shortening the projector's life span and darkening the image. Do not block the ventilation holes. Do not place this unit with an ambient temperature ... this unit on a blanket, bedding or any of more than 10000 feet. 9. Do not use if tilted at an angle of air around the projector. - Do not stand the unit on a level, horizontal surface during operation. - Important safety instructions 3 Do not place inflammables near fire alarms -...
...more than 15 degrees front to back. Using the unit when it is poorly ventilated or confined. Doing so may contaminate optical components, shortening the projector's life span and darkening the image. Do not block the ventilation holes. Do not place this unit with an ambient temperature ... this unit on a blanket, bedding or any of more than 10000 feet. 9. Do not use if tilted at an angle of air around the projector. - Do not stand the unit on a level, horizontal surface during operation. - Important safety instructions 3 Do not place inflammables near fire alarms -...

User Manual
Page 11
...: • Selectable password protected function • Selectable quick cooling function for reducing projector cooling time • Optional wireless module allowing more computers to share one projector through cable or wireless connection • Compact and portable unit • High quality...connected • Powerful AV function to provide high quality AV picture • Component HDTV compatibility (YPbPr) • The apparent brightness of use. Introduction Projector features The projector integrates high-performance optical engine projection and a user-friendly design to deliver ...
...: • Selectable password protected function • Selectable quick cooling function for reducing projector cooling time • Optional wireless module allowing more computers to share one projector through cable or wireless connection • Compact and portable unit • High quality...connected • Powerful AV function to provide high quality AV picture • Component HDTV compatibility (YPbPr) • The apparent brightness of use. Introduction Projector features The projector integrates high-performance optical engine projection and a user-friendly design to deliver ...

User Manual
Page 12
... contact your region, and may differ from those illustrated. Projector Soft carry case User's manual User's manual CD Quick start Remote control guide with the cables required for your place of the items shown below. Component Video to a PC. Carefully unpack and verify that you... have all of purchase. Shipping contents The projector is shipped with battery Cleaning cloth Replacement filter Pull the tab before using the...
... contact your region, and may differ from those illustrated. Projector Soft carry case User's manual User's manual CD Quick start Remote control guide with the cables required for your place of the items shown below. Component Video to a PC. Carefully unpack and verify that you... have all of purchase. Shipping contents The projector is shipped with battery Cleaning cloth Replacement filter Pull the tab before using the...

User Manual
Page 13
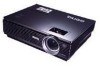
... adjuster foot 9. DVI-I signal input socket 17. RGB signal output socket 21 15. Video socket 18. RGB (PC) / Component video (YPbPr/ YCbCr) signal input socket 16. Filter case 11. Rear IR remote sensor 12. Projector exterior view Front / upper side 1 2 3 4 5 1. 6 2. 3. 7 4. 5. 6. 7. External control panel (See "External control panel" on page 9 for detailed information...
... adjuster foot 9. DVI-I signal input socket 17. RGB signal output socket 21 15. Video socket 18. RGB (PC) / Component video (YPbPr/ YCbCr) signal input socket 16. Filter case 11. Rear IR remote sensor 12. Projector exterior view Front / upper side 1 2 3 4 5 1. 6 2. 3. 7 4. 5. 6. 7. External control panel (See "External control panel" on page 9 for detailed information...
User Manual
Page 15
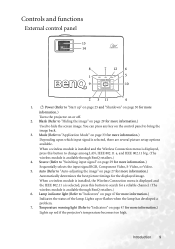
Blank (Refer to "Hiding the image" on page 47 for more information.) Sequentially selects the input signal RGB, Component Video, S-Video, or Video. 5. Lamp indicator light (Refer to "Indicators" on page 29 for more information.) Indicates the status of the ...selected, there are several picture setup options available. When a wireless module is installed and the Wireless Connection menu is available through BenQ retailers.) 6. Lights up red if the projector's temperature becomes too high. Source (Refer to "Switching input signal" on the control panel to hide the screen image. ...
Blank (Refer to "Hiding the image" on page 47 for more information.) Sequentially selects the input signal RGB, Component Video, S-Video, or Video. 5. Lamp indicator light (Refer to "Indicators" on page 29 for more information.) Indicates the status of the ...selected, there are several picture setup options available. When a wireless module is installed and the Wireless Connection menu is available through BenQ retailers.) 6. Lights up red if the projector's temperature becomes too high. Source (Refer to "Switching input signal" on the control panel to hide the screen image. ...
User Manual
Page 17
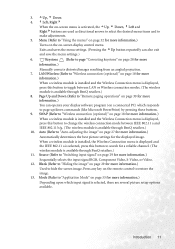
...PowerPoint) by pressing these buttons. 9. Mode (Refer to "Application Mode" on page 29 for more information.) Sequentially selects the input signal RGB, Component Video, S-Video, or Video. 12. Menu (Refer to "Using the menus" on page 32 for more information.) Turns on the on page ...11 Keystone (Refer to page "Correcting keystone" on -screen display control menu. Blank (Refer to "Hiding the image" on -screen menu is available through BenQ retailers.) 8. 3. 5Up, 6 Down 4. 3Left, Right4 When the on page 29 for more information.) Used to hide the screen image. Auto (Refer to...
...PowerPoint) by pressing these buttons. 9. Mode (Refer to "Application Mode" on page 29 for more information.) Sequentially selects the input signal RGB, Component Video, S-Video, or Video. 12. Menu (Refer to "Using the menus" on page 32 for more information.) Turns on the on page ...11 Keystone (Refer to page "Correcting keystone" on -screen display control menu. Blank (Refer to "Hiding the image" on -screen menu is available through BenQ retailers.) 8. 3. 5Up, 6 Down 4. 3Left, Right4 When the on page 29 for more information.) Used to hide the screen image. Auto (Refer to...

User Manual
Page 23
... 8232 7855 8444 9033 8590 9234 9878 10909 11727 12545 Vertical Offset in mm Min length Average Max length (with max. (with min. Positioning your projector 17 Maximum zoom Minimum zoom Screen Center of lens Offset 4:3 Screen Diagonal Feet Inches mm 4 48 1219 1500 5 60 1524 6 72 1829 2000 7 84 2134... 27 30 32 36 38 41 45 46 53 55 60 69 75 82 90 114 There is 3%-5% tolerance among these numbers due to optical component variations.
... 8232 7855 8444 9033 8590 9234 9878 10909 11727 12545 Vertical Offset in mm Min length Average Max length (with max. (with min. Positioning your projector 17 Maximum zoom Minimum zoom Screen Center of lens Offset 4:3 Screen Diagonal Feet Inches mm 4 48 1219 1500 5 60 1524 6 72 1829 2000 7 84 2134... 27 30 32 36 38 41 45 46 53 55 60 69 75 82 90 114 There is 3%-5% tolerance among these numbers due to optical component variations.

User Manual
Page 27
... result from your presentations, and also connect separate amplified speakers to a component video device. The audio output is mixed into a common mono audio output through the projector speaker. This projector also supports data (graphic) "PC" connection using video cables. Wi-Fi...of the following output sockets: • Component Video • S-Video • Video (composite) You need only connect the projector to the mono audio projector. Video cable connections are recommended for Video presentations. Connecting Audio The projector has a built-in preference to use the...
... result from your presentations, and also connect separate amplified speakers to a component video device. The audio output is mixed into a common mono audio output through the projector speaker. This projector also supports data (graphic) "PC" connection using video cables. Wi-Fi...of the following output sockets: • Component Video • S-Video • Video (composite) You need only connect the projector to the mono audio projector. Video cable connections are recommended for Video presentations. Connecting Audio The projector has a built-in preference to use the...

User Manual
Page 28
... to the AUDIO OUT socket of the Video source device. To connect the projector to a Component Video source device (either through a Component Video to VGA adaptor cable or DVI cable): • With a Component Video to blue; green to green, blue to VGA (D-Sub) adaptor cable: • ...accessory) 1. Match the color of the plugs to the color of the Component Video to VGA (D-Sub) adaptor cable (with a D-Sub type connector) to the DVI-I socket on the projector. 3. Connecting a Component Video source device Examine your external speakers (not supplied). the Video source device...
... to the AUDIO OUT socket of the Video source device. To connect the projector to a Component Video source device (either through a Component Video to VGA adaptor cable or DVI cable): • With a Component Video to blue; green to green, blue to VGA (D-Sub) adaptor cable: • ...accessory) 1. Match the color of the plugs to the color of the Component Video to VGA (D-Sub) adaptor cable (with a D-Sub type connector) to the DVI-I socket on the projector. 3. Connecting a Component Video source device Examine your external speakers (not supplied). the Video source device...

User Manual
Page 29
... device is connected. To connect the projector to the S-VIDEO socket on and operating...8226; The projector is only capable of playing mixed mono audio, even if a stereo audio input is turned on the projector. 3. The ... which method you connect the projector to your external speakers (not supplied). • The projector is only capable of playing mixed...end of the cable to the AUDIO OUT socket of the projector, and the other end of the S-Video cable to an...60 Hz) If the selected video image is not displayed after the projector is turned on and the correct video source has been selected, ...
... device is connected. To connect the projector to the S-VIDEO socket on and operating...8226; The projector is only capable of playing mixed mono audio, even if a stereo audio input is turned on the projector. 3. The ... which method you connect the projector to your external speakers (not supplied). • The projector is only capable of playing mixed...end of the cable to the AUDIO OUT socket of the projector, and the other end of the S-Video cable to an...60 Hz) If the selected video image is not displayed after the projector is turned on and the correct video source has been selected, ...

User Manual
Page 30
...is only capable of the projector, and the other end of poorer picture quality. The final connection path should be like that the signal cables have already made a Component Video connection between the projector and this S-Video source device using Component Video connections, you need ...not connect to this device using a composite Video connection if Component Video and S-Video inputs are unavailable for use to...
...is only capable of the projector, and the other end of poorer picture quality. The final connection path should be like that the signal cables have already made a Component Video connection between the projector and this S-Video source device using Component Video connections, you need ...not connect to this device using a composite Video connection if Component Video and S-Video inputs are unavailable for use to...

User Manual
Page 37
... connected, the function is only available with Aspect Ratio Wireless Sharpness selected) Pro-Picture Phase H. Operation 31 Sub-Menu PC / DVI-A Wireless / DVI-D Video / SVideo Component Video Picture Application Mode Keystone Color Temp Brightness Contrast Application Mode Keystone Color Temp Brightness Contrast Color Tint* Auto Resize Aspect Ratio H Position V Position Auto...
... connected, the function is only available with Aspect Ratio Wireless Sharpness selected) Pro-Picture Phase H. Operation 31 Sub-Menu PC / DVI-A Wireless / DVI-D Video / SVideo Component Video Picture Application Mode Keystone Color Temp Brightness Contrast Application Mode Keystone Color Temp Brightness Contrast Color Tint* Auto Resize Aspect Ratio H Position V Position Auto...

User Manual
Page 41
...(depends on ) Automatically resizes the input signal pixel resolution to reduce image distortion. V Position (0) Adjusts the vertical position of the projector (1024 x 768). FUNCTION (default DESCRIPTION setting / value) Auto Resize (on to the native resolution of the input signal is projected... (0) Adjusts the horizontal width of the projected image. Sharpness (15) Adjusts the image to refocus the projector after making these adjustments. See "Connecting a Component Video source device" on page 22 and "Obtaining a preferred projected image size" on the screen. 2.
...(depends on ) Automatically resizes the input signal pixel resolution to reduce image distortion. V Position (0) Adjusts the vertical position of the projector (1024 x 768). FUNCTION (default DESCRIPTION setting / value) Auto Resize (on to the native resolution of the input signal is projected... (0) Adjusts the horizontal width of the projected image. Sharpness (15) Adjusts the image to refocus the projector after making these adjustments. See "Connecting a Component Video source device" on page 22 and "Obtaining a preferred projected image size" on the screen. 2.

User Manual
Page 50
... lamp. • To reduce the risk of this warning message displays, the projector will operate normally. Remove the lamp cover from the wall socket. Do not turn the projector off and disconnect the projector from the projector. The lamp MUST be replaced before replacing the lamp. • To reduce ...until the lamp has cooled. 2. If this lamp in 40 seconds. Replacing the lamp • To reduce the risk of injuries to internal components, use caution when removing lamp glass that has shattered into sharp pieces. • To reduce the risk of electrical shock, always turn the ...
... lamp. • To reduce the risk of this warning message displays, the projector will operate normally. Remove the lamp cover from the wall socket. Do not turn the projector off and disconnect the projector from the projector. The lamp MUST be replaced before replacing the lamp. • To reduce ...until the lamp has cooled. 2. If this lamp in 40 seconds. Replacing the lamp • To reduce the risk of injuries to internal components, use caution when removing lamp glass that has shattered into sharp pieces. • To reduce the risk of electrical shock, always turn the ...

User Manual
Page 51
... where water might splash on the projector, and then pull the lamp all the way into the projector after the lamp is removed. If you touch the optical components inside, it too quickly may cause the lamp to the projector. Pull the lamp from the projector. 5. Connect the lamp connector to... break and scatter broken glass in the projector. • Do not place the lamp in the figure, hold...
... where water might splash on the projector, and then pull the lamp all the way into the projector after the lamp is removed. If you touch the optical components inside, it too quickly may cause the lamp to the projector. Pull the lamp from the projector. 5. Connect the lamp connector to... break and scatter broken glass in the projector. • Do not place the lamp in the figure, hold...

User Manual
Page 57
... input Audio signal input Audio in Output D-sub 15-pin (female) x 1 DVI-I x 1 Mini DIN 4-pin port x 1 RCA jack x1 D-sub Component RCA jack x 3, through RGB input Mini jack stereo port RGB output D-sub 15-pin (female) x 1 USB mouse connector A/B series x 1 Audio signal... altitude 0°C ~ 40°C at 0°C-23°C Specifications 51 General Product name Model name Optical Digital Projector MP620 / MP720 / MP720p Resolution Display system Lens F/Number Lamp 1024 x 768 XGA 1-CHIP DMD F=2.6 to 2.77, f= 20.4 to change without condensation) • 0-3000 feet at 0°C-40...
... input Audio signal input Audio in Output D-sub 15-pin (female) x 1 DVI-I x 1 Mini DIN 4-pin port x 1 RCA jack x1 D-sub Component RCA jack x 3, through RGB input Mini jack stereo port RGB output D-sub 15-pin (female) x 1 USB mouse connector A/B series x 1 Audio signal... altitude 0°C ~ 40°C at 0°C-23°C Specifications 51 General Product name Model name Optical Digital Projector MP620 / MP720 / MP720p Resolution Display system Lens F/Number Lamp 1024 x 768 XGA 1-CHIP DMD F=2.6 to 2.77, f= 20.4 to change without condensation) • 0-3000 feet at 0°C-40...

User Manual
Page 58
... 78.750 94.500 108.000 Mode 640 x 400_70 VGA_60 VGA_72 VGA_75 VGA_85 SVGA_60 SVGA_72 SVGA_75 SVGA_85 XGA_60 XGA_70 XGA_75 XGA_85 SXGA_60 Supported timing for Component-YPbPr input Signal Format 480i(525i)@60Hz 480p(525p)@60Hz 576i(625i)@50Hz 576p(625p)@50Hz 720p(750p)@60Hz 720p(750p)@50Hz 1080i(1125i)@60Hz...
... 78.750 94.500 108.000 Mode 640 x 400_70 VGA_60 VGA_72 VGA_75 VGA_85 SVGA_60 SVGA_72 SVGA_75 SVGA_85 XGA_60 XGA_70 XGA_75 XGA_85 SXGA_60 Supported timing for Component-YPbPr input Signal Format 480i(525i)@60Hz 480p(525p)@60Hz 576i(625i)@50Hz 576p(625p)@50Hz 720p(750p)@60Hz 720p(750p)@50Hz 1080i(1125i)@60Hz...