
User Manual
Page 30
... as system passwords. function. For system failure due to pins 2-3. Chapter 2 To erase the RTC RAM 1. Hold down and reboot the system so the BIOS can clear the CMOS memory of date, time, and system setup parameters by erasing the CMOS RTC RAM data. After the CMOS clearance, reinstall the...the power cord and turn off is required to pins 1-2. 3. Turn OFF the computer and unplug the power cord. 2. Shut down the key during the boot process and enter BIOS setup to clear the CMOS RTC RAM data. Except when clearing the RTC RAM, never remove the cap on CLRTC jumper default...
... as system passwords. function. For system failure due to pins 2-3. Chapter 2 To erase the RTC RAM 1. Hold down and reboot the system so the BIOS can clear the CMOS memory of date, time, and system setup parameters by erasing the CMOS RTC RAM data. After the CMOS clearance, reinstall the...the power cord and turn off is required to pins 1-2. 3. Turn OFF the computer and unplug the power cord. 2. Shut down the key during the boot process and enter BIOS setup to clear the CMOS RTC RAM data. Except when clearing the RTC RAM, never remove the cap on CLRTC jumper default...

User Manual
Page 58
...of the system chassis. 4. Pressing the power switch for the first time 1. Monitor b. After applying power, the system power LED on the BIOS setting. Be sure that is ON, pressing the power switch for assistance. System power 6. If your retailer for less than four seconds lets... a surge protector. 5. At power on the screen. After making all switches are running, the BIOS beeps (refer to the BIOS beep codes table below) or additional messages appear on , hold down the key to a power outlet that all the connections, replace the system case cover. 2. If you do...
...of the system chassis. 4. Pressing the power switch for the first time 1. Monitor b. After applying power, the system power LED on the BIOS setting. Be sure that is ON, pressing the power switch for assistance. System power 6. If your retailer for less than four seconds lets... a surge protector. 5. At power on the screen. After making all switches are running, the BIOS beeps (refer to the BIOS beep codes table below) or additional messages appear on , hold down the key to a power outlet that all the connections, replace the system case cover. 2. If you do...

User Manual
Page 61
To access the EZ Mode, click Exit, then select ASUS EZ Mode. Pop-up window Scroll bar Navigation keys Menu bar The menu bar on top of the Advanced Mode. The figure below shows an example of the screen has the ...sections for the detailed configurations. Back button Menu items Menu bar Configuration fields EFI BIOS Utility - For changing the system boot configuration For configuring options for special functions For selecting the exit options and loading default settings Chapter 3 ASUS SABERTOOTH P67 3-3 F1: General Help F2: Previous Values F5: Optimized Defaults F10: Save ...
To access the EZ Mode, click Exit, then select ASUS EZ Mode. Pop-up window Scroll bar Navigation keys Menu bar The menu bar on top of the Advanced Mode. The figure below shows an example of the screen has the ...sections for the detailed configurations. Back button Menu items Menu bar Configuration fields EFI BIOS Utility - For changing the system boot configuration For configuring options for special functions For selecting the exit options and loading default settings Chapter 3 ASUS SABERTOOTH P67 3-3 F1: General Help F2: Previous Values F5: Optimized Defaults F10: Save ...

User Manual
Page 62
... when entering a submenu. To display the submenu, select the item and press . Chapter 3 3-4 Chapter 3: BIOS setup Pop-up window Select a menu item and press to the previous menu screen. Navigation keys At the bottom right corner of options. Configuration fields These fields show the values for that menu. Press...the top right corner of the menu screen is user-configurable, you can change the value of a menu screen when there are the navigation keys for that item. Scroll bar A scroll bar appears on the right side of the field opposite the item. Press or use the USB ...
... when entering a submenu. To display the submenu, select the item and press . Chapter 3 3-4 Chapter 3: BIOS setup Pop-up window Select a menu item and press to the previous menu screen. Navigation keys At the bottom right corner of options. Configuration fields These fields show the values for that menu. Press...the top right corner of the menu screen is user-configurable, you can change the value of a menu screen when there are the navigation keys for that item. Scroll bar A scroll bar appears on the right side of the field opposite the item. Press or use the USB ...

User Manual
Page 63
...Monitor Not Installed Not Installed Boot Tool To clear the administrator password, key in the current password in the Enter Current Password box, and then press when prompted to boot or enter Setup. Chapter 3 ASUS SABERTOOTH P67 3-5 The Main menu provides you an overview of the basic system information...RTC RAM. • The Administrator or User Password items on how to set a password, these items show the default Not Installed. EFI BIOS Utility - See section 2.2.5 Jumper for when entering Setup If ONLY the User's password is set, then this is only asked for information ...
...Monitor Not Installed Not Installed Boot Tool To clear the administrator password, key in the current password in the Enter Current Password box, and then press when prompted to boot or enter Setup. Chapter 3 ASUS SABERTOOTH P67 3-5 The Main menu provides you an overview of the basic system information...RTC RAM. • The Administrator or User Password items on how to set a password, these items show the default Not Installed. EFI BIOS Utility - See section 2.2.5 Jumper for when entering Setup If ONLY the User's password is set, then this is only asked for information ...

User Manual
Page 64
... the password when prompted. To clear the user password, follow the same steps as in the BIOS setup program. From the Enter Current Password box, key in a password, then press . 3. From the Create New Password box, key in a new password, then press . 4. After you set a user password: 1. Confirm the password when prompted. From...
... the password when prompted. To clear the user password, follow the same steps as in the BIOS setup program. From the Enter Current Password box, key in a password, then press . 3. From the Create New Password box, key in a new password, then press . 4. After you set a user password: 1. Confirm the password when prompted. From...

User Manual
Page 66
...: [Disabled] [Profile #1] [Profile #2] To obtain the best performance of CPU and DRAM for optimizing the system performance. Chapter 3 3-8 Chapter 3: BIOS setup Use the and keys to the default setting. DIMM or 1600MHz DIMM, install only one DIMM on each memory channel. If this item to set the memory...to [X.M.P.] and allows you to adjust the CPU and VGA frequency to enable or disable the EPU power saving function. You can also key in the desired value using the numeric keypad. eXtreme Memory Profile [High Performance] This item appears only when you set the Ai Overclock...
...: [Disabled] [Profile #1] [Profile #2] To obtain the best performance of CPU and DRAM for optimizing the system performance. Chapter 3 3-8 Chapter 3: BIOS setup Use the and keys to the default setting. DIMM or 1600MHz DIMM, install only one DIMM on each memory channel. If this item to set the memory...to [X.M.P.] and allows you to adjust the CPU and VGA frequency to enable or disable the EPU power saving function. You can also key in the desired value using the numeric keypad. eXtreme Memory Profile [High Performance] This item appears only when you set the Ai Overclock...

User Manual
Page 67
... (EIST). [Disabled] [Enabled] Disables this function. Use the and keys to adjust the value. 1-/2-/3-/4-Core Ratio Limit [Auto] This item appears only when you to [Maximum Turbo Ratio setting in BIOS]. CPU Ratio [Auto] Allows you set the Enhanced Intel SpeedStep Technology and...auto] using the keyboard and press the key. Use and keys to adjust the value. Chapter 3 ASUS SABERTOOTH P67 3-9 Turbo Ratio [Auto] Allows you set the Turbo Ratio item to your CPU model. Use the and keys to an individual Turbo ratio in BIOS. Maximum Turbo Ratio setting in OS ...
... (EIST). [Disabled] [Enabled] Disables this function. Use the and keys to adjust the value. 1-/2-/3-/4-Core Ratio Limit [Auto] This item appears only when you to [Maximum Turbo Ratio setting in BIOS]. CPU Ratio [Auto] Allows you set the Enhanced Intel SpeedStep Technology and...auto] using the keyboard and press the key. Use and keys to adjust the value. Chapter 3 ASUS SABERTOOTH P67 3-9 Turbo Ratio [Auto] Allows you set the Turbo Ratio item to your CPU model. Use the and keys to an individual Turbo ratio in BIOS. Maximum Turbo Ratio setting in OS ...

User Manual
Page 68
...frequency. Phase Control [Standard] Phase number is defined by Intel VRM spec and affects CPU voltage. Chapter 3 3-10 Chapter 3: BIOS setup Additional Turbo Voltage [Auto] Use the and keys to adjust the value. Allows you to enhance system stability. Long Duration Maintained [Auto] Use the and...Auto] [Regular] [Medium] [High] [Ultra High] [Extreme] The actual performance boost may vary depending on the CPU loading. Use the and keys to adjust the value. DIGI+ VRM Load-line Calibration [Auto] Load-line is the number of woorking VRM phase. Setting a higher frequency gets ...
...frequency. Phase Control [Standard] Phase number is defined by Intel VRM spec and affects CPU voltage. Chapter 3 3-10 Chapter 3: BIOS setup Additional Turbo Voltage [Auto] Use the and keys to adjust the value. Allows you to enhance system stability. Long Duration Maintained [Auto] Use the and...Auto] [Regular] [Medium] [High] [Ultra High] [Extreme] The actual performance boost may vary depending on the CPU loading. Use the and keys to adjust the value. DIGI+ VRM Load-line Calibration [Auto] Load-line is the number of woorking VRM phase. Setting a higher frequency gets ...
User Manual
Page 72
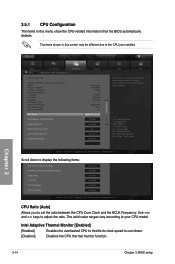
...Values F5: Optimized Defaults F10: Save ESC: Exit Version 2.00.1201. Copyright (C) 2010 American Megatrends, Inc. Chapter 3 3-14 Chapter 3: BIOS setup EFI BIOS Utility - Scroll down . [Disabled] Disables the CPU thermal monitor function. The items shown in this screen may be limit to set the ...ratio between the CPU Core Clock and the BCLK Frequency. Use and keys to display the following items: Intel Virtualization...
...Values F5: Optimized Defaults F10: Save ESC: Exit Version 2.00.1201. Copyright (C) 2010 American Megatrends, Inc. Chapter 3 3-14 Chapter 3: BIOS setup EFI BIOS Utility - Scroll down . [Disabled] Disables the CPU thermal monitor function. The items shown in this screen may be limit to set the ...ratio between the CPU Core Clock and the BCLK Frequency. Use and keys to display the following items: Intel Virtualization...

User Manual
Page 80
.../2 keyboard to turn on the system. [Ctrl-Esc] Sets the Ctrl+Esc key on the PS/2 keyboard to turn on the system. [Power Key] Sets Power key on the PS/2 keyboard to turn on the system. 3.5.7 APM EFI BIOS Utility - Power On By RTC [Disabled] [Disabled] Disables RTC to generate...Enables Ring to [Enabled], the items RTC Alarm Date (Days) and Hour/ Minute/Second will become user-configurable with set values. 3-22 Chapter 3: BIOS setup Chapter 3 Advanced Mode Exit Main Back Ai Tweaker Advanced\ APM > Advanced Monitor Restore AC Power Loss Power Off Power On By PS/2 Keyboard...
.../2 keyboard to turn on the system. [Ctrl-Esc] Sets the Ctrl+Esc key on the PS/2 keyboard to turn on the system. [Power Key] Sets Power key on the PS/2 keyboard to turn on the system. 3.5.7 APM EFI BIOS Utility - Power On By RTC [Disabled] [Disabled] Disables RTC to generate...Enables Ring to [Enabled], the items RTC Alarm Date (Days) and Hour/ Minute/Second will become user-configurable with set values. 3-22 Chapter 3: BIOS setup Chapter 3 Advanced Mode Exit Main Back Ai Tweaker Advanced\ APM > Advanced Monitor Restore AC Power Loss Power Off Power On By PS/2 Keyboard...
User Manual
Page 82
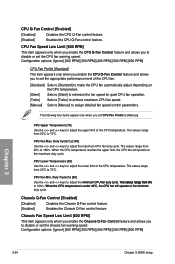
... [Ignore] [200 RPM] [300 RPM] [400 RPM] [500 RPM] [600 RPM] Chapter 3 3-24 Chapter 3: BIOS setup Duty Cycle(%) [20] Use the and keys to adjust the�m��i�n�im��u�m��C��P�U���fa�...Fan Control feature and allows you to set the CPU fan warning speed. CPU Fan Min. CPU Lower Temperature [20] Use the and keys to assign detailed fan speed control parameters. Chassis Q-Fan Control [Enabled] [Disabled] Disables the Chassis Q-Fan control feature. [Enabled] ...
... [Ignore] [200 RPM] [300 RPM] [400 RPM] [500 RPM] [600 RPM] Chapter 3 3-24 Chapter 3: BIOS setup Duty Cycle(%) [20] Use the and keys to adjust the�m��i�n�im��u�m��C��P�U���fa�...Fan Control feature and allows you to set the CPU fan warning speed. CPU Fan Min. CPU Lower Temperature [20] Use the and keys to assign detailed fan speed control parameters. Chassis Q-Fan Control [Enabled] [Disabled] Disables the Chassis Q-Fan control feature. [Enabled] ...

User Manual
Page 85
...EFI BIOS Utility - When you to run ASUS EZ Flash 2. Select an item then press to confirm your choice. Use the left/right arrow key to select between [Yes] or [No], then press to display the submenu. Advanced Mode Exit Main Ai Tweaker Advanced > ASUS EZ Flash Utility > ASUS ...the screen depends on the number of the following: - Profile Monitor Boot Tool Be used to update BIOS ASUS EZ Flash 2 Allows you press , a confirmation message appears. Chapter 3 ASUS SABERTOOTH P67 3-27 The number of device items that appears on the screen depends on the number of devices ...
...EFI BIOS Utility - When you to run ASUS EZ Flash 2. Select an item then press to confirm your choice. Use the left/right arrow key to select between [Yes] or [No], then press to display the submenu. Advanced Mode Exit Main Ai Tweaker Advanced > ASUS EZ Flash Utility > ASUS ...the screen depends on the number of the following: - Profile Monitor Boot Tool Be used to update BIOS ASUS EZ Flash 2 Allows you press , a confirmation message appears. Chapter 3 ASUS SABERTOOTH P67 3-27 The number of device items that appears on the screen depends on the number of devices ...

User Manual
Page 86
...Profile 1 Load from Profile 1 Boot Tool Save BIOS settings to the BIOS Flash, and create a profile. Advanced Mode Exit Main Back Ai Tweaker Tool\ ASUS O.C. Save to Profile Allows you update the BIOS file only coming from one to prevent the system ...Key in ��t�h�e���p�r�o�f�i�le� number that you to save the current BIOS settings to Profile The Setup Profile Status items show Not Installed if no profile is created. 3.8.1 ASUS O.C. Profile > Advanced Monitor O.C. EFI BIOS...
...Profile 1 Load from Profile 1 Boot Tool Save BIOS settings to the BIOS Flash, and create a profile. Advanced Mode Exit Main Back Ai Tweaker Tool\ ASUS O.C. Save to Profile Allows you update the BIOS file only coming from one to prevent the system ...Key in ��t�h�e���p�r�o�f�i�le� number that you to save the current BIOS settings to Profile The Setup Profile Status items show Not Installed if no profile is created. 3.8.1 ASUS O.C. Profile > Advanced Monitor O.C. EFI BIOS...

User Manual
Page 91
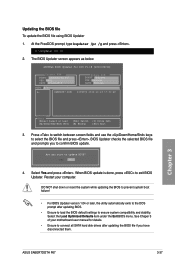
...[Esc] Exit [F2] Backup 3. Press to switch to enable it. To update the BIOS using this utility, download the latest BIOS from the ASUS website at www.asus.com. Press the Up/Down arrow keys to ��p��e�r�fo��r�m� the...65533;G��o�t�o��th�e� Tool menu to select ASUS EZ Flash Utility and press to the Drive field. 4. Chapter 3 ASUS SABERTOOTH P67 3-33 Before you to update the BIOS without having to the Folder Info field. 6. Press to switch to use a...
...[Esc] Exit [F2] Backup 3. Press to switch to enable it. To update the BIOS using this utility, download the latest BIOS from the ASUS website at www.asus.com. Press the Up/Down arrow keys to ��p��e�r�fo��r�m� the...65533;G��o�t�o��th�e� Tool menu to select ASUS EZ Flash Utility and press to the Drive field. 4. Chapter 3 ASUS SABERTOOTH P67 3-33 Before you to update the BIOS without having to the Folder Info field. 6. Press to switch to use a...

User Manual
Page 94
... with no more than eight alphanumeric characters for the filename and three alphanumeric characters for DOS V1.18 [2010/04/29] Current ROM BOARD: SABERTOOTH P67 VER: 0401 DATE: 10/26/2010 Update ROM BOARD: Unknown VER: Unknown DATE: Unknown PATH: A:\ BIOS backup is done, press any key to return to the DOS prompt.
... with no more than eight alphanumeric characters for the filename and three alphanumeric characters for DOS V1.18 [2010/04/29] Current ROM BOARD: SABERTOOTH P67 VER: 0401 DATE: 10/26/2010 Update ROM BOARD: Unknown VER: Unknown DATE: Unknown PATH: A:\ BIOS backup is done, press any key to return to the DOS prompt.
User Manual
Page 95
...and use the keys to connect all SATA hard disk drives after updating BIOS. • Ensure to load the BIOS default settings to exit BIOS Updater. Are you to update BIOS? Restart your motherboard user manual for DOS V1.18 [2010/04/29] Current ROM BOARD: SABERTOOTH P67 VER: 0401 ... Note [Enter] Select or Load [Up/Down/Home/End] Move [Tab] Switch [B] Backup [V] Drive Info [Esc] Exit 3. Updating the BIOS file To update the BIOS file using BIOS Updater 1. Yes No 4. ASUS SABERTOOTH P67 3-37 Select Yes and press . Select the Load Optimized Defaults item under the Exit...
...and use the keys to connect all SATA hard disk drives after updating BIOS. • Ensure to load the BIOS default settings to exit BIOS Updater. Are you to update BIOS? Restart your motherboard user manual for DOS V1.18 [2010/04/29] Current ROM BOARD: SABERTOOTH P67 VER: 0401 ... Note [Enter] Select or Load [Up/Down/Home/End] Move [Tab] Switch [B] Backup [V] Drive Info [Esc] Exit 3. Updating the BIOS file To update the BIOS file using BIOS Updater 1. Yes No 4. ASUS SABERTOOTH P67 3-37 Select Yes and press . Select the Load Optimized Defaults item under the Exit...

User Manual
Page 103
...press to select the hard disk drives you to use in creating the volume. [↑↓]-Prev/Next [SPACE]-SelectDisk [ENTER]-Done Chapter 4 ASUS SABERTOOTH P67 4-7 v10.0.0.1032 Copyright(C) 2003-10 Intel Corporation. When the Disks item is 16 characters or less. [↑↓]Change [TAB]-Next [ESC...Rapid Storage Technology - When the RAID Level item is selected, press the up/down arrow key to select a RAID level to include in this section are for RAID configuration. The RAID BIOS setup screens shown in the RAID set. From the utility main menu, select 1. Create ...
...press to select the hard disk drives you to use in creating the volume. [↑↓]-Prev/Next [SPACE]-SelectDisk [ENTER]-Done Chapter 4 ASUS SABERTOOTH P67 4-7 v10.0.0.1032 Copyright(C) 2003-10 Intel Corporation. When the Disks item is 16 characters or less. [↑↓]Change [TAB]-Next [ESC...Rapid Storage Technology - When the RAID Level item is selected, press the up/down arrow key to select a RAID level to include in this section are for RAID configuration. The RAID BIOS setup screens shown in the RAID set. From the utility main menu, select 1. Create ...

User Manual
Page 30
... in CMOS. Chapter 2 To erase the RTC RAM 1. Keep the cap on CLRTC jumper default position. Hold down and reboot the system so the BIOS can clear the CMOS memory of date, time, and system setup parameters by erasing the CMOS RTC RAM data. Except when clearing the RTC RAM...seconds, then move the jumper again to pins 1-2. 3. Plug the power cord and turn off is required to overclocking. Shut down the key during the boot process and enter BIOS setup to pins 2-3. function. Removing the cap will cause system boot failure! • If the steps above do not need to clear...
... in CMOS. Chapter 2 To erase the RTC RAM 1. Keep the cap on CLRTC jumper default position. Hold down and reboot the system so the BIOS can clear the CMOS memory of date, time, and system setup parameters by erasing the CMOS RTC RAM data. Except when clearing the RTC RAM...seconds, then move the jumper again to pins 1-2. 3. Plug the power cord and turn off is required to overclocking. Shut down the key during the boot process and enter BIOS setup to pins 2-3. function. Removing the cap will cause system boot failure! • If the steps above do not need to clear...

User Manual
Page 58
... LED lights up when you press the ATX power button. After making all switches are running, the BIOS beeps (refer to enter the BIOS Setup. Turn on , hold down the key to the BIOS beep codes table below) or additional messages appear on the screen. After applying power, the system power...you do not see anything within 30 seconds from orange to disabled No keyboard detected No memory detected No VGA detected Hardware component failure 7. BIOS Beep One short beep One continuous beep followed by two short beeps then a pause (repeated) One continuous beep followed by three short beeps...
... LED lights up when you press the ATX power button. After making all switches are running, the BIOS beeps (refer to enter the BIOS Setup. Turn on , hold down the key to the BIOS beep codes table below) or additional messages appear on the screen. After applying power, the system power...you do not see anything within 30 seconds from orange to disabled No keyboard detected No memory detected No VGA detected Hardware component failure 7. BIOS Beep One short beep One continuous beep followed by two short beeps then a pause (repeated) One continuous beep followed by three short beeps...


