User Manual
Page 2
... LGPL Software, which you wish to anyone in this product. SPECIFICATIONS AND INFORMATION CONTAINED IN THIS MANUAL ARE FURNISHED FOR INFORMATIONAL USE ONLY, AND ARE SUBJECT TO CHANGE AT ANY TIME WITHOUT NOTICE, AND SHOULD NOT BE CONSTRUED AS A COMMITMENT BY ASUS. Products and corporate names appearing in receipt of shipment with the complete machinereadable "work that uses...
... LGPL Software, which you wish to anyone in this product. SPECIFICATIONS AND INFORMATION CONTAINED IN THIS MANUAL ARE FURNISHED FOR INFORMATIONAL USE ONLY, AND ARE SUBJECT TO CHANGE AT ANY TIME WITHOUT NOTICE, AND SHOULD NOT BE CONSTRUED AS A COMMITMENT BY ASUS. Products and corporate names appearing in receipt of shipment with the complete machinereadable "work that uses...

User Manual
Page 5
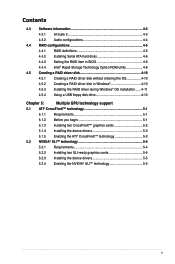
Contents 4.3 Software information 4-3 4.3.1 AI Suite II 4-3 4.3.2 Audio configurations 4-4 4.4 RAID configurations 4-5 4.4.1 RAID definitions 4-5 4.4.2 Installing Serial ATA hard disks 4-6 4.4.3 Setting the RAID item in BIOS 4-6 4.4.4 Intel® Rapid Storage Technology Option ROM utility 4-6 4.5 Creating a RAID driver disk 4-10 4.5.1 Creating a RAID driver disk without entering the OS 4-10 4.5.2 Creating a RAID driver disk in Windows 4-10 4.5.3 Installing the RAID driver during Windows® OS installation....... 4-11 4.5.4 Using a USB floppy disk drive 4-12 Chapter 5: ...
Contents 4.3 Software information 4-3 4.3.1 AI Suite II 4-3 4.3.2 Audio configurations 4-4 4.4 RAID configurations 4-5 4.4.1 RAID definitions 4-5 4.4.2 Installing Serial ATA hard disks 4-6 4.4.3 Setting the RAID item in BIOS 4-6 4.4.4 Intel® Rapid Storage Technology Option ROM utility 4-6 4.5 Creating a RAID driver disk 4-10 4.5.1 Creating a RAID driver disk without entering the OS 4-10 4.5.2 Creating a RAID driver disk in Windows 4-10 4.5.3 Installing the RAID driver during Windows® OS installation....... 4-11 4.5.4 Using a USB floppy disk drive 4-12 Chapter 5: ...

User Manual
Page 29
... SATA Controller #1 - - - - USB 2.0 Controller 1 - - - - - - - shared - - - - - - PCI Express sharing mode PCIe 2.0 x1_2 USB3_34 N/A Enabled x1 Disabled IRQ assignments for details. PCIE x1_2/USB3.0_2 - PCIE x16_1 shared - - - - - - - Marvell 9120 - - shared - - - - - - shared - - - - - shared - - - - 1394 Controller - HD Audio - - - - - ASUS SABERTOOTH P67 2-11 shared - Refer to page 2-22 for details. • Connect a chassis fan to the motherboard connector labeled CHA_FAN1/2 when using multiple...
... SATA Controller #1 - - - - USB 2.0 Controller 1 - - - - - - - shared - - - - - - PCI Express sharing mode PCIe 2.0 x1_2 USB3_34 N/A Enabled x1 Disabled IRQ assignments for details. PCIE x1_2/USB3.0_2 - PCIE x16_1 shared - - - - - - - Marvell 9120 - - shared - - - - - - shared - - - - - shared - - - - 1394 Controller - HD Audio - - - - - ASUS SABERTOOTH P67 2-11 shared - Refer to page 2-22 for details. • Connect a chassis fan to the motherboard connector labeled CHA_FAN1/2 when using multiple...

User Manual
Page 79
...;�=�3�]� Chapter 3 ASUS SABERTOOTH P67 3-21 Serial Port [Enabled] Allows you to display or hide the OptionRom of the Intel LAN controller. Configuration options: [Enabled] [Disabled] Change Settings [IO=3F8h; Display OptionRom in this menu allow you to select the Serial Port base address. Configuration options: [Enabled] [Disabled] Intel LAN Controller [Enabled] [Enabled] Enables the Intel LAN controller. [Disabled] Disables the controller. Intel PXE OPROM [Disabled] This item appears only when you set the serial port configuration.
...;�=�3�]� Chapter 3 ASUS SABERTOOTH P67 3-21 Serial Port [Enabled] Allows you to display or hide the OptionRom of the Intel LAN controller. Configuration options: [Enabled] [Disabled] Change Settings [IO=3F8h; Display OptionRom in this menu allow you to select the Serial Port base address. Configuration options: [Enabled] [Disabled] Intel LAN Controller [Enabled] [Enabled] Enables the Intel LAN controller. [Disabled] Disables the controller. Intel PXE OPROM [Disabled] This item appears only when you set the serial port configuration.

User Manual
Page 88
...utilities allow you to boot. ASUS Update: Updates the BIOS in case you update the BIOS using the motherboard support DVD and a USB flash disk drive. Refer to manage, save, and update the motherboard BIOS in the system's failure to manage and update the motherboard BIOS setup program. 1. ASUS Update requires an Internet connection either through a network or an Internet Service Provider (ISP). ASUS EZ Flash 2: Updates the BIOS using the motherboard support DVD or a USB flash drive when the BIOS file fails or gets corrupted. 4. However, BIOS updating is no problem...
...utilities allow you to boot. ASUS Update: Updates the BIOS in case you update the BIOS using the motherboard support DVD and a USB flash disk drive. Refer to manage, save, and update the motherboard BIOS in the system's failure to manage and update the motherboard BIOS setup program. 1. ASUS Update requires an Internet connection either through a network or an Internet Service Provider (ISP). ASUS EZ Flash 2: Updates the BIOS using the motherboard support DVD or a USB flash drive when the BIOS file fails or gets corrupted. 4. However, BIOS updating is no problem...

User Manual
Page 93
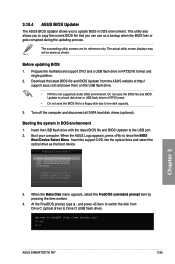
...:// support.asus.com and save the BIOS file to a floppy disk due to Drive D (USB flash drive). 3.10.4 ASUS BIOS Updater The ASUS BIOS Updater allows you can use as a backup when the BIOS fails or gets corrupted during the updating process. The succeeding utility screens are for reference only. C:\>d: D:\> Chapter 3 ASUS SABERTOOTH P67 3-35 Before updating BIOS 1. Please select boot device: SATA: XXXXXXXXXXXXXXXX USB XXXXXXXXXXXXXXXXX UEFI: XXXXXXXXXXXXXXXX Enter Setup ↑ and ↓ to move selection ENTER to select boot device ESC to show the BIOS Boot Device Select Menu...
...:// support.asus.com and save the BIOS file to a floppy disk due to Drive D (USB flash drive). 3.10.4 ASUS BIOS Updater The ASUS BIOS Updater allows you can use as a backup when the BIOS fails or gets corrupted during the updating process. The succeeding utility screens are for reference only. C:\>d: D:\> Chapter 3 ASUS SABERTOOTH P67 3-35 Before updating BIOS 1. Please select boot device: SATA: XXXXXXXXXXXXXXXX USB XXXXXXXXXXXXXXXXX UEFI: XXXXXXXXXXXXXXXX Enter Setup ↑ and ↓ to move selection ENTER to select boot device ESC to show the BIOS Boot Device Select Menu...

User Manual
Page 97
... contents of supplementary user manuals. Click an icon to display DVD/ motherboard information Chapter 4 If Autorun is NOT enabled in this chapter for updates. 4.2.1 Running the support DVD Place the support DVD into the optical drive. Click the Contact tab to use the devices. Install the necessary drivers to display the ASUS contact information. ASUS SABERTOOTH P67 4-1 Click an item to install The Make Disk menu contains items to change at www.asus.com for reference...
... contents of supplementary user manuals. Click an icon to display DVD/ motherboard information Chapter 4 If Autorun is NOT enabled in this chapter for updates. 4.2.1 Running the support DVD Place the support DVD into the optical drive. Click the Contact tab to use the devices. Install the necessary drivers to display the ASUS contact information. ASUS SABERTOOTH P67 4-1 Click an item to install The Make Disk menu contains items to change at www.asus.com for reference...
User Manual
Page 102
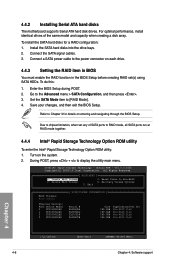
... then exit the BIOS Setup. During POST, press + to Non-RAID 4. Recovery Volume Options 5. Connect a SATA power cable to RAID mode, all SATA ports run at RAID mode together. 4.4.4 Intel® Rapid Storage Technology Option ROM utility To enter the Intel® Rapid Storage Technology Option ROM utility: 1. Turn on entering and navigating through the BIOS Setup. Reset Disks to display the utility main menu. Install the SATA hard disks into the drive bays. 2. Enter the BIOS Setup during POST. 2. v10.0.0.1032 Copyright(C) 2003-10 Intel Corporation. Delete RAID Volume 3. For...
... then exit the BIOS Setup. During POST, press + to Non-RAID 4. Recovery Volume Options 5. Connect a SATA power cable to RAID mode, all SATA ports run at RAID mode together. 4.4.4 Intel® Rapid Storage Technology Option ROM utility To enter the Intel® Rapid Storage Technology Option ROM utility: 1. Turn on entering and navigating through the BIOS Setup. Reset Disks to display the utility main menu. Install the SATA hard disks into the drive bays. 2. Enter the BIOS Setup during POST. 2. v10.0.0.1032 Copyright(C) 2003-10 Intel Corporation. Delete RAID Volume 3. For...

User Manual
Page 106
... optical drive. 5. Select USB floppy disk drive as the primary boot device. 4. Boot your computer. 2. Start Windows®. 2. Write-protect the floppy disk to enter the BIOS setup utility. 3. Set the optical drive as the destination disk. 6. Go to the Make Disk menu, and then click Intel AHCI/RAID Driver Disk to section 4.5.4 Using a USB floppy disk drive. 4.5.1 Creating a RAID driver disk without entering the OS To create a RAID driver disk without entering the OS: 1. To work around this OS limitation, refer to create a RAID driver disk. 5. When the Make Disk menu appears...
... optical drive. 5. Select USB floppy disk drive as the primary boot device. 4. Boot your computer. 2. Start Windows®. 2. Write-protect the floppy disk to enter the BIOS setup utility. 3. Set the optical drive as the destination disk. 6. Go to the Make Disk menu, and then click Intel AHCI/RAID Driver Disk to section 4.5.4 Using a USB floppy disk drive. 4.5.1 Creating a RAID driver disk without entering the OS To create a RAID driver disk without entering the OS: 1. To work around this OS limitation, refer to create a RAID driver disk. 5. When the Make Disk menu appears...

User Manual
Page 107
... RAID driver into the USB port or the support DVD into the USB floppy disk drive. 3. Click the name of the device you have to use another computer to copy the RAID driver from the support DVD to select the installation media containing the RAID driver. 2. Follow the succeeding screen instructions to install third- 4.5.3 Installing the RAID driver during Windows® OS installation To install the RAID driver in Windows® XP: 1. During the OS installation, the system prompts you to the USB flash drive...
... RAID driver into the USB port or the support DVD into the USB floppy disk drive. 3. Click the name of the device you have to use another computer to copy the RAID driver from the support DVD to select the installation media containing the RAID driver. 2. Follow the succeeding screen instructions to install third- 4.5.3 Installing the RAID driver during Windows® OS installation To install the RAID driver in Windows® XP: 1. During the OS installation, the system prompts you to the USB flash drive...

User Manual
Page 108
... the Windows® desktop or start menu, and then select Manage from the pop-up window. Using another computer, plug the USB floppy disk drive, and insert the floppy disk containing the RAID driver. 2. Browse the contents of the USB floppy disk drive varies with different vendors. 4. Chapter 4 4-12 Chapter 4: Software support A window appears, allowing you install the RAID driver from the pop-up window. From the Universal Serial Bus controllers, right-click xxxxxx USB Floppy, and then select Properties from a floppy disk...
... the Windows® desktop or start menu, and then select Manage from the pop-up window. Using another computer, plug the USB floppy disk drive, and insert the floppy disk containing the RAID driver. 2. Browse the contents of the USB floppy disk drive varies with different vendors. 4. Chapter 4 4-12 Chapter 4: Software support A window appears, allowing you install the RAID driver from the pop-up window. From the Universal Serial Bus controllers, right-click xxxxxx USB Floppy, and then select Properties from a floppy disk...
User Manual
Page 5
Contents 4.3 Software information 4-3 4.3.1 AI Suite II 4-3 4.3.2 Audio configurations 4-4 4.4 RAID configurations 4-5 4.4.1 RAID definitions 4-5 4.4.2 Installing Serial ATA hard disks 4-6 4.4.3 Setting the RAID item in BIOS 4-6 4.4.4 Intel® Rapid Storage Technology Option ROM utility 4-6 4.5 Creating a RAID driver disk 4-10 4.5.1 Creating a RAID driver disk without entering the OS 4-10 4.5.2 Creating a RAID driver disk in Windows 4-10 4.5.3 Installing the RAID driver during Windows® OS installation....... 4-11 4.5.4 Using a USB floppy disk drive 4-12 Chapter 5: ...
Contents 4.3 Software information 4-3 4.3.1 AI Suite II 4-3 4.3.2 Audio configurations 4-4 4.4 RAID configurations 4-5 4.4.1 RAID definitions 4-5 4.4.2 Installing Serial ATA hard disks 4-6 4.4.3 Setting the RAID item in BIOS 4-6 4.4.4 Intel® Rapid Storage Technology Option ROM utility 4-6 4.5 Creating a RAID driver disk 4-10 4.5.1 Creating a RAID driver disk without entering the OS 4-10 4.5.2 Creating a RAID driver disk in Windows 4-10 4.5.3 Installing the RAID driver during Windows® OS installation....... 4-11 4.5.4 Using a USB floppy disk drive 4-12 Chapter 5: ...

User Manual
Page 79
... LAN controller. [Disabled] Disables the controller. IRQ=4] [IO=2F8h; IRQ=3] Chapter 3 ASUS SABERTOOTH P67 3-21 IRQ=4] [IO=2E8h; Configuration options: [Enabled] [Disabled] Serial Port Configuration The sub-items in POST [Enabled] This item appears only when you set the JMB Storage OPROM item to [Enabled] and allows you to enable or disable the PXE OptionRom of the JMB storage controller during POST. Configuration options: [Enabled] [Disabled] Change Settings [IO=3F8h; This item functions only if there is a serial port (COM1) connector on the motherboard. Display...
... LAN controller. [Disabled] Disables the controller. IRQ=4] [IO=2F8h; IRQ=3] Chapter 3 ASUS SABERTOOTH P67 3-21 IRQ=4] [IO=2E8h; Configuration options: [Enabled] [Disabled] Serial Port Configuration The sub-items in POST [Enabled] This item appears only when you set the JMB Storage OPROM item to [Enabled] and allows you to enable or disable the PXE OptionRom of the JMB storage controller during POST. Configuration options: [Enabled] [Disabled] Change Settings [IO=3F8h; This item functions only if there is a serial port (COM1) connector on the motherboard. Display...

User Manual
Page 88
...or a USB flash drive when the BIOS file fails or gets corrupted. 4. ASUS Update requires an Internet connection either through a network or an Internet Service Provider (ISP). ASUS CrashFree BIOS 3: Restores the BIOS using a USB flash drive. 3. Quit all Windows® applications before you need to a USB flash disk in DOS environment using this utility. ASUS BIOS Updater: Updates and backups the BIOS in case you update the BIOS using the motherboard support DVD and a USB flash disk drive. Carefully follow the instructions of this motherboard. Copy the original motherboard BIOS...
...or a USB flash drive when the BIOS file fails or gets corrupted. 4. ASUS Update requires an Internet connection either through a network or an Internet Service Provider (ISP). ASUS CrashFree BIOS 3: Restores the BIOS using a USB flash drive. 3. Quit all Windows® applications before you need to a USB flash disk in DOS environment using this utility. ASUS BIOS Updater: Updates and backups the BIOS in case you update the BIOS using the motherboard support DVD and a USB flash disk drive. Carefully follow the instructions of this motherboard. Copy the original motherboard BIOS...
User Manual
Page 93
... optical drive as shown. The actual utility screen displays may not be same as the boot device. Prepare the motherboard support DVD and a USB flash drive in DOS environment 1. Do not save the BIOS file and BIOS Updater to Drive D (USB flash drive). Booting the system in FAT32/16 format and single partition. 2. Insert the USB flash drive with the latest BIOS file and BIOS Updater to FreeDOS (http://www.freedos.org)! C:\>d: D:\> Chapter 3 ASUS SABERTOOTH P67 3-35 When the Make Disk menu appears...
... optical drive as shown. The actual utility screen displays may not be same as the boot device. Prepare the motherboard support DVD and a USB flash drive in DOS environment 1. Do not save the BIOS file and BIOS Updater to Drive D (USB flash drive). Booting the system in FAT32/16 format and single partition. 2. Insert the USB flash drive with the latest BIOS file and BIOS Updater to FreeDOS (http://www.freedos.org)! C:\>d: D:\> Chapter 3 ASUS SABERTOOTH P67 3-35 When the Make Disk menu appears...

User Manual
Page 97
... to change at www.asus.com for reference only. The Drivers menu shows the available device drivers if the system detects installed devices. The Manual menu contains the list of the support DVD are subject to your computer. ASUS SABERTOOTH P67 4-1 Install the necessary drivers to install. Double-click the ASSETUP.EXE to avail all motherboard features. Use the setup procedures presented in your hardware. • Motherboard settings and hardware options vary. The DVD automatically displays the Drivers menu...
... to change at www.asus.com for reference only. The Drivers menu shows the available device drivers if the system detects installed devices. The Manual menu contains the list of the support DVD are subject to your computer. ASUS SABERTOOTH P67 4-1 Install the necessary drivers to install. Double-click the ASSETUP.EXE to avail all motherboard features. Use the setup procedures presented in your hardware. • Motherboard settings and hardware options vary. The DVD automatically displays the Drivers menu...

User Manual
Page 102
... RAID mode together. 4.4.4 Intel® Rapid Storage Technology Option ROM utility To enter the Intel® Rapid Storage Technology Option ROM utility: 1. Recovery Volume Options 5. Connect the SATA signal cables. 3. Go to Non-RAID 4. Connect a SATA power cable to chipset limitation, when set (s) using SATA HDDs. 4.4.2 Installing Serial ATA hard disks The motherboard supports Serial ATA hard disk drives. v10.0.0.1032 Copyright(C) 2003-10 Intel Corporation. Install the SATA hard disks into the drive bays. 2. Set the SATA Mode item to display the utility main menu...
... RAID mode together. 4.4.4 Intel® Rapid Storage Technology Option ROM utility To enter the Intel® Rapid Storage Technology Option ROM utility: 1. Recovery Volume Options 5. Connect the SATA signal cables. 3. Go to Non-RAID 4. Connect a SATA power cable to chipset limitation, when set (s) using SATA HDDs. 4.4.2 Installing Serial ATA hard disks The motherboard supports Serial ATA hard disk drives. v10.0.0.1032 Copyright(C) 2003-10 Intel Corporation. Install the SATA hard disks into the drive bays. 2. Set the SATA Mode item to display the utility main menu...

User Manual
Page 106
...Select USB floppy disk drive as the primary boot device. 4. To work around this OS limitation, refer to complete the process. 4.5.2 Creating a RAID driver disk in Windows® To create a RAID driver disk in a RAID set. • The motherboard does not provide a floppy drive connector. Boot your computer. 2. Set the optical drive as the destination disk. 6. Save changes and exit BIOS. 6. Plug the USB floppy disk drive and insert a floppy disk. 3. Follow the succeeding screen instructions to enter the BIOS setup utility. 3. Insert the support DVD into the USB floppy disk drive...
...Select USB floppy disk drive as the primary boot device. 4. To work around this OS limitation, refer to complete the process. 4.5.2 Creating a RAID driver disk in Windows® To create a RAID driver disk in a RAID set. • The motherboard does not provide a floppy drive connector. Boot your computer. 2. Set the optical drive as the destination disk. 6. Save changes and exit BIOS. 6. Plug the USB floppy disk drive and insert a floppy disk. 3. Follow the succeeding screen instructions to enter the BIOS setup utility. 3. Insert the support DVD into the USB floppy disk drive...

User Manual
Page 107
... device you to Drivers > RAID, and then select the RAID driver for the corresponding OS version. Before loading the RAID driver from the support DVD to install third- Chapter 4 ASUS SABERTOOTH P67 4-11 During the OS installation, the system prompts you have to use another computer to copy the RAID driver from a USB flash drive, you to press the F6 key to the USB flash drive. Press , and then insert the floppy disk with RAID driver into the USB port or the support DVD...
... device you to Drivers > RAID, and then select the RAID driver for the corresponding OS version. Before loading the RAID driver from the support DVD to install third- Chapter 4 ASUS SABERTOOTH P67 4-11 During the OS installation, the system prompts you have to use another computer to copy the RAID driver from a USB flash drive, you to press the F6 key to the USB flash drive. Press , and then insert the floppy disk with RAID driver into the USB port or the support DVD...

User Manual
Page 108
... Universal Serial Bus controllers, right-click xxxxxx USB Floppy, and then select Properties from the pop-up window. or 3. Using another computer, plug the USB floppy disk drive, and insert the floppy disk containing the RAID driver. 2. Right-click My Computer on the Windows® desktop or start menu, and then select Manage from a floppy disk during the OS installation. The name of the RAID driver disk to locate the file txtsetup.oem. 6. Browse the contents of the USB floppy disk drive...
... Universal Serial Bus controllers, right-click xxxxxx USB Floppy, and then select Properties from the pop-up window. or 3. Using another computer, plug the USB floppy disk drive, and insert the floppy disk containing the RAID driver. 2. Right-click My Computer on the Windows® desktop or start menu, and then select Manage from a floppy disk during the OS installation. The name of the RAID driver disk to locate the file txtsetup.oem. 6. Browse the contents of the USB floppy disk drive...


