
User Manual
Page 7
... and circuitry. • Avoid dust, humidity, and temperature extremes. vii These devices could interrupt the grounding circuit. • Ensure that your power supply is broken, do not try to the correct voltage in any damage, contact your area. If you are not sure about the voltage of ...for the devices are unplugged before the signal cables are connected. If possible, disconnect all power cables from the existing system before you are using, contact your local power company. • If the power supply is set to fix it , carefully read all the manuals that came with the product...
... and circuitry. • Avoid dust, humidity, and temperature extremes. vii These devices could interrupt the grounding circuit. • Ensure that your power supply is broken, do not try to the correct voltage in any damage, contact your area. If you are not sure about the voltage of ...for the devices are unplugged before the signal cables are connected. If possible, disconnect all power cables from the existing system before you are using, contact your local power company. • If the power supply is set to fix it , carefully read all the manuals that came with the product...
User Manual
Page 19
... is detached from the wall socket before you install motherboard components or change any motherboard settings. • Unplug the power cord from the power supply. ASUS SABERTOOTH 990FX 2-1 Chapter 2 2.1 Before you proceed Take note of the following precautions before touching any component. • Before handling components, use a grounded wrist strap or touch a safely ...
... is detached from the wall socket before you install motherboard components or change any motherboard settings. • Unplug the power cord from the power supply. ASUS SABERTOOTH 990FX 2-1 Chapter 2 2.1 Before you proceed Take note of the following precautions before touching any component. • Before handling components, use a grounded wrist strap or touch a safely ...
User Manual
Page 36
... CLRTC) This jumper allows you to overclocking, use the C.P.R. (CPU Parameter Recall) feature. Plug the power cord and turn off is required to enable C.P.R. The onboard button cell battery powers the RAM data in CMOS. Chapter 2 To erase the RTC RAM 1. Removing the cap will cause ...8226; You do not help, remove the onboard battery and move the cap back to the chipset behavior, AC power off and on the power supply or unplug and plug the power cord before rebooting the system. 2-18 Chapter 2: Hardware information function. Except when clearing the RTC RAM, never remove...
... CLRTC) This jumper allows you to overclocking, use the C.P.R. (CPU Parameter Recall) feature. Plug the power cord and turn off is required to enable C.P.R. The onboard button cell battery powers the RAM data in CMOS. Chapter 2 To erase the RTC RAM 1. Removing the cap will cause ...8226; You do not help, remove the onboard battery and move the cap back to the chipset behavior, AC power off and on the power supply or unplug and plug the power cord before rebooting the system. 2-18 Chapter 2: Hardware information function. Except when clearing the RTC RAM, never remove...

User Manual
Page 44
... fit these connectors in the BIOS setup to this connector. • We recommend that supports either HD Audio or legacy AC`97 audio standard. The power supply plugs are for a chassis-mounted front panel audio I /O module cable to [HD]; Find the proper orientation and push down firmly until the connectors completely fit... panel audio I /O module that you want to connect an AC'97 front panel audio module to this connector, set to this connector is for ATX power supply plugs.
... fit these connectors in the BIOS setup to this connector. • We recommend that supports either HD Audio or legacy AC`97 audio standard. The power supply plugs are for a chassis-mounted front panel audio I /O module cable to [HD]; Find the proper orientation and push down firmly until the connectors completely fit... panel audio I /O module that you want to connect an AC'97 front panel audio module to this connector, set to this connector is for ATX power supply plugs.
User Manual
Page 45
Chapter 2 ASUS SABERTOOTH 990FX 2-27 com/PowerSupplyCalculator/PSCalculator.aspx?SLanguage=en-us for your system, refer to the Recommended Power Supply Wattage Calculator at http://support.asus. • For a fully configured system, we recommend that complies with ATX 12 V Specification 2.0 (or later version) and provides a minimum power of a PSU with a higher power output is inadequate. • If you want...
Chapter 2 ASUS SABERTOOTH 990FX 2-27 com/PowerSupplyCalculator/PSCalculator.aspx?SLanguage=en-us for your system, refer to the Recommended Power Supply Wattage Calculator at http://support.asus. • For a fully configured system, we recommend that complies with ATX 12 V Specification 2.0 (or later version) and provides a minimum power of a PSU with a higher power output is inadequate. • If you want...
User Manual
Page 47
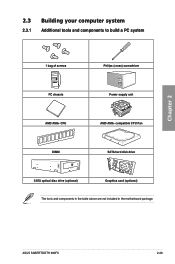
Chapter 2 2.3 Building your computer system 2.3.1 Additional tools and components to build a PC system 1 bag of screws Philips (cross) screwdriver PC chassis Power supply unit AMD AM3+ CPU AMD AM3+ compatible CPU Fan DIMM SATA hard disk drive SATA optical disc drive (optional) Graphics card (optional) The tools and components in the table above are not included in the motherboard package. ASUS SABERTOOTH 990FX 2-29
Chapter 2 2.3 Building your computer system 2.3.1 Additional tools and components to build a PC system 1 bag of screws Philips (cross) screwdriver PC chassis Power supply unit AMD AM3+ CPU AMD AM3+ compatible CPU Fan DIMM SATA hard disk drive SATA optical disc drive (optional) Graphics card (optional) The tools and components in the table above are not included in the motherboard package. ASUS SABERTOOTH 990FX 2-29

User Manual
Page 62
External SCSI devices (starting with ATX power supplies, the system LED lights up when you turned on the power, the system may light up or change from the time you press the ATX power button. For systems with the last device on self tests or POST. While the tests are off mode...from orange to disabled No keyboard detected No memory detected No VGA detected Hardware component failure 7. Chapter 2 2.4 Starting up . Connect the power cord to a power outlet that all the connections, replace the system case cover. 2. Turn on the system front panel case lights up for less than ...
External SCSI devices (starting with ATX power supplies, the system LED lights up when you turned on the power, the system may light up or change from the time you press the ATX power button. For systems with the last device on self tests or POST. While the tests are off mode...from orange to disabled No keyboard detected No memory detected No VGA detected Hardware component failure 7. Chapter 2 2.4 Starting up . Connect the power cord to a power outlet that all the connections, replace the system case cover. 2. Turn on the system front panel case lights up for less than ...
User Manual
Page 139
Select your system. ASUS SABERTOOTH 990FX 5-1 To uninstall existing graphics card drivers: 1. For Windows XP, select Add/Remove. Download the latest driver from the AMD website (www.amd.com). • Ensure that your power supply unit (PSU) can provide at least the minimum power required by your system. �S�e�e��C��h�a�...
Select your system. ASUS SABERTOOTH 990FX 5-1 To uninstall existing graphics card drivers: 1. For Windows XP, select Add/Remove. Download the latest driver from the AMD website (www.amd.com). • Ensure that your power supply unit (PSU) can provide at least the minimum power required by your system. �S�e�e��C��h�a�...

User Manual
Page 140
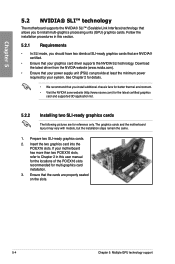
... CrossFireX™ graphics cards The following pictures are properly seated on each graphics card. Prepare two CrossFireX-ready graphics cards. 2. Connect two independent auxiliary power sources from the power supply to the graphics card. goldfingers 5-2 Chapter 5: Multiple GPU technology support If your motherboard has more than two PCIEX16 slots, refer to the goldfingers...
... CrossFireX™ graphics cards The following pictures are properly seated on each graphics card. Prepare two CrossFireX-ready graphics cards. 2. Connect two independent auxiliary power sources from the power supply to the graphics card. goldfingers 5-2 Chapter 5: Multiple GPU technology support If your motherboard has more than two PCIEX16 slots, refer to the goldfingers...
User Manual
Page 142
... the locations of the PCIEX16 slots recommended for reference only. Download the latest driver from the NVIDIA website (www.nvidia.com). • Ensure that your power supply unit (PSU) can provide at least the minimum...
... the locations of the PCIEX16 slots recommended for reference only. Download the latest driver from the NVIDIA website (www.nvidia.com). • Ensure that your power supply unit (PSU) can provide at least the minimum...
User Manual
Page 143
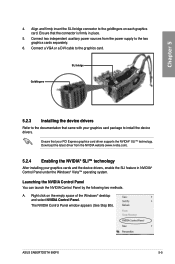
... to the goldfingers on the empty space of the Windows® desktop and select NVIDIA Control Panel. Right click on each graphics card. ASUS SABERTOOTH 990FX 5-5 Connect two independent auxiliary power sources from the NVIDIA website (www.nvidia.com). 5.2.4 Enabling the NVIDIA® SLI™ technology After installing your graphics cards and the device... drivers. A. Chapter 5 4. Launching the NVIDIA Control Panel You can launch the NVIDIA Control Panel by the following two methods. Download the latest driver from the power supply to the graphics card.
... to the goldfingers on the empty space of the Windows® desktop and select NVIDIA Control Panel. Right click on each graphics card. ASUS SABERTOOTH 990FX 5-5 Connect two independent auxiliary power sources from the NVIDIA website (www.nvidia.com). 5.2.4 Enabling the NVIDIA® SLI™ technology After installing your graphics cards and the device... drivers. A. Chapter 5 4. Launching the NVIDIA Control Panel You can launch the NVIDIA Control Panel by the following two methods. Download the latest driver from the power supply to the graphics card.


