User Manual
Page 5
Contents 4.4.2 Installing Serial ATA hard disks 4-30 4.4.3 Setting the RAID item in BIOS 4-30 4.4.4 AMD® Option ROM Utility 4-31 4.5 Creating a RAID driver disk 4-34 4.5.1 Creating a RAID driver disk without entering the OS 4-...
Contents 4.4.2 Installing Serial ATA hard disks 4-30 4.4.3 Setting the RAID item in BIOS 4-30 4.4.4 AMD® Option ROM Utility 4-31 4.5 Creating a RAID driver disk 4-34 4.5.1 Creating a RAID driver disk without entering the OS 4-...

User Manual
Page 6
...separation between the equipment and receiver. • Connect the equipment to an outlet on a circuit different from digital apparatus set out in the Radio Interference Regulations of the Canadian Department of Chemicals) regulatory framework, we published the chemical substances in our products at... ASUS REACH website at http://csr.asus.com/english/REACH.htm. These limits are designed to operate this unit not expressly approved by turning the equipment...
...separation between the equipment and receiver. • Connect the equipment to an outlet on a circuit different from digital apparatus set out in the Radio Interference Regulations of the Canadian Department of Chemicals) regulatory framework, we published the chemical substances in our products at... ASUS REACH website at http://csr.asus.com/english/REACH.htm. These limits are designed to operate this unit not expressly approved by turning the equipment...

User Manual
Page 7
... the product, ensure all power cables are unplugged. • Seek professional assistance before using , contact your local power company. • If the power supply is set to the correct voltage in any damage, contact your retailer. Safety information Electrical safety • To prevent electrical shock hazard, disconnect the power cable from...
... the product, ensure all power cables are unplugged. • Seek professional assistance before using , contact your local power company. • If the power supply is set to the correct voltage in any damage, contact your retailer. Safety information Electrical safety • To prevent electrical shock hazard, disconnect the power cable from...

User Manual
Page 8
Refer to change system settings through the BIOS Setup menus. viii Detailed descriptions of the BIOS parameters are not part of the motherboard and the new technology it supports. • ... added by your dealer. These documents are also provided. • Chapter 4: Software support This chapter describes the contents of the switches, jumpers, and connectors on ASUS hardware and software products. About this guide is organized This guide contains the following sources for additional information and for product and software updates. 1.
Refer to change system settings through the BIOS Setup menus. viii Detailed descriptions of the BIOS parameters are not part of the motherboard and the new technology it supports. • ... added by your dealer. These documents are also provided. • Chapter 4: Software support This chapter describes the contents of the switches, jumpers, and connectors on ASUS hardware and software products. About this guide is organized This guide contains the following sources for additional information and for product and software updates. 1.
User Manual
Page 16
...smoothness as their operating system. Users can happen suddenly and its user-friendly interface, ASUS AI Suite II consolidates all -in no need to patch memory issues. determines failsafe settings and dramatically improves system boot success. ESD Guards Unique protection of a button to... flexible and convenient mouse controls. Get your system up to extend component lifespan. It allows you to enable more intricate system settings. Exclusive ASUS anti-static chip, a protective circuit design, and the I/O shield provides four times better protection to a massive 40A of ...
...smoothness as their operating system. Users can happen suddenly and its user-friendly interface, ASUS AI Suite II consolidates all -in no need to patch memory issues. determines failsafe settings and dramatically improves system boot success. ESD Guards Unique protection of a button to... flexible and convenient mouse controls. Get your system up to extend component lifespan. It allows you to enable more intricate system settings. Exclusive ASUS anti-static chip, a protective circuit design, and the I/O shield provides four times better protection to a massive 40A of ...
User Manual
Page 17
... of Q-LED, Q-Slot, and Q-DIMM design speed up and simplify the DIY process! ASUS SABERTOOTH 990FX 1-5 ASUS Q-Connector Make connection quick and accurate! O.C. The BIOS settings can update your system with customizable and animated boot logos. Simply launch this tool and update...feature, retasking functions and multi-streaming technology. Profile Conveniently store or load multiple BIOS settings Freely share and distribute favorite overclocking settings The motherboard features the ASUS O.C. MyLogo2 Personalize your system with one cable at a time, making it convenient ...
... of Q-LED, Q-Slot, and Q-DIMM design speed up and simplify the DIY process! ASUS SABERTOOTH 990FX 1-5 ASUS Q-Connector Make connection quick and accurate! O.C. The BIOS settings can update your system with customizable and animated boot logos. Simply launch this tool and update...feature, retasking functions and multi-streaming technology. Profile Conveniently store or load multiple BIOS settings Freely share and distribute favorite overclocking settings The motherboard features the ASUS O.C. MyLogo2 Personalize your system with one cable at a time, making it convenient ...
User Manual
Page 19
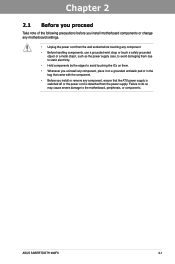
ASUS SABERTOOTH 990FX 2-1 Failure to do so may cause severe damage to avoid touching the ICs on them. • Whenever you uninstall any component, place it on a grounded ... is detached from the power supply. Chapter 2 2.1 Before you proceed Take note of the following precautions before you install motherboard components or change any motherboard settings. • Unplug the power cord from the wall socket before touching any component. • Before handling components, use a grounded wrist strap or touch a safely grounded...
ASUS SABERTOOTH 990FX 2-1 Failure to do so may cause severe damage to avoid touching the ICs on them. • Whenever you uninstall any component, place it on a grounded ... is detached from the power supply. Chapter 2 2.1 Before you proceed Take note of the following precautions before you install motherboard components or change any motherboard settings. • Unplug the power cord from the wall socket before touching any component. • Before handling components, use a grounded wrist strap or touch a safely grounded...
User Manual
Page 36
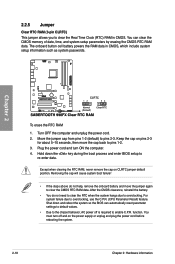
... must turn ON the computer. 4. Move the jumper cap from pins 1-2 (default) to enable C.P.R. For system failure due to overclocking. You can automatically reset parameter settings to default values. • Due to the chipset behavior, AC power off and on CLRTC jumper default position. The onboard button cell battery powers the...
... must turn ON the computer. 4. Move the jumper cap from pins 1-2 (default) to enable C.P.R. For system failure due to overclocking. You can automatically reset parameter settings to default values. • Due to the chipset behavior, AC power off and on CLRTC jumper default position. The onboard button cell battery powers the...
User Manual
Page 37
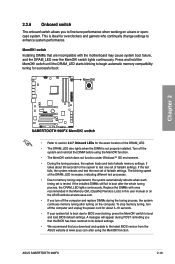
... at www.asus.com. • If you turn off the computer and unplug the power cord for about 30 seconds for overclockers and gamers who continually change settings to enhance system performance. MemOK! switch lights continuously. switch does not function ...settings. If the test fails, the system reboots and test the next set is ideal for the system to test one set of failsafe settings. A messgae will appear during the tuning process, the system continues memory tuning after turning on the ASUS website at www.asus.com after using the MemOK! function. ASUS SABERTOOTH 990FX...
... at www.asus.com. • If you turn off the computer and unplug the power cord for about 30 seconds for overclockers and gamers who continually change settings to enhance system performance. MemOK! switch lights continuously. switch does not function ...settings. If the test fails, the system reboots and test the next set is ideal for the system to test one set of failsafe settings. A messgae will appear during the tuning process, the system continues memory tuning after turning on the ASUS website at www.asus.com after using the MemOK! function. ASUS SABERTOOTH 990FX...
User Manual
Page 39
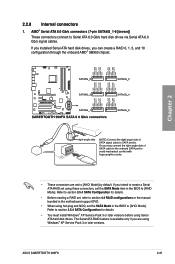
... the BIOS to create a Serial ATA RAID set the SATA Mode in the motherboard support DVD. • When using Serial ATA hard disk drives. If you installed Serial ATA hard disk drives, you intend to [AHCI Mode]. ASUS SABERTOOTH 990FX 2-21 Refer to section 3.5.4 SATA Configuration for... details. • You must install Windows® XP Service Pack 3 or later versions before using hot-plug and NCQ, set using Windows® XP Service Pack 3 or later versions....
... the BIOS to create a Serial ATA RAID set the SATA Mode in the motherboard support DVD. • When using Serial ATA hard disk drives. If you installed Serial ATA hard disk drives, you intend to [AHCI Mode]. ASUS SABERTOOTH 990FX 2-21 Refer to section 3.5.4 SATA Configuration for... details. • You must install Windows® XP Service Pack 3 or later versions before using hot-plug and NCQ, set using Windows® XP Service Pack 3 or later versions....

User Manual
Page 44
... to [HD]; Find the proper orientation and push down firmly until the connectors completely fit. Front panel audio connector (10-1 pin AAFP) This connector is set the item to fit these connectors in the BIOS setup to avail of the front panel audio I /O module that you want to connect an AC...'97 front panel audio module to this connector, set to [HD]. 10. if you connect a high-definition front panel audio module to this connector is for ATX power supply plugs. If��y�...
... to [HD]; Find the proper orientation and push down firmly until the connectors completely fit. Front panel audio connector (10-1 pin AAFP) This connector is set the item to fit these connectors in the BIOS setup to avail of the front panel audio I /O module that you want to connect an AC...'97 front panel audio module to this connector, set to [HD]. 10. if you connect a high-definition front panel audio module to this connector is for ATX power supply plugs. If��y�...

User Manual
Page 46
... PANEL) This connector supports several chassis-mounted functions. Connect the chassis power LED cable to this connector. The speaker allows you turn on the BIOS settings.
... PANEL) This connector supports several chassis-mounted functions. Connect the chassis power LED cable to this connector. The speaker allows you turn on the BIOS settings.
User Manual
Page 58
... your USB 3.0 devices. • If you want to use the hot-plug function of the external SATA ports, you have to set the JMB Storage Controller item in the BIOS setting to section 3.5.6 Onboard Devices Configuration for details. 2-40 Chapter 2: Hardware information LAN1 (RJ-45) port* 8. 2.3.10 Rear panel connection Chapter 2 Rear...
... your USB 3.0 devices. • If you want to use the hot-plug function of the external SATA ports, you have to set the JMB Storage Controller item in the BIOS setting to section 3.5.6 Onboard Devices Configuration for details. 2-40 Chapter 2: Hardware information LAN1 (RJ-45) port* 8. 2.3.10 Rear panel connection Chapter 2 Rear...

User Manual
Page 62
... detected Hardware component failure 7. After making all switches are running, the BIOS beeps (refer to the power connector at the back of the BIOS setting. 2-44 Chapter 2: Hardware information After applying power, the system power LED on . At power on, hold down the key to a power...For systems with a surge protector. 5. Be sure that is ON, pressing the power switch for more than four seconds puts the system on the BIOS setting. If your retailer for the first time 1. Chapter 2 2.4 Starting up for assistance. Connect the power cord to the BIOS beep codes table below)...
... detected Hardware component failure 7. After making all switches are running, the BIOS beeps (refer to the power connector at the back of the BIOS setting. 2-44 Chapter 2: Hardware information After applying power, the system power LED on . At power on, hold down the key to a power...For systems with a surge protector. 5. Be sure that is ON, pressing the power switch for more than four seconds puts the system on the BIOS setting. If your retailer for the first time 1. Chapter 2 2.4 Starting up for assistance. Connect the power cord to the BIOS beep codes table below)...
User Manual
Page 63
...the Exit menu. Chapter 3 ASUS SABERTOOTH 990FX 3-1 The term "BIOS" in the following circumstances: • An error message appears on how to enable more flexible and convenient mouse input. BIOS (Basic Input and Output System) stores system hardware settings such as easy to use the...devices. Chapter 3 Chapter 3: 3.1 Knowing BIOS BIOS setup The new ASUS UEFI BIOS is an Extensible Firmware Interface that complies with uEFI architecture, offering a user-friendly interface that requires further BIOS settings or update. See section 3.9 Exit Menu for system startup in the...
...the Exit menu. Chapter 3 ASUS SABERTOOTH 990FX 3-1 The term "BIOS" in the following circumstances: • An error message appears on how to enable more flexible and convenient mouse input. BIOS (Basic Input and Output System) stores system hardware settings such as easy to use the...devices. Chapter 3 Chapter 3: 3.1 Knowing BIOS BIOS setup The new ASUS UEFI BIOS is an Extensible Firmware Interface that complies with uEFI architecture, offering a user-friendly interface that requires further BIOS settings or update. See section 3.9 Exit Menu for system startup in the...
User Manual
Page 65
... an example of the screen has the following sections for special functions For selecting the exit options and loading default settings Chapter 3 ASUS SABERTOOTH 990FX 3-3 Advanced Mode General help Exit Main Back Ai Tweaker Advanced Advanced\ Onboard Devices Configuration > Monitor VIA 1394 Controller... For configuring options for the detailed configurations. To access the EZ Mode, click Exit, then select ASUS EZ Mode. Refer to configure the BIOS settings. Back button Menu items Menu bar Configuration fields UEFI BIOS Utility - 3.2.2 Advanced Mode The Advanced Mode...
... an example of the screen has the following sections for special functions For selecting the exit options and loading default settings Chapter 3 ASUS SABERTOOTH 990FX 3-3 Advanced Mode General help Exit Main Back Ai Tweaker Advanced Advanced\ Onboard Devices Configuration > Monitor VIA 1394 Controller... For configuring options for the detailed configurations. To access the EZ Mode, click Exit, then select ASUS EZ Mode. Refer to configure the BIOS settings. Back button Menu items Menu bar Configuration fields UEFI BIOS Utility - 3.2.2 Advanced Mode The Advanced Mode...

User Manual
Page 66
... there are the navigation keys for the menu items. If an item is highlighted when selected. A configurable field is user-configurable, you can change the settings.
... there are the navigation keys for the menu items. If an item is highlighted when selected. A configurable field is user-configurable, you can change the settings.
User Manual
Page 67
... or User Password items on password and must be entered to clear the BIOS password. UEFI BIOS Utility - Chapter 3 ASUS SABERTOOTH 990FX 3-5 Advanced Mode Exit Main Back Ai Tweaker Main\ Security > Advanced Password Description If ONLY the Administrator's password is set , then this only limits access to create/confirm the password. • If you...
... or User Password items on password and must be entered to clear the BIOS password. UEFI BIOS Utility - Chapter 3 ASUS SABERTOOTH 990FX 3-5 Advanced Mode Exit Main Back Ai Tweaker Main\ Security > Advanced Password Description If ONLY the Administrator's password is set , then this only limits access to create/confirm the password. • If you...

User Manual
Page 68
...password, then press . 3. After you clear the password, the User Password item on top of the screen shows Not Installed. Administrator Password If you have set a user password, you must enter the user password for accessing the system. Select the Administrator Password item and press . 2. To... set an administrator password: 1. From the Create New Password box, key in a new password, then press . 4. After you clear the password, the Administrator Password item ...
...password, then press . 3. After you clear the password, the User Password item on top of the screen shows Not Installed. Administrator Password If you have set a user password, you must enter the user password for accessing the system. Select the Administrator Password item and press . 2. To... set an administrator password: 1. From the Create New Password box, key in a new password, then press . 4. After you clear the password, the Administrator Password item ...
User Manual
Page 69
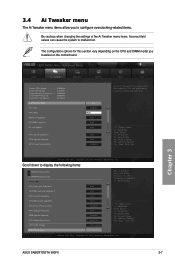
Chapter 3 ASUS SABERTOOTH 990FX 3-7 F1: General Help F2: Previous Values F5: Optimized Defaults F10: Save ESC: Exit Version 2.00.1201. Copyright (C) 2010 American Megatrends, Inc. CPU & NB Voltage Offset ... The Ai Tweaker menu items allow you installed on the CPU and DIMM model you to configure overclocking-related items. Be cautious when changing the settings of the Ai Tweaker menu items. Incorrect field values can cause the system to display the following items: > DRAM Timing Control > DRAM Driving Control DIGI...
Chapter 3 ASUS SABERTOOTH 990FX 3-7 F1: General Help F2: Previous Values F5: Optimized Defaults F10: Save ESC: Exit Version 2.00.1201. Copyright (C) 2010 American Megatrends, Inc. CPU & NB Voltage Offset ... The Ai Tweaker menu items allow you installed on the CPU and DIMM model you to configure overclocking-related items. Be cautious when changing the settings of the Ai Tweaker menu items. Incorrect field values can cause the system to display the following items: > DRAM Timing Control > DRAM Driving Control DIGI...


