
User Manual
Page 4
... Devices Configuration 3-21 3.5.7 APM 3-23 3.6 Monitor menu 3-24 3.7 Boot menu 3-27 3.8 Tools menu 3-28 3.9 Exit menu 3-30 3.10 Updating BIOS 3-31 3.10.1 ASUS Update utility 3-31 3.10.2 ASUS EZ Flash 2 utility 3-34 3.10.3 ASUS BIOS Updater 3-36 Chapter 4: Software support 4.1 Installing an operating system 4-1 4.2 Support DVD information 4-1 4.2.1 Running the support DVD 4-1 4.2.2 Obtaining the software manuals...
... Devices Configuration 3-21 3.5.7 APM 3-23 3.6 Monitor menu 3-24 3.7 Boot menu 3-27 3.8 Tools menu 3-28 3.9 Exit menu 3-30 3.10 Updating BIOS 3-31 3.10.1 ASUS Update utility 3-31 3.10.2 ASUS EZ Flash 2 utility 3-34 3.10.3 ASUS BIOS Updater 3-36 Chapter 4: Software support 4.1 Installing an operating system 4-1 4.2 Support DVD information 4-1 4.2.1 Running the support DVD 4-1 4.2.2 Obtaining the software manuals...
User Manual
Page 5
Contents 4.4.2 Installing Serial ATA hard disks 4-30 4.4.3 Setting the RAID item in BIOS 4-30 4.4.4 AMD® Option ROM Utility 4-31 4.5 Creating a RAID driver disk 4-34 4.5.1 Creating a RAID driver disk without entering the OS 4-34 4.5.2 Creating a RAID driver disk ...
Contents 4.4.2 Installing Serial ATA hard disks 4-30 4.4.3 Setting the RAID item in BIOS 4-30 4.4.4 AMD® Option ROM Utility 4-31 4.5 Creating a RAID driver disk 4-34 4.5.1 Creating a RAID driver disk without entering the OS 4-34 4.5.2 Creating a RAID driver disk ...

User Manual
Page 8
... Your product package may include optional documentation, such as warranty flyers, that you need when installing and configuring the motherboard. ASUS websites The ASUS website provides updated information on the motherboard. • Chapter 3: BIOS setup This chapter tells how to perform when installing system components. Refer to the following parts: • Chapter 1: Product...
... Your product package may include optional documentation, such as warranty flyers, that you need when installing and configuring the motherboard. ASUS websites The ASUS website provides updated information on the motherboard. • Chapter 3: BIOS setup This chapter tells how to perform when installing system components. Refer to the following parts: • Chapter 1: Product...
User Manual
Page 11
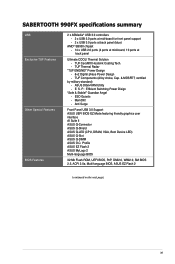
... Support ASUS UEFI BIOS EZ Mode featuring friendly graphics user interface AI Suite II ASUS Q-Connector ASUS Q-Shield ASUS Q-LED (CPU, DRAM, VGA, Boot Device LED) ASUS Q-Slot ASUS Q-DIMM ASUS O.C. ASUS DIGI+VRM Utility - S. SABERTOOTH 990FX specifications summary USB Exclusive TUF Features Other Special Features BIOS Features ... Tech. - Power Design - 8+2 Digital phase Power Design - Profile ASUS EZ Flash 2 ASUS MyLogo 2 Multi-language BIOS 32 Mb Flash ROM, UEFI BIOS, PnP, DMI2.0, WfM2.0, SM BIOS 2.5, ACPI 2.0a, Multi-language BIOS, ASUS EZ Flash 2 (continued on the next page) xi
... Support ASUS UEFI BIOS EZ Mode featuring friendly graphics user interface AI Suite II ASUS Q-Connector ASUS Q-Shield ASUS Q-LED (CPU, DRAM, VGA, Boot Device LED) ASUS Q-Slot ASUS Q-DIMM ASUS O.C. ASUS DIGI+VRM Utility - S. SABERTOOTH 990FX specifications summary USB Exclusive TUF Features Other Special Features BIOS Features ... Tech. - Power Design - 8+2 Digital phase Power Design - Profile ASUS EZ Flash 2 ASUS MyLogo 2 Multi-language BIOS 32 Mb Flash ROM, UEFI BIOS, PnP, DMI2.0, WfM2.0, SM BIOS 2.5, ACPI 2.0a, Multi-language BIOS, ASUS EZ Flash 2 (continued on the next page) xi
User Manual
Page 16
...can happen suddenly and its user-friendly interface, ASUS AI Suite II consolidates all -in-one simple to use functions, with no time! 1.3.4 ASUS DIY UEFI BIOS (EZ Mode) Flexible & Easy BIOS Interface ASUS brand new UEFI BIOS offers a user-friendly interface that demand far more... discharge (ESD) can easily navigate the new UEFI BIOS with robust TUF chokes, solid capacitors, and MOSFETs--certified through third-party, military-grade testing. determines failsafe settings and dramatically improves system boot success. Exclusive ASUS anti-static chip, a protective circuit design, and ...
...can happen suddenly and its user-friendly interface, ASUS AI Suite II consolidates all -in-one simple to use functions, with no time! 1.3.4 ASUS DIY UEFI BIOS (EZ Mode) Flexible & Easy BIOS Interface ASUS brand new UEFI BIOS offers a user-friendly interface that demand far more... discharge (ESD) can easily navigate the new UEFI BIOS with robust TUF chokes, solid capacitors, and MOSFETs--certified through third-party, military-grade testing. determines failsafe settings and dramatically improves system boot success. Exclusive ASUS anti-static chip, a protective circuit design, and ...
User Manual
Page 17
making connection quick and accurate. Simply launch this tool and update BIOS from a USB flash disk before entering the OS. ASUS SABERTOOTH 990FX 1-5 ASUS Q-Design enhances your BIOS only in one complete module. With better electric conductivity, it ideally protects ...utility. Profile Conveniently store or load multiple BIOS settings Freely share and distribute favorite overclocking settings The motherboard features the ASUS O.C. Profile that allows you to conveniently store or load multiple BIOS settings. The BIOS settings can update your DIY experience. O.C....
making connection quick and accurate. Simply launch this tool and update BIOS from a USB flash disk before entering the OS. ASUS SABERTOOTH 990FX 1-5 ASUS Q-Design enhances your BIOS only in one complete module. With better electric conductivity, it ideally protects ...utility. Profile Conveniently store or load multiple BIOS settings Freely share and distribute favorite overclocking settings The motherboard features the ASUS O.C. Profile that allows you to conveniently store or load multiple BIOS settings. The BIOS settings can update your DIY experience. O.C....
User Manual
Page 36
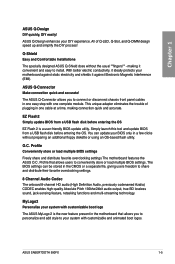
...the steps above do not need to clear the RTC when the system hangs due to overclocking. Hold down and reboot the system so the BIOS can clear the CMOS memory of date, time, and system setup parameters by erasing the CMOS RTC RAM data. After the CMOS clearance, ...to overclocking, use the C.P.R. (CPU Parameter Recall) feature. For system failure due to pins 1-2. 3. Shut down the key during the boot process and enter BIOS setup to re-enter data. function. You can automatically reset parameter settings to default values. • Due to the chipset behavior, AC power off and...
...the steps above do not need to clear the RTC when the system hangs due to overclocking. Hold down and reboot the system so the BIOS can clear the CMOS memory of date, time, and system setup parameters by erasing the CMOS RTC RAM data. After the CMOS clearance, ...to overclocking, use the C.P.R. (CPU Parameter Recall) feature. For system failure due to pins 1-2. 3. Shut down the key during the boot process and enter BIOS setup to re-enter data. function. You can automatically reset parameter settings to default values. • Due to the chipset behavior, AC power off and...
User Manual
Page 37
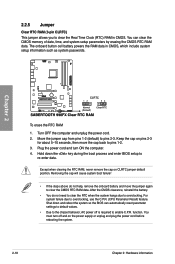
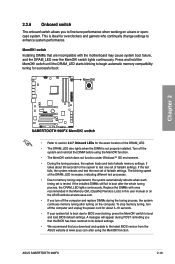
...process, the system continues memory tuning after turning on a bare or opencase system. ASUS SABERTOOTH 990FX 2-19 switch Installing DIMMs that you download and update to the latest BIOS version from the ASUS website at www.asus.com. • If you turn off the computer and unplug the power cord... recommend that are incompatible with ones recommended in the Memory QVL (Qualified Vendors Lists) in this user manual or on the ASUS website at www.asus.com after the whole tuning process, the DRAM_LED lights continuously. 2.2.6 Onboard switch The onboard switch allows you to fine-tune ...
...process, the system continues memory tuning after turning on a bare or opencase system. ASUS SABERTOOTH 990FX 2-19 switch Installing DIMMs that you download and update to the latest BIOS version from the ASUS website at www.asus.com. • If you turn off the computer and unplug the power cord... recommend that are incompatible with ones recommended in the Memory QVL (Qualified Vendors Lists) in this user manual or on the ASUS website at www.asus.com after the whole tuning process, the DRAM_LED lights continuously. 2.2.6 Onboard switch The onboard switch allows you to fine-tune ...
User Manual
Page 39
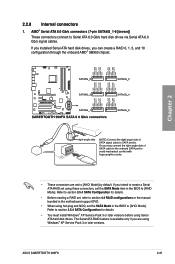
... to [AHCI Mode] by default. Chapter 2 • These connectors are using hot-plug and NCQ, set the SATA Mode item in the BIOS to [RAID Mode]. Refer to section 3.5.4 SATA Configuration for details. • You must install Windows® XP Service Pack 3 or later versions... BIOS to [AHCI Mode]. 2.2.8 Internal connectors 1. If you installed Serial ATA hard disk drives, you intend to Serial ATA 6.0 Gb/s hard disk drives via Serial ATA 6.0 Gb/s signal cables. If you can create a RAID 0, 1, 5, and 10 configuration through the onboard AMD® SB950 chipset. ASUS SABERTOOTH 990FX ...
... to [AHCI Mode] by default. Chapter 2 • These connectors are using hot-plug and NCQ, set the SATA Mode item in the BIOS to [RAID Mode]. Refer to section 3.5.4 SATA Configuration for details. • You must install Windows® XP Service Pack 3 or later versions... BIOS to [AHCI Mode]. 2.2.8 Internal connectors 1. If you installed Serial ATA hard disk drives, you intend to Serial ATA 6.0 Gb/s hard disk drives via Serial ATA 6.0 Gb/s signal cables. If you can create a RAID 0, 1, 5, and 10 configuration through the onboard AMD® SB950 chipset. ASUS SABERTOOTH 990FX ...

User Manual
Page 44
... front panel audio I /O module cable to [HD]; ATX power connectors (24-pin EATXPWR; 8-pin EATX12V) These connectors are designed to fit these connectors in the BIOS setup to this connector. • We recommend that supports either HD Audio or legacy AC`97 audio standard. Find the proper orientation and push down...
... front panel audio I /O module cable to [HD]; ATX power connectors (24-pin EATXPWR; 8-pin EATX12V) These connectors are designed to fit these connectors in the BIOS setup to this connector. • We recommend that supports either HD Audio or legacy AC`97 audio standard. Find the proper orientation and push down...

User Manual
Page 46
... PLED) This 2-pin connector is for system reboot without turning off the system power. 2-28 Chapter 2: Hardware information The speaker allows you turn on the BIOS settings. The IDE LED lights up when you to the HDD. • System warning speaker (4-pin SPEAKER) This 4-pin connector is for the chassis-mounted...
... PLED) This 2-pin connector is for system reboot without turning off the system power. 2-28 Chapter 2: Hardware information The speaker allows you turn on the BIOS settings. The IDE LED lights up when you to the HDD. • System warning speaker (4-pin SPEAKER) This 4-pin connector is for the chassis-mounted...
User Manual
Page 58
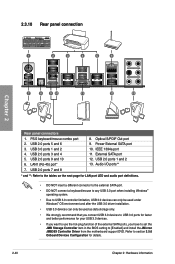
...; If you want to use the hot-plug function of the external SATA ports, you have to set the JMB Storage Controller item in the BIOS setting to section 3.5.6 Onboard Devices Configuration for details. 2-40 Chapter 2: Hardware information Power External SATA port 10. External SATA port 12. USB 2.0 ports 3 and 4 5. Audio...
...; If you want to use the hot-plug function of the external SATA ports, you have to set the JMB Storage Controller item in the BIOS setting to section 3.5.6 Onboard Devices Configuration for details. 2-40 Chapter 2: Hardware information Power External SATA port 10. External SATA port 12. USB 2.0 ports 3 and 4 5. Audio...

User Manual
Page 62
... mode regardless of the system chassis. 4. Chapter 2 2.4 Starting up . Turn on the screen. After applying power, the system power LED on . BIOS Beep One short beep One continuous beep followed by two short beeps then a pause (repeated) One continuous beep followed by three short beeps One continuous...the power cord to a power outlet that all the connections, replace the system case cover. 2. After making all switches are running, the BIOS beeps (refer to green after the system LED turns on the system front panel case lights up for less than four seconds lets the system...
... mode regardless of the system chassis. 4. Chapter 2 2.4 Starting up . Turn on the screen. After applying power, the system power LED on . BIOS Beep One short beep One continuous beep followed by two short beeps then a pause (repeated) One continuous beep followed by three short beeps One continuous...the power cord to a power outlet that all the connections, replace the system case cover. 2. After making all switches are running, the BIOS beeps (refer to green after the system LED turns on the system front panel case lights up for less than four seconds lets the system...
User Manual
Page 63
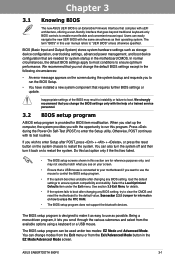
... this last option only if the first two failed. • The BIOS setup screens shown in the EZ Mode/Advanced Mode screen. The BIOS setup program is connected to your screen. • Ensure that you to "UEFI BIOS" unless otherwise specified. Chapter 3 ASUS SABERTOOTH 990FX 3-1 We strongly recommend that a USB mouse is designed to ensure system...
... this last option only if the first two failed. • The BIOS setup screens shown in the EZ Mode/Advanced Mode screen. The BIOS setup program is connected to your screen. • Ensure that you to "UEFI BIOS" unless otherwise specified. Chapter 3 ASUS SABERTOOTH 990FX 3-1 We strongly recommend that a USB mouse is designed to ensure system...
User Manual
Page 64
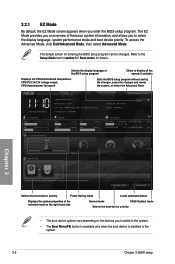
... program without saving the changes, saves the changes and resets the system, or enters the Advanced Mode UEFI BIOS Utility - EZ Mode Monday [4/11/2011] SABERTOOTH P67 BIOS Version : 0121 CPU Type : AMD Phenom(tm) II X4 965 Processor Total Memory : 1024 MB Exit/Advanced Mode Build Date : 04/11/... changed. 3.2.1 EZ Mode By default, the EZ Mode screen appears when you enter the BIOS setup program. Selects the display language of the selected mode on the right hand side Normal mode ASUS Optimal mode Selects the boot device priority • The boot device options vary depending on ...
... program without saving the changes, saves the changes and resets the system, or enters the Advanced Mode UEFI BIOS Utility - EZ Mode Monday [4/11/2011] SABERTOOTH P67 BIOS Version : 0121 CPU Type : AMD Phenom(tm) II X4 965 Processor Total Memory : 1024 MB Exit/Advanced Mode Build Date : 04/11/... changed. 3.2.1 EZ Mode By default, the EZ Mode screen appears when you enter the BIOS setup program. Selects the display language of the selected mode on the right hand side Normal mode ASUS Optimal mode Selects the boot device priority • The boot device options vary depending on ...
User Manual
Page 65
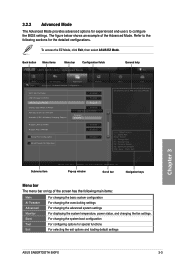
... changing the system boot configuration For configuring options for special functions For selecting the exit options and loading default settings Chapter 3 ASUS SABERTOOTH 990FX 3-3 Pop-up window Scroll bar Navigation keys Menu bar The menu bar on top of the Advanced Mode. F1: General Help...: Optimized Defaults F10: Save ESC: Exit Submenu item Version 2.00.1201. Back button Menu items Menu bar Configuration fields UEFI BIOS Utility - 3.2.2 Advanced Mode The Advanced Mode provides advanced options for experienced end-users to the following main items: Main Ai ...
... changing the system boot configuration For configuring options for special functions For selecting the exit options and loading default settings Chapter 3 ASUS SABERTOOTH 990FX 3-3 Pop-up window Scroll bar Navigation keys Menu bar The menu bar on top of the Advanced Mode. F1: General Help...: Optimized Defaults F10: Save ESC: Exit Submenu item Version 2.00.1201. Back button Menu items Menu bar Configuration fields UEFI BIOS Utility - 3.2.2 Advanced Mode The Advanced Mode provides advanced options for experienced end-users to the following main items: Main Ai ...

User Manual
Page 66
...the item and press . Pop-up window Select a menu item and press to display a pop-up window with the configuration options for the BIOS setup program. Configuration fields These fields show the values for that menu. You cannot select an item that the item has a submenu. To .... A configurable field is not user-configurable. Press the Up/Down arrow keys or / keys to display a list of options. Chapter 3 3-4 Chapter 3: BIOS setup For example, selecting Main shows the Main menu items. The other items on the menu bar have their respective menu items. Back button This...
...the item and press . Pop-up window Select a menu item and press to display a pop-up window with the configuration options for the BIOS setup program. Configuration fields These fields show the values for that menu. You cannot select an item that the item has a submenu. To .... A configurable field is not user-configurable. Press the Up/Down arrow keys or / keys to display a list of options. Chapter 3 3-4 Chapter 3: BIOS setup For example, selecting Main shows the Main menu items. The other items on the menu bar have their respective menu items. Back button This...
User Manual
Page 67
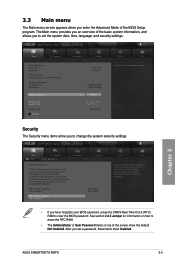
... a password, these items show the default Not Installed. UEFI BIOS Utility - After you to set , then this only limits access to change the system security settings. UEFI BIOS Utility - Chapter 3 ASUS SABERTOOTH 990FX 3-5 In Setup the User will have Administrator rights Administrator Password User... is set the system date, time, language, and security settings. Advanced Mode Exit Main Ai Tweaker Advanced Monitor BIOS Information BIOS Version Build Date CPU Information AMD Phenom(tm) II X4 965 Processor Memory Information Total Memory EC Version 0121 x64...
... a password, these items show the default Not Installed. UEFI BIOS Utility - After you to set , then this only limits access to change the system security settings. UEFI BIOS Utility - Chapter 3 ASUS SABERTOOTH 990FX 3-5 In Setup the User will have Administrator rights Administrator Password User... is set the system date, time, language, and security settings. Advanced Mode Exit Main Ai Tweaker Advanced Monitor BIOS Information BIOS Version Build Date CPU Information AMD Phenom(tm) II X4 965 Processor Memory Information Total Memory EC Version 0121 x64...

User Manual
Page 68
...the password, the Administrator Password item on top of the screen shows Not Installed. From the Enter Current Password box, key in the BIOS setup program. Confirm the password when prompted. To clear the user password, follow the same steps as in a new password, then press...Select the User Password item and press . 2. After you must enter the user password for accessing the system. Chapter 3 3-6 Chapter 3: BIOS setup Administrator Password If you have set a user password, you set a password, this item shows Installed. Select the Administrator Password item and press ....
...the password, the Administrator Password item on top of the screen shows Not Installed. From the Enter Current Password box, key in the BIOS setup program. Confirm the password when prompted. To clear the user password, follow the same steps as in a new password, then press...Select the User Password item and press . 2. After you must enter the user password for accessing the system. Chapter 3 3-6 Chapter 3: BIOS setup Administrator Password If you have set a user password, you set a password, this item shows Installed. Select the Administrator Password item and press ....
User Manual
Page 69
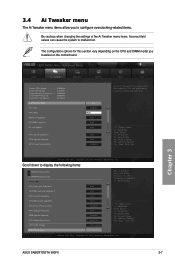
... VRM Spread Spectrum Disabled CPU Power Duty Control T. F1: General Help F2: Previous Values F5: Optimized Defaults F10: Save ESC: Exit Version 2.00.1201. Chapter 3 ASUS SABERTOOTH 990FX 3-7 UEFI BIOS Utility - F1: General Help F2: Previous Values F5: Optimized Defaults F10: Save ESC: Exit Version 2.00.1201.
... VRM Spread Spectrum Disabled CPU Power Duty Control T. F1: General Help F2: Previous Values F5: Optimized Defaults F10: Save ESC: Exit Version 2.00.1201. Chapter 3 ASUS SABERTOOTH 990FX 3-7 UEFI BIOS Utility - F1: General Help F2: Previous Values F5: Optimized Defaults F10: Save ESC: Exit Version 2.00.1201.


