

PG349Q Series User Guide
Page 2
... 1.3 Assembling the monitor 1-2 1.4 Cable management 1-3 1.5 Connect cables 1-4 1.5.1 Rear of the LCD monitor 1-4 1.6 Monitor introduction 1-5 1.6.1 Using the Controls button 1-5 2.1 Adjusting the monitor 2-1 2.2 Outline dimension 2-2 2.3 Detaching the arm/stand (for VESA wall mount 2-3 3.1 OSD (On-Screen Display) menu 3-1 3.1.1 How to infringe. SPECIFICATIONS AND INFORMATION CONTAINED IN THIS MANUAL ARE FURNISHED FOR INFORMATIONAL USE ONLY, AND ARE SUBJECT TO CHANGE AT ANY TIME WITHOUT NOTICE, AND SHOULD NOT BE CONSTRUED AS A COMMITMENT BY ASUS. or (2) the serial number of...
... 1.3 Assembling the monitor 1-2 1.4 Cable management 1-3 1.5 Connect cables 1-4 1.5.1 Rear of the LCD monitor 1-4 1.6 Monitor introduction 1-5 1.6.1 Using the Controls button 1-5 2.1 Adjusting the monitor 2-1 2.2 Outline dimension 2-2 2.3 Detaching the arm/stand (for VESA wall mount 2-3 3.1 OSD (On-Screen Display) menu 3-1 3.1.1 How to infringe. SPECIFICATIONS AND INFORMATION CONTAINED IN THIS MANUAL ARE FURNISHED FOR INFORMATIONAL USE ONLY, AND ARE SUBJECT TO CHANGE AT ANY TIME WITHOUT NOTICE, AND SHOULD NOT BE CONSTRUED AS A COMMITMENT BY ASUS. or (2) the serial number of...

PG349Q Series User Guide
Page 3
...user's authority to which can radiate radio frequency energy and, if not installed and used in the Radio Interference Regulations of the Canadian Department of the Canadian Interference -Causing Equipment Regulations. This equipment generates, uses and can be determined by turning the equipment off and on a circuit different from digital apparatus set out in accordance with manufacturer's instructions...receiver is connected. • Consult the dealer or an experienced radio/TV technician for a Class B digital device, pursuant to Part 15 of the monitor to the graphics card is ...
...user's authority to which can radiate radio frequency energy and, if not installed and used in the Radio Interference Regulations of the Canadian Department of the Canadian Interference -Causing Equipment Regulations. This equipment generates, uses and can be determined by turning the equipment off and on a circuit different from digital apparatus set out in accordance with manufacturer's instructions...receiver is connected. • Consult the dealer or an experienced radio/TV technician for a Class B digital device, pursuant to Part 15 of the monitor to the graphics card is ...
PG349Q Series User Guide
Page 4
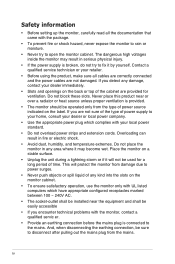
...openings on the monitor cabinet. • To ensure satisfactory operation, use the monitor only with UL listed computers which complies with the monitor, contact a qualified servic er. • Provide an earthing connection before the mains plug is broken, do not try to your home, consult your dealer or local power company. • Use the appropriate power plug...encounter technical problems with your local power standard. • Do not overload power strips and extension cords. Overloading can result in serious physical injury. • If the power supply is connected to fix it may...
...openings on the monitor cabinet. • To ensure satisfactory operation, use the monitor only with UL listed computers which complies with the monitor, contact a qualified servic er. • Provide an earthing connection before the mains plug is broken, do not try to your home, consult your dealer or local power company. • Use the appropriate power plug...encounter technical problems with your local power standard. • Do not overload power strips and extension cords. Overloading can result in serious physical injury. • If the power supply is connected to fix it may...

PG349Q Series User Guide
Page 6
... light. Conventions used in this guide WARNING: Information to prevent injury to yourself when trying to complete a task. CAUTION: Information to prevent damage to the components when trying to complete a task. vi Please check local regulations for disposal of the monitor. Turn off the Power Switch and turn off the Power Switch for hours. • When the screen becomes black or flashes, or cannot work...
... light. Conventions used in this guide WARNING: Information to prevent injury to yourself when trying to complete a task. CAUTION: Information to prevent damage to the components when trying to complete a task. vi Please check local regulations for disposal of the monitor. Turn off the Power Switch and turn off the Power Switch for hours. • When the screen becomes black or flashes, or cannot work...

PG349Q Series User Guide
Page 8
ASUS LCD Monitor PG Series 1-1 1.1 Welcome Thank you for the following items: LCD Monitor Monitor Base Quick Start Guide Warranty Card 1x Power Cord 1x HDMI Cable 1x DP Cable 1x Power Adapter 1x USB 3.0 Cable 1x LED projection cover and changeable films • If any of features that the monitor brings you can enjoy the convenience and delightful visual experience that enhance your viewing experience. With these features, you ! 1.2 Package contents Check your retailer immediately. The...
ASUS LCD Monitor PG Series 1-1 1.1 Welcome Thank you for the following items: LCD Monitor Monitor Base Quick Start Guide Warranty Card 1x Power Cord 1x HDMI Cable 1x DP Cable 1x Power Adapter 1x USB 3.0 Cable 1x LED projection cover and changeable films • If any of features that the monitor brings you can enjoy the convenience and delightful visual experience that enhance your viewing experience. With these features, you ! 1.2 Package contents Check your retailer immediately. The...

PG349Q Series User Guide
Page 9
... screw on the monitor base and the LED projection cover. Align the triangle marks on the base. To change the film on the LED projection cover, follow the illustration below. 1.3 Assembling the monitor To assemble the monitor: • While assembling the monitor arm/base, we recommend that is most comfortable for you keep the monitor inside its EPS packaging. Fix the base to the arm by fastening the bundled screw. 3. Remove the monitor...
... screw on the monitor base and the LED projection cover. Align the triangle marks on the base. To change the film on the LED projection cover, follow the illustration below. 1.3 Assembling the monitor To assemble the monitor: • While assembling the monitor arm/base, we recommend that is most comfortable for you keep the monitor inside its EPS packaging. Fix the base to the arm by fastening the bundled screw. 3. Remove the monitor...
PG349Q Series User Guide
Page 12
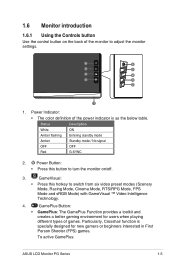
... White ON Amber flashing Entering standby mode Amber Standby mode / No signal OFF OFF Red G-SYNC 2. GamePlus Button: • GamePlus: The GamePlus Function provides a toolkit and creates a better gaming environment for new gamers or beginners interested in First Person Shooter (FPS) games. 1.6 Monitor introduction 1.6.1 Using the Controls button Use the control button on /off. 3. Power Button: • Press this hotkey to adjust the monitor settings. 6 6 5 5 4 4 3 3 2 1 1. GameVisual: • Press this button to turn...
... White ON Amber flashing Entering standby mode Amber Standby mode / No signal OFF OFF Red G-SYNC 2. GamePlus Button: • GamePlus: The GamePlus Function provides a toolkit and creates a better gaming environment for new gamers or beginners interested in First Person Shooter (FPS) games. 1.6 Monitor introduction 1.6.1 Using the Controls button Use the control button on /off. 3. Power Button: • Press this hotkey to adjust the monitor settings. 6 6 5 5 4 4 3 3 2 1 1. GameVisual: • Press this button to turn...

PG349Q Series User Guide
Page 14
... you. • Hold the stand to -5˚ and it allows 50˚ swivel adjustment from falling when you change its angle. • You can also adjust the monitor's height within +/- 10cm. -5 ~ 20 50° 50° 10cm It is normal that the monitor slightly shakes while you adjust the viewing angle. ASUS LCD Monitor PG Series 2-1 You can adjust the monitor's angle from +20˚...
... you. • Hold the stand to -5˚ and it allows 50˚ swivel adjustment from falling when you change its angle. • You can also adjust the monitor's height within +/- 10cm. -5 ~ 20 50° 50° 10cm It is normal that the monitor slightly shakes while you adjust the viewing angle. ASUS LCD Monitor PG Series 2-1 You can adjust the monitor's angle from +20˚...

PG349Q Series User Guide
Page 16
... (Screw size: M4 x 10 mm). The detachable stand of the monitor. 4. ASUS LCD Monitor PG Series 2-3 Carefully put the monitor facedown on where the monitor and the arm meet. 3. Disconnect power and signal cables. To detach the arm/stand 1. Detach the stand (arm and base) from the monitor. • The VESA wall mount kit ( 100 x 100 mm) is specially designed for VESA wall mount) • Avoid damaging the monitor surface. 2.3 Detaching the arm/stand (for VESA wall mount.
... (Screw size: M4 x 10 mm). The detachable stand of the monitor. 4. ASUS LCD Monitor PG Series 2-3 Carefully put the monitor facedown on where the monitor and the arm meet. 3. Disconnect power and signal cables. To detach the arm/stand 1. Detach the stand (arm and base) from the monitor. • The VESA wall mount kit ( 100 x 100 mm) is specially designed for VESA wall mount) • Avoid damaging the monitor surface. 2.3 Detaching the arm/stand (for VESA wall mount.
PG349Q Series User Guide
Page 17
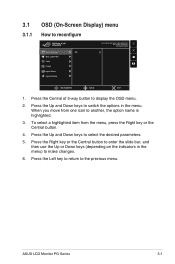
... 5-way button to reconfigure Over Clocking ON Blue Light Filter Color Image Input Select System Setup Normal Mode DisplayPort 3440x1440@ 60Hz Racing Mode Aura Static ROG Swift PG349Q MOVE/ENTER BACK EXIT 1. ASUS LCD Monitor PG Series 3-1 To select a highlighted item from one icon to enter the slide bar, and then use the Up or Down keys (depending on the indicators in the menu. 3.1 3.1.1 OSD (On-Screen Display) menu How to display the OSD menu...
... 5-way button to reconfigure Over Clocking ON Blue Light Filter Color Image Input Select System Setup Normal Mode DisplayPort 3440x1440@ 60Hz Racing Mode Aura Static ROG Swift PG349Q MOVE/ENTER BACK EXIT 1. ASUS LCD Monitor PG Series 3-1 To select a highlighted item from one icon to enter the slide bar, and then use the Up or Down keys (depending on the indicators in the menu. 3.1 3.1.1 OSD (On-Screen Display) menu How to display the OSD menu...
PG349Q Series User Guide
Page 18
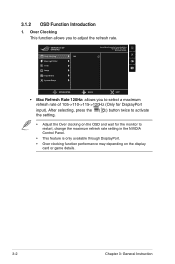
... Blue Light Filter Color Image Input Select System Setup Normal Mode DisplayPort 3440x1440@ 60Hz Racing Mode Aura Static ROG Swift PG349Q MOVE/ENTER BACK EXIT • Max Refresh Rate 120Hz: allows you to adjust the refresh rate. After selecting, press the ( ) button twice to restart, change the maximum refresh rate setting in the NVIDIA Control Panel. • This feature is only available through DisplayPort. • Over clocking function performance may depending on the display card...
... Blue Light Filter Color Image Input Select System Setup Normal Mode DisplayPort 3440x1440@ 60Hz Racing Mode Aura Static ROG Swift PG349Q MOVE/ENTER BACK EXIT • Max Refresh Rate 120Hz: allows you to adjust the refresh rate. After selecting, press the ( ) button twice to restart, change the maximum refresh rate setting in the NVIDIA Control Panel. • This feature is only available through DisplayPort. • Over clocking function performance may depending on the display card...
PG349Q Series User Guide
Page 19
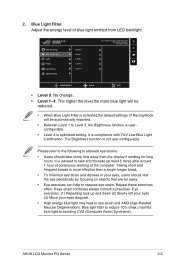
... your eyes, users should take short breaks (at the computer. ASUS LCD Monitor PG Series 3-3 Blue Light Filter Adjust the energy level of blue light emitted from the display if working at least 5 mins) after around 1 hour of Racing Mode will be automatically imported. • Between Level 1 to Level 3, the Brightness function is userconfigurable. • Level 4 is activated,the default settings of continuous working for long hours...
... your eyes, users should take short breaks (at the computer. ASUS LCD Monitor PG Series 3-3 Blue Light Filter Adjust the energy level of blue light emitted from the display if working at least 5 mins) after around 1 hour of Racing Mode will be automatically imported. • Between Level 1 to Level 3, the Brightness function is userconfigurable. • Level 4 is activated,the default settings of continuous working for long hours...

PG349Q Series User Guide
Page 20
Over Clocking Blue Light Filter Color Image Input Select System Setup Brightness Contrast Saturation Color Temp. Gamma Normal Mode DisplayPort 3440x1440@ 60Hz Racing Mode Aura Static ROG Swift PG349Q 80 50 50 MOVE/ENTER BACK EXIT • Brightness: The adjusting range is from 0 to 100. • Contrast: The adjusting range is from 0 to 100. • Saturation: The adjusting range is from 0 ~ 100. 3-4 Chapter 3: General Instruction the adjusting range is from this function. 3. Color Select the image color you like...
Over Clocking Blue Light Filter Color Image Input Select System Setup Brightness Contrast Saturation Color Temp. Gamma Normal Mode DisplayPort 3440x1440@ 60Hz Racing Mode Aura Static ROG Swift PG349Q 80 50 50 MOVE/ENTER BACK EXIT • Brightness: The adjusting range is from 0 to 100. • Contrast: The adjusting range is from 0 to 100. • Saturation: The adjusting range is from 0 ~ 100. 3-4 Chapter 3: General Instruction the adjusting range is from this function. 3. Color Select the image color you like...
PG349Q Series User Guide
Page 21
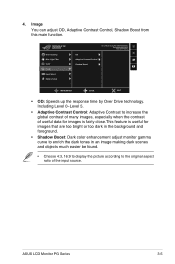
ASUS LCD Monitor PG Series 3-5 Image You can adjust OD, Adaptive Contrast Control, Shadow Boost from this main function. 4. Over Clocking Blue Light Filter Color Image Input Select System Setup Normal Mode DisplayPort 3440x1440@ 60Hz Racing Mode Aura Static ROG Swift PG349Q OD Adaptive Contrast Control Shadow Boost MOVE/ENTER BACK EXIT • OD: Speeds up the response time by Over Drive technology. Including Level 0~Level 5. • Adaptive Contrast Control: Adaptive Contrast to increase the global contrast of many images, especially...
ASUS LCD Monitor PG Series 3-5 Image You can adjust OD, Adaptive Contrast Control, Shadow Boost from this main function. 4. Over Clocking Blue Light Filter Color Image Input Select System Setup Normal Mode DisplayPort 3440x1440@ 60Hz Racing Mode Aura Static ROG Swift PG349Q OD Adaptive Contrast Control Shadow Boost MOVE/ENTER BACK EXIT • OD: Speeds up the response time by Over Drive technology. Including Level 0~Level 5. • Adaptive Contrast Control: Adaptive Contrast to increase the global contrast of many images, especially...
PG349Q Series User Guide
Page 22
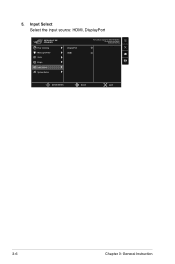
5. Input Select Select the input source: HDMI, DisplayPort Over Clocking Blue Light Filter Color Image Input Select System Setup DisplayPort HDMI Normal Mode DisplayPort 3440x1440@ 60Hz Racing Mode Aura Static ROG Swift PG349Q MOVE/ENTER BACK EXIT 3-6 Chapter 3: General Instruction
5. Input Select Select the input source: HDMI, DisplayPort Over Clocking Blue Light Filter Color Image Input Select System Setup DisplayPort HDMI Normal Mode DisplayPort 3440x1440@ 60Hz Racing Mode Aura Static ROG Swift PG349Q MOVE/ENTER BACK EXIT 3-6 Chapter 3: General Instruction

PG349Q Series User Guide
Page 23
... Over Clocking Blue Light Filter Color Image Input Select System Setup Language LIGHT IN MOTION Aura Sync Aura RGB OSD Position Transparency Normal Mode DisplayPort 3440x1440@ 60Hz Racing Mode Aura Static ROG Swift PG349Q OK MOVE/ENTER BACK EXIT Over Clocking Blue Light Filter Color Image Input Select System Setup OSD Timeout Key Lock Information Sound All Reset DisplayPort Deep Sleep Normal Mode DisplayPort 3440x1440@ 60Hz Racing Mode Aura Static ROG Swift PG349Q MOVE/ENTER BACK EXIT • Language: Select OSD language. ASUS LCD Monitor PG Series 3-7 System Setup Adjusts the...
... Over Clocking Blue Light Filter Color Image Input Select System Setup Language LIGHT IN MOTION Aura Sync Aura RGB OSD Position Transparency Normal Mode DisplayPort 3440x1440@ 60Hz Racing Mode Aura Static ROG Swift PG349Q OK MOVE/ENTER BACK EXIT Over Clocking Blue Light Filter Color Image Input Select System Setup OSD Timeout Key Lock Information Sound All Reset DisplayPort Deep Sleep Normal Mode DisplayPort 3440x1440@ 60Hz Racing Mode Aura Static ROG Swift PG349Q MOVE/ENTER BACK EXIT • Language: Select OSD language. ASUS LCD Monitor PG Series 3-7 System Setup Adjusts the...

PG349Q Series User Guide
Page 24
• OSD Position: Adjusts OSD Position。 • Transparency: Adjusts OSD Transparency。 • OSD Timeout:Adjusts OSD Timeout。 • Key Lock: Disable all settings to the factory default mode. • DisplayPort Deep Sleep: Select DisplayPort Deep Sleep. • HDMI Deep Sleep: Select HDMI Deep Sleep. 3-8 Chapter 3: General Instruction Pressing the down button for more than five seconds to disable key lock function. • Information:Displays the monitor information. • Sound: Selects "Volume" to revert all key functions. Selects...
• OSD Position: Adjusts OSD Position。 • Transparency: Adjusts OSD Transparency。 • OSD Timeout:Adjusts OSD Timeout。 • Key Lock: Disable all settings to the factory default mode. • DisplayPort Deep Sleep: Select DisplayPort Deep Sleep. • HDMI Deep Sleep: Select HDMI Deep Sleep. 3-8 Chapter 3: General Instruction Pressing the down button for more than five seconds to disable key lock function. • Information:Displays the monitor information. • Sound: Selects "Volume" to revert all key functions. Selects...
PG349Q Series User Guide
Page 25
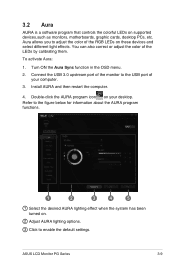
... color of the RGB LEDs on . 2 Adjust AURA lighting options. 3 Click to the USB port of the LEDs by calibrating them. To activate Aura: 1. Connect the USB 3.0 upstream port of the monitor to enable the default settings. ASUS LCD Monitor PG Series 3-9 Install AURA and then restart the computer. 4. Double-click the AURA program icon on supported devices,such as monitors, motherboards, graphic cards, desktop PCs, etc. 3.2 Aura AURA is a software program that controls the colorful LEDs...
... color of the RGB LEDs on . 2 Adjust AURA lighting options. 3 Click to the USB port of the LEDs by calibrating them. To activate Aura: 1. Connect the USB 3.0 upstream port of the monitor to enable the default settings. ASUS LCD Monitor PG Series 3-9 Install AURA and then restart the computer. 4. Double-click the AURA program icon on supported devices,such as monitors, motherboards, graphic cards, desktop PCs, etc. 3.2 Aura AURA is a software program that controls the colorful LEDs...

PG349Q Series User Guide
Page 27
... audio/ USB/ Card reader connection) Black < 0.5W < 0.5W -5° ~ +20° 815.85 x 560.22x 307.35 mm 815.85 x 560.22x128.55 mm 956 x 577 x 293 mm 9.9 kg 15 kg AC 100~240V(Built-in) ASUS LCD Monitor PG Series 3-11 Resolution Brightness (Typ.) Intrinsic Contrast Ratio (Typ.) Viewing Angle (CR>10) Display Colors Response Time Sound from HDMI HDMI input DisplayPort input USB3.0 Port Earphone Power ON Consumption Chassis Colors Power saving mode Power off mode Tilt...
... audio/ USB/ Card reader connection) Black < 0.5W < 0.5W -5° ~ +20° 815.85 x 560.22x 307.35 mm 815.85 x 560.22x128.55 mm 956 x 577 x 293 mm 9.9 kg 15 kg AC 100~240V(Built-in) ASUS LCD Monitor PG Series 3-11 Resolution Brightness (Typ.) Intrinsic Contrast Ratio (Typ.) Viewing Angle (CR>10) Display Colors Response Time Sound from HDMI HDMI input DisplayPort input USB3.0 Port Earphone Power ON Consumption Chassis Colors Power saving mode Power off mode Tilt...

PG349Q Series User Guide
Page 28
... properly installed and activated. • Check the audio source. No sound or sound is low • Adjust the volume settings of the pins are in the there is no screen image ON mode. • Make sure the signal cable is properly connected the monitor and the computer. • Inspect the signal cable and make sure that may cause electrical interference. Screen image has color defects (white does not look white) • Inspect the signal cable and make sure...
... properly installed and activated. • Check the audio source. No sound or sound is low • Adjust the volume settings of the pins are in the there is no screen image ON mode. • Make sure the signal cable is properly connected the monitor and the computer. • Inspect the signal cable and make sure that may cause electrical interference. Screen image has color defects (white does not look white) • Inspect the signal cable and make sure...


