User Manual
Page 5
... the support DVD 4-1 4.2.2 Obtaining the software manuals 4-2 4.3 Software information 4-3 4.3.1 AI Suite II 4-3 4.3.2 TurboV EVO 4-4 4.3.3 DIGI+ Power Control 4-8 4.3.4 EPU 4-10 4.3.5 FAN Xpert 4-11 4.3.6 Probe II 4-12 4.3.7 Sensor Recorder 4-13 4.3.8 USB 3.0 Boost 4-14 4.3.9 ASUS SSD Caching 4-15 4.3.10 ASUS Update 4-16 4.3.11 MyLogo2 4-17 4.3.12 Audio configurations 4-19 4.4 RAID configurations 4-20 4.4.1 RAID definitions 4-20 4.4.2 Installing Serial ATA hard disks 4-21 4.4.3 Setting the RAID item in BIOS 4-21 4.4.4 Intel® Rapid Storage Technology Option ROM utility...
... the support DVD 4-1 4.2.2 Obtaining the software manuals 4-2 4.3 Software information 4-3 4.3.1 AI Suite II 4-3 4.3.2 TurboV EVO 4-4 4.3.3 DIGI+ Power Control 4-8 4.3.4 EPU 4-10 4.3.5 FAN Xpert 4-11 4.3.6 Probe II 4-12 4.3.7 Sensor Recorder 4-13 4.3.8 USB 3.0 Boost 4-14 4.3.9 ASUS SSD Caching 4-15 4.3.10 ASUS Update 4-16 4.3.11 MyLogo2 4-17 4.3.12 Audio configurations 4-19 4.4 RAID configurations 4-20 4.4.1 RAID definitions 4-20 4.4.2 Installing Serial ATA hard disks 4-21 4.4.3 Setting the RAID item in BIOS 4-21 4.4.4 Intel® Rapid Storage Technology Option ROM utility...
User Manual
Page 14
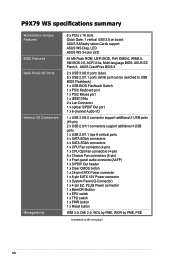
...PCIe x 16 slots Quick Gate: 1 vertical USB 2.0 on the next page) xiv P9X79 WS specifications summary Workstation Unique Features BIOS Features Back Panel I/O Ports Internal I /O 1 x USB 3.0/2.0 connector support additional 2 USB ports (19-pin) 2 x USB 2.0/1/1 connectors support additional 4 USB ports 1 x USB 2.0/1.1 trpe A vertical ports 4 x SATA 6Gb/s connectors 4 x SATA 3Gb/s connectors 1 x CPU Fan connector (4-pin) 1 x CPU Opt Fan connectors (4-pin) 4 x Chassis Fan connectors (4-pin) 1 x Front panel audio connector(AAFP) 1 x S/PDIF Out header 1 x Clear CMOS button 1 x 24-pin EATX Power...
...PCIe x 16 slots Quick Gate: 1 vertical USB 2.0 on the next page) xiv P9X79 WS specifications summary Workstation Unique Features BIOS Features Back Panel I/O Ports Internal I /O 1 x USB 3.0/2.0 connector support additional 2 USB ports (19-pin) 2 x USB 2.0/1/1 connectors support additional 4 USB ports 1 x USB 2.0/1.1 trpe A vertical ports 4 x SATA 6Gb/s connectors 4 x SATA 3Gb/s connectors 1 x CPU Fan connector (4-pin) 1 x CPU Opt Fan connectors (4-pin) 4 x Chassis Fan connectors (4-pin) 1 x Front panel audio connector(AAFP) 1 x S/PDIF Out header 1 x Clear CMOS button 1 x 24-pin EATX Power...
User Manual
Page 22
.... LED checks key components (CPU, memory, graphics card and hard drive) in class power efficiency and stability Two critical components work perfectly together to CPU voltage control. Best in sequence during bootup. This stops important data storage devices from the CPU, with specific CPU and DRAM power controls, including new VCCSA load line calibration for both CPU and DRAM ASUS X79 motherboards include New DIGI+ Power Control with accurate input through UEFI BIOS tuning or the exclusive ASUS interface. If an error...
.... LED checks key components (CPU, memory, graphics card and hard drive) in class power efficiency and stability Two critical components work perfectly together to CPU voltage control. Best in sequence during bootup. This stops important data storage devices from the CPU, with specific CPU and DRAM power controls, including new VCCSA load line calibration for both CPU and DRAM ASUS X79 motherboards include New DIGI+ Power Control with accurate input through UEFI BIOS tuning or the exclusive ASUS interface. If an error...

User Manual
Page 25
... designed ASUS Q-Shield does without using a bootable floppy disk or an OS-based utility. Users can choose system performance settings and drag and drop boot priorities. ASUS UEFI BIOS ASUS UEFI BIOS offers the first mouse-controlled graphical BIOS designed with difficult POST situations. ASUS EZ-Flash 2 ASUS EZ Flash 2 is a user-friendly utility that goes beyond traditional keyboard-only controls. ASUS DRAM SPD (Serial Presence Detect) Information for accessing memory info, detecting faulty DIMMs and helping with selectable modes, providing a user-friendly...
... designed ASUS Q-Shield does without using a bootable floppy disk or an OS-based utility. Users can choose system performance settings and drag and drop boot priorities. ASUS UEFI BIOS ASUS UEFI BIOS offers the first mouse-controlled graphical BIOS designed with difficult POST situations. ASUS EZ-Flash 2 ASUS EZ Flash 2 is a user-friendly utility that goes beyond traditional keyboard-only controls. ASUS DRAM SPD (Serial Presence Detect) Information for accessing memory info, detecting faulty DIMMs and helping with selectable modes, providing a user-friendly...
User Manual
Page 39
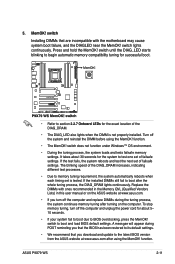
....asus.com. • If you download and update to BIOS overclocking, press the MemOK! switch Installing DIMMs that the BIOS has been restored to test one set is not properly installed. Turn off the computer and replace DIMMs during POST reminding you that are incompatible with ones recommended in the Memory QVL (Qualified Vendors Lists) in this user manual or on the computer. switch to boot after turning on the ASUS...
....asus.com. • If you download and update to BIOS overclocking, press the MemOK! switch Installing DIMMs that the BIOS has been restored to test one set is not properly installed. Turn off the computer and replace DIMMs during POST reminding you that are incompatible with ones recommended in the Memory QVL (Qualified Vendors Lists) in this user manual or on the computer. switch to boot after turning on the ASUS...
User Manual
Page 47
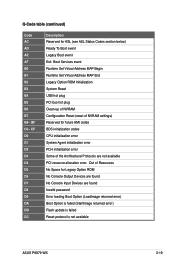
... Runtime Set Virtual Address MAP End Legacy Option ROM Initialization System Reset USB hot plug PCI bus hot plug Clean-up of NVRAM Configuration Reset (reset of NVRAM settings) Reserved for future AMI codes BDS initialization codes CPU initialization error System Agent initialization error PCH initialization error Some of Resources No Space for Legacy Option ROM No Console Output Devices are found Invalid password Error loading Boot Option (LoadImage returned error) Boot Option is failed (StartImage returned error) Flash update is failed Reset protocol is not available ASUS P9X79 WS...
... Runtime Set Virtual Address MAP End Legacy Option ROM Initialization System Reset USB hot plug PCI bus hot plug Clean-up of NVRAM Configuration Reset (reset of NVRAM settings) Reserved for future AMI codes BDS initialization codes CPU initialization error System Agent initialization error PCH initialization error Some of Resources No Space for Legacy Option ROM No Console Output Devices are found Invalid password Error loading Boot Option (LoadImage returned error) Boot Option is failed (StartImage returned error) Flash update is failed Reset protocol is not available ASUS P9X79 WS...

User Manual
Page 50
Chassis Fan control setting (3-pin CHAFAN_SEL) These jumpers allow you installed will always run at full speed. 2-22 Chapter 2: Hardware information The CHAFAN_SEL jumper is for fan pin selection. 2. Set to pins 1-2 when using 3-pin fans or pins 2-3 when using 4-pin fans. ® • If you use a 4-pin fan but set the jumper to pin 1-2, the fan you installed may not work. • If you use a 3-pin fan but set the jumper for a 4-pin fan, the fan control will not work and the fan you to switch for the front fans and rear fans control.
Chassis Fan control setting (3-pin CHAFAN_SEL) These jumpers allow you installed will always run at full speed. 2-22 Chapter 2: Hardware information The CHAFAN_SEL jumper is for fan pin selection. 2. Set to pins 1-2 when using 3-pin fans or pins 2-3 when using 4-pin fans. ® • If you use a 4-pin fan but set the jumper to pin 1-2, the fan you installed may not work. • If you use a 3-pin fan but set the jumper for a 4-pin fan, the fan control will not work and the fan you to switch for the front fans and rear fans control.
User Manual
Page 53
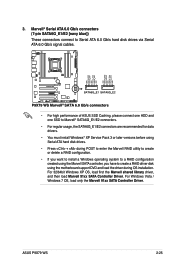
...; For regular usage, the SATA6G_E1/E2 connectors are recommended for data drivers. • You must install Windows® XP Service Pack 3 or later versions before using Serial ATA hard disk drives. • Press + during POST to enter the Marvell RAID utility to create or delete a RAID configuration. • If you want to install a Windows operating system to a RAID configuration created using the Marvell SATA controller, you have to create a RAID driver disk using the motherboard support DVD and load the driver during OS installation.
...; For regular usage, the SATA6G_E1/E2 connectors are recommended for data drivers. • You must install Windows® XP Service Pack 3 or later versions before using Serial ATA hard disk drives. • Press + during POST to enter the Marvell RAID utility to create or delete a RAID configuration. • If you want to install a Windows operating system to a RAID configuration created using the Marvell SATA controller, you have to create a RAID driver disk using the motherboard support DVD and load the driver during OS installation.
User Manual
Page 81
... boot after changing any BIOS setting, try to clear the CMOS and reset the motherboard to the default value. �S�e�e��s�e��c�ti�o�n� 2.2.8 Jumpers for information on the system chassis to erase the RTC RAM. • The BIOS setup program does not support the bluetooth devices. The BIOS setup program can change modes from the Exit menu or from the available options using a keyboard or a USB...
... boot after changing any BIOS setting, try to clear the CMOS and reset the motherboard to the default value. �S�e�e��s�e��c�ti�o�n� 2.2.8 Jumpers for information on the system chassis to erase the RTC RAM. • The BIOS setup program does not support the bluetooth devices. The BIOS setup program can change modes from the Exit menu or from the available options using a keyboard or a USB...
User Manual
Page 113
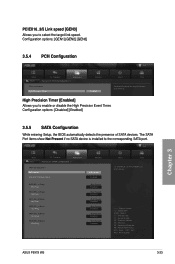
... Disabled Boot Tool (1) IDE Mode. (2) AHCI Mode. (3) RAID Mode. →←: Select Screen ↑↓: Select Item Enter: Select +/-: Change Opt. Configuration options: [GEN1] [GEN2] [GEN3] 3.5.4 PCH Configuration UEFI BIOS Utility - F1: General Help F2: Previous Values F3: Shortcut F5: Optimized Defaults F6: ASUS Ratio Boost F10: Save ESC: Exit F12: Print Screen Chapter 3 ASUS P9X79 WS 3-33 The SATA Port items show Not Present if no SATA device is installed to select the target link speed. Advanced Mode Exit Main...
... Disabled Boot Tool (1) IDE Mode. (2) AHCI Mode. (3) RAID Mode. →←: Select Screen ↑↓: Select Item Enter: Select +/-: Change Opt. Configuration options: [GEN1] [GEN2] [GEN3] 3.5.4 PCH Configuration UEFI BIOS Utility - F1: General Help F2: Previous Values F3: Shortcut F5: Optimized Defaults F6: ASUS Ratio Boost F10: Save ESC: Exit F12: Print Screen Chapter 3 ASUS P9X79 WS 3-33 The SATA Port items show Not Present if no SATA device is installed to select the target link speed. Advanced Mode Exit Main...

User Manual
Page 118
Configuration options: [Disabled] [Enabled] Asmedia USB 3.0 Controller [Enabled] This item allows user to enable/disable VIA 1394 Controller. Change Settings [IO=3F8h; Chapter 3 3-38 Chapter 3: BIOS setup Configuration options: [Disabled] [Enabled] VIA 1394 Controller [Enabled] This item allows user to enable/disable Asmedia USB 3.0. Configuration options: [Disabled] [Enabled] Serial Port Configuration Serial Port [Enabled] This item allows user to enable/disable Marvell Storage OPROM. IRQ=4 Select an optimal setting for Super IO device. Intel LAN2 PXE OPROM [Disabled] This ...
Configuration options: [Disabled] [Enabled] Asmedia USB 3.0 Controller [Enabled] This item allows user to enable/disable VIA 1394 Controller. Change Settings [IO=3F8h; Chapter 3 3-38 Chapter 3: BIOS setup Configuration options: [Disabled] [Enabled] VIA 1394 Controller [Enabled] This item allows user to enable/disable Asmedia USB 3.0. Configuration options: [Disabled] [Enabled] Serial Port Configuration Serial Port [Enabled] This item allows user to enable/disable Marvell Storage OPROM. IRQ=4 Select an optimal setting for Super IO device. Intel LAN2 PXE OPROM [Disabled] This ...
User Manual
Page 127
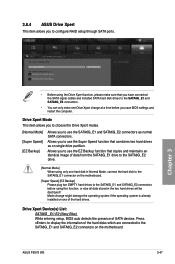
... entering setup, BIOS auto detects the presence of the hard disks which are connected to the SATA6G_E1 and SATA6G_E2 connectors. • You can only make sure that combines two hard drives as normal SATA connectors. Press to display the information of SATA devices. Chapter 3 ASUS P9X79 WS 3-47 Drive Xpert Mode This item allows you to choose the Drive Xpert modes. [Normal Mode] [Super Speed] [EZ Backup] Allows you to configure RAID setup through SATA ports. UEFI BIOS Utility - Mode change at a time before using...
... entering setup, BIOS auto detects the presence of the hard disks which are connected to the SATA6G_E1 and SATA6G_E2 connectors. • You can only make sure that combines two hard drives as normal SATA connectors. Press to display the information of SATA devices. Chapter 3 ASUS P9X79 WS 3-47 Drive Xpert Mode This item allows you to choose the Drive Xpert modes. [Normal Mode] [Super Speed] [EZ Backup] Allows you to configure RAID setup through SATA ports. UEFI BIOS Utility - Mode change at a time before using...
User Manual
Page 129
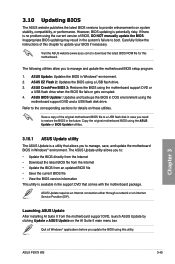
... manually update the BIOS. 3.10 Updating BIOS The ASUS website publishes the latest BIOS versions to provide enhancements on the AI Suite II main menu bar. The following utilities allow you to: • Update the BIOS directly from the Internet • Download the latest BIOS file from the Internet • Update the BIOS from the motherboard support DVD, launch ASUS Update by clicking Update > ASUS Update on system stability, compatibility, or performance. The ASUS Update utility allows you to boot. Chapter 3 ASUS P9X79 WS...
... manually update the BIOS. 3.10 Updating BIOS The ASUS website publishes the latest BIOS versions to provide enhancements on the AI Suite II main menu bar. The following utilities allow you to: • Update the BIOS directly from the Internet • Download the latest BIOS file from the Internet • Update the BIOS from the motherboard support DVD, launch ASUS Update by clicking Update > ASUS Update on system stability, compatibility, or performance. The ASUS Update utility allows you to boot. Chapter 3 ASUS P9X79 WS...

User Manual
Page 133
... recover the BIOS: 1. When found, the utility reads the BIOS file and enters ASUS EZ Flash 2 utility automatically. 4. Doing so can restore a corrupted BIOS file using the motherboard support DVD or a USB flash drive that contains the BIOS file. If you to enter BIOS Setup to recover BIOS setting. Ensure to load the BIOS default settings to the USB port. 3. You can cause system boot failure! Turn on the ASUS official website. The system requires you want to use the newer BIOS file, download the file at support.asus.com and...
... recover the BIOS: 1. When found, the utility reads the BIOS file and enters ASUS EZ Flash 2 utility automatically. 4. Doing so can restore a corrupted BIOS file using the motherboard support DVD or a USB flash drive that contains the BIOS file. If you to enter BIOS Setup to recover BIOS setting. Ensure to load the BIOS default settings to the USB port. 3. You can cause system boot failure! Turn on the ASUS official website. The system requires you want to use the newer BIOS file, download the file at support.asus.com and...
User Manual
Page 134
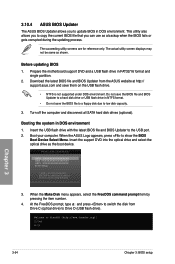
... to boot using defaults 3. C:\>d: D:\> Chapter 3 3-54 Chapter 3: BIOS setup Before updating BIOS 1. Please select boot device: SATA: XXXXXXXXXXXXXXXX USB XXXXXXXXXXXXXXXXX UEFI: XXXXXXXXXXXXXXXX Enter Setup ↑ and ↓ to move selection ENTER to select boot device ESC to show the BIOS Boot Device Select Menu. At the FreeDOS prompt, type d: and press to switch the disk from the ASUS website at http:// support.asus.com and save the BIOS file to a floppy disk due to a hard disk drive or USB flash drive in DOS environment. The actual utility screen displays may...
... to boot using defaults 3. C:\>d: D:\> Chapter 3 3-54 Chapter 3: BIOS setup Before updating BIOS 1. Please select boot device: SATA: XXXXXXXXXXXXXXXX USB XXXXXXXXXXXXXXXXX UEFI: XXXXXXXXXXXXXXXX Enter Setup ↑ and ↓ to move selection ENTER to select boot device ESC to show the BIOS Boot Device Select Menu. At the FreeDOS prompt, type d: and press to switch the disk from the ASUS website at http:// support.asus.com and save the BIOS file to a floppy disk due to a hard disk drive or USB flash drive in DOS environment. The actual utility screen displays may...
User Manual
Page 137
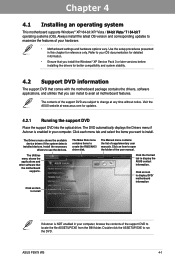
... Contact tab to use the devices. ASUS P9X79 WS 4-1 Click each menu tab and select the items you install the Windows® XP Service Pack 3 or later versions before installing the drivers for better compatibility and system stability. 4.2 Support DVD information The support DVD that comes with the motherboard package contains the drivers, software applications, and utilities that the motherboard supports. Refer to your computer, browse the contents of supplementary user manuals. Double-click the...
... Contact tab to use the devices. ASUS P9X79 WS 4-1 Click each menu tab and select the items you install the Windows® XP Service Pack 3 or later versions before installing the drivers for better compatibility and system stability. 4.2 Support DVD information The support DVD that comes with the motherboard package contains the drivers, software applications, and utilities that the motherboard supports. Refer to your computer, browse the contents of supplementary user manuals. Double-click the...

User Manual
Page 157
4.4.2 Installing Serial ATA hard disks The motherboard supports Serial ATA hard disk drives. During POST, press + to [RAID Mode]. 4. v10.0.0.1032 Copyright(C) 2003-10 Intel Corporation. Create RAID Volume 3. Connect the SATA signal cables. 3. Connect a SATA power cable to RAID mode, all SATA ports run at RAID mode together. 4.4.4 Intel® Rapid Storage Technology Option ROM utility To enter the Intel® Rapid Storage Technology Option ROM utility: 1. Intel(R) Rapid Storage Technology - All Rights Reserved. [ MAIN MENU ] 1. Recovery Volume Options 5. ...
4.4.2 Installing Serial ATA hard disks The motherboard supports Serial ATA hard disk drives. During POST, press + to [RAID Mode]. 4. v10.0.0.1032 Copyright(C) 2003-10 Intel Corporation. Create RAID Volume 3. Connect the SATA signal cables. 3. Connect a SATA power cable to RAID mode, all SATA ports run at RAID mode together. 4.4.4 Intel® Rapid Storage Technology Option ROM utility To enter the Intel® Rapid Storage Technology Option ROM utility: 1. Intel(R) Rapid Storage Technology - All Rights Reserved. [ MAIN MENU ] 1. Recovery Volume Options 5. ...

User Manual
Page 161
... the hard drives to the drive status. Chapter 4 ASUS P9X79 WS 4-25 An asterisk (*) appears in the RAID array. Topology HBA 0: Marvell 0 ├ Virtual Disks └ Free Physical Disks ├ PD 0: ST3160812AS └ PD 8: ST3160812AS Information Vendor ID : 1B4B Device ID : 9130 Revision ID : B1 BIOS Version : 1.0.0.1028 Firmware Version: 2.2.0.1105 PCIe Speed Rate : 5.0Gbps Configure SATA as: AHCI Mode ▶ ▶ Help Marvell RAID on the hard disk drives will be used in your motherboard user manual for the RAID...
... the hard drives to the drive status. Chapter 4 ASUS P9X79 WS 4-25 An asterisk (*) appears in the RAID array. Topology HBA 0: Marvell 0 ├ Virtual Disks └ Free Physical Disks ├ PD 0: ST3160812AS └ PD 8: ST3160812AS Information Vendor ID : 1B4B Device ID : 9130 Revision ID : B1 BIOS Version : 1.0.0.1028 Firmware Version: 2.2.0.1105 PCIe Speed Rate : 5.0Gbps Configure SATA as: AHCI Mode ▶ ▶ Help Marvell RAID on the hard disk drives will be used in your motherboard user manual for the RAID...
User Manual
Page 165
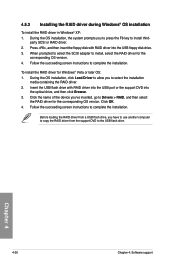
...boot device. 4. Write-protect the floppy disk to complete the process. Boot your computer. 7. Set the optical drive as the destination disk. 6. Insert the support DVD into the optical drive. 5. Restart your computer. 2. Follow the succeeding screen instructions to section 4.5.4 Using a USB floppy disk drive. 4.5.1 Creating a RAID driver disk without entering the OS To create a RAID driver disk without entering the OS: 1. Chapter 4 ASUS P9X79 WS 4-29 Go to the Make Disk menu, and then click Intel AHCI/RAID Disk to create a RAID driver disk. 8. Plug the USB floppy disk drive...
...boot device. 4. Write-protect the floppy disk to complete the process. Boot your computer. 7. Set the optical drive as the destination disk. 6. Insert the support DVD into the optical drive. 5. Restart your computer. 2. Follow the succeeding screen instructions to section 4.5.4 Using a USB floppy disk drive. 4.5.1 Creating a RAID driver disk without entering the OS To create a RAID driver disk without entering the OS: 1. Chapter 4 ASUS P9X79 WS 4-29 Go to the Make Disk menu, and then click Intel AHCI/RAID Disk to create a RAID driver disk. 8. Plug the USB floppy disk drive...
User Manual
Page 166
... the USB flash drive with RAID driver into the optical drive, and then click Browse. 3. Click the name of the device you to press the F6 key to install third- Press , and then insert the floppy disk with RAID driver into the USB port or the support DVD into the USB floppy disk drive. 3. Click OK. 4. During the OS installation, the system prompts you 've inserted, go to the USB flash drive. Chapter 4 4-30 Chapter 4: Software support
... the USB flash drive with RAID driver into the optical drive, and then click Browse. 3. Click the name of the device you to press the F6 key to install third- Press , and then insert the floppy disk with RAID driver into the USB port or the support DVD into the USB floppy disk drive. 3. Click OK. 4. During the OS installation, the system prompts you 've inserted, go to the USB flash drive. Chapter 4 4-30 Chapter 4: Software support


