User Manual
Page 5
...4.3.6 Probe II 4-12 4.3.7 Sensor Recorder 4-13 4.3.8 USB 3.0 Boost 4-14 4.3.9 ASUS SSD Caching 4-15 4.3.10 ASUS Update 4-16 4.3.11 MyLogo2 4-17 4.3.12 Audio configurations 4-19 4.4 RAID configurations ...4-20 4.4.1 RAID definitions 4-20 4.4.2 Installing Serial ATA hard disks 4-21 4.4.3 Setting the RAID item in BIOS 4-21 4.4.4 Intel® Rapid Storage Technology Option ROM utility..... 4-21 4.4.5 Marvell RAID utility 4-25 4.5 Creating a RAID driver disk 4-29 4.5.1 Creating a RAID driver...
...4.3.6 Probe II 4-12 4.3.7 Sensor Recorder 4-13 4.3.8 USB 3.0 Boost 4-14 4.3.9 ASUS SSD Caching 4-15 4.3.10 ASUS Update 4-16 4.3.11 MyLogo2 4-17 4.3.12 Audio configurations 4-19 4.4 RAID configurations ...4-20 4.4.1 RAID definitions 4-20 4.4.2 Installing Serial ATA hard disks 4-21 4.4.3 Setting the RAID item in BIOS 4-21 4.4.4 Intel® Rapid Storage Technology Option ROM utility..... 4-21 4.4.5 Marvell RAID utility 4-25 4.5 Creating a RAID driver disk 4-29 4.5.1 Creating a RAID driver...

User Manual
Page 6
...174; CrossFireX™ technology 5-1 5.1.1 Requirements 5-1 5.1.2 Before you begin 5-1 5.1.3 Installing CrossFireX graphics cards 5-2 5.1.4 Installing the device drivers 5-3 5.1.5 Enabling the ATI® CrossFireX™ technology 5-3 5.2 NVIDIA® SLI™ technology 5-5 5.2.1 Requirements 5-5 5.2.2 ... Installing three SLI-ready graphics cards 5-7 5.2.4 Installing four SLI-ready graphics cards 5-8 5.2.5 Installing the device drivers 5-9 5.2.6 Enabling the NVIDIA® SLI™ technology 5-9 5.3 NVIDIA® CUDA™ technology 5-12 5.3.1 Requirements 5-12 5.3.2 Installing...
...174; CrossFireX™ technology 5-1 5.1.1 Requirements 5-1 5.1.2 Before you begin 5-1 5.1.3 Installing CrossFireX graphics cards 5-2 5.1.4 Installing the device drivers 5-3 5.1.5 Enabling the ATI® CrossFireX™ technology 5-3 5.2 NVIDIA® SLI™ technology 5-5 5.2.1 Requirements 5-5 5.2.2 ... Installing three SLI-ready graphics cards 5-7 5.2.4 Installing four SLI-ready graphics cards 5-8 5.2.5 Installing the device drivers 5-9 5.2.6 Enabling the NVIDIA® SLI™ technology 5-9 5.3 NVIDIA® CUDA™ technology 5-12 5.3.1 Requirements 5-12 5.3.2 Installing...
User Manual
Page 15
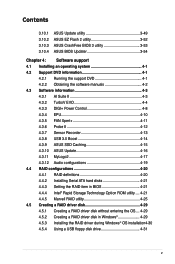
xv Accessories 4 x Serial ATA 6Gb/s cables 4 x Serial ATA 3Gb/s cables 1 x ASUS 4-Way SLI bridge connector 1 x ASUS 3-Way SLI bridge connector 1 x ASUS SLI bridge connector 2 in 1 Q-connector I/O shield User's Manual Support DVD Form Factor Drivers ASUS Utilities ASUS Update Anti-virus software (OEM version) CEB Form Factor, 12"x 10.5" *Specifications are subject to change without notice.
xv Accessories 4 x Serial ATA 6Gb/s cables 4 x Serial ATA 3Gb/s cables 1 x ASUS 4-Way SLI bridge connector 1 x ASUS 3-Way SLI bridge connector 1 x ASUS SLI bridge connector 2 in 1 Q-connector I/O shield User's Manual Support DVD Form Factor Drivers ASUS Utilities ASUS Update Anti-virus software (OEM version) CEB Form Factor, 12"x 10.5" *Specifications are subject to change without notice.
User Manual
Page 21
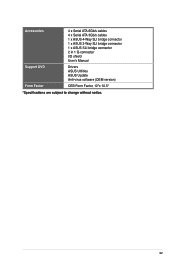
... the most powerful Intel® X79 platform to understand color coding. ASUS P9X79 WS 1-3 It's ideal for professional use in dual Intel® Gigabit LAN that features lower CPU utilization, less package drop rate, wide driver supported. Quad-GPU CrossFireX Support! Intel lan also support teaming and ... gaming style you the multi-GPU choice of Intel lan can easily run even the most demanding PC games in multiple GPU configurations. P9X79 WS brings you 've never experienced before! Extra SATA 6.0 Gb/s Support The Intel® X79 Express Chipset natively supports the next-generation...
... the most powerful Intel® X79 platform to understand color coding. ASUS P9X79 WS 1-3 It's ideal for professional use in dual Intel® Gigabit LAN that features lower CPU utilization, less package drop rate, wide driver supported. Quad-GPU CrossFireX Support! Intel lan also support teaming and ... gaming style you the multi-GPU choice of Intel lan can easily run even the most demanding PC games in multiple GPU configurations. P9X79 WS brings you 've never experienced before! Extra SATA 6.0 Gb/s Support The Intel® X79 Express Chipset natively supports the next-generation...
User Manual
Page 45
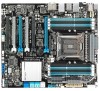
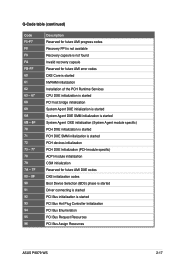
... (PCH module specific) ACPI module initialization CSM initialization Reserved for future AMI DXE codes DXE initialization codes Boot Device Selection (BDS) phase is started Driver connecting is started PCI Bus initialization is started PCI Bus Hot Plug Controller Initialization PCI Bus Enumeration PCI Bus Request Resources PCI Bus Assign Resources ASUS P9X79 WS 2-17
... (PCH module specific) ACPI module initialization CSM initialization Reserved for future AMI DXE codes DXE initialization codes Boot Device Selection (BDS) phase is started Driver connecting is started PCI Bus initialization is started PCI Bus Hot Plug Controller Initialization PCI Bus Enumeration PCI Bus Request Resources PCI Bus Assign Resources ASUS P9X79 WS 2-17

User Manual
Page 51
Refer to section 3.5.4 SATA Configuration for details. • You must load IRST Driver during OS installation for details. • Before creating a RAID set the SATA Mode item in the BIOS to section 4.4 RAID configurations or the manual bundled ... drives. Refer to section 3.5.4 SATA Configuration for the system to detect the Optical Disk Drive (the ODD should be connected to [IDE Mode] by default. ASUS P9X79 WS 2-23 2.2.9 Internal connectors 1. The Serial ATA RAID feature is available only if you intend to create a Serial ATA RAID set to the SATA_3G port), or...
Refer to section 3.5.4 SATA Configuration for details. • You must load IRST Driver during OS installation for details. • Before creating a RAID set the SATA Mode item in the BIOS to section 4.4 RAID configurations or the manual bundled ... drives. Refer to section 3.5.4 SATA Configuration for the system to detect the Optical Disk Drive (the ODD should be connected to [IDE Mode] by default. ASUS P9X79 WS 2-23 2.2.9 Internal connectors 1. The Serial ATA RAID feature is available only if you intend to create a Serial ATA RAID set to the SATA_3G port), or...
User Manual
Page 53
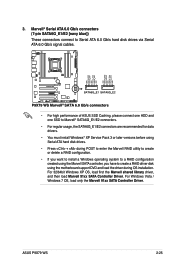
...Marvell 91xx SATA Controller Driver. 3. ASUS P9X79 WS 2-25 Marvell® Serial ATA 6.0 Gb/s connectors (7-pin SATA6G_E1/E2 [navy blue]) These connectors connect to Serial ATA 6.0 Gb/s hard disk drives via Serial ATA 6.0 Gb/s signal cables. ® • For high performance of ASUS SSD Caching, please connect... one HDD and one SSD to Marvell® SATA6G_E1/E2 connectors. • For regular usage, the SATA6G_E1/E2 connectors are recommended for data drivers. • You must install Windows® XP Service...
...Marvell 91xx SATA Controller Driver. 3. ASUS P9X79 WS 2-25 Marvell® Serial ATA 6.0 Gb/s connectors (7-pin SATA6G_E1/E2 [navy blue]) These connectors connect to Serial ATA 6.0 Gb/s hard disk drives via Serial ATA 6.0 Gb/s signal cables. ® • For high performance of ASUS SSD Caching, please connect... one HDD and one SSD to Marvell® SATA6G_E1/E2 connectors. • For regular usage, the SATA6G_E1/E2 connectors are recommended for data drivers. • You must install Windows® XP Service...
User Manual
Page 74
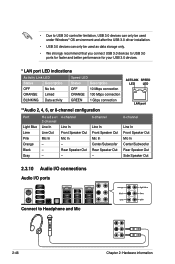
• Due to USB 3.0 controller limitation, USB 3.0 devices can only be used under Windows® OS environment and after the USB 3.0 driver installation. • USB 3.0 devices can only be used as data storage only. • We strongly recommend that you connect USB 3.0 devices to Headphone and Mic 2-...
• Due to USB 3.0 controller limitation, USB 3.0 devices can only be used under Windows® OS environment and after the USB 3.0 driver installation. • USB 3.0 devices can only be used as data storage only. • We strongly recommend that you connect USB 3.0 devices to Headphone and Mic 2-...

User Manual
Page 114
... configurations for SATA are disallowed under this feature allows the hard disk to internally optimize the order of commands. The AHCI allows the onboard storage driver to enable advanced Serial ATA features that increases storage performance on random workloads by allowing the drive to report warning messages during the POST. When...
... configurations for SATA are disallowed under this feature allows the hard disk to internally optimize the order of commands. The AHCI allows the onboard storage driver to enable advanced Serial ATA features that increases storage performance on random workloads by allowing the drive to report warning messages during the POST. When...
User Manual
Page 137
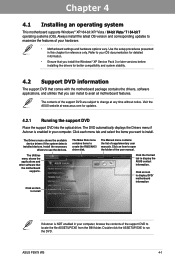
... for updates. 4.2.1 Running the support DVD Place the support DVD into the optical drive. ASUS P9X79 WS 4-1 Refer to your computer, browse the contents of the support DVD are subject to install. The DVD automatically displays the Drivers menu if Autorun is ��ta 7 6�4��-b��i�t�7� operating...
... for updates. 4.2.1 Running the support DVD Place the support DVD into the optical drive. ASUS P9X79 WS 4-1 Refer to your computer, browse the contents of the support DVD are subject to install. The DVD automatically displays the Drivers menu if Autorun is ��ta 7 6�4��-b��i�t�7� operating...
User Manual
Page 139
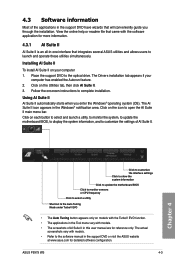
...Suite II is an all-in the Tool menu vary with the software application for detailed software configuration. ASUS P9X79 WS 4-3 4.3 Software information Most of AI Suite II. The Drivers installation tab appears if your computer 1. Click on models with the TurboV EVO function. • The... applications in -one interface that integrates several ASUS utilities and allows users to launch and operate these utilities simultaneously. ...
...Suite II is an all-in the Tool menu vary with the software application for detailed software configuration. ASUS P9X79 WS 4-3 4.3 Software information Most of AI Suite II. The Drivers installation tab appears if your computer 1. Click on models with the TurboV EVO function. • The... applications in -one interface that integrates several ASUS utilities and allows users to launch and operate these utilities simultaneously. ...

User Manual
Page 155
ASUS P9X79 WS 4-19 The CODEC also includes the ...the icon to the software manual in the support DVD or visit the ASUS website at www.asus.com for Windows XP Configuration options Set default device buttons Connector settings Exit... button Minimize button Control settings window Chapter 4 Information button Refer to display the Realtek HD Audio Manager. 4.3.12 Audio configurations The Realtek® audio CODEC provides 8-channel audio capability to install the Realtek® Audio Driver...
ASUS P9X79 WS 4-19 The CODEC also includes the ...the icon to the software manual in the support DVD or visit the ASUS website at www.asus.com for Windows XP Configuration options Set default device buttons Connector settings Exit... button Minimize button Control settings window Chapter 4 Information button Refer to display the Realtek HD Audio Manager. 4.3.12 Audio configurations The Realtek® audio CODEC provides 8-channel audio capability to install the Realtek® Audio Driver...
User Manual
Page 156
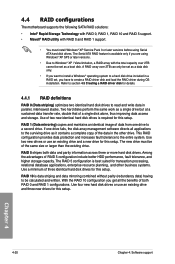
... parity information across three or more hard disk drives. Refer to section 4.5 Creating a RAID driver disk for this setup. A RAID array over 2TB cannot be set , you have to create a RAID driver disk and load the RAID driver during OS installation. Use four new hard disk drives or use an existing drive and...
... parity information across three or more hard disk drives. Refer to section 4.5 Creating a RAID driver disk for this setup. A RAID array over 2TB cannot be set , you have to create a RAID driver disk and load the RAID driver during OS installation. Use four new hard disk drives or use an existing drive and...
User Manual
Page 165
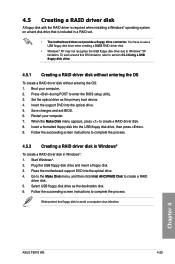
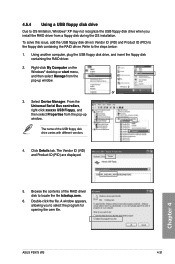
...disk drive. 4.5.1 Creating a RAID driver disk without entering the OS To create a RAID driver disk without entering the OS: 1. Place the motherboard support DVD into the optical drive. 5. Select USB floppy disk drive as the primary boot device. 4. Chapter 4 ASUS P9X79 WS 4-29 Insert the support DVD into... the optical drive. 4. Insert a formatted floppy disk into the USB floppy disk drive, then press . 9. You have to use a USB floppy disk drive when creating a SATA RAID driver disk. • Windows®...
...disk drive. 4.5.1 Creating a RAID driver disk without entering the OS To create a RAID driver disk without entering the OS: 1. Place the motherboard support DVD into the optical drive. 5. Select USB floppy disk drive as the primary boot device. 4. Chapter 4 ASUS P9X79 WS 4-29 Insert the support DVD into... the optical drive. 4. Insert a formatted floppy disk into the USB floppy disk drive, then press . 9. You have to use a USB floppy disk drive when creating a SATA RAID driver disk. • Windows®...
User Manual
Page 166
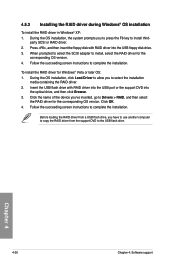
... to install third- Click the name of the device you to select the installation media containing the RAID driver. 2. When prompted to select the SCSI adapter to Drivers > RAID, and then select the RAID driver for Windows® Vista or later OS: 1. Click OK. 4. Follow the succeeding screen instructions to... complete the installation. Follow the succeeding screen instructions to complete the installation. Press , and then insert the floppy disk with RAID driver into the USB port or the support DVD into the USB floppy disk drive. 3. During the OS installation, click Load...
... to install third- Click the name of the device you to select the installation media containing the RAID driver. 2. When prompted to select the SCSI adapter to Drivers > RAID, and then select the RAID driver for Windows® Vista or later OS: 1. Click OK. 4. Follow the succeeding screen instructions to... complete the installation. Follow the succeeding screen instructions to complete the installation. Press , and then insert the floppy disk with RAID driver into the USB port or the support DVD into the USB floppy disk drive. 3. During the OS installation, click Load...
User Manual
Page 167
...to locate the file txtsetup.oem. 6. Using another computer, plug the USB floppy disk drive, and insert the floppy disk containing the RAID driver. 2. Browse the contents of the USB floppy disk drive varies with different vendors. 4. A window appears, allowing you to OS limitation,... you install the RAID driver from the pop-up window. Select Device Manager. Click Details tab. From the Universal Serial Bus controllers, right-click xxxxxx USB Floppy, and then select Properties from a floppy disk during the OS installation. or 3. Chapter 4 ASUS P9X79 WS 4-31 4.5.4 Using a...
...to locate the file txtsetup.oem. 6. Using another computer, plug the USB floppy disk drive, and insert the floppy disk containing the RAID driver. 2. Browse the contents of the USB floppy disk drive varies with different vendors. 4. A window appears, allowing you to OS limitation,... you install the RAID driver from the pop-up window. Select Device Manager. Click Details tab. From the Universal Serial Bus controllers, right-click xxxxxx USB Floppy, and then select Properties from a floppy disk during the OS installation. or 3. Chapter 4 ASUS P9X79 WS 4-31 4.5.4 Using a...

User Manual
Page 171
... the installation procedures in this section. 5.1.1 Requirements • In CrossFireX mode, you should have to uninstall all current applications. 2. Turn off your current graphics card driver/s. 4. For Windows XP, go to Control Panel > Add/Remove Programs. For Windows Vista, go to Control Panel > Programs and Features. 3. 5.1 ATI® CrossFireX™ technology... for better thermal environment. • Visit the ATI Game website at least the minimum power required by your system. • We recommend that your system. ASUS P9X79 WS 5-1
... the installation procedures in this section. 5.1.1 Requirements • In CrossFireX mode, you should have to uninstall all current applications. 2. Turn off your current graphics card driver/s. 4. For Windows XP, go to Control Panel > Add/Remove Programs. For Windows Vista, go to Control Panel > Programs and Features. 3. 5.1 ATI® CrossFireX™ technology... for better thermal environment. • Visit the ATI Game website at least the minimum power required by your system. • We recommend that your system. ASUS P9X79 WS 5-1
User Manual
Page 173
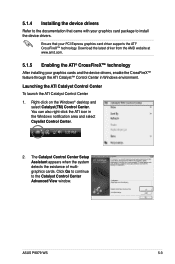
... notification area and select Cayalist Control Center. 2. 5.1.4 Installing the device drivers Refer to the documentation that your graphics card package to the Catalyst Control Center Advanced View window. Launching the ATI Catalyst Control Center To launch the ATI Catalyst Control Center 1. ASUS P9X79 WS 5-3 Right-click on the Windows® desktop and select Catalyst...
... notification area and select Cayalist Control Center. 2. 5.1.4 Installing the device drivers Refer to the documentation that your graphics card package to the Catalyst Control Center Advanced View window. Launching the ATI Catalyst Control Center To launch the ATI Catalyst Control Center 1. ASUS P9X79 WS 5-3 Right-click on the Windows® desktop and select Catalyst...

User Manual
Page 175
... mode, you should have two identical SLI-ready graphics cards that are NVIDIA® certified. • Ensure that your graphics card driver supports the NVIDIA SLI technology. Download the latest driver from the NVIDIA website (www.nvidia.com). • Ensure that your power supply unit (PSU) can provide at http://www.nzone.... • We recommend that you should have three identical SLI-ready graphics cards that allows you to install multi-graphics processing units (GPU) graphics cards. ASUS P9X79 WS 5-5
... mode, you should have two identical SLI-ready graphics cards that are NVIDIA® certified. • Ensure that your graphics card driver supports the NVIDIA SLI technology. Download the latest driver from the NVIDIA website (www.nvidia.com). • Ensure that your power supply unit (PSU) can provide at http://www.nzone.... • We recommend that you should have three identical SLI-ready graphics cards that allows you to install multi-graphics processing units (GPU) graphics cards. ASUS P9X79 WS 5-5
User Manual
Page 179
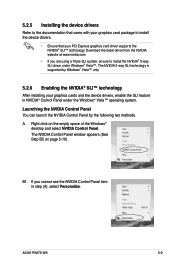
...methods. Right click on page 5-10). If you are using a Triple SLI system, ensure to install the device drivers. • Ensure that your graphics cards and the device drivers, enable the SLI feature in step (A), select Personalize. Launching the NVIDIA Control Panel You can launch the NVIDIA ... Panel window appears (See Step B5 on the empty space of the Windows® desktop and select NVIDIA Control Panel. B1. A. ASUS P9X79 WS 5-9 5.2.5 Installing the device drivers Refer to the documentation that came with your graphics card package to install the NVIDIA® 3-way SLI...
...methods. Right click on page 5-10). If you are using a Triple SLI system, ensure to install the device drivers. • Ensure that your graphics cards and the device drivers, enable the SLI feature in step (A), select Personalize. Launching the NVIDIA Control Panel You can launch the NVIDIA ... Panel window appears (See Step B5 on the empty space of the Windows® desktop and select NVIDIA Control Panel. B1. A. ASUS P9X79 WS 5-9 5.2.5 Installing the device drivers Refer to the documentation that came with your graphics card package to install the NVIDIA® 3-way SLI...


