
User Manual
Page 18
...ASUS EZ DIY ASUS UEFI BIOS ASUS UEFI BIOS offers the first mouse-controlled graphical BIOS designed with difficult POST situations. New upgrade! ASUS Q-Design ASUS...ASUS DRAM SPD (Serial Presence Detect) Information for enhanced system control - ASUS Q-Shield The specially designed ASUS Q-Shield does without even entering their existing BIOS or operating system. ASUS Q-Connector ASUS...plug in 64-bit operating systems. ASUS exclusive interface EZ Mode displays frequently-accessed...- ASUS EZ-Flash 2 ASUS EZ Flash 2 is automatically flashed using a bootable floppy disk or an OS-based utility. ...
...ASUS EZ DIY ASUS UEFI BIOS ASUS UEFI BIOS offers the first mouse-controlled graphical BIOS designed with difficult POST situations. New upgrade! ASUS Q-Design ASUS...ASUS DRAM SPD (Serial Presence Detect) Information for enhanced system control - ASUS Q-Shield The specially designed ASUS Q-Shield does without even entering their existing BIOS or operating system. ASUS Q-Connector ASUS...plug in 64-bit operating systems. ASUS exclusive interface EZ Mode displays frequently-accessed...- ASUS EZ-Flash 2 ASUS EZ Flash 2 is automatically flashed using a bootable floppy disk or an OS-based utility. ...
User Manual
Page 73
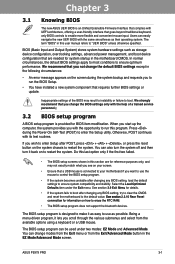
...and then turn it back on the screen during the Power-On Self-Test (POST) to enter the Setup utility. The term "BIOS" in this user manual refers to use the mouse to control the BIOS setup program. • If the system becomes unstable after changing any BIOS setting, try to clear... and select from the Exit/Advanced Mode button in the EZ Mode/Advanced Mode screen. Chapter 3 ASUS P9X79 PRO 3-1 When you start up the computer, the system provides you with the opportunity to run the BIOS Setup. • You have installed a new system component that you change the BIOS settings only with...
...and then turn it back on the screen during the Power-On Self-Test (POST) to enter the Setup utility. The term "BIOS" in this user manual refers to use the mouse to control the BIOS setup program. • If the system becomes unstable after changing any BIOS setting, try to clear... and select from the Exit/Advanced Mode button in the EZ Mode/Advanced Mode screen. Chapter 3 ASUS P9X79 PRO 3-1 When you start up the computer, the system provides you with the opportunity to run the BIOS Setup. • You have installed a new system component that you change the BIOS settings only with...

User Manual
Page 77
...password in the Enter Current Password box, and then press when prompted to create/confirm the password. • If you have forgotten your BIOS password, erase the CMOS Real Time Clock (RTC) RAM to change the system security settings. Chapter 3 ASUS P9X79 PRO 3-5 UEFI BIOS Utility - Advanced Mode... language Security The Security menu items allow you to boot or enter Setup. The Main menu provides you an overview of the basic system information, and allows you to clear the BIOS password. UEFI BIOS Utility - Advanced Mode Exit Main Back Ai Tweaker Main\ Security >...
...password in the Enter Current Password box, and then press when prompted to create/confirm the password. • If you have forgotten your BIOS password, erase the CMOS Real Time Clock (RTC) RAM to change the system security settings. Chapter 3 ASUS P9X79 PRO 3-5 UEFI BIOS Utility - Advanced Mode... language Security The Security menu items allow you to boot or enter Setup. The Main menu provides you an overview of the basic system information, and allows you to clear the BIOS password. UEFI BIOS Utility - Advanced Mode Exit Main Back Ai Tweaker Main\ Security >...

User Manual
Page 94
... BLCK frequency, CPU ratio and memory parameters will be auto optimized. →←: Select Screen ↑↓: Select Item Enter: Select +/-: Change Opt. UEFI BIOS Utility - Configuration options: [Disabled] [Enabled] Chapter 3 3-22 Chapter 3: BIOS setup Copyright (C) 2011 American Megatrends, Inc. Enhanced Intel SpeedStep Technology [Enabled] Enhanced Intel SpeedStep Technology, allows the system operation...
... BLCK frequency, CPU ratio and memory parameters will be auto optimized. →←: Select Screen ↑↓: Select Item Enter: Select +/-: Change Opt. UEFI BIOS Utility - Configuration options: [Disabled] [Enabled] Chapter 3 3-22 Chapter 3: BIOS setup Copyright (C) 2011 American Megatrends, Inc. Enhanced Intel SpeedStep Technology [Enabled] Enhanced Intel SpeedStep Technology, allows the system operation...

User Manual
Page 98
... Configuration Parameters →←: Select Screen ↑↓: Select Item Enter: Select +/-: Change Opt. The values range from 0.3950x to malfunction. UEFI BIOS Utility - DRAM Read REF Voltage on Channel C/D. CPU Spread Spectrum [Auto...] [Disabled] Enhances the BCLK overclocking ability. [Enabled] Sets to change the settings for EMI control. F1: General Help F2: Previous Values F5: Optimized Defaults F10: Save ESC: Exit Version 2.10.1208. Chapter 3 3-26 Chapter 3: BIOS setup...
... Configuration Parameters →←: Select Screen ↑↓: Select Item Enter: Select +/-: Change Opt. The values range from 0.3950x to malfunction. UEFI BIOS Utility - DRAM Read REF Voltage on Channel C/D. CPU Spread Spectrum [Auto...] [Disabled] Enhances the BCLK overclocking ability. [Enabled] Sets to change the settings for EMI control. F1: General Help F2: Previous Values F5: Optimized Defaults F10: Save ESC: Exit Version 2.10.1208. Chapter 3 3-26 Chapter 3: BIOS setup...
User Manual
Page 101
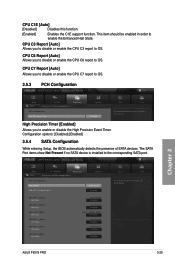
...to OS. CPU C7 Report [Auto] Allows you to enable the Enhanced Halt State. Configuration options: [Disabled] [Enabled] 3.5.4 SATA Configuration While entering Setup, the BIOS automatically detects the presence of SATA devices. CPU C3 Report [Auto] Allows you to disable or enable the CPU C6 report to... SATA Mode AHCI Mode S.M.A.R.T. The SATA Port items show Not Present if no SATA device is installed to OS. UEFI BIOS Utility - Chapter 3 ASUS P9X79 PRO 3-29 CPU C6 Report [Auto] Allows you to disable or enable the CPU C3 report to OS. 3.5.3 PCH Configuration UEFI BIOS...
...to OS. CPU C7 Report [Auto] Allows you to enable the Enhanced Halt State. Configuration options: [Disabled] [Enabled] 3.5.4 SATA Configuration While entering Setup, the BIOS automatically detects the presence of SATA devices. CPU C3 Report [Auto] Allows you to disable or enable the CPU C6 report to... SATA Mode AHCI Mode S.M.A.R.T. The SATA Port items show Not Present if no SATA device is installed to OS. UEFI BIOS Utility - Chapter 3 ASUS P9X79 PRO 3-29 CPU C6 Report [Auto] Allows you to disable or enable the CPU C3 report to OS. 3.5.3 PCH Configuration UEFI BIOS...

User Manual
Page 108
... Speed Low Limit 600 RPM Chassis 1 Fan Profile Standard →←: Select Screen ↑↓: Select Item Enter: Select +/-: Change Opt. Scroll down to change the fan settings. 3.6 Monitor menu The Monitor menu displays the...F2: Previous Values F3: Shortcut F5: Optimized Defaults F6: ASUS Ratio Boost F10: Save ESC: Exit F12: Print Screen Version 2.10.1208. Chapter 3 3-36 Chapter 3: BIOS setup Copyright (C) 2011 American Megatrends, Inc. CPU Temperature / MB...Surge Support Enabled Version 2.10.1208. Copyright (C) 2011 American Megatrends, Inc. UEFI BIOS Utility -
... Speed Low Limit 600 RPM Chassis 1 Fan Profile Standard →←: Select Screen ↑↓: Select Item Enter: Select +/-: Change Opt. Scroll down to change the fan settings. 3.6 Monitor menu The Monitor menu displays the...F2: Previous Values F3: Shortcut F5: Optimized Defaults F6: ASUS Ratio Boost F10: Save ESC: Exit F12: Print Screen Version 2.10.1208. Chapter 3 3-36 Chapter 3: BIOS setup Copyright (C) 2011 American Megatrends, Inc. CPU Temperature / MB...Surge Support Enabled Version 2.10.1208. Copyright (C) 2011 American Megatrends, Inc. UEFI BIOS Utility -

User Manual
Page 111
UEFI BIOS Utility - Bootup NumLock State [On] [On] Sets the power...NumLock State On Full Screen Logo Enabled Wait For 'F1' If Error Enabled Option ROM Messages Force BIOS Setup Mode EZ Mode Select the keyboard NumLock state Boot Option Priorities Boot Option #1 Boot Option #2 Boot ...8595;: Select Item Enter: Select +/-: Change Opt. Copyright (C) 2011 American Megatrends, Inc. Full Screen Logo [Enabled] [Enabled] Enables the full screen logo display feature. [Disabled] Disables the full screen logo display feature. Chapter 3 ASUS P9X79 PRO 3-39 Option ROM...
UEFI BIOS Utility - Bootup NumLock State [On] [On] Sets the power...NumLock State On Full Screen Logo Enabled Wait For 'F1' If Error Enabled Option ROM Messages Force BIOS Setup Mode EZ Mode Select the keyboard NumLock state Boot Option Priorities Boot Option #1 Boot Option #2 Boot ...8595;: Select Item Enter: Select +/-: Change Opt. Copyright (C) 2011 American Megatrends, Inc. Full Screen Logo [Enabled] [Enabled] Enables the full screen logo display feature. [Disabled] Disables the full screen logo display feature. Chapter 3 ASUS P9X79 PRO 3-39 Option ROM...

User Manual
Page 112
... Ai Tweaker Advanced > ASUS EZ Flash 2 Utility > ASUS DRAM SPD Information > ASUS O.C. Click an item to confirm your choice. The number of device items that appears on the screen depends on the number of the following: - Setup Mode [EZ Mode] [Advanced Mode] Sets Advanced Mode as the default screen for entering the BIOS setup program. [EZ Mode...
... Ai Tweaker Advanced > ASUS EZ Flash 2 Utility > ASUS DRAM SPD Information > ASUS O.C. Click an item to confirm your choice. The number of device items that appears on the screen depends on the number of the following: - Setup Mode [EZ Mode] [Advanced Mode] Sets Advanced Mode as the default screen for entering the BIOS setup program. [EZ Mode...

User Manual
Page 114
... Mode Exit Main Back Ai Tweaker Tool\ ASUS O.C. Chapter 3 3-42 Chapter 3: BIOS setup UEFI BIOS Utility - Profile Configuration Setup Profile1 Status : Not Installed Setup Profile2 Status : Not Installed Setup Profile3 Status : Not Installed Setup Profile4 Status : Not Installed Setup Profile5 Status : Not Installed Setup Profile6 Status : Not Installed Setup Profile7 Status : Not Installed Setup Profile8 Status : Not Installed Label Save to...
... Mode Exit Main Back Ai Tweaker Tool\ ASUS O.C. Chapter 3 3-42 Chapter 3: BIOS setup UEFI BIOS Utility - Profile Configuration Setup Profile1 Status : Not Installed Setup Profile2 Status : Not Installed Setup Profile3 Status : Not Installed Setup Profile4 Status : Not Installed Setup Profile5 Status : Not Installed Setup Profile6 Status : Not Installed Setup Profile7 Status : Not Installed Setup Profile8 Status : Not Installed Label Save to...
User Manual
Page 115
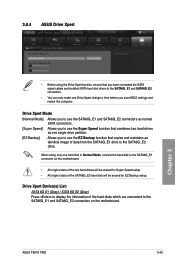
... of the SATA6G_E2 hard disk will be erased for Super Speed setup. • All original data of the hard disks which are connected to the SATA6G_E1 connector on the motherboard. 3.8.4 ASUS Drive Xpert UEFI BIOS Utility - When using the Drive Xpert function, ensure that copies and...Allows you to use the EZ Backup function that you save BIOS settings and restart the computer. Chapter 3 ASUS P9X79 PRO 3-43 Advanced Mode Main Back Ai Tweaker Tool\ ASUS Drive Xpert > Drive Xpert Setup Utility Drive Xpert Mode Drive Xpert Device(s) List : > SATA 6G E1 (Gray) > SATA 6G E2 (Gray...
... of the SATA6G_E2 hard disk will be erased for Super Speed setup. • All original data of the hard disks which are connected to the SATA6G_E1 connector on the motherboard. 3.8.4 ASUS Drive Xpert UEFI BIOS Utility - When using the Drive Xpert function, ensure that copies and...Allows you to use the EZ Backup function that you save BIOS settings and restart the computer. Chapter 3 ASUS P9X79 PRO 3-43 Advanced Mode Main Back Ai Tweaker Tool\ ASUS Drive Xpert > Drive Xpert Setup Utility Drive Xpert Mode Drive Xpert Device(s) List : > SATA 6G E1 (Gray) > SATA 6G E2 (Gray...

User Manual
Page 120
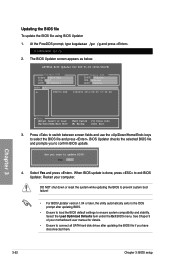
...system when the update process is done. ASUSTek EZ Flash 2 BIOS ROM Utility V00.75 Flash Info MODEL: P9X79 PRO fs0:\ Drive 79 fs0:\ fs1:\ VER: 0220 Folder Info 08/05/...10 10:23p 4194304 Exit DATE: 08/09/2011 P9X79D.ROM File Infor MODEL: Help Info VER: DATE: [Enter] ...utility. Chapter 3 3-48 Chapter 3: BIOS setup Press to switch to the Folder Info field. 6. To update the BIOS using this utility, download the latest BIOS from the ASUS website at www.asus.com. 3.10.2 ASUS EZ Flash 2 utility The ASUS...
...system when the update process is done. ASUSTek EZ Flash 2 BIOS ROM Utility V00.75 Flash Info MODEL: P9X79 PRO fs0:\ Drive 79 fs0:\ fs1:\ VER: 0220 Folder Info 08/05/...10 10:23p 4194304 Exit DATE: 08/09/2011 P9X79D.ROM File Infor MODEL: Help Info VER: DATE: [Enter] ...utility. Chapter 3 3-48 Chapter 3: BIOS setup Press to switch to the Folder Info field. 6. To update the BIOS using this utility, download the latest BIOS from the ASUS website at www.asus.com. 3.10.2 ASUS EZ Flash 2 utility The ASUS...
User Manual
Page 121
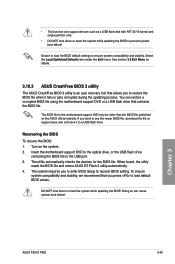
... support DVD or a USB flash drive that allows you to enter BIOS Setup to ensure system compatibility and stability. When found, the utility reads the BIOS file and enters ASUS EZ Flash 2 utility automatically. 4. Doing so can cause system boot failure! Recovering the... BIOS To recover the BIOS: 1. Turn on the ASUS official website. The system requires you to restore the BIOS file when it to a USB flash drive. Chapter 3 ASUS P9X79 PRO...
... support DVD or a USB flash drive that allows you to enter BIOS Setup to ensure system compatibility and stability. When found, the utility reads the BIOS file and enters ASUS EZ Flash 2 utility automatically. 4. Doing so can cause system boot failure! Recovering the... BIOS To recover the BIOS: 1. Turn on the ASUS official website. The system requires you to restore the BIOS file when it to a USB flash drive. Chapter 3 ASUS P9X79 PRO...

User Manual
Page 122
...org)! Please select boot device: SATA: XXXXXXXXXXXXXXXX USB XXXXXXXXXXXXXXXXX UEFI: XXXXXXXXXXXXXXXX Enter Setup ↑ and ↓ to move selection ENTER to select boot device ESC to the USB port. 2. C:\>d: D:\> Chapter 3 3-50 Chapter 3: BIOS setup Insert the support DVD into the optical drive and select the optical drive...USB flash drive in DOS environment 1. The actual utility screen displays may not be same as shown. Insert the USB flash drive with the latest BIOS file and BIOS Updater to boot using defaults 3. When the ASUS Logo appears, press to update BIOS in NTFS ...
...org)! Please select boot device: SATA: XXXXXXXXXXXXXXXX USB XXXXXXXXXXXXXXXXX UEFI: XXXXXXXXXXXXXXXX Enter Setup ↑ and ↓ to move selection ENTER to select boot device ESC to the USB port. 2. C:\>d: D:\> Chapter 3 3-50 Chapter 3: BIOS setup Insert the support DVD into the optical drive and select the optical drive...USB flash drive in DOS environment 1. The actual utility screen displays may not be same as shown. Insert the USB flash drive with the latest BIOS file and BIOS Updater to boot using defaults 3. When the ASUS Logo appears, press to update BIOS in NTFS ...
User Manual
Page 124
...utility automatically exits to ensure system compatibility and stability. Are you sure to select the BIOS file and press . BIOS Updater checks the selected BIOS file and prompts you have disconnected them. 3-52 Chapter 3: BIOS setup Restart your motherboard user manual for DOS V1.18 [2011/04/29] Current ROM BOARD: P9X79 PRO... VER: 0220 DATE: 08/09/2011 Update ROM BOARD: Unknown VER: Unknown DATE: Unknown PATH: A:\ A: P8P67D.ROM 4194304 2011-08-05 17:30:48 Chapter 3 Note [Enter...
...utility automatically exits to ensure system compatibility and stability. Are you sure to select the BIOS file and press . BIOS Updater checks the selected BIOS file and prompts you have disconnected them. 3-52 Chapter 3: BIOS setup Restart your motherboard user manual for DOS V1.18 [2011/04/29] Current ROM BOARD: P9X79 PRO... VER: 0220 DATE: 08/09/2011 Update ROM BOARD: Unknown VER: Unknown DATE: Unknown PATH: A:\ A: P8P67D.ROM 4194304 2011-08-05 17:30:48 Chapter 3 Note [Enter...
User Manual
Page 146
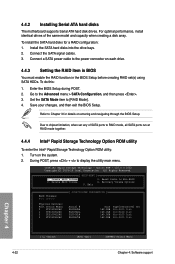
... RAID mode, all SATA ports run at RAID mode together. 4.4.4 Intel® Rapid Storage Technology Option ROM utility To enter the Intel® Rapid Storage Technology Option ROM utility: 1. Turn on entering and navigating through the BIOS Setup. Create RAID Volume 2. Reset Disks to [RAID Mode]. 4. Exit RAID Volumes: None defined. Physical Devices: Port Device...
... RAID mode, all SATA ports run at RAID mode together. 4.4.4 Intel® Rapid Storage Technology Option ROM utility To enter the Intel® Rapid Storage Technology Option ROM utility: 1. Turn on entering and navigating through the BIOS Setup. Create RAID Volume 2. Reset Disks to [RAID Mode]. 4. Exit RAID Volumes: None defined. Physical Devices: Port Device...
User Manual
Page 147
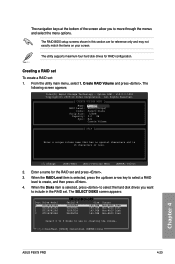
...or less. [↑↓]Change [TAB]-Next [ESC]-Previous Menu [ENTER]-Select 2. Create RAID Volume and press . v10.0.0.1032 Copyright(C) 2003-10 Intel Corporation. Enter a name for the RAID set : 1. The utility supports maximum four hard disk drives for reference only and may not... key to select a RAID level to use in creating the volume. [↑↓]-Prev/Next [SPACE]-SelectDisk [ENTER]-Done Chapter 4 ASUS P9X79 PRO 4-23 Option ROM - The RAID BIOS setup screens shown in this section are for RAID configuration. The SELECT DISKS screen appears: Port Drive Model 0 ST3160812AS ...
...or less. [↑↓]Change [TAB]-Next [ESC]-Previous Menu [ENTER]-Select 2. Create RAID Volume and press . v10.0.0.1032 Copyright(C) 2003-10 Intel Corporation. Enter a name for the RAID set : 1. The utility supports maximum four hard disk drives for reference only and may not... key to select a RAID level to use in creating the volume. [↑↓]-Prev/Next [SPACE]-SelectDisk [ENTER]-Done Chapter 4 ASUS P9X79 PRO 4-23 Option ROM - The RAID BIOS setup screens shown in this section are for RAID configuration. The SELECT DISKS screen appears: Port Drive Model 0 ST3160812AS ...
User Manual
Page 150
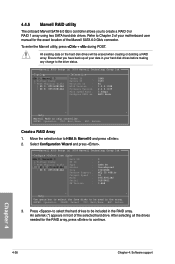
4.4.5 Marvell RAID utility The onboard Marvell SATA 6.0 Gb/s controller allows you have back up all the drives needed for the exact location of the selected hard drive. Ensure that you to continue. ENTER: Operation F10: Exit/Save ESC: Return Create a RAID Array 1. Chapter 4 4-26... used in front of the Marvell SATA 6.0 Gb/s connector. To enter the Marvell utility, press + during POST. An asterisk (*) appears in the array. All exisiting data on chip controller. Marvell BIOS Setup (c) 2009 Marvell Technology Group Ltd. Select Configuration Wizard and press ....
4.4.5 Marvell RAID utility The onboard Marvell SATA 6.0 Gb/s controller allows you have back up all the drives needed for the exact location of the selected hard drive. Ensure that you to continue. ENTER: Operation F10: Exit/Save ESC: Return Create a RAID Array 1. Chapter 4 4-26... used in front of the Marvell SATA 6.0 Gb/s connector. To enter the Marvell utility, press + during POST. An asterisk (*) appears in the array. All exisiting data on chip controller. Marvell BIOS Setup (c) 2009 Marvell Technology Group Ltd. Select Configuration Wizard and press ....
User Manual
Page 152
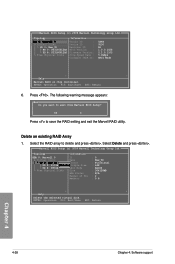
...of PDs Members : 0 : New_VD : Functional : 64K : RAID0 : 304128MB : N/A : 2 : 0 8 ▶ ▶ Help Delete the selected virtual disk. ENTER: Operation F10: Exit/Save ESC: Return Chapter 4 4-28 Chapter 4: Software support Topology HBA 0: Marvell 0 ├ Virtual Disks │ └ VD 0: New_VD │...exit from Marvell BIOS Setup? Marvell BIOS Setup (c) 2009 Marvell Technology Group Ltd. Marvell BIOS Setup (c) 2009 Marvell Technology Group Ltd. Select Delete and press . Yes No Press to save the RAID setting and exit the Marvell RAID utility. ENTER: Operation F10: ...
...of PDs Members : 0 : New_VD : Functional : 64K : RAID0 : 304128MB : N/A : 2 : 0 8 ▶ ▶ Help Delete the selected virtual disk. ENTER: Operation F10: Exit/Save ESC: Return Chapter 4 4-28 Chapter 4: Software support Topology HBA 0: Marvell 0 ├ Virtual Disks │ └ VD 0: New_VD │...exit from Marvell BIOS Setup? Marvell BIOS Setup (c) 2009 Marvell Technology Group Ltd. Marvell BIOS Setup (c) 2009 Marvell Technology Group Ltd. Select Delete and press . Yes No Press to save the RAID setting and exit the Marvell RAID utility. ENTER: Operation F10: ...

User Manual
Page 154
... disk drive when creating a SATA RAID driver disk. • Windows® XP may not recognize the USB floppy disk drive due to enter the BIOS setup utility. 3. Press during POST to Windows® XP limitation. Insert a formatted floppy disk into the optical drive. 4. Write-protect the floppy ...the Make Disk menu appears, press to section 4.5.4 Using a USB floppy disk drive. 4.5.1 Creating a RAID driver disk without entering the OS To create a RAID driver disk without entering the OS: 1. Go to the Make Disk menu, and then click Intel X79 RAID Driver Disk to complete the process. ...
... disk drive when creating a SATA RAID driver disk. • Windows® XP may not recognize the USB floppy disk drive due to enter the BIOS setup utility. 3. Press during POST to Windows® XP limitation. Insert a formatted floppy disk into the optical drive. 4. Write-protect the floppy ...the Make Disk menu appears, press to section 4.5.4 Using a USB floppy disk drive. 4.5.1 Creating a RAID driver disk without entering the OS To create a RAID driver disk without entering the OS: 1. Go to the Make Disk menu, and then click Intel X79 RAID Driver Disk to complete the process. ...


