User Guide
Page 6
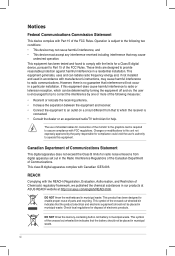
... in municipal waste. This symbol of the FCC Rules. Notices Federal Communications Commission Statement This device complies with Canadian ICES-003. This equipment has been tested and found to Part 15 of the crossed out wheeled bin indicates that interference will not occur in accordance with manufacturer's instructions, may cause undesired..., there is encouraged to try to enable proper reuse of the FCC Rules. This equipment generates, uses and can be placed in our products at ASUS REACH website at http://csr.asus.com/english/REACH.htm.
... in municipal waste. This symbol of the FCC Rules. Notices Federal Communications Commission Statement This device complies with Canadian ICES-003. This equipment has been tested and found to Part 15 of the crossed out wheeled bin indicates that interference will not occur in accordance with manufacturer's instructions, may cause undesired..., there is encouraged to try to enable proper reuse of the FCC Rules. This equipment generates, uses and can be placed in our products at ASUS REACH website at http://csr.asus.com/english/REACH.htm.
User Guide
Page 34
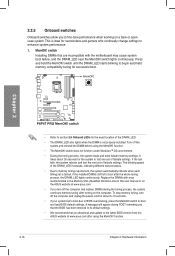
...to fine-tune performance when working on the ASUS website at www.asus.com after the whole tuning process, the DRAM_LED lights continuously. Chapter 2 • Refer to boot and load BIOS default settings. If the installed DIMMs still fail to test one set of failsafe settings. Press and...8226; If your system fail to boot due to begin automatic memory compatibility tuning for the exact location of the DRAM_LED increases, indicating different test processes. • Due to enhance system performance. 1. The blinking speed of the DRAM_LED. • The DRAM_LED also lights when the DIMM...
...to fine-tune performance when working on the ASUS website at www.asus.com after the whole tuning process, the DRAM_LED lights continuously. Chapter 2 • Refer to boot and load BIOS default settings. If the installed DIMMs still fail to test one set of failsafe settings. Press and...8226; If your system fail to boot due to begin automatic memory compatibility tuning for the exact location of the DRAM_LED increases, indicating different test processes. • Due to enhance system performance. 1. The blinking speed of the DRAM_LED. • The DRAM_LED also lights when the DIMM...
User Guide
Page 37
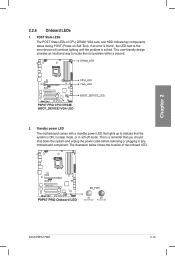
... any motherboard component. The illustration below shows the location of CPU, DRAM, VGA card, and HDD indicate key components status during POST (Power-on Self Test). Chapter 2 ASUS P8P67 PRO 2-19 Standby power LED The motherboard comes with a standby power LED that lights up to indicate that the system is a reminder that you...
... any motherboard component. The illustration below shows the location of CPU, DRAM, VGA card, and HDD indicate key components status during POST (Power-on Self Test). Chapter 2 ASUS P8P67 PRO 2-19 Standby power LED The motherboard comes with a standby power LED that lights up to indicate that the system is a reminder that you...
User Guide
Page 65
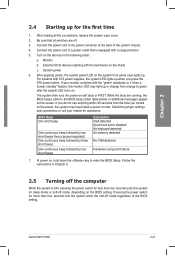
...At power on, hold down the key to the BIOS beep codes table below) or additional messages appear on test. Follow the instructions in the following order: a. System power 6. While the tests are off mode, depending on the devices in Chapter 3. 2.5 Turning off the computer While the system is equipped... for less than four seconds lets the system enter the soft-off mode regardless of the system chassis. 4. ASUS P8P67 PRO 2-47 For systems with the last device on self tests or POST. Be sure that is ON, pressing the power switch for more than four seconds puts the system...
...At power on, hold down the key to the BIOS beep codes table below) or additional messages appear on test. Follow the instructions in the following order: a. System power 6. While the tests are off mode, depending on the devices in Chapter 3. 2.5 Turning off the computer While the system is equipped... for less than four seconds lets the system enter the soft-off mode regardless of the system chassis. 4. ASUS P8P67 PRO 2-47 For systems with the last device on self tests or POST. Be sure that is ON, pressing the power switch for more than four seconds puts the system...
User Guide
Page 67
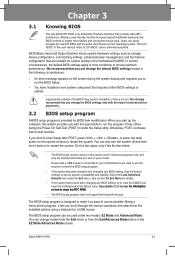
...shown in this user manual refers to your motherboard if you change the BIOS settings only with the same smoothness as possible. Chapter 3 ASUS P8P67 PRO 3-1 BIOS (Basic Input and Output System) stores system hardware settings such as storage device configuration, overclocking settings, advanced power management,...the new EFI BIOS with the help of the BIOS may not exactly match what you see on the screen during the Power-On Self-Test (POST) to ensure optimum performance. The term "BIOS" in this program. Inappropriate settings of a trained service personnel.ç 3.2 BIOS ...
...shown in this user manual refers to your motherboard if you change the BIOS settings only with the same smoothness as possible. Chapter 3 ASUS P8P67 PRO 3-1 BIOS (Basic Input and Output System) stores system hardware settings such as storage device configuration, overclocking settings, advanced power management,...the new EFI BIOS with the help of the BIOS may not exactly match what you see on the screen during the Power-On Self-Test (POST) to ensure optimum performance. The term "BIOS" in this program. Inappropriate settings of a trained service personnel.ç 3.2 BIOS ...
User Guide
Page 97
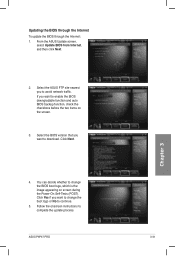
... items on screen during the Power‑On Self-Tests (POST). You can decide whether to change the boot logo or No to avoid network traffic. ASUS P8P67 PRO 3-31 Select the BIOS version that you to continue. 5. Select the ASUS FTP site nearest you want to complete the update process.... From the ASUS Update screen, select Update BIOS from Internet, and then click Next....
... items on screen during the Power‑On Self-Tests (POST). You can decide whether to change the boot logo or No to avoid network traffic. ASUS P8P67 PRO 3-31 Select the BIOS version that you to continue. 5. Select the ASUS FTP site nearest you want to complete the update process.... From the ASUS Update screen, select Update BIOS from Internet, and then click Next....
User Guide
Page 113
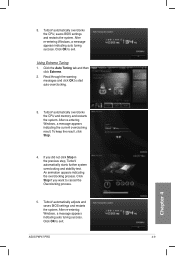
... indicating the current overclocking result. Click Stop if you did not click Stop in the previous step, TurboV automatically starts further system overclocking and stability test. ASUS P8P67 PRO 4-9 Chapter 4 3. If you want to exit. TurboV automatically adjusts and saves BIOS settings and restarts the system. After re-entering Windows, a message appears indicating...
... indicating the current overclocking result. Click Stop if you did not click Stop in the previous step, TurboV automatically starts further system overclocking and stability test. ASUS P8P67 PRO 4-9 Chapter 4 3. If you want to exit. TurboV automatically adjusts and saves BIOS settings and restarts the system. After re-entering Windows, a message appears indicating...

