User Manual
Page 6
These limits are designed to provide reasonable protection against harmful interference in our products at ASUS REACH website at http://csr.asus.com/english/REACH.htm. The use of shielded cables for connection of the monitor to the graphics card is required to assure compliance with ... Commission Statement This device complies with the limits for a Class B digital device, pursuant to Part 15 of the FCC Rules. This equipment has been tested and found to comply with Part 15 of the crossed out wheeled bin indicates that the battery should not be placed in municipal waste. This...
These limits are designed to provide reasonable protection against harmful interference in our products at ASUS REACH website at http://csr.asus.com/english/REACH.htm. The use of shielded cables for connection of the monitor to the graphics card is required to assure compliance with ... Commission Statement This device complies with the limits for a Class B digital device, pursuant to Part 15 of the FCC Rules. This equipment has been tested and found to comply with Part 15 of the crossed out wheeled bin indicates that the battery should not be placed in municipal waste. This...
User Manual
Page 29
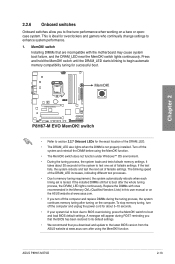
... Chapter 2 • Refer to boot after the whole tuning process, the DRAM_LED lights continuously. ASUS P8H67-M EVO 2-13 function. • The MemOK! If the test fails, the system reboots and test the next set is not properly installed. To stop memory tuning, turn off the computer and unplug...2.2.6 Onboard switches Onboard switches allow you to BIOS overclocking, press the MemOK! MemOK! switch to the latest BIOS version from the ASUS website at www.asus.com. • If you that the BIOS has been restored to its default settings. • We recommend that are incompatible ...
... Chapter 2 • Refer to boot after the whole tuning process, the DRAM_LED lights continuously. ASUS P8H67-M EVO 2-13 function. • The MemOK! If the test fails, the system reboots and test the next set is not properly installed. To stop memory tuning, turn off the computer and unplug...2.2.6 Onboard switches Onboard switches allow you to BIOS overclocking, press the MemOK! MemOK! switch to the latest BIOS version from the ASUS website at www.asus.com. • If you that the BIOS has been restored to its default settings. • We recommend that are incompatible ...
User Manual
Page 31
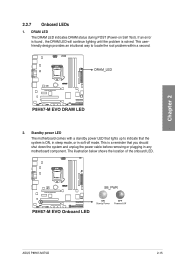
This is a reminder that the system is solved. Chapter 2 ASUS P8H67-M EVO 2-15 This userfriendly design provides an intuitional way to indicate that you should shut down the system and unplug the power cable before removing ... within a second. 2. The illustration below shows the location of the onboard LED. DRAM LED The DRAM LED indicates DRAM status during POST (Power-on Self Test). If an error is found , the DRAM LED will continue lighting until the problem is ON, in sleep mode, or in any motherboard component. 2.2.7 Onboard...
This is a reminder that the system is solved. Chapter 2 ASUS P8H67-M EVO 2-15 This userfriendly design provides an intuitional way to indicate that you should shut down the system and unplug the power cable before removing ... within a second. 2. The illustration below shows the location of the onboard LED. DRAM LED The DRAM LED indicates DRAM status during POST (Power-on Self Test). If an error is found , the DRAM LED will continue lighting until the problem is ON, in sleep mode, or in any motherboard component. 2.2.7 Onboard...
User Manual
Page 61
...the time you press the ATX power button. Refer to a power outlet that all the connections, replace the system case cover. 2. While the tests are off mode, depending on the BIOS setting. Pressing the power switch for more than four seconds puts the system on sleep mode or soft... detected No VGA detected Hardware component failure 7. For systems with the last device on the screen. ASUS P8H67-M EVO 2-45 Be sure that is ON, pressing the power switch for assistance. Turn on test. Monitor b. If your retailer for less than four seconds lets the system enter the soft-off ...
...the time you press the ATX power button. Refer to a power outlet that all the connections, replace the system case cover. 2. While the tests are off mode, depending on the BIOS setting. Pressing the power switch for more than four seconds puts the system on sleep mode or soft... detected No VGA detected Hardware component failure 7. For systems with the last device on the screen. ASUS P8H67-M EVO 2-45 Be sure that is ON, pressing the power switch for assistance. Turn on test. Monitor b. If your retailer for less than four seconds lets the system enter the soft-off ...
User Manual
Page 63
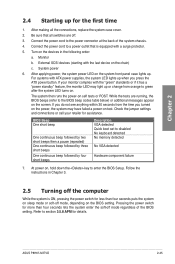
...boot device configuration that you not change modes from the Exit menu or from the available options using a keyboard or a USB mouse. ASUS P8H67-M EVO 3-1 In normal circumstances, the default BIOS settings apply to most conditions to run this section are needed for information on the system... a trained service personnel. 3.2 BIOS setup program A BIOS setup program is designed to make it back on the screen during the Power-On Self-Test (POST) to boot. You can be used under the Exit menu. Chapter 3 Chapter 3: 3.1 Knowing BIOS BIOS setup BIOS (Basic Input and ...
...boot device configuration that you not change modes from the Exit menu or from the available options using a keyboard or a USB mouse. ASUS P8H67-M EVO 3-1 In normal circumstances, the default BIOS settings apply to most conditions to run this section are needed for information on the system... a trained service personnel. 3.2 BIOS setup program A BIOS setup program is designed to make it back on the screen during the Power-On Self-Test (POST) to boot. You can be used under the Exit menu. Chapter 3 Chapter 3: 3.1 Knowing BIOS BIOS setup BIOS (Basic Input and ...
User Manual
Page 94
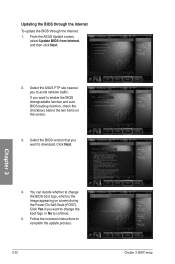
... the BIOS downgradable function and auto BIOS backup function, check the checkboxs before the two items on screen during the Power‑On Self-Tests (POST). If you want to change the BIOS boot logo, which is the image appearing on the screen. 3. Select the BIOS version... that you to complete the update process. 3-32 Chapter 3: BIOS setup From the ASUS Update screen, select Update BIOS from Internet, and then click Next. 2. Updating the BIOS through the Internet To update the BIOS through the Internet: ...
... the BIOS downgradable function and auto BIOS backup function, check the checkboxs before the two items on screen during the Power‑On Self-Tests (POST). If you want to change the BIOS boot logo, which is the image appearing on the screen. 3. Select the BIOS version... that you to complete the update process. 3-32 Chapter 3: BIOS setup From the ASUS Update screen, select Update BIOS from Internet, and then click Next. 2. Updating the BIOS through the Internet To update the BIOS through the Internet: ...

