User Manual
Page 2
... FOR ANY ERRORS OR INACCURACIES THAT MAY APPEAR IN THIS MANUAL, INCLUDING THE PRODUCTS AND SOFTWARE DESCRIBED IN IT. The GPL and LGPL licensed code in it from http://support.asus.com/download; ASUSTeK is distributed without any warranty. All Rights Reserved. SPECIFICATIONS AND INFORMATION CONTAINED IN THIS MANUAL ARE FURNISHED FOR INFORMATIONAL USE ONLY, AND ARE SUBJECT TO CHANGE AT...
... FOR ANY ERRORS OR INACCURACIES THAT MAY APPEAR IN THIS MANUAL, INCLUDING THE PRODUCTS AND SOFTWARE DESCRIBED IN IT. The GPL and LGPL licensed code in it from http://support.asus.com/download; ASUSTeK is distributed without any warranty. All Rights Reserved. SPECIFICATIONS AND INFORMATION CONTAINED IN THIS MANUAL ARE FURNISHED FOR INFORMATIONAL USE ONLY, AND ARE SUBJECT TO CHANGE AT...
User Manual
Page 5
... 4-12 4.3.9 Audio configurations 4-13 4.4 RAID configurations 4-14 4.4.1 RAID definitions 4-14 4.4.2 Installing Serial ATA hard disks 4-15 4.4.3 Setting the RAID item in BIOS 4-15 4.4.4 Intel® Rapid Storage Technology Option ROM utility 4-15 4.5 Creating a RAID driver disk 4-19 4.5.1 Creating a RAID driver disk without entering the OS 4-19 4.5.2 Creating a RAID driver disk in Windows 4-19 4.5.3 Installing the RAID driver during Windows® OS installation....... 4-20 4.5.4 Using a USB floppy disk drive 4-21 Chapter 5: ATI® CrossFireX™ technology support 5.1 ATI...
... 4-12 4.3.9 Audio configurations 4-13 4.4 RAID configurations 4-14 4.4.1 RAID definitions 4-14 4.4.2 Installing Serial ATA hard disks 4-15 4.4.3 Setting the RAID item in BIOS 4-15 4.4.4 Intel® Rapid Storage Technology Option ROM utility 4-15 4.5 Creating a RAID driver disk 4-19 4.5.1 Creating a RAID driver disk without entering the OS 4-19 4.5.2 Creating a RAID driver disk in Windows 4-19 4.5.3 Installing the RAID driver during Windows® OS installation....... 4-20 4.5.4 Using a USB floppy disk drive 4-21 Chapter 5: ATI® CrossFireX™ technology support 5.1 ATI...
User Manual
Page 12
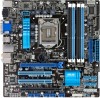
... 1 x EPU switch 1 x COM port connector 1 x Clear CMOS jumper 1 x TPM header 32 Mb Flash ROM, EFI MIOS, PnP, DMI 2.0, WfM 2.0, SM BIOS 2.5, ACPI 2.0a, Multi-language BIOS, ASUS EZ Flash 2, ASUS CrashFree BIOS 3 WfM 2.0, DMI 2.0, WOL by PME, WOR by PME, PXE Drivers ASUS Utilities ASUS Update Anti-virus software (OEM version) uATX Form Factor, 9.6"x 9.6" (24.5cm x 24.5cm) *Specifications are subject to change without notice. P8H67-M EVO specifications summary Back Panel I/O Ports Internal I/O Connectors BIOS Features Manageability Support DVD Contents Form Factor 1 x PS/2 Keyboard/Mouse port...
... 1 x EPU switch 1 x COM port connector 1 x Clear CMOS jumper 1 x TPM header 32 Mb Flash ROM, EFI MIOS, PnP, DMI 2.0, WfM 2.0, SM BIOS 2.5, ACPI 2.0a, Multi-language BIOS, ASUS EZ Flash 2, ASUS CrashFree BIOS 3 WfM 2.0, DMI 2.0, WOL by PME, WOR by PME, PXE Drivers ASUS Utilities ASUS Update Anti-virus software (OEM version) uATX Form Factor, 9.6"x 9.6" (24.5cm x 24.5cm) *Specifications are subject to change without notice. P8H67-M EVO specifications summary Back Panel I/O Ports Internal I/O Connectors BIOS Features Manageability Support DVD Contents Form Factor 1 x PS/2 Keyboard/Mouse port...
User Manual
Page 16
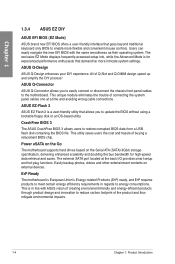
... mouse controls. ASUS EZ-Flash 2 ASUS EZ Flash 2 is for high-speed data retrieval and saves. The exclusive EZ Mode displays frequently-accessed setup info, while the Advanced Mode is a user-friendly utility that goes beyond traditional keyboard only BIOS to enable more intricate system settings. The external SATA port located at a time and avoiding wrong cable connections. Power eSATA on the Go The motherboard supports hard drives based on external devices. ASUS Q-Connector ASUS Q-Connector allows you to update the BIOS without using a bootable floppy disk or...
... mouse controls. ASUS EZ-Flash 2 ASUS EZ Flash 2 is for high-speed data retrieval and saves. The exclusive EZ Mode displays frequently-accessed setup info, while the Advanced Mode is a user-friendly utility that goes beyond traditional keyboard only BIOS to enable more intricate system settings. The external SATA port located at a time and avoiding wrong cable connections. Power eSATA on the Go The motherboard supports hard drives based on external devices. ASUS Q-Connector ASUS Q-Connector allows you to update the BIOS without using a bootable floppy disk or...
User Manual
Page 28
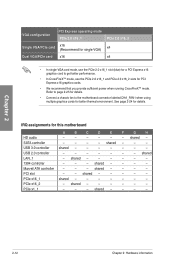
... information USB 3.0 controller shared - - - - - - - shared - - - - - - 1394 controller - - - shared - - - - Chapter 2 VGA configuration PCI Express operating mode PCIe 2.0 x16_1 Single VGA/PCIe card x16 (Recommend for single VGA) Dual VGA/PCIe card x16 PCIe 2.0 x16_2 x4 x4 • In single VGA card mode, use the PCIe 2.0 x16_1 slot (blue) for a PCI Express x16 graphics card to the motherboard connector labeled CHA_FAN1 when using multiple graphics cards for PCI Express x16 graphics cards. • We recommend that you provide sufficient power when running...
... information USB 3.0 controller shared - - - - - - - shared - - - - - - 1394 controller - - - shared - - - - Chapter 2 VGA configuration PCI Express operating mode PCIe 2.0 x16_1 Single VGA/PCIe card x16 (Recommend for single VGA) Dual VGA/PCIe card x16 PCIe 2.0 x16_2 x4 x4 • In single VGA card mode, use the PCIe 2.0 x16_1 slot (blue) for a PCI Express x16 graphics card to the motherboard connector labeled CHA_FAN1 when using multiple graphics cards for PCI Express x16 graphics cards. • We recommend that you provide sufficient power when running...
User Manual
Page 29
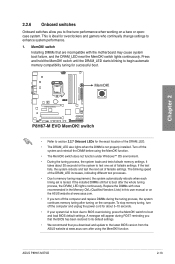
... replace DIMMs during POST reminding you that the BIOS has been restored to its default settings. • We recommend that are incompatible with ones recommended in the Memory QVL (Qualified Vendors Lists) in this user manual or on the ASUS website at www.asus.com after using the MemOK! 2.2.6 Onboard switches Onboard switches allow you to BIOS overclocking, press the MemOK! switch Installing DIMMs that you download and update to begin automatic memory compatibility...
... replace DIMMs during POST reminding you that the BIOS has been restored to its default settings. • We recommend that are incompatible with ones recommended in the Memory QVL (Qualified Vendors Lists) in this user manual or on the ASUS website at www.asus.com after using the MemOK! 2.2.6 Onboard switches Onboard switches allow you to BIOS overclocking, press the MemOK! switch Installing DIMMs that you download and update to begin automatic memory compatibility...
User Manual
Page 56
... 2GB Playback software - Using the CPU/Memory of the onboard VGA, DVI-D, and HDMI ports. If this happens, wait 15 seconds for VGA output. • This motherboard comes with the higher-version DVD player and drivers will automatically select the the add-on two monitors. Chapter 2 • DO NOT insert a different connector to the external SATA port. • Due to USB 3.0 controller limitation, USB 3.0 devices can only be used as data storage only...
... 2GB Playback software - Using the CPU/Memory of the onboard VGA, DVI-D, and HDMI ports. If this happens, wait 15 seconds for VGA output. • This motherboard comes with the higher-version DVD player and drivers will automatically select the the add-on two monitors. Chapter 2 • DO NOT insert a different connector to the external SATA port. • Due to USB 3.0 controller limitation, USB 3.0 devices can only be used as data storage only...
User Manual
Page 63
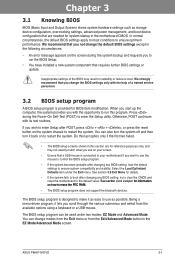
... the reset button on to ensure system compatibility and stability. Otherwise, POST continues with the opportunity to restart the system. If you change modes from the Exit menu or from the available options using a keyboard or a USB mouse. Select the Load Optimized Defaults item under two modes: EZ Mode and Advanced Mode. The BIOS setup program is connected to your screen. • Ensure that you wish to enter Setup after changing any BIOS setting, load the default settings...
... the reset button on to ensure system compatibility and stability. Otherwise, POST continues with the opportunity to restart the system. If you change modes from the Exit menu or from the available options using a keyboard or a USB mouse. Select the Load Optimized Defaults item under two modes: EZ Mode and Advanced Mode. The BIOS setup program is connected to your screen. • Ensure that you wish to enter Setup after changing any BIOS setting, load the default settings...
User Manual
Page 65
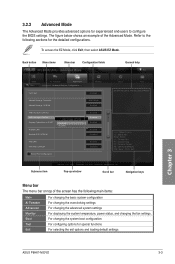
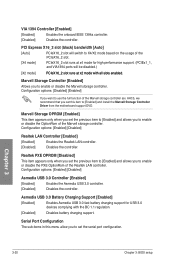
... settings Chapter 3 ASUS P8H67-M EVO 3-3 Back button Menu items Menu bar Configuration fields EFI BIOS Utility - Advanced Mode General help Exit Main Back Ai Tweaker Advanced Advanced\ Onboard Devices Configuration > Monitor VIA 1394 Enabled Marvell Storage Controller AHCI Mode Marvell Storage OPROM Enabled JMB Storage Controller Enabled JMB Storage OPROM JMB Storage OPROM Display OptionRom in POST Disabled Enabled Realtek LAN Enabled Enabled Enabled Realtek PXE OPROM Disabled Intel LAN Enabled Intel PXE OPROM Disabled > Serial Port Configuration Boot...
... settings Chapter 3 ASUS P8H67-M EVO 3-3 Back button Menu items Menu bar Configuration fields EFI BIOS Utility - Advanced Mode General help Exit Main Back Ai Tweaker Advanced Advanced\ Onboard Devices Configuration > Monitor VIA 1394 Enabled Marvell Storage Controller AHCI Mode Marvell Storage OPROM Enabled JMB Storage Controller Enabled JMB Storage OPROM JMB Storage OPROM Display OptionRom in POST Disabled Enabled Realtek LAN Enabled Enabled Enabled Realtek PXE OPROM Disabled Intel LAN Enabled Intel PXE OPROM Disabled > Serial Port Configuration Boot...
User Manual
Page 69
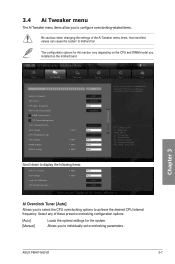
... overclocking parameters. Allows you installed on the CPU and DIMM model you to display the following items: CPU PLL Voltage 1.800V Auto PCH Voltage 1.050V Auto Load-Line Calibration Auto CPU Spread Spectrum Auto Version 2.00.1201. Frequency Auto EPU Power Saving Mode Disabled > DRAM Timing Control > CPU Power Management CPU Offset Mode Sign + CPU Voltage 1.230V Auto iGPU Offset Mode Sign + iGPU Voltage 1.000V Auto DRAM Voltage 1.500V Auto VCCIO Voltage 1.050V Auto Boot Tool [X.M.P.] When XMP is enabled BLCK frequency, CPU ratio and memory...
... overclocking parameters. Allows you installed on the CPU and DIMM model you to display the following items: CPU PLL Voltage 1.800V Auto PCH Voltage 1.050V Auto Load-Line Calibration Auto CPU Spread Spectrum Auto Version 2.00.1201. Frequency Auto EPU Power Saving Mode Disabled > DRAM Timing Control > CPU Power Management CPU Offset Mode Sign + CPU Voltage 1.230V Auto iGPU Offset Mode Sign + iGPU Voltage 1.000V Auto DRAM Voltage 1.500V Auto VCCIO Voltage 1.050V Auto Boot Tool [X.M.P.] When XMP is enabled BLCK frequency, CPU ratio and memory...

User Manual
Page 71
... default speed. [Enabled] The operating system controls the CPU speed. Chapter 3 ASUS P8H67-M EVO 3-9 Long Duration Maintained [Auto] Use the and keys to adjust the value. Turbo Mode [Enabled] This item appears only when you set the Enhanced Intel SpeedStep Technology and Turbo Mode items to [Enabled]. Short Duration Power Limit [Auto] Use the and keys to adjust the value. Primary Plane Current Limit [Auto] Use the and keys to adjust the value. To restore the default setting, type [auto] using...
... default speed. [Enabled] The operating system controls the CPU speed. Chapter 3 ASUS P8H67-M EVO 3-9 Long Duration Maintained [Auto] Use the and keys to adjust the value. Turbo Mode [Enabled] This item appears only when you set the Enhanced Intel SpeedStep Technology and Turbo Mode items to [Enabled]. Short Duration Power Limit [Auto] Use the and keys to adjust the value. Primary Plane Current Limit [Auto] Use the and keys to adjust the value. To restore the default setting, type [auto] using...
User Manual
Page 81
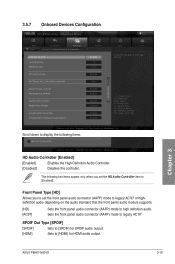
...Controller Enabled Asmedia USB 3.0 Battery Charing Support Enabled Boot Tool Enabled/Disabled Marvell Storage OPROM. →←: Select Screen ↑↓: Select Item Enter: Select +/-: Change Opt. F1: General Help F2: Previous Values F5: Optimized Defaults F10: Save ESC: Exit Version 2.00.1201. Copyright (C) 2010 American Megatrends, Inc. Sets the front panel audio connector (AAFP) mode to legacy AC'97 SPDIF Out Type [SPDIF] [SPDIF] Sets to [SPDIF] for HDMI audio output. HD Audio Controller [Enabled] [Enabled] Enables the High Definition Audio Controller...
...Controller Enabled Asmedia USB 3.0 Battery Charing Support Enabled Boot Tool Enabled/Disabled Marvell Storage OPROM. →←: Select Screen ↑↓: Select Item Enter: Select +/-: Change Opt. F1: General Help F2: Previous Values F5: Optimized Defaults F10: Save ESC: Exit Version 2.00.1201. Copyright (C) 2010 American Megatrends, Inc. Sets the front panel audio connector (AAFP) mode to legacy AC'97 SPDIF Out Type [SPDIF] [SPDIF] Sets to [SPDIF] for HDMI audio output. HD Audio Controller [Enabled] [Enabled] Enables the High Definition Audio Controller...
User Manual
Page 82
... item to use the full function of the PCIeX16_2 slot. Configuration options: [Enabled] [Disabled] Asmedia USB 3.0 Controller [Enabled] [Enabled] Enables the Asmedia USB 3.0 controller. [Disabled] Disables the controller. PCIeX16_2 slot runs at x4 mode for USB 3.0 devices complying with the BC 1.1 regulation. [Disabled] Disables battery charging support. Marvell Storage Controller [Enabled] Allows you want to [Enabled] and install the Marvell Storage Controller Driver from the motherboard support DVD. PCI Express X16_2 slot (black) bandwidth [Auto] [Auto] [X4 mode...
... item to use the full function of the PCIeX16_2 slot. Configuration options: [Enabled] [Disabled] Asmedia USB 3.0 Controller [Enabled] [Enabled] Enables the Asmedia USB 3.0 controller. [Disabled] Disables the controller. PCIeX16_2 slot runs at x4 mode for USB 3.0 devices complying with the BC 1.1 regulation. [Disabled] Disables battery charging support. Marvell Storage Controller [Enabled] Allows you want to [Enabled] and install the Marvell Storage Controller Driver from the motherboard support DVD. PCI Express X16_2 slot (black) bandwidth [Auto] [Auto] [X4 mode...
User Manual
Page 93
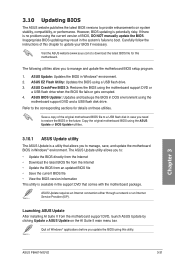
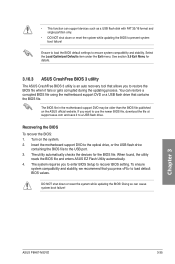
... a utility that comes with the motherboard package. Carefully follow the instructions of BIOS, DO NOT manually update the BIOS. Copy the original motherboard BIOS using the motherboard support DVD or a USB flash drive when the BIOS file fails or gets corrupted. 4. 3.10 Updating BIOS The ASUS website publishes the latest BIOS versions to provide enhancements on the AI Suite II main menu bar. ASUS Update requires an Internet connection either through a network or an Internet Service Provider (ISP). Quit all Windows...
... a utility that comes with the motherboard package. Carefully follow the instructions of BIOS, DO NOT manually update the BIOS. Copy the original motherboard BIOS using the motherboard support DVD or a USB flash drive when the BIOS file fails or gets corrupted. 4. 3.10 Updating BIOS The ASUS website publishes the latest BIOS versions to provide enhancements on the AI Suite II main menu bar. ASUS Update requires an Internet connection either through a network or an Internet Service Provider (ISP). Quit all Windows...
User Manual
Page 97
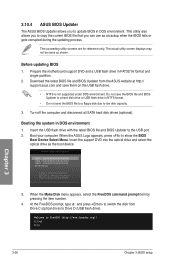
... BIOS setting. If you to the USB port. 3. When found, the utility reads the BIOS file and enters ASUS EZ Flash Utility automatically. 4. The system requires you press to prevent system boot failure! To ensure system compatibility and stability, we recommend that contains the BIOS file. Chapter 3 ASUS P8H67-M EVO 3-35 DO NOT shut down or reset the system while updating the BIOS to load default BIOS values. You can restore a corrupted BIOS file using the motherboard support DVD or a USB flash drive...
... BIOS setting. If you to the USB port. 3. When found, the utility reads the BIOS file and enters ASUS EZ Flash Utility automatically. 4. The system requires you press to prevent system boot failure! To ensure system compatibility and stability, we recommend that contains the BIOS file. Chapter 3 ASUS P8H67-M EVO 3-35 DO NOT shut down or reset the system while updating the BIOS to load default BIOS values. You can restore a corrupted BIOS file using the motherboard support DVD or a USB flash drive...
User Manual
Page 98
... support.asus.com and save the BIOS file to a floppy disk due to show the BIOS Boot Device Select Menu. Turn off the computer and disconnect all SATA hard disk drives (optional). Please select boot device: SATA: XXXXXXXXXXXXXXXX USB XXXXXXXXXXXXXXXXX UEFI: XXXXXXXXXXXXXXXX Enter Setup ↑ and ↓ to move selection ENTER to select boot device ESC to Drive D (USB flash drive). Prepare the motherboard support DVD and a USB flash drive in DOS environment 1. Download the latest BIOS file and BIOS Updater from Drive C (optical drive) to boot using defaults 3. Insert the USB flash...
... support.asus.com and save the BIOS file to a floppy disk due to show the BIOS Boot Device Select Menu. Turn off the computer and disconnect all SATA hard disk drives (optional). Please select boot device: SATA: XXXXXXXXXXXXXXXX USB XXXXXXXXXXXXXXXXX UEFI: XXXXXXXXXXXXXXXX Enter Setup ↑ and ↓ to move selection ENTER to select boot device ESC to Drive D (USB flash drive). Prepare the motherboard support DVD and a USB flash drive in DOS environment 1. Download the latest BIOS file and BIOS Updater from Drive C (optical drive) to boot using defaults 3. Insert the USB flash...
User Manual
Page 101
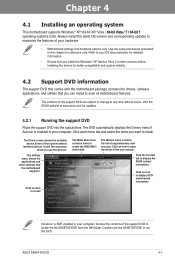
... you install the Windows® XP Service Pack 2 or later versions before installing the drivers for better compatibility and system stability. 4.2 Support DVD information The support DVD that comes with the motherboard package contains the drivers, software applications, and utilities that the motherboard supports. The contents of the user manual. Double-click the ASSETUP.EXE to use the devices. Always install the latest OS version and corresponding updates to avail all motherboard features. Install the necessary drivers...
... you install the Windows® XP Service Pack 2 or later versions before installing the drivers for better compatibility and system stability. 4.2 Support DVD information The support DVD that comes with the motherboard package contains the drivers, software applications, and utilities that the motherboard supports. The contents of the user manual. Double-click the ASSETUP.EXE to use the devices. Always install the latest OS version and corresponding updates to avail all motherboard features. Install the necessary drivers...
User Manual
Page 115
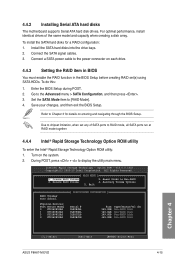
4.4.2 Installing Serial ATA hard disks The motherboard supports Serial ATA hard disk drives. Connect the SATA signal cables. 3. Enter the BIOS Setup during POST. 2. During POST, press + to Non-RAID 4. Intel(R) Rapid Storage Technology - All Rights Reserved. [ MAIN MENU ] 1. Delete RAID Volume 3. Exit RAID Volumes: None defined. Save your changes, and then exit the BIOS Setup. Create RAID Volume 2. Recovery Volume Options 5. Reset Disks to display the utility main menu. To do this: 1. Set the SATA Mode item to the Advanced menu > SATA Configuration, and then press . ...
4.4.2 Installing Serial ATA hard disks The motherboard supports Serial ATA hard disk drives. Connect the SATA signal cables. 3. Enter the BIOS Setup during POST. 2. During POST, press + to Non-RAID 4. Intel(R) Rapid Storage Technology - All Rights Reserved. [ MAIN MENU ] 1. Delete RAID Volume 3. Exit RAID Volumes: None defined. Save your changes, and then exit the BIOS Setup. Create RAID Volume 2. Recovery Volume Options 5. Reset Disks to display the utility main menu. To do this: 1. Set the SATA Mode item to the Advanced menu > SATA Configuration, and then press . ...
User Manual
Page 119
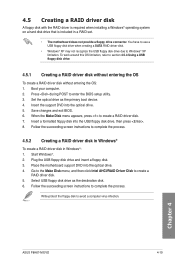
... a RAID driver disk A floppy disk with the RAID driver is required when installing a Windows® operating system on a hard disk drive that is included in Windows®: 1. Save changes and exit BIOS. 6. Chapter 4 ASUS P8H67-M EVO 4-19 Press during POST to complete the process. 4.5.2 Creating a RAID driver disk in Windows® To create a RAID driver disk in a RAID set. • The motherboard does not provide a floppy drive connector. Boot your computer. 2. Follow the succeeding screen instructions to enter the BIOS setup utility. 3. Place the motherboard support DVD...
... a RAID driver disk A floppy disk with the RAID driver is required when installing a Windows® operating system on a hard disk drive that is included in Windows®: 1. Save changes and exit BIOS. 6. Chapter 4 ASUS P8H67-M EVO 4-19 Press during POST to complete the process. 4.5.2 Creating a RAID driver disk in Windows® To create a RAID driver disk in a RAID set. • The motherboard does not provide a floppy drive connector. Boot your computer. 2. Follow the succeeding screen instructions to enter the BIOS setup utility. 3. Place the motherboard support DVD...
User Manual
Page 120
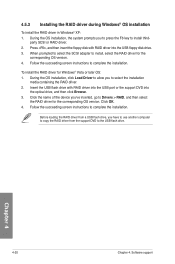
... 4 4-20 Chapter 4: Software support Press , and then insert the floppy disk with RAID driver into the USB port or the support DVD into the USB floppy disk drive. 3. Follow the succeeding screen instructions to complete the installation. Before loading the RAID driver from a USB flash drive, you 've inserted, go to the USB flash drive. During the OS installation, click Load Driver to allow you to press the F6 key to select the installation media containing the RAID driver. 2. To install the RAID driver for the...
... 4 4-20 Chapter 4: Software support Press , and then insert the floppy disk with RAID driver into the USB port or the support DVD into the USB floppy disk drive. 3. Follow the succeeding screen instructions to complete the installation. Before loading the RAID driver from a USB flash drive, you 've inserted, go to the USB flash drive. During the OS installation, click Load Driver to allow you to press the F6 key to select the installation media containing the RAID driver. 2. To install the RAID driver for the...


