
User Manual
Page 2
... Software licenses. ASUSTeK is dependent on the preferred carrier and the location where you want to have it shipped to : ASUSTeK Computer Inc. SPECIFICATIONS AND INFORMATION CONTAINED IN THIS MANUAL ARE FURNISHED FOR INFORMATIONAL USE ONLY, AND ARE SUBJECT TO CHANGE AT ANY TIME WITHOUT NOTICE, AND SHOULD NOT BE CONSTRUED AS A COMMITMENT BY ASUS. The source code...
... Software licenses. ASUSTeK is dependent on the preferred carrier and the location where you want to have it shipped to : ASUSTeK Computer Inc. SPECIFICATIONS AND INFORMATION CONTAINED IN THIS MANUAL ARE FURNISHED FOR INFORMATIONAL USE ONLY, AND ARE SUBJECT TO CHANGE AT ANY TIME WITHOUT NOTICE, AND SHOULD NOT BE CONSTRUED AS A COMMITMENT BY ASUS. The source code...
User Manual
Page 11
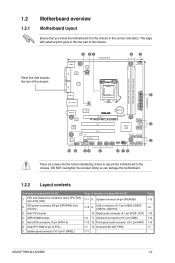
... USB910 CLRTC USB78 USB56 SPEAKER SATA3G_6 SATA3G_4 5 AAFP F_PANEL 13 12 11 10 9 8 76 Place six screws into the chassis in the correct orientation. Digital audio connector (4-1 pin SPDIF_OUT) 1-3 11. Onboard LED (SB_PWR) 1-11 Page 1-13 1-9 1-10 1-14 1-13 1-1 ASUS P7H55-M LX/USB3 1-2 System panel connector (10-1 pin F_PANEL) Page Connectors/Jumpers/Slots/LED 1-11 8. Clear RTC RAM (3-pin CLRTC) 7. Front panel audio connector (10-1 pin AAFP) 1-7 13. DO NOT overtighten the screws! Intel® CPU socket 4.
... USB910 CLRTC USB78 USB56 SPEAKER SATA3G_6 SATA3G_4 5 AAFP F_PANEL 13 12 11 10 9 8 76 Place six screws into the chassis in the correct orientation. Digital audio connector (4-1 pin SPDIF_OUT) 1-3 11. Onboard LED (SB_PWR) 1-11 Page 1-13 1-9 1-10 1-14 1-13 1-1 ASUS P7H55-M LX/USB3 1-2 System panel connector (10-1 pin F_PANEL) Page Connectors/Jumpers/Slots/LED 1-11 8. Clear RTC RAM (3-pin CLRTC) 7. Front panel audio connector (10-1 pin AAFP) 1-7 13. DO NOT overtighten the screws! Intel® CPU socket 4.

User Manual
Page 15
..., SCSI cards and other cards that comply with the PCI Express specifications. 1.5.5 PCI Express x16 slot This motherboard supports PCI Express x16 graphics cards that you physical injury and damage motherboard components. 1.5.1 Installing an expansion card To install an expansion card: 1. ASUS P7H55-M LX/USB3 1-6 Remove the bracket opposite the slot that comply with the screw. 6. Install the software drivers for the card. 2. Replace the chassis cover. 1.5.2 Configuring an expansion card After installing the expansion card, configure it and make the necessary hardware settings for...
..., SCSI cards and other cards that comply with the PCI Express specifications. 1.5.5 PCI Express x16 slot This motherboard supports PCI Express x16 graphics cards that you physical injury and damage motherboard components. 1.5.1 Installing an expansion card To install an expansion card: 1. ASUS P7H55-M LX/USB3 1-6 Remove the bracket opposite the slot that comply with the screw. 6. Install the software drivers for the card. 2. Replace the chassis cover. 1.5.2 Configuring an expansion card After installing the expansion card, configure it and make the necessary hardware settings for...

User Manual
Page 17
...1. PS/2 Mouse port. Video Graphics Adapter (VGA) port. LAN (RJ-45) port. This port connects the tape, CD, DVD player, or other VGA-compatible devices. 3. Line Out port (lime). In 4-channel, 6-channel, and 8-channel configurations, the function of the audio ports in the front panel to a Local Area Network (LAN) through a network hub. This 15-pin port is for a VGA monitor or other audio sources. 5. This port connects a microphone. This port connects to a headphone or a speaker. Microphone port (pink). This port is for a PS/2 mouse. 2. ASUS P7H55-M LX/USB3 1-8
...1. PS/2 Mouse port. Video Graphics Adapter (VGA) port. LAN (RJ-45) port. This port connects the tape, CD, DVD player, or other VGA-compatible devices. 3. Line Out port (lime). In 4-channel, 6-channel, and 8-channel configurations, the function of the audio ports in the front panel to a Local Area Network (LAN) through a network hub. This 15-pin port is for a VGA monitor or other audio sources. 5. This port connects a microphone. This port connects to a headphone or a speaker. Microphone port (pink). This port is for a PS/2 mouse. 2. ASUS P7H55-M LX/USB3 1-8

User Manual
Page 25
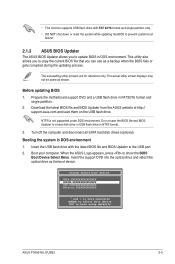
...and update the motherboard BIOS in Windows® environment. • ASUS Update requires an Internet connection either of the original motherboard BIOS file to a USB flash disk in the future. c. Copy the original motherboard BIOS using this utility. The Drivers menu appears. 2. From the FTP site, select the BIOS version that comes with the motherboard package. Click the Utilities tab, then click ASUS Update. 3. ASUS P7H55-M LX/USB3 2-1 Installing ASUS Update To install ASUS Update: 1. From the dropdown list, select either through a network or an Internet Service Provider...
...and update the motherboard BIOS in Windows® environment. • ASUS Update requires an Internet connection either of the original motherboard BIOS file to a USB flash disk in the future. c. Copy the original motherboard BIOS using this utility. The Drivers menu appears. 2. From the FTP site, select the BIOS version that comes with the motherboard package. Click the Utilities tab, then click ASUS Update. 3. ASUS P7H55-M LX/USB3 2-1 Installing ASUS Update To install ASUS Update: 1. From the dropdown list, select either through a network or an Internet Service Provider...

User Manual
Page 26
... you start using EZ Flash 2: 1. Press to the USB port, then launch EZ Flash 2 in either of updating itself through the Internet. Updating from the ASUS website at www.asus.com. To update the BIOS using this utility, download the latest BIOS file from a BIOS file a. ASUSTek EZ Flash 2 BIOS ROM Utility V4.14 Current ROM BOARD: P7H55 M LX USB3 VER: 0205 (H:00 B:00) DATE: 10/29/2010 Update ROM BOARD: Unknown VER: Unknown DATE: Unknown PATH: A:\ A: Note [Enter] Select or Load [Up...
... you start using EZ Flash 2: 1. Press to the USB port, then launch EZ Flash 2 in either of updating itself through the Internet. Updating from the ASUS website at www.asus.com. To update the BIOS using this utility, download the latest BIOS file from a BIOS file a. ASUSTek EZ Flash 2 BIOS ROM Utility V4.14 Current ROM BOARD: P7H55 M LX USB3 VER: 0205 (H:00 B:00) DATE: 10/29/2010 Update ROM BOARD: Unknown VER: Unknown DATE: Unknown PATH: A:\ A: Note [Enter] Select or Load [Up...
User Manual
Page 27
...The succeeding utility screens are for reference only. Prepare the motherboard support DVD and a USB flash drive in DOS environment 1. Insert the support DVD into the optical drive and select the optical drive as shown. Before updating BIOS 1. Do not save them on the USB flash drive. Turn off the computer and disconnect all SATA hard disk drives (optional). Boot your computer. This utility also allows you to boot using defaults ASUS P7H55-M LX/USB3 2-3 Please select boot device: SATA:XXXXXXXXXXXXXXXX CDROM:XXXXXXXXXXXXXXX USB:XXXXXXXXXXXXXXXXX Network:XXXXXXXXXXXXX...
...The succeeding utility screens are for reference only. Prepare the motherboard support DVD and a USB flash drive in DOS environment 1. Insert the support DVD into the optical drive and select the optical drive as shown. Before updating BIOS 1. Do not save them on the USB flash drive. Turn off the computer and disconnect all SATA hard disk drives (optional). Boot your computer. This utility also allows you to boot using defaults ASUS P7H55-M LX/USB3 2-3 Please select boot device: SATA:XXXXXXXXXXXXXXXX CDROM:XXXXXXXXXXXXXXX USB:XXXXXXXXXXXXXXXXX Network:XXXXXXXXXXXXX...

User Manual
Page 29
... 3. ASUSTek BIOS Updater for details. • Ensure to connect all SATA hard disk drives after updating BIOS. • Ensure to load the BIOS default settings to exit BIOS Updater. DO NOT shut down or reset the system while updating the BIOS to prevent system boot failure! • For BIOS Updater version 1.04 or later, the utility automatically exits to the DOS prompt after updating the BIOS file if you to confirm BIOS update. At the FreeDOS prompt, type bupdater /pc...
... 3. ASUSTek BIOS Updater for details. • Ensure to connect all SATA hard disk drives after updating BIOS. • Ensure to load the BIOS default settings to exit BIOS Updater. DO NOT shut down or reset the system while updating the BIOS to prevent system boot failure! • For BIOS Updater version 1.04 or later, the utility automatically exits to the DOS prompt after updating the BIOS file if you to confirm BIOS update. At the FreeDOS prompt, type bupdater /pc...

User Manual
Page 30
... starts flashing the corrupted BIOS file. 4. Refer to ensure system compatibility and stability. You can cause system boot failure! Recovering the BIOS To recover the BIOS: 1. Turn on again. Select the Load Setup Defaults item under the Exit menu. 2.1.4 ASUS CrashFree BIOS 3 ASUS CrashFree BIOS 3 is an auto recovery tool that contains the BIOS file to the USB port or to the floppy disk drive, if supported. 3. The utility automatically checks the devices for details. 2-6 Chapter 2: BIOS information Ensure to load the BIOS default settings...
... starts flashing the corrupted BIOS file. 4. Refer to ensure system compatibility and stability. You can cause system boot failure! Recovering the BIOS To recover the BIOS: 1. Turn on again. Select the Load Setup Defaults item under the Exit menu. 2.1.4 ASUS CrashFree BIOS 3 ASUS CrashFree BIOS 3 is an auto recovery tool that contains the BIOS file to the USB port or to the floppy disk drive, if supported. 3. The utility automatically checks the devices for details. 2-6 Chapter 2: BIOS information Ensure to load the BIOS default settings...
User Manual
Page 32
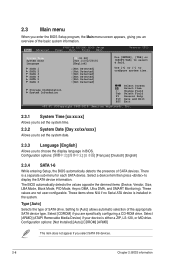
... drive. 2.3 Main menu When you enter the BIOS Setup program, the Main menu screen appears, giving you select SATA 5/6 devices. 2-8 Chapter 2: BIOS information Select Screen Select Item +- Select a device item then press to [Auto] allows automatic selection of the basic system information. Select [CDROM] if you to set the system date. 2.3.3 Language [English] Allows you are not user-configurable. There is a separate sub-menu for each SATA device. Main Advanced P7H55-M LX/USB3 BIOS Setup Power Boot Tools Exit Version...
... drive. 2.3 Main menu When you enter the BIOS Setup program, the Main menu screen appears, giving you select SATA 5/6 devices. 2-8 Chapter 2: BIOS information Select Screen Select Item +- Select a device item then press to [Auto] allows automatic selection of the basic system information. Select [CDROM] if you to set the system date. 2.3.3 Language [English] Allows you are not user-configurable. There is a separate sub-menu for each SATA device. Main Advanced P7H55-M LX/USB3 BIOS Setup Power Boot Tools Exit Version...

User Manual
Page 33
...Due to Intel chipset driver support regulation, the AHCI mode is only supported by the Southbridge chip. ASUS P7H55-M LX/USB3 2-9 When set to [Disabled], the data transfer from and to set the SATA configuration. Configuration options: [Disabled] [Compatible] [Enhanced] Configure SATA as [IDE] Sets the configuration for the SATA devices installed in Windows XP environment. Configuration options: [Auto] [0] [1] [2] [3] [4] DMA Mode [Auto] Selects the DMA mode. Configuration options: [Auto] [Disabled] [Enabled] 32Bit Data Transfer [Enabled] Enables or disables 32-bit data...
...Due to Intel chipset driver support regulation, the AHCI mode is only supported by the Southbridge chip. ASUS P7H55-M LX/USB3 2-9 When set to [Disabled], the data transfer from and to set the SATA configuration. Configuration options: [Disabled] [Compatible] [Enhanced] Configure SATA as [IDE] Sets the configuration for the SATA devices installed in Windows XP environment. Configuration options: [Auto] [0] [1] [2] [3] [4] DMA Mode [Auto] Selects the DMA mode. Configuration options: [Auto] [Disabled] [Enabled] 32Bit Data Transfer [Enabled] Enables or disables 32-bit data...
User Manual
Page 34
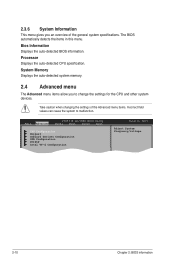
... items in this menu. System Memory Displays the auto-detected system memory. 2.4 Advanced menu The Advanced menu items allow you an overview of the Advanced menu items. Incorrect field values can cause the system to change the settings for the CPU and other system devices. Processor Displays the auto-detected CPU specification. Main Advanced P7H55-M LX/USB3 BIOS Setup Power Boot Tools Exit CPU Configuration Chipset Onboard Devices Configuration USB Configuration PCIPnP Intel VT-d Configuration Version 0205 Adjust System frequency/voltage. 2-10 Chapter 2: BIOS information Take...
... items in this menu. System Memory Displays the auto-detected system memory. 2.4 Advanced menu The Advanced menu items allow you an overview of the Advanced menu items. Incorrect field values can cause the system to change the settings for the CPU and other system devices. Processor Displays the auto-detected CPU specification. Main Advanced P7H55-M LX/USB3 BIOS Setup Power Boot Tools Exit CPU Configuration Chipset Onboard Devices Configuration USB Configuration PCIPnP Intel VT-d Configuration Version 0205 Adjust System frequency/voltage. 2-10 Chapter 2: BIOS information Take...
User Manual
Page 35
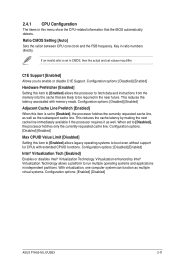
... multiple virtual systems. Configuration options: [Enabled] [Disabled] ASUS P7H55-M LX/USB3 2-11 2.4.1 CPU Configuration The items in this item to [Enabled] allows the processor to fetch data and instructions from the memory into the cache that the BIOS automatically detects. Ratio CMOS Setting [Auto] Sets the ration between CPU core clock and the FSB frequency. This reduces the latency associated with extended CPUID functions. With virtualization, one computer system can function as well. C1E Support [Enabled] Allows...
... multiple virtual systems. Configuration options: [Enabled] [Disabled] ASUS P7H55-M LX/USB3 2-11 2.4.1 CPU Configuration The items in this item to [Enabled] allows the processor to fetch data and instructions from the memory into the cache that the BIOS automatically detects. Ratio CMOS Setting [Auto] Sets the ration between CPU core clock and the FSB frequency. This reduces the latency associated with extended CPUID functions. With virtualization, one computer system can function as well. C1E Support [Enabled] Allows...

User Manual
Page 36
... 2: BIOS information Turbo mode allows processor cores to zero (0). We recommend that supports the Enhanced Intel® SpeedStep® Technology (EIST). Configuration options: [Disabled] [Enabled] Execute-Disable Bit Capability [Enabled] Allows you set the CPU Ratio Setting item to activate in specific condition. Configuration options: [All] [1] [2] A20M [Disabled] Setting this item is controlled by your CPU. Intel(R) SpeedStep(TM) Tech [Enabled] When this item to [Auto] for BIOS to [Disabled], the CPU runs at its default speed. Configuration options: [Enabled] [Disabled...
... 2: BIOS information Turbo mode allows processor cores to zero (0). We recommend that supports the Enhanced Intel® SpeedStep® Technology (EIST). Configuration options: [Disabled] [Enabled] Execute-Disable Bit Capability [Enabled] Allows you set the CPU Ratio Setting item to activate in specific condition. Configuration options: [All] [1] [2] A20M [Disabled] Setting this item is controlled by your CPU. Intel(R) SpeedStep(TM) Tech [Enabled] When this item to [Auto] for BIOS to [Disabled], the CPU runs at its default speed. Configuration options: [Enabled] [Disabled...

User Manual
Page 37
...enable or disable the high definition audio controller. The configuration options for this option only when you to enabled or disable the remapping of the overlapped PCI memory above the total physical memory. Configuration options: [Enabled] [Disabled] Front Panel Type [HD Audio] Allows you to select the front panel type. Select an item then press to [Enabled]. Configuration options: [AC97] [HD Audio] Onboard LAN [Enabled] Allows you to enable or disable the onboard LAN controller. Configuration options: [Disabled] [3F8/IRQ4] [2F8/IRQ3] [3E8/IRQ4] [2E8/IRQ3] ASUS P7H55-M LX/USB3...
...enable or disable the high definition audio controller. The configuration options for this option only when you to enabled or disable the remapping of the overlapped PCI memory above the total physical memory. Configuration options: [Enabled] [Disabled] Front Panel Type [HD Audio] Allows you to select the front panel type. Select an item then press to [Enabled]. Configuration options: [AC97] [HD Audio] Onboard LAN [Enabled] Allows you to enable or disable the onboard LAN controller. Configuration options: [Disabled] [3F8/IRQ4] [2F8/IRQ3] [3E8/IRQ4] [2E8/IRQ3] ASUS P7H55-M LX/USB3...
User Manual
Page 38
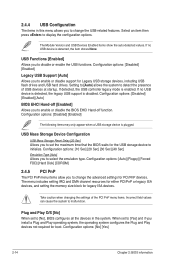
... Plug and Play devices not required for boot. If no USB device is disabled. Setting to [Auto] allows the system to display the configuration options. Configuration options: [Auto] [Floppy] [Forced FDD] [Hard Disk] [CDROM] 2.4.5 PCI PnP The PCI PnP menu items allow you to change the advanced settings for legacy ISA devices. Configuration options: [No] [Yes] 2-14 Chapter 2: BIOS information The menu includes setting IRQ and DMA channel resources for either PCI/PnP or legacy ISA devices, and setting the memory size block for PCI/PnP devices. Configuration options: [Disabled...
... Plug and Play devices not required for boot. If no USB device is disabled. Setting to [Auto] allows the system to display the configuration options. Configuration options: [Auto] [Floppy] [Forced FDD] [Hard Disk] [CDROM] 2.4.5 PCI PnP The PCI PnP menu items allow you to change the advanced settings for legacy ISA devices. Configuration options: [No] [Yes] 2-14 Chapter 2: BIOS information The menu includes setting IRQ and DMA channel resources for either PCI/PnP or legacy ISA devices, and setting the memory size block for PCI/PnP devices. Configuration options: [Disabled...
User Manual
Page 39
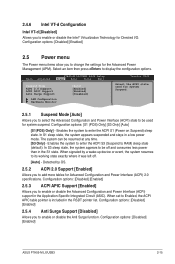
...RAM) sleep state (default). Configuration options: [Disabled] [Enabled] 2.5 Power menu The Power menu items allow you to its working state exactly where it was left off and consumes less power than in the Application-Specific Integrated Circuit (ASIC). Select an item then press to enable or disable the Intel® Virtualization Technology for system suspend. Main Advanced P7H55-M LX/USB3 BIOS Setup Power Boot Tools Exit Suspend Mode ACPI 2.0 Support ACPI APIC Support Anti Surge Support [Auto] [Enabled] [Enabled] [Disabled] APM Configuration Hardware Monitor Version...
...RAM) sleep state (default). Configuration options: [Disabled] [Enabled] 2.5 Power menu The Power menu items allow you to its working state exactly where it was left off and consumes less power than in the Application-Specific Integrated Circuit (ASIC). Select an item then press to enable or disable the Intel® Virtualization Technology for system suspend. Main Advanced P7H55-M LX/USB3 BIOS Setup Power Boot Tools Exit Suspend Mode ACPI 2.0 Support ACPI APIC Support Anti Surge Support [Auto] [Enabled] [Enabled] [Disabled] APM Configuration Hardware Monitor Version...
User Manual
Page 41
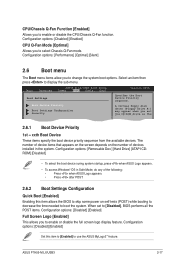
CPU/Chassis Q-Fan Function [Enabled] Allows you to select Chassis Q-Fan mode. Configuration options: [Removable Dev.] [Hard Drive] [ATAPI CDROM] [Disabled] • To select the boot device suring system startup, press when ASUS Logo appears. • To access Windows® OS in Safe Mode, do any of devices installed in the system. Configuration options: [Disabled] [Enabled] CPU Q-Fan Mode [Optimal] Allows you to enable or disable the CPU/Chassis Q-Fan function. Main Advanced P7H55-M LX/USB3 BIOS Setup Power Boot Tools Exit Boot Settings Boot Device Priority Boot Settings ...
CPU/Chassis Q-Fan Function [Enabled] Allows you to select Chassis Q-Fan mode. Configuration options: [Removable Dev.] [Hard Drive] [ATAPI CDROM] [Disabled] • To select the boot device suring system startup, press when ASUS Logo appears. • To access Windows® OS in Safe Mode, do any of devices installed in the system. Configuration options: [Disabled] [Enabled] CPU Q-Fan Mode [Optimal] Allows you to enable or disable the CPU/Chassis Q-Fan function. Main Advanced P7H55-M LX/USB3 BIOS Setup Power Boot Tools Exit Boot Settings Boot Device Priority Boot Settings ...
User Manual
Page 43
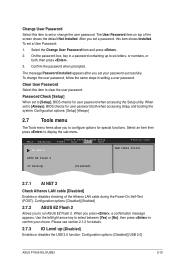
... 2 Version 0205 LAN Cable Status ASUS EZ Flash 2 IO Levelup [Disabled] 2.7.1 AI NET 2 Check Atheros LAN cable [Disabled] Enables or disables checking of the screen shows the default Not Installed. Select the Change User Password item and press . 2. Clear User Password Select this item shows Installed. Select an item then press to display the sub-menu. Use the left/right arrow key to select between [Yes] or [No], then press to confirm your password successfully. Configuration options: [Disabled] [USB 3.0] ASUS P7H55-M LX/USB3 2-19 Configuration options: [Setup...
... 2 Version 0205 LAN Cable Status ASUS EZ Flash 2 IO Levelup [Disabled] 2.7.1 AI NET 2 Check Atheros LAN cable [Disabled] Enables or disables checking of the screen shows the default Not Installed. Select the Change User Password item and press . 2. Clear User Password Select this item shows Installed. Select an item then press to display the sub-menu. Use the left/right arrow key to select between [Yes] or [No], then press to confirm your password successfully. Configuration options: [Disabled] [USB 3.0] ASUS P7H55-M LX/USB3 2-19 Configuration options: [Setup...
User Manual
Page 45
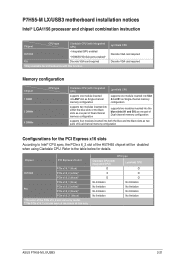
... limitation No limitation No limitation ASUS P7H55-M LX/USB3 2-21 P7H55-M LX/USB3 motherboard installation notices Intel® LGA1156 processor and chipset combination instruction Chipset CPU type Clarkdale CPU (with integrated GPU) H57/H55 • Integrated GPU enabled • HDMI/DVI/D-Sub ports enabled* P55 Discrete VGA card required * Only available for details. Refer to Intel® CPU spec, the PCIe x 6_2 slot of the PCIe x16_2 slot varies by model. ** The PCIe x16_2 slot can work at maximum x8 link only...
... limitation No limitation No limitation ASUS P7H55-M LX/USB3 2-21 P7H55-M LX/USB3 motherboard installation notices Intel® LGA1156 processor and chipset combination instruction Chipset CPU type Clarkdale CPU (with integrated GPU) H57/H55 • Integrated GPU enabled • HDMI/DVI/D-Sub ports enabled* P55 Discrete VGA card required * Only available for details. Refer to Intel® CPU spec, the PCIe x 6_2 slot of the PCIe x16_2 slot varies by model. ** The PCIe x16_2 slot can work at maximum x8 link only...


