User Manual
Page 6
... RAID driver disk 4-19 4.5.1 Creating a RAID driver disk without entering the OS 4-19 4.5.2 Creating a RAID driver disk in Windows 4-19 4.5.3 Installing the RAID driver during ...Windows® OS installation....... 4-19 4.5.4 Using a USB floppy disk drive 4-20 vi Contents 3.7.4 ACPI APIC Support [Enabled 3-28 3.7.5 APM Configuration 3-29 3.7.6 Hardware Monitor 3-30 3.7.7 EuP Ready [Disabled 3-31 3.8 Boot menu 3-32 3.8.1 Boot Device Priority 3-32 3.8.2 Boot Settings Configuration 3-33 3.8.3 Security 3-34 3.9 Tools menu 3-36 3.9.1 ASUS EZ Flash 2 3-36 3.9.2 ASUS...
... RAID driver disk 4-19 4.5.1 Creating a RAID driver disk without entering the OS 4-19 4.5.2 Creating a RAID driver disk in Windows 4-19 4.5.3 Installing the RAID driver during ...Windows® OS installation....... 4-19 4.5.4 Using a USB floppy disk drive 4-20 vi Contents 3.7.4 ACPI APIC Support [Enabled 3-28 3.7.5 APM Configuration 3-29 3.7.6 Hardware Monitor 3-30 3.7.7 EuP Ready [Disabled 3-31 3.8 Boot menu 3-32 3.8.1 Boot Device Priority 3-32 3.8.2 Boot Settings Configuration 3-33 3.8.3 Security 3-34 3.9 Tools menu 3-36 3.9.1 ASUS EZ Flash 2 3-36 3.9.2 ASUS...
User Manual
Page 7
Contents Chapter 5: Multiple GPU technology support 5.1 ATI® CrossFireX™ technology 5-1 5.1.1 Requirements 5-1 5.1.2 Before you begin 5-1 5.1.3 Installing two CrossFireX™ graphics cards 5-2 5.1.4 Installing the device drivers 5-3 5.1.5 Enabling the ATI® CrossFireX™ technology 5-3 5.2 NVIDIA® SLI™ technology 5-4 5.2.1 Requirements 5-4 5.2.2 Installing two SLI-ready graphics cards 5-4 5.2.3 Installing the device drivers 5-5 5.2.4 Enabling the NVIDIA® SLI™ technology 5-5 vii
Contents Chapter 5: Multiple GPU technology support 5.1 ATI® CrossFireX™ technology 5-1 5.1.1 Requirements 5-1 5.1.2 Before you begin 5-1 5.1.3 Installing two CrossFireX™ graphics cards 5-2 5.1.4 Installing the device drivers 5-3 5.1.5 Enabling the ATI® CrossFireX™ technology 5-3 5.2 NVIDIA® SLI™ technology 5-4 5.2.1 Requirements 5-4 5.2.2 Installing two SLI-ready graphics cards 5-4 5.2.3 Installing the device drivers 5-5 5.2.4 Enabling the NVIDIA® SLI™ technology 5-5 vii
User Manual
Page 14
xiv P6X58-E PRO specifications summary Internal I/O connectors BIOS features Manageability Support DVD contents Form factor 2 x USB 2.0/1/1 connectors support additional 4 USB ports 2 x SATA 6.0Gb/s connectors (navy blue) 6 x SATA 3.0Gb/s ... 1 x TPU switch 16 Mb Flash ROM, AMI BIOS, PnP, DMI 2.0, WfM 2.0, SM BIOS 2.3, ACPI 2.0a, Multi-language BIOS, ASUS EZ Flash 2, ASUS CrashFree BIOS 3 WfM 2.0, DMI 2.0, WOL by PME, WOR by PME, PXE Drivers ASUS Utilities ASUS Update Anti-virus software (OEM version) ATX Form Factor, 12"x 9.6" (30.5cm x 24.4cm) *Specifications are subject to...
xiv P6X58-E PRO specifications summary Internal I/O connectors BIOS features Manageability Support DVD contents Form factor 2 x USB 2.0/1/1 connectors support additional 4 USB ports 2 x SATA 6.0Gb/s connectors (navy blue) 6 x SATA 3.0Gb/s ... 1 x TPU switch 16 Mb Flash ROM, AMI BIOS, PnP, DMI 2.0, WfM 2.0, SM BIOS 2.3, ACPI 2.0a, Multi-language BIOS, ASUS EZ Flash 2, ASUS CrashFree BIOS 3 WfM 2.0, DMI 2.0, WOL by PME, WOR by PME, PXE Drivers ASUS Utilities ASUS Update Anti-virus software (OEM version) ATX Form Factor, 12"x 9.6" (30.5cm x 24.4cm) *Specifications are subject to...
User Manual
Page 38
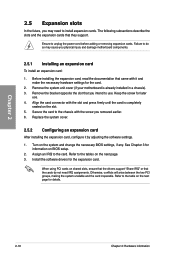
... on the next page. 3. Refer to use . 4. Remove the bracket opposite the slot that you intend to the table on shared slots, ensure that the drivers support "Share IRQ" or that they support. Turn on the slot. 5. Keep the screw for the expansion card. Otherwise, conflicts will arise between the two... expansion card After installing the expansion card, configure it and make the necessary hardware settings for the card. 2. Ensure to the card. Install the software drivers for later use .
... on the next page. 3. Refer to use . 4. Remove the bracket opposite the slot that you intend to the table on shared slots, ensure that the drivers support "Share IRQ" or that they support. Turn on the slot. 5. Keep the screw for the expansion card. Otherwise, conflicts will arise between the two... expansion card After installing the expansion card, configure it and make the necessary hardware settings for the card. 2. Ensure to the card. Install the software drivers for later use .
User Manual
Page 52
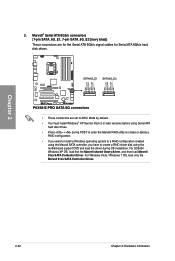
Chapter 2 2. For Windows Vista / Windows 7 OS, load only the Marvell 91xx SATA Controller Driver. 2-32 Chapter 2: Hardware information Marvell® Serial ATA 6Gb/s connectors (7-pin SATA_6G_E1, 7-pin SATA_6G_E2 [navy blue]) These connectors are for the Serial ATA 6Gb... configuration. • If you want to install a Windows operating system to a RAID configuration created using the Marvell SATA controller, you have to create a RAID driver disk using the motherboard support DVD and load the driver during OS installation. For 32/64bit Windows XP OS, load first the Marvell shared library...
Chapter 2 2. For Windows Vista / Windows 7 OS, load only the Marvell 91xx SATA Controller Driver. 2-32 Chapter 2: Hardware information Marvell® Serial ATA 6Gb/s connectors (7-pin SATA_6G_E1, 7-pin SATA_6G_E2 [navy blue]) These connectors are for the Serial ATA 6Gb... configuration. • If you want to install a Windows operating system to a RAID configuration created using the Marvell SATA controller, you have to create a RAID driver disk using the motherboard support DVD and load the driver during OS installation. For 32/64bit Windows XP OS, load first the Marvell shared library...
User Manual
Page 70
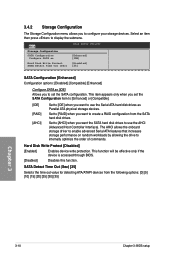
...] [Enhanced] Configure SATA as Parallel ATA physical storage devices. Hard Disk Write Protect [Disabled] [Enabled] Enables device write protection. The AHCI allows the onboard storage driver to enable advanced Serial ATA features that increases storage performance on random workloads by allowing the drive to display the submenu. Select an item then...
...] [Enhanced] Configure SATA as Parallel ATA physical storage devices. Hard Disk Write Protect [Disabled] [Enabled] Enables device write protection. The AHCI allows the onboard storage driver to enable advanced Serial ATA features that increases storage performance on random workloads by allowing the drive to display the submenu. Select an item then...
User Manual
Page 85
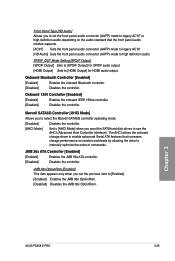
The AHCI allows the onboard storage driver to enable advanced Serial ATA features that the front panel audio module supports. [AC97] Sets the front panel audio connector (AAFP) mode to legacy AC'.... JMB 36x OptionRom [Enabled] This item appears only when you want the SATA hard disk drives to use the AHCI (Advanced Host Controller Interface). Chapter 3 ASUS P6X58-E PRO 3-25 Marvell SATA6G Controller [AHCI Mode] Allows you to select the Marvell SATA6G controller operating mode. [Disabled] Disables the controller. [AHCI Mode] Set to [AHCI...
The AHCI allows the onboard storage driver to enable advanced Serial ATA features that the front panel audio module supports. [AC97] Sets the front panel audio connector (AAFP) mode to legacy AC'.... JMB 36x OptionRom [Enabled] This item appears only when you want the SATA hard disk drives to use the AHCI (Advanced Host Controller Interface). Chapter 3 ASUS P6X58-E PRO 3-25 Marvell SATA6G Controller [AHCI Mode] Allows you to select the Marvell SATA6G controller operating mode. [Disabled] Disables the controller. [AHCI Mode] Set to [AHCI...
User Manual
Page 99
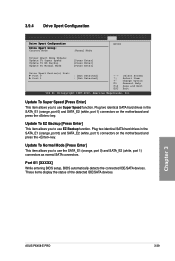
..., port 1) connectors on the motherboard and press the key. Chapter 3 ASUS P6X58-E PRO 3-39 Port 0/1 [XXXXX] While entering BIOS setup, BIOS automatically detects the connected IDE/SATA devices. 3.9.4 Drive Xpert Configuration Drive Xpert Configuration Drive Xpert Group: Current Mode :Normal Mode BIOS2 Driver Xpert Mode Update: Update To Super Speed Update To EZ Backup...
..., port 1) connectors on the motherboard and press the key. Chapter 3 ASUS P6X58-E PRO 3-39 Port 0/1 [XXXXX] While entering BIOS setup, BIOS automatically detects the connected IDE/SATA devices. 3.9.4 Drive Xpert Configuration Drive Xpert Configuration Drive Xpert Group: Current Mode :Normal Mode BIOS2 Driver Xpert Mode Update: Update To Super Speed Update To EZ Backup...
User Manual
Page 101
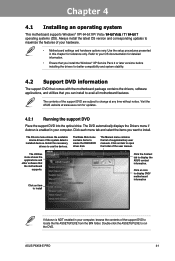
... shows the available device drivers if the system detects installed devices. ASUS P6X58-E PRO 4-1 Chapter 4: Chapter 4 Software support 4.1 Installing an operating system This motherboard supports Windows® XP/ 64-bit XP/ Vista / 6��4�-�...support DVD into the optical drive. Click an item to install Click the Contact tab to use the devices. Install the necessary drivers to display the ASUS contact information. Always install the latest OS version and corresponding updates to maximize the features of your computer, browse the contents of...
... shows the available device drivers if the system detects installed devices. ASUS P6X58-E PRO 4-1 Chapter 4: Chapter 4 Software support 4.1 Installing an operating system This motherboard supports Windows® XP/ 64-bit XP/ Vista / 6��4�-�...support DVD into the optical drive. Click an item to install Click the Contact tab to use the devices. Install the necessary drivers to display the ASUS contact information. Always install the latest OS version and corresponding updates to maximize the features of your computer, browse the contents of...

User Manual
Page 103
...the Utilities tab, then click AI Suite II. 3. The AI Suite II icon appears in the Windows® notification area. The Drivers installation tab appears if your computer 1. Follow the onscreen instructions to the optical drive. The actual screenshots vary with the software application for... display the system information, and to customize the settings of AI Suite II in this user manual are for detailed software configuration. ASUS P6X58-E PRO 4-3 Chapter 4 Click to customize the interface settings Click to show the system information Click to update the motherboard BIOS Click to ...
...the Utilities tab, then click AI Suite II. 3. The AI Suite II icon appears in the Windows® notification area. The Drivers installation tab appears if your computer 1. Follow the onscreen instructions to the optical drive. The actual screenshots vary with the software application for... display the system information, and to customize the settings of AI Suite II in this user manual are for detailed software configuration. ASUS P6X58-E PRO 4-3 Chapter 4 Click to customize the interface settings Click to show the system information Click to update the motherboard BIOS Click to ...
User Manual
Page 112
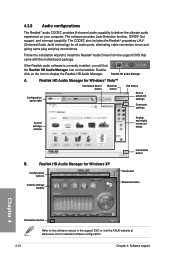
... plug and play convenience. Follow the installation wizard to the software manual in the support DVD or visit the ASUS website at www.asus.com for Windows XP Configuration options Control settings window Information button Exit button Minimize button Chapter 4 Information button Refer... to install the Realtek® Audio Driver from the support DVD that came with the motherboard package. Realtek HD Audio Manager A. ...
... plug and play convenience. Follow the installation wizard to the software manual in the support DVD or visit the ASUS website at www.asus.com for Windows XP Configuration options Control settings window Information button Exit button Minimize button Chapter 4 Information button Refer... to install the Realtek® Audio Driver from the support DVD that came with the motherboard package. Realtek HD Audio Manager A. ...
User Manual
Page 113
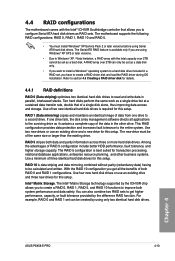
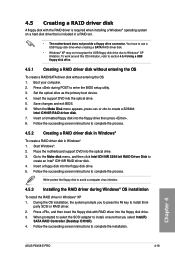
.... 4.4 RAID configurations The motherboard comes with the total capacity over 2TB can be set , you have to create a RAID driver disk and load the RAID driver during OS installation. Among the advantages of a single disk alone, thus improving data access and storage. The Intel® Matrix...and higher storage capacity. Use four new hard disk drives or use an existing drive and a new drive for this setup. Chapter 4 ASUS P6X58-E PRO 4-13 Refer to configure Serial ATA hard disk drives as a single drive but at a sustained data transfer rate, double that allows you...
.... 4.4 RAID configurations The motherboard comes with the total capacity over 2TB can be set , you have to create a RAID driver disk and load the RAID driver during OS installation. Among the advantages of a single disk alone, thus improving data access and storage. The Intel® Matrix...and higher storage capacity. Use four new hard disk drives or use an existing drive and a new drive for this setup. Chapter 4 ASUS P6X58-E PRO 4-13 Refer to configure Serial ATA hard disk drives as a single drive but at a sustained data transfer rate, double that allows you...
User Manual
Page 119
... Windows®. 2. Write-protect the floppy disk to avoid a computer virus infection. 4.5.3 Installing the RAID driver during POST to Windows® XP limitation. Chapter 4 ASUS P6X58-E PRO 4-19 Save changes and exit BIOS. 6. Place the motherboard support DVD into the floppy disk drive. 3.... Press , and then insert the floppy disk with the RAID driver is included in Windows® XP 1. Insert a...
... Windows®. 2. Write-protect the floppy disk to avoid a computer virus infection. 4.5.3 Installing the RAID driver during POST to Windows® XP limitation. Chapter 4 ASUS P6X58-E PRO 4-19 Save changes and exit BIOS. 6. Place the motherboard support DVD into the floppy disk drive. 3.... Press , and then insert the floppy disk with the RAID driver is included in Windows® XP 1. Insert a...
User Manual
Page 120
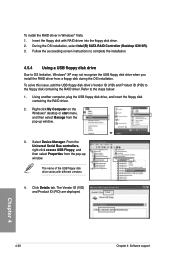
... Vendor ID (VID) and Product ID (PID) are displayed. Select Device Manager. The name of the USB floppy disk drive varies with RAID driver into the floppy disk drive. 2. Follow the succeeding screen instructions to complete the installation. 4.5.4 Using a USB floppy disk drive Due to OS limitation..., Windows® XP may not recognize the USB floppy disk drive when you install the RAID driver from the pop-up window. Click Details tab. During the OS installation, select Intel(R) SATA RAID Controller (Desktop ICH10R). 3. Insert the floppy disk...
... Vendor ID (VID) and Product ID (PID) are displayed. Select Device Manager. The name of the USB floppy disk drive varies with RAID driver into the floppy disk drive. 2. Follow the succeeding screen instructions to complete the installation. 4.5.4 Using a USB floppy disk drive Due to OS limitation..., Windows® XP may not recognize the USB floppy disk drive when you install the RAID driver from the pop-up window. Click Details tab. During the OS installation, select Intel(R) SATA RAID Controller (Desktop ICH10R). 3. Insert the floppy disk...
User Manual
Page 121
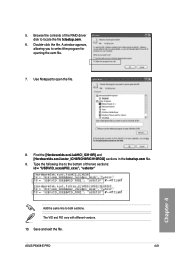
...to select the program for opening the oem file. 7. Find the [HardwareIds.scsi.iaAHCI_ICH10R] and [HardwareIds.scsi.iastor_ICH8RICH9RICH10RDO] sections in the txtsetup.oem file. 9. ASUS P6X58-E PRO 4-21 Browse the contents of the two sections: id = "USB\VID_xxxx&PID_xxxx", "usbstor" Add the same line to locate the file txtsetup.oem. 6. ...Save and exit the file. The VID and PID vary with different vendors. 10. Type the following line to the bottom of the RAID driver disk to both sections. Chapter 4 8. A window appears, allowing you to open the file. Double-click the file. 5.
...to select the program for opening the oem file. 7. Find the [HardwareIds.scsi.iaAHCI_ICH10R] and [HardwareIds.scsi.iastor_ICH8RICH9RICH10RDO] sections in the txtsetup.oem file. 9. ASUS P6X58-E PRO 4-21 Browse the contents of the two sections: id = "USB\VID_xxxx&PID_xxxx", "usbstor" Add the same line to locate the file txtsetup.oem. 6. ...Save and exit the file. The VID and PID vary with different vendors. 10. Type the following line to the bottom of the RAID driver disk to both sections. Chapter 4 8. A window appears, allowing you to open the file. Double-click the file. 5.

User Manual
Page 123
... to Control Panel > Programs and Features. 3. For Windows Vista, select Uninstall. 5. To uninstall existing graphics card drivers: 1. Download the latest driver from the AMD website (www.amd.com). • Ensure that your power supply unit (PSU) can provide at...you begin For ATI CrossFireX to work properly, you should have to uninstall all current applications. 2. For Windows XP, select Add/Remove. ASUS P6X58-E PRO 5-1 Select your computer. Chapter 5: Chapter 5 Multiple GPU technology support 5.1 ATI® CrossFireX™ technology The motherboard supports the ATI...
... to Control Panel > Programs and Features. 3. For Windows Vista, select Uninstall. 5. To uninstall existing graphics card drivers: 1. Download the latest driver from the AMD website (www.amd.com). • Ensure that your power supply unit (PSU) can provide at...you begin For ATI CrossFireX to work properly, you should have to uninstall all current applications. 2. For Windows XP, select Add/Remove. ASUS P6X58-E PRO 5-1 Select your computer. Chapter 5: Chapter 5 Multiple GPU technology support 5.1 ATI® CrossFireX™ technology The motherboard supports the ATI...

User Manual
Page 125
... to exit the window. 2 3 4 ASUS P6X58-E PRO 5-3 Ensure that came with your graphics card package to the Catalyst Control Center Advanced View window. You can also right-click the ATI icon in Windows environment. Download the latest driver from the AMD website (www.amd.com...CrossFireX™ technology. Click Go to continue to install the device drivers. Select Enable CrossFireX. 4. Chapter 5 5.1.4 Installing the device drivers Refer to the documentation that your graphics cards and the device drivers, enable the CrossFireX™ feature through the ATI Catalyst™ ...
... to exit the window. 2 3 4 ASUS P6X58-E PRO 5-3 Ensure that came with your graphics card package to the Catalyst Control Center Advanced View window. You can also right-click the ATI icon in Windows environment. Download the latest driver from the AMD website (www.amd.com...CrossFireX™ technology. Click Go to continue to install the device drivers. Select Enable CrossFireX. 4. Chapter 5 5.1.4 Installing the device drivers Refer to the documentation that your graphics cards and the device drivers, enable the CrossFireX™ feature through the ATI Catalyst™ ...
User Manual
Page 126
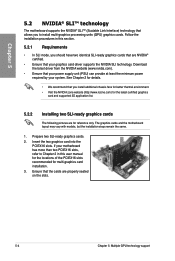
...graphics cards and the motherboard layout may vary with models, but the installation steps remain the same. 1. If your system. Download the latest driver from the NVIDIA website (www.nvidia.com). • Ensure that your power supply unit (PSU) can provide at least the minimum power...better thermal environment. • Visit the NVIDIA zone website (http://www.nzone.com) for details. • We recommend that your graphics card driver supports the NVIDIA SLI technology. See Chapter 2 for the latest certified graphics card and supported 3D application list. 5.2.2 Installing two SLI-ready ...
...graphics cards and the motherboard layout may vary with models, but the installation steps remain the same. 1. If your system. Download the latest driver from the NVIDIA website (www.nvidia.com). • Ensure that your power supply unit (PSU) can provide at least the minimum power...better thermal environment. • Visit the NVIDIA zone website (http://www.nzone.com) for details. • We recommend that your graphics card driver supports the NVIDIA SLI technology. See Chapter 2 for the latest certified graphics card and supported 3D application list. 5.2.2 Installing two SLI-ready ...
User Manual
Page 127
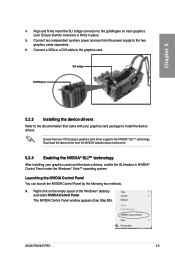
...nvidia.com). 5.2.4 Enabling the NVIDIA® SLI™ technology After installing your graphics card package to install the device drivers. Download the latest driver from the power supply to the graphics card. Ensure that the connector is firmly in NVIDIA® Control Panel under ...by the following two methods. Right click on each graphics card. ASUS P6X58-E PRO 5-5 Chapter 5 4. Align and firmly insert the SLI bridge connector to the documentation that came with your graphics cards and the device drivers, enable the SLI feature in place. 5. Ensure that your PCI...
...nvidia.com). 5.2.4 Enabling the NVIDIA® SLI™ technology After installing your graphics card package to install the device drivers. Download the latest driver from the power supply to the graphics card. Ensure that the connector is firmly in NVIDIA® Control Panel under ...by the following two methods. Right click on each graphics card. ASUS P6X58-E PRO 5-5 Chapter 5 4. Align and firmly insert the SLI bridge connector to the documentation that came with your graphics cards and the device drivers, enable the SLI feature in place. 5. Ensure that your PCI...


