User Manual
Page 4
... (system panel 2-39 2.10 Starting up for the first time 2-40 2.11 Turning off the computer 2-40 Chapter 3: BIOS setup 3.1 Knowing BIOS 3-1 3.2 Updating BIOS 3-1 3.2.1 ASUS Update utility 3-2 3.2.2 ASUS EZ Flash 2 utility 3-4 3.2.3 ASUS CrashFree BIOS 3 utility 3-5 3.3 BIOS setup program 3-6 3.3.1 BIOS menu screen 3-6 3.3.2 Menu bar 3-6 3.3.3 Navigation keys 3-7 3.3.4 Menu items 3-7 3.3.5 Submenu items 3-7 3.3.6 Configuration fields 3-7 3.3.7 Pop-up window 3-7 3.3.8 Scroll bar 3-7 3.3.9 General help 3-7 3.4 Main...
... (system panel 2-39 2.10 Starting up for the first time 2-40 2.11 Turning off the computer 2-40 Chapter 3: BIOS setup 3.1 Knowing BIOS 3-1 3.2 Updating BIOS 3-1 3.2.1 ASUS Update utility 3-2 3.2.2 ASUS EZ Flash 2 utility 3-4 3.2.3 ASUS CrashFree BIOS 3 utility 3-5 3.3 BIOS setup program 3-6 3.3.1 BIOS menu screen 3-6 3.3.2 Menu bar 3-6 3.3.3 Navigation keys 3-7 3.3.4 Menu items 3-7 3.3.5 Submenu items 3-7 3.3.6 Configuration fields 3-7 3.3.7 Pop-up window 3-7 3.3.8 Scroll bar 3-7 3.3.9 General help 3-7 3.4 Main...
User Manual
Page 6
...31 3.8 Boot menu 3-32 3.8.1 Boot Device Priority 3-32 3.8.2 Boot Settings Configuration 3-33 3.8.3 Security 3-34 3.9 Tools menu 3-36 3.9.1 ASUS EZ Flash 2 3-36 3.9.2 ASUS O.C. Profile 3-37 3.9.3 AI NET 2 3-38 3.9.4 Drive Xpert Configuration 3-39 3.10 Exit menu 3-40 Chapter 4: Software support 4.1 Installing...12 4.4 RAID configurations 4-13 4.4.1 RAID definitions 4-13 4.4.2 Installing Serial ATA hard disks 4-14 4.4.3 Setting the RAID item in BIOS 4-14 4.4.4 Intel® Rapid Storage Technology Option ROM utility 4-15 4.5 Creating a RAID driver disk 4-19 4.5.1 Creating a ...
...31 3.8 Boot menu 3-32 3.8.1 Boot Device Priority 3-32 3.8.2 Boot Settings Configuration 3-33 3.8.3 Security 3-34 3.9 Tools menu 3-36 3.9.1 ASUS EZ Flash 2 3-36 3.9.2 ASUS O.C. Profile 3-37 3.9.3 AI NET 2 3-38 3.9.4 Drive Xpert Configuration 3-39 3.10 Exit menu 3-40 Chapter 4: Software support 4.1 Installing...12 4.4 RAID configurations 4-13 4.4.1 RAID definitions 4-13 4.4.2 Installing Serial ATA hard disks 4-14 4.4.3 Setting the RAID item in BIOS 4-14 4.4.4 Intel® Rapid Storage Technology Option ROM utility 4-15 4.5 Creating a RAID driver disk 4-19 4.5.1 Creating a ...
User Manual
Page 10
ASUS websites The ASUS website provides updated information on the motherboard. • Chapter 3: BIOS setup This chapter tells how to install and configure multiple ATI® CrossFireX™ and NVIDIA® SLI™ graphics cards. Where ...you need when installing and configuring the motherboard. Refer to perform when installing system components. Detailed descriptions of the BIOS parameters are not part of the support DVD that may have to the ASUS contact information. 2. These documents are also provided. • Chapter 4: Software support This chapter describes the ...
ASUS websites The ASUS website provides updated information on the motherboard. • Chapter 3: BIOS setup This chapter tells how to install and configure multiple ATI® CrossFireX™ and NVIDIA® SLI™ graphics cards. Where ...you need when installing and configuring the motherboard. Refer to perform when installing system components. Detailed descriptions of the BIOS parameters are not part of the support DVD that may have to the ASUS contact information. 2. These documents are also provided. • Chapter 4: Software support This chapter describes the ...
User Manual
Page 13
..., Personal Manager ASUS BT Turbo Remote - ASUS Q-Connector - ASUS MyLogo 2 - EPU ASUS BT GO! - ASUS Fanless Design: Heat-pipe solution - ASUS Fan Xpert ASUS EZ DIY - ASUS CrashFree BIOS 3 - AI Suite II - ASUS Q-Shield - Auto Tuning, TurboV, TPU switch ASUS EPU - MemOK! - Exclusive Smartphone Interface supporting iPhone, Android, Windows Mobile, and Symbian systems ASUS Exclusive Features - P6X58-E PRO specifications summary ASUS unique features ASUS Q-Design Back...
..., Personal Manager ASUS BT Turbo Remote - ASUS Q-Connector - ASUS MyLogo 2 - EPU ASUS BT GO! - ASUS Fanless Design: Heat-pipe solution - ASUS Fan Xpert ASUS EZ DIY - ASUS CrashFree BIOS 3 - AI Suite II - ASUS Q-Shield - Auto Tuning, TurboV, TPU switch ASUS EPU - MemOK! - Exclusive Smartphone Interface supporting iPhone, Android, Windows Mobile, and Symbian systems ASUS Exclusive Features - P6X58-E PRO specifications summary ASUS unique features ASUS Q-Design Back...
User Manual
Page 14
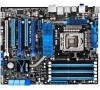
..., AMI BIOS, PnP, DMI 2.0, WfM 2.0, SM BIOS 2.3, ACPI 2.0a, Multi-language BIOS, ASUS EZ Flash 2, ASUS CrashFree BIOS 3 WfM 2.0, DMI 2.0, WOL by PME, WOR by PME, PXE Drivers ASUS Utilities ASUS Update Anti-virus software (OEM version) ATX Form Factor, 12"x 9.6" (30.5cm x 24.4cm) *Specifications are subject to change without notice. P6X58-E PRO specifications summary Internal I/O connectors BIOS features Manageability...
..., AMI BIOS, PnP, DMI 2.0, WfM 2.0, SM BIOS 2.3, ACPI 2.0a, Multi-language BIOS, ASUS EZ Flash 2, ASUS CrashFree BIOS 3 WfM 2.0, DMI 2.0, WOL by PME, WOR by PME, PXE Drivers ASUS Utilities ASUS Update Anti-virus software (OEM version) ATX Form Factor, 12"x 9.6" (30.5cm x 24.4cm) *Specifications are subject to change without notice. P6X58-E PRO specifications summary Internal I/O connectors BIOS features Manageability...
User Manual
Page 17
... standard. This remarkable memory rescue tool requires nothing but a push of a buttton to Bluetooth devices with Super Alloy Power enables users through BIOS tuning and exclusive user interface features. ASUS P6X58-E PRO 1-3 ASUS BT GO! Unibodyconstructed chokes also eliminate vibration noise, delivering improved performance and durability even under extreme conditions. is among the top concerns...
... standard. This remarkable memory rescue tool requires nothing but a push of a buttton to Bluetooth devices with Super Alloy Power enables users through BIOS tuning and exclusive user interface features. ASUS P6X58-E PRO 1-3 ASUS BT GO! Unibodyconstructed chokes also eliminate vibration noise, delivering improved performance and durability even under extreme conditions. is among the top concerns...
User Manual
Page 18
...into one simple to install side-flow fan or passive cooler. The built-in different geographic regions and your DIY experience. ASUS Q-Design ASUS Q-Design enhances your PC's loading. ASUS Q-Connector ASUS Q-Connector allows you to adjust both the CPU and chassis fan speeds according to supervise overclocking, energy management, fan speed... users to different ambient temperatures caused by yourself. The Heat Pipe design is the most reliable fanless thermal solution to update the BIOS without having to the heatsink near the back IO ports, where it provides options for details.
...into one simple to install side-flow fan or passive cooler. The built-in different geographic regions and your DIY experience. ASUS Q-Design ASUS Q-Design enhances your PC's loading. ASUS Q-Connector ASUS Q-Connector allows you to adjust both the CPU and chassis fan speeds according to supervise overclocking, energy management, fan speed... users to different ambient temperatures caused by yourself. The Heat Pipe design is the most reliable fanless thermal solution to update the BIOS without having to the heatsink near the back IO ports, where it provides options for details.
User Manual
Page 19
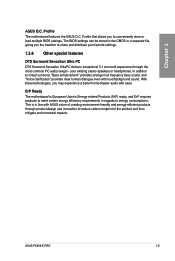
In addition to conveniently store or load multiple BIOS settings. ASUS P6X58-E PRO 1-5 The BIOS settings can be stored in the CMOS or a separate file, giving you the freedom to meet certain energy efficiency requirements in line with ASUS vision of the product and thus mitigate environmental impacts. ErP Ready The motherboard is in regards to reduce... virtual surround, "Bass enhancement" provides stronger low frequency bass sound, and "Voice clarification" provides clear human dialogue even with ease. Profile The motherboard features the ASUS O.C. Chapter 1 ASUS O.C.
In addition to conveniently store or load multiple BIOS settings. ASUS P6X58-E PRO 1-5 The BIOS settings can be stored in the CMOS or a separate file, giving you the freedom to meet certain energy efficiency requirements in line with ASUS vision of the product and thus mitigate environmental impacts. ErP Ready The motherboard is in regards to reduce... virtual surround, "Bass enhancement" provides stronger low frequency bass sound, and "Voice clarification" provides clear human dialogue even with ease. Profile The motherboard features the ASUS O.C. Chapter 1 ASUS O.C.
User Manual
Page 38
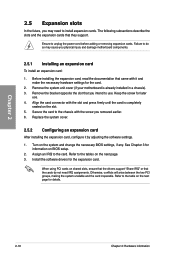
... with it by adjusting the software settings. 1. When using PCI cards on the system and change the necessary BIOS settings, if any. Remove the system unit cover (if your motherboard is completely seated on BIOS setup. 2. Keep the screw for the expansion card. Chapter 2 2.5 Expansion slots In the future, you may cause...
... with it by adjusting the software settings. 1. When using PCI cards on the system and change the necessary BIOS settings, if any. Remove the system unit cover (if your motherboard is completely seated on BIOS setup. 2. Keep the screw for the expansion card. Chapter 2 2.5 Expansion slots In the future, you may cause...
User Manual
Page 41
..., and a PCIe device with a bandwidth slower than x4 link to get better performance. • Use the three PCIe 2.0 x16 slots for better thermal environment. Chapter 2 ASUS P6X58-E PRO 2-21 VGA configuration Single VGA/PCIe card Dual VGA/PCIe card Triple VGA/PCIe card PCI Express operating mode PCIe x16_1 PCIe x16_2 PCIe x16_3... work at x16, x16, x1 link as the default. • You may manually reassign the link width of PCIe x16_2 and PCIe x16_3 slots in BIOS settings. See page 2-35 for details.
..., and a PCIe device with a bandwidth slower than x4 link to get better performance. • Use the three PCIe 2.0 x16 slots for better thermal environment. Chapter 2 ASUS P6X58-E PRO 2-21 VGA configuration Single VGA/PCIe card Dual VGA/PCIe card Triple VGA/PCIe card PCI Express operating mode PCIe x16_1 PCIe x16_2 PCIe x16_3... work at x16, x16, x1 link as the default. • You may manually reassign the link width of PCIe x16_2 and PCIe x16_3 slots in BIOS settings. See page 2-35 for details.

User Manual
Page 42
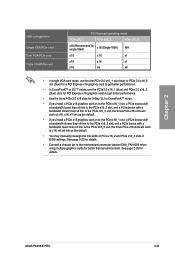
... the jumper settings for example, a water-cooling system) to enable or disable the advanced DRAM Bus, and QPI DRAM overvoltage settings in BIOS. Read the following information before you change the setting of these three jumpers. • The system may need a better cooling system (for... extra-high overvoltage ability, use the BIOS items first to adjust the desired DRAM, and QPI performance. Ensure that your system functions well under the highest BIOS voltage settings before you to work stably under high voltage settings. 2-22 Chapter 2: ...
... the jumper settings for example, a water-cooling system) to enable or disable the advanced DRAM Bus, and QPI DRAM overvoltage settings in BIOS. Read the following information before you change the setting of these three jumpers. • The system may need a better cooling system (for... extra-high overvoltage ability, use the BIOS items first to adjust the desired DRAM, and QPI performance. Ensure that your system functions well under the highest BIOS voltage settings before you to work stably under high voltage settings. 2-22 Chapter 2: ...
User Manual
Page 44
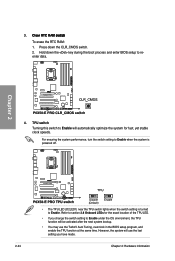
...Hold down the CLR_CMOS switch. 2. Chapter 2 4. Refer to Enable under the OS environment, the TPU function will use the TurboV Auto Tuning, overclock in the BIOS setup program, and enable the TPU function at the same time. Press down the key during the boot process and enter... BIOS setup to Enable. 3. ���C�le�a�r�R�T�C��R�A��M���s��w�&#...
...Hold down the CLR_CMOS switch. 2. Chapter 2 4. Refer to Enable under the OS environment, the TPU function will use the TurboV Auto Tuning, overclock in the BIOS setup program, and enable the TPU function at the same time. Press down the key during the boot process and enter... BIOS setup to Enable. 3. ���C�le�a�r�R�T�C��R�A��M���s��w�&#...

User Manual
Page 45
...about 5-10 seconds. • If your system fail to boot due to the latest BIOS version from the ASUS website at www.asus.com. • If you download and update to BIOS overclocking, press the MemOK! A messgae will reboot the computer and start the memory tuning... processes. • Due to boot and load BIOS default settings. switch under Windows® OS environment will appear during the tuning process, the system continues memory tuning after the whole tuning process, the DRAM_LED lights continuously. ASUS P6X58-E PRO 2-25 switch lights continuously. 5. MemOK!
...about 5-10 seconds. • If your system fail to boot due to the latest BIOS version from the ASUS website at www.asus.com. • If you download and update to BIOS overclocking, press the MemOK! A messgae will reboot the computer and start the memory tuning... processes. • Due to boot and load BIOS default settings. switch under Windows® OS environment will appear during the tuning process, the system continues memory tuning after the whole tuning process, the DRAM_LED lights continuously. ASUS P6X58-E PRO 2-25 switch lights continuously. 5. MemOK!
User Manual
Page 51
... the BIOS to [RAID]. The Serial ATA RAID feature is available only if you can create a RAID 0, 1, 5, and 10 configuration with the Intel® Rapid Storage Technology through the onboard Intel® ICH10R RAID controller. See section 3.4.2 Storage Configuration for Serial ATA 3.0Gb/s hard disk drives and optical disc drives. ASUS P6X58-E PRO 2-31... for the Serial ATA signal cables for details. See section 3.4.2 Storage Configuration for details. • Before creating a RAID set the Configure SATA as in the BIOS to [AHCI]. 2.9.3 Internal connectors 1.
... the BIOS to [RAID]. The Serial ATA RAID feature is available only if you can create a RAID 0, 1, 5, and 10 configuration with the Intel® Rapid Storage Technology through the onboard Intel® ICH10R RAID controller. See section 3.4.2 Storage Configuration for Serial ATA 3.0Gb/s hard disk drives and optical disc drives. ASUS P6X58-E PRO 2-31... for the Serial ATA signal cables for details. See section 3.4.2 Storage Configuration for details. • Before creating a RAID set the Configure SATA as in the BIOS to [AHCI]. 2.9.3 Internal connectors 1.

User Manual
Page 56
...;h�i�s�c��o�n�n�e��c�to��r,�s��e�t the Front Panel Type item in the BIOS setup to [AC97].
...;h�i�s�c��o�n�n�e��c�to��r,�s��e�t the Front Panel Type item in the BIOS setup to [AC97].

User Manual
Page 58
... for the system power LED. System panel connector (20-8 pin PANEL) This connector supports several chassis-mounted functions. The speaker allows you turn on the BIOS settings. Connect the chassis power LED cable to hear system beeps and warnings. • ATX power button/soft-off the system power. 2-38 Chapter 2: Hardware...
... for the system power LED. System panel connector (20-8 pin PANEL) This connector supports several chassis-mounted functions. The speaker allows you turn on the BIOS settings. Connect the chassis power LED cable to hear system beeps and warnings. • ATX power button/soft-off the system power. 2-38 Chapter 2: Hardware...

User Manual
Page 60
...the power switch for less than four seconds lets the system enter the soft-off . 3. Refer to the power connector at the back of the BIOS setting. After applying power, the system power LED on the devices in Chapter 3. 2.11 Turning off mode, depending on the chain) c. Turn on... four seconds puts the system on the screen. Check the jumper settings and connections or call your monitor complies with the last device on the BIOS setting. Chapter 2 2.10 Starting up for assistance. Connect the power cord to disabled No keyboard detected No memory detected No VGA detected Hardware...
...the power switch for less than four seconds lets the system enter the soft-off . 3. Refer to the power connector at the back of the BIOS setting. After applying power, the system power LED on the devices in Chapter 3. 2.11 Turning off mode, depending on the chain) c. Turn on... four seconds puts the system on the screen. Check the jumper settings and connections or call your monitor complies with the last device on the BIOS setting. Chapter 2 2.10 Starting up for assistance. Connect the power cord to disabled No keyboard detected No memory detected No VGA detected Hardware...
User Manual
Page 61
... you not change the BIOS settings only with the help of BIOS, DO NOT manually update the BIOS. However, BIOS updating is no problem using the current version of a trained service personnel. 3.2 Updating BIOS The ASUS website publishes the latest BIOS versions to provide enhancements on these utilities. Chapter 3 ASUS P6X58-E PRO 3-1 Chapter 3: Chapter 3 BIOS setup 3.1 Knowing BIOS BIOS (Basic Input and Output...
... you not change the BIOS settings only with the help of BIOS, DO NOT manually update the BIOS. However, BIOS updating is no problem using the current version of a trained service personnel. 3.2 Updating BIOS The ASUS website publishes the latest BIOS versions to provide enhancements on these utilities. Chapter 3 ASUS P6X58-E PRO 3-1 Chapter 3: Chapter 3 BIOS setup 3.1 Knowing BIOS BIOS (Basic Input and Output...
User Manual
Page 62
... Service Provider (ISP). From the Main menu, click the Utilities tab, then click Install ASUS Update VX.XX.XX. 3. Quit all Windows® applications before you update the BIOS using this utility. Installing ASUS Update To install ASUS Update: 1. The ASUS Update utility is available in Windows® environment. Place the support DVD in the...
... Service Provider (ISP). From the Main menu, click the Utilities tab, then click Install ASUS Update VX.XX.XX. 3. Quit all Windows® applications before you update the BIOS using this utility. Installing ASUS Update To install ASUS Update: 1. The ASUS Update utility is available in Windows® environment. Place the support DVD in the...

User Manual
Page 63
... instructions to avail all its features. The ASUS Update utility is capable of updating itself through a BIOS file: 1. Fom the Windows® desktop, click Start > Programs > ASUS > ASUSUpdate > ASUSUpdate. Select Update BIOS from a file from the Open window, then click Open. 4. P6X58-E-PRO.ROM ASUS P6X58-E PRO P6X58-E-PRO Ensure to load the BIOS default settings to complete the update process. Select...
... instructions to avail all its features. The ASUS Update utility is capable of updating itself through a BIOS file: 1. Fom the Windows® desktop, click Start > Programs > ASUS > ASUSUpdate > ASUSUpdate. Select Update BIOS from a file from the Open window, then click Open. 4. P6X58-E-PRO.ROM ASUS P6X58-E PRO P6X58-E-PRO Ensure to load the BIOS default settings to complete the update process. Select...


