
User Manual
Page 1
P6X58-E PRO Motherboard
P6X58-E PRO Motherboard
User Manual
Page 3
... Safety information...ix About this guide...x P6X58-E PRO specifications summary xii Chapter 1: Product introduction 1.1 Welcome!...1-1 1.2 Package contents 1-1 1.3 Special features 1-2 1.3.1 Product highlights 1-2 1.3.2 Dual Intelligent Processors 2 with DIGI+ VRM 1-3 1.3.3 ASUS Exclusive Features 1-3 1.3.4 ASUS Quiet Thermal Solutions 1-4 1.3.5 ASUS EZ DIY 1-4 1.3.6 Other special features 1-5 Chapter 2: Hardware information 2.1 Before you proceed 2-1 2.2 Motherboard overview 2-2 2.2.1 Motherboard layout 2-2 2.2.2 Layout contents 2-3 2.2.3 Placement direction...
... Safety information...ix About this guide...x P6X58-E PRO specifications summary xii Chapter 1: Product introduction 1.1 Welcome!...1-1 1.2 Package contents 1-1 1.3 Special features 1-2 1.3.1 Product highlights 1-2 1.3.2 Dual Intelligent Processors 2 with DIGI+ VRM 1-3 1.3.3 ASUS Exclusive Features 1-3 1.3.4 ASUS Quiet Thermal Solutions 1-4 1.3.5 ASUS EZ DIY 1-4 1.3.6 Other special features 1-5 Chapter 2: Hardware information 2.1 Before you proceed 2-1 2.2 Motherboard overview 2-2 2.2.1 Motherboard layout 2-2 2.2.2 Layout contents 2-3 2.2.3 Placement direction...
User Manual
Page 8
... reasonable protection against harmful interference in municipal waste. The use of shielded cables for connection of electronic products. DO NOT throw the motherboard in municipal waste. Check local regulations for disposal of the monitor to the graphics card is connected. • Consult the dealer ... These limits are designed to which can radiate radio frequency energy and, if not installed and used in our products at ASUS REACH website at http://csr.asus.com/english/REACH.htm. However, there is subject to the following measures: • Reorient or relocate the receiving antenna....
... reasonable protection against harmful interference in municipal waste. The use of shielded cables for connection of electronic products. DO NOT throw the motherboard in municipal waste. Check local regulations for disposal of the monitor to the graphics card is connected. • Consult the dealer ... These limits are designed to which can radiate radio frequency energy and, if not installed and used in our products at ASUS REACH website at http://csr.asus.com/english/REACH.htm. However, there is subject to the following measures: • Reorient or relocate the receiving antenna....
User Manual
Page 9
...clips, screws, and staples away from connectors, slots, sockets and circuitry. • Avoid dust, humidity, and temperature extremes. ASUS Recycling/Takeback Services ASUS recycling and takeback programs come from our commitment to or from the system, ensure that the power cables for the devices are .... • Before using the product, ensure all power cables are using an adapter or extension cord. Operation safety • Before installing the motherboard and adding devices on it may become wet. • Place the product on a stable surface. • If you are unplugged. •...
...clips, screws, and staples away from connectors, slots, sockets and circuitry. • Avoid dust, humidity, and temperature extremes. ASUS Recycling/Takeback Services ASUS recycling and takeback programs come from our commitment to or from the system, ensure that the power cables for the devices are .... • Before using the product, ensure all power cables are using an adapter or extension cord. Operation safety • Before installing the motherboard and adding devices on it may become wet. • Place the product on a stable surface. • If you are unplugged. •...
User Manual
Page 10
... 1: Product introduction This chapter describes the features of the support DVD that you need when installing and configuring the motherboard. About this guide is organized This guide contains the following sources for additional information and for product and software updates... not part of the switches, jumpers, and connectors on ASUS hardware and software products. ASUS websites The ASUS website provides updated information on the motherboard. • Chapter 3: BIOS setup This chapter tells how to the ASUS contact information. 2. It includes description of the standard package...
... 1: Product introduction This chapter describes the features of the support DVD that you need when installing and configuring the motherboard. About this guide is organized This guide contains the following sources for additional information and for product and software updates... not part of the switches, jumpers, and connectors on ASUS hardware and software products. ASUS websites The ASUS website provides updated information on the motherboard. • Chapter 3: BIOS setup This chapter tells how to the ASUS contact information. 2. It includes description of the standard package...
User Manual
Page 15
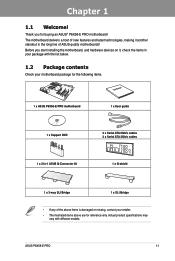
... kit 1 x Q-shield 1 x 3-way SLI Bridge 1 x SLI Bridge • If any of ASUS quality motherboards! Actual product specifications may vary with the list below. 1.2 Package contents Check your motherboard package for the following items. User Manual 1 x ASUS P6X58-E PRO motherboard 1 x User guide 1 x Support DVD 2 x Serial ATA 6Gb/s cables 2 x Serial ATA 3Gb/s cables 1 x 2-in the long line of the...
... kit 1 x Q-shield 1 x 3-way SLI Bridge 1 x SLI Bridge • If any of ASUS quality motherboards! Actual product specifications may vary with the list below. 1.2 Package contents Check your motherboard package for the following items. User Manual 1 x ASUS P6X58-E PRO motherboard 1 x User guide 1 x Support DVD 2 x Serial ATA 6Gb/s cables 2 x Serial ATA 3Gb/s cables 1 x 2-in the long line of the...

User Manual
Page 16
... with USB 3.0-the latest connectivity standard. Triple-Channel DDR3 2200(O.C.)/ 2133(O.C.)/ 2000(O.C.)/ 1866(O.C.)/ 1600/ 1333/ 1066 support The motherboard supports DDR3 memory that features data transfer rates of the most powerful and energy efficient CPUs in multiple GPU configurations. Expect a... 5 for double speed and bandwidth which enhances system performance. 3-Way SLI™ and Quad-GPU CrossFireX™ support The P6X58-E PRO breaks the boundaries to boost system performance. Built to connect easily with next-generation components and peripherals, USB 3.0 transfers data...
... with USB 3.0-the latest connectivity standard. Triple-Channel DDR3 2200(O.C.)/ 2133(O.C.)/ 2000(O.C.)/ 1866(O.C.)/ 1600/ 1333/ 1066 support The motherboard supports DDR3 memory that features data transfer rates of the most powerful and energy efficient CPUs in multiple GPU configurations. Expect a... 5 for double speed and bandwidth which enhances system performance. 3-Way SLI™ and Quad-GPU CrossFireX™ support The P6X58-E PRO breaks the boundaries to boost system performance. Built to connect easily with next-generation components and peripherals, USB 3.0 transfers data...
User Manual
Page 17
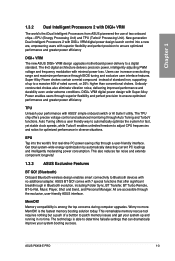
... technology is able to determine failsafe settings that offer significant breakthrough in diverse situations. ASUS BT GO! MemOK! Memory compatibility is the fastest memory booting solution today. ASUS P6X58-E PRO 1-3 TPU Unleash your system booting success. Auto Tuning offers a user friendly way ...superior flexibility and perfect precision to ensure optimized performance and greater power efficiency DIGI+ VRM The new ASUS DIGI+ VRM design upgrades motherboard power delivery to Bluetooth devices with 7 special functions that can increase overclocking range and maximize performance ...
... technology is able to determine failsafe settings that offer significant breakthrough in diverse situations. ASUS BT GO! MemOK! Memory compatibility is the fastest memory booting solution today. ASUS P6X58-E PRO 1-3 TPU Unleash your system booting success. Auto Tuning offers a user friendly way ...superior flexibility and perfect precision to ensure optimized performance and greater power efficiency DIGI+ VRM The new ASUS DIGI+ VRM design upgrades motherboard power delivery to Bluetooth devices with 7 special functions that can increase overclocking range and maximize performance ...
User Manual
Page 18
... Xpert intelligently allows you to easily connect or disconnect the chassis front panel cables to the motherboard. ASUS Q-Design ASUS Q-Design enhances your PC's loading. This all the exclusive ASUS features into one simple to use functions, with mobile devices via Bluetooth. All of connecting the system panel cables one at a time and avoiding...
... Xpert intelligently allows you to easily connect or disconnect the chassis front panel cables to the motherboard. ASUS Q-Design ASUS Q-Design enhances your PC's loading. This all the exclusive ASUS features into one simple to use functions, with mobile devices via Bluetooth. All of connecting the system panel cables one at a time and avoiding...
User Manual
Page 19
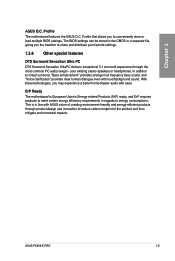
...distribute your existing stereo speakers or headphones. ErP Ready The motherboard is in regards to meet certain energy efficiency requirements in line with ease. This is European Union's Energy-related Products (ErP) ready, and ErP requires products to energy consumptions. ASUS P6X58-E PRO 1-5 Chapter 1 ASUS O.C. your favorite settings. 1.3.6 Other special features DTS Surround... In addition to reduce carbon footprint of creating environment-friendly and energy-efficient products through the most common PC audio setups - Profile The motherboard features the ASUS O.C.
...distribute your existing stereo speakers or headphones. ErP Ready The motherboard is in regards to meet certain energy efficiency requirements in line with ease. This is European Union's Energy-related Products (ErP) ready, and ErP requires products to energy consumptions. ASUS P6X58-E PRO 1-5 Chapter 1 ASUS O.C. your favorite settings. 1.3.6 Other special features DTS Surround... In addition to reduce carbon footprint of creating environment-friendly and energy-efficient products through the most common PC audio setups - Profile The motherboard features the ASUS O.C.
User Manual
Page 21
...ASUS P6X58-E PRO 2-1 Chapter 2: Chapter 2 Hardware information 2.1 Before you install motherboard components or change any component. • Before handling components, use a grounded wrist strap or touch a safely grounded object or a metal object, such as the power supply case, to avoid damaging them due to static electricity. • Hold components by the edges to the motherboard... the power cord is detached from the wall socket before you proceed Take note of the following precautions before touching any motherboard settings. • Unplug the power cord from the power supply.
...ASUS P6X58-E PRO 2-1 Chapter 2: Chapter 2 Hardware information 2.1 Before you install motherboard components or change any component. • Before handling components, use a grounded wrist strap or touch a safely grounded object or a metal object, such as the power supply case, to avoid damaging them due to static electricity. • Hold components by the edges to the motherboard... the power cord is detached from the wall socket before you proceed Take note of the following precautions before touching any motherboard settings. • Unplug the power cord from the power supply.
User Manual
Page 22
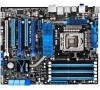
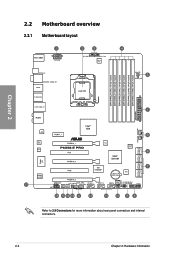
2.2 Motherboard overview 2.2.1 Motherboard layout Chapter 2 Refer to 2.9 Connectors for more information about rear panel connectors and internal connectors. 2-2 Chapter 2: Hardware information
2.2 Motherboard overview 2.2.1 Motherboard layout Chapter 2 Refer to 2.9 Connectors for more information about rear panel connectors and internal connectors. 2-2 Chapter 2: Hardware information

User Manual
Page 24
Place this side towards the rear of the chassis as indicated in the image below. 2.2.4 Screw holes Place nine screws into the chassis in the correct orientation. Doing so can damage the motherboard. 2.2.3 Placement direction When installing the motherboard, ensure that you place it into the holes indicated by circles to secure the motherboard to the rear part of the chassis Chapter 2 2-4 Chapter 2: Hardware information DO NOT overtighten the screws! The edge with external ports goes to the chassis.
Place this side towards the rear of the chassis as indicated in the image below. 2.2.4 Screw holes Place nine screws into the chassis in the correct orientation. Doing so can damage the motherboard. 2.2.3 Placement direction When installing the motherboard, ensure that you place it into the holes indicated by circles to secure the motherboard to the rear part of the chassis Chapter 2 2-4 Chapter 2: Hardware information DO NOT overtighten the screws! The edge with external ports goes to the chassis.
User Manual
Page 25
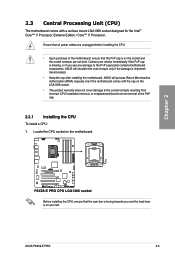
... not cover damage to the PnP cap/socket contacts/motherboard components. ASUS will process Return Merchandise Authorization (RMA) requests only if the motherboard comes with a surface mount LGA1366 socket designed for the Intel® Core™ i7 Processor Extreme Edition / Core™ i7 Processor. ASUS P6X58-E PRO 2-5 Contact your left. Chapter 2 Before installing the CPU, ensure...
... not cover damage to the PnP cap/socket contacts/motherboard components. ASUS will process Return Merchandise Authorization (RMA) requests only if the motherboard comes with a surface mount LGA1366 socket designed for the Intel® Core™ i7 Processor Extreme Edition / Core™ i7 Processor. ASUS P6X58-E PRO 2-5 Contact your left. Chapter 2 Before installing the CPU, ensure...
User Manual
Page 28
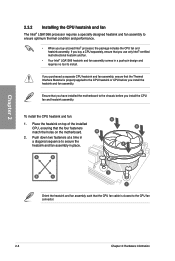
... Thermal Interface Material is closest to the CPU fan connector. 2-8 Chapter 2: Hardware information To install the CPU heatsink and fan: 1. Place the heatsink on the motherboard. B 2. Push down two fasteners at a time in a diagonal sequence to secure the heatsink and fan assembly in a push-pin design and requires no tool to... a specially designed heatsink and fan assembly to ensure optimum thermal condition and performance. • When you buy a CPU separately, ensure that you have installed the motherboard to the chassis before you install the heatsink and fan assembly.
... Thermal Interface Material is closest to the CPU fan connector. 2-8 Chapter 2: Hardware information To install the CPU heatsink and fan: 1. Place the heatsink on the motherboard. B 2. Push down two fasteners at a time in a diagonal sequence to secure the heatsink and fan assembly in a push-pin design and requires no tool to... a specially designed heatsink and fan assembly to ensure optimum thermal condition and performance. • When you buy a CPU separately, ensure that you have installed the motherboard to the chassis before you install the heatsink and fan assembly.
User Manual
Page 29
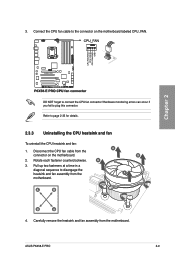
... and fan: 1. A B A A B B A 4. Carefully remove the heatsink and fan assembly from the connector on the motherboard labeled CPU_FAN. Refer to connect the CPU fan connector! B 3. ASUS P6X58-E PRO 2-9 Hardware monitoring errors can occur if you fail to the connector on the motherboard. 2. Rotate each fastener counterclockwise. Connect the CPU fan cable to plug this connector. Pull...
... and fan: 1. A B A A B B A 4. Carefully remove the heatsink and fan assembly from the connector on the motherboard labeled CPU_FAN. Refer to connect the CPU fan connector! B 3. ASUS P6X58-E PRO 2-9 Hardware monitoring errors can occur if you fail to the connector on the motherboard. 2. Rotate each fastener counterclockwise. Connect the CPU fan cable to plug this connector. Pull...
User Manual
Page 30
... has the same physical dimensions as a single-channel operation. DDR3 modules are developed for recommended memory configuration. 2-10 Chapter 2: Hardware information 2.4 System memory 2.4.1 Overview The motherboard comes with less power consumption.
... has the same physical dimensions as a single-channel operation. DDR3 modules are developed for recommended memory configuration. 2-10 Chapter 2: Hardware information 2.4 System memory 2.4.1 Overview The motherboard comes with less power consumption.
User Manual
Page 31
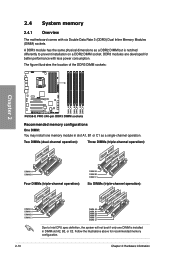
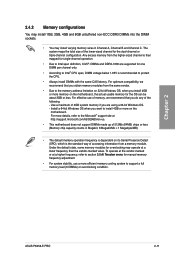
...frequency, refer to section 3.5 Ai Tweaker menu for one DIMM per channel only. • According to install 4GB or more memory on the motherboard, the actual usable memory for the dual-channel or triple-channel configuration. Chapter 2 2.4.2 Memory configurations You may install 1GB, 2GB, 4GB ... at http://support.microsoft.com/kb/929605/en-us. • This motherboard does not support DIMMs made up of 512Mb (64MB) chips or less (Memory chip capacity counts in Channel A, Channel B and Channel C. ASUS P6X58-E PRO 2-11 The system maps the total size of memory, we recommend that...
...frequency, refer to section 3.5 Ai Tweaker menu for one DIMM per channel only. • According to install 4GB or more memory on the motherboard, the actual usable memory for the dual-channel or triple-channel configuration. Chapter 2 2.4.2 Memory configurations You may install 1GB, 2GB, 4GB ... at http://support.microsoft.com/kb/929605/en-us. • This motherboard does not support DIMMs made up of 512Mb (64MB) chips or less (Memory chip capacity counts in Channel A, Channel B and Channel C. ASUS P6X58-E PRO 2-11 The system maps the total size of memory, we recommend that...

User Manual
Page 33
Chapter 2 P6X58-E PRO Motherboard Qualified Vendors Lists (QVL) DDR3-1600 MHz capability Vendors Part No. DIMM socket support (Optional) 2 3 46 ••• •• ...8226; •• •• •• •• •• •• •• ••• ••• ••• ASUS P6X58-E PRO 2-13 Timing Voltage 9-9-9-24 2 9-9-9-24 1.6 6-6-6-18 1.65 8-8-8-24 1.65 6-6-6-18 1.65 8-8-8-24 1.65 8-8-8-24 1.65 7-7-7-20 1.65 8-8-8-24 1.65 8-8-8-24 1.65 9-9-9-24 ...
Chapter 2 P6X58-E PRO Motherboard Qualified Vendors Lists (QVL) DDR3-1600 MHz capability Vendors Part No. DIMM socket support (Optional) 2 3 46 ••• •• ...8226; •• •• •• •• •• •• •• ••• ••• ••• ASUS P6X58-E PRO 2-13 Timing Voltage 9-9-9-24 2 9-9-9-24 1.6 6-6-6-18 1.65 8-8-8-24 1.65 6-6-6-18 1.65 8-8-8-24 1.65 8-8-8-24 1.65 7-7-7-20 1.65 8-8-8-24 1.65 8-8-8-24 1.65 9-9-9-24 ...

User Manual
Page 36
... of 4GB capacity or more, Windows 32-bit operation system may operate at a lower frequency than the vendor-marked value. 2-16 Chapter 2: Hardware information Chapter 2 P6X58-E PRO Motherboard Qualified Vendors Lists (QVL) DDR3-1067 MHz capability Vendors Part No. SS MICRON 8ZF22 D9KPV 7 SS MICRON D9KPT 7 DS MICRON 8ZF22 D9KPV 7 DS MICRON D9KPT...
... of 4GB capacity or more, Windows 32-bit operation system may operate at a lower frequency than the vendor-marked value. 2-16 Chapter 2: Hardware information Chapter 2 P6X58-E PRO Motherboard Qualified Vendors Lists (QVL) DDR3-1067 MHz capability Vendors Part No. SS MICRON 8ZF22 D9KPV 7 SS MICRON D9KPT 7 DS MICRON 8ZF22 D9KPV 7 DS MICRON D9KPT...


