User Manual
Page 3
Contents Notices...v Safety information vi About this guide vi P5KPL-AM SE specifications summary viii Chapter 1: Product information 1.1 Before you proceed 1-1 1.2 Motherboard overview 1-2 1.2.1 Motherboard layout 1-2 1.2.2 Layout contents 1-2 1.3 Central Processing Unit (CPU 1-3 1.4 System memory 1-3 1.4.1 Overview 1-3 1.4.2 Memory configurations 1-3 1.5 Expansion slots 1-7 1.5.1 PCI slot 1-7 1.5.2 PCI Express x1 slot 1-7 1.5.3 PCI Express x16 slot 1-7 1.6 Jumpers 1-7 1.7 Connectors 1-9 1.7.1 Rear panel ports 1-9 1.7.2 Internal connectors 1-10 1.8 Software...
Contents Notices...v Safety information vi About this guide vi P5KPL-AM SE specifications summary viii Chapter 1: Product information 1.1 Before you proceed 1-1 1.2 Motherboard overview 1-2 1.2.1 Motherboard layout 1-2 1.2.2 Layout contents 1-2 1.3 Central Processing Unit (CPU 1-3 1.4 System memory 1-3 1.4.1 Overview 1-3 1.4.2 Memory configurations 1-3 1.5 Expansion slots 1-7 1.5.1 PCI slot 1-7 1.5.2 PCI Express x1 slot 1-7 1.5.3 PCI Express x16 slot 1-7 1.6 Jumpers 1-7 1.7 Connectors 1-9 1.7.1 Rear panel ports 1-9 1.7.2 Internal connectors 1-10 1.8 Software...
User Manual
Page 8
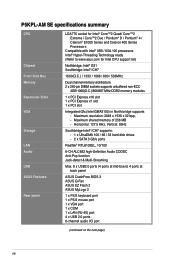
... port 1 x COM 1 x LAN (RJ-45) port 4 x USB 2.0 ports 6-channel audio I/O port (continued on the next page) viii P5KPL-AM SE specifications summary CPU Chipset Front Side Bus Memory Expansion Slots VGA Storage LAN Audio USB ASUS Features Rear panel LGA775 socket for Intel® Core™2 Quad/ Core™2 Extreme / Core™2 Duo / Pentium...
... port 1 x COM 1 x LAN (RJ-45) port 4 x USB 2.0 ports 6-channel audio I/O port (continued on the next page) viii P5KPL-AM SE specifications summary CPU Chipset Front Side Bus Memory Expansion Slots VGA Storage LAN Audio USB ASUS Features Rear panel LGA775 socket for Intel® Core™2 Quad/ Core™2 Extreme / Core™2 Duo / Pentium...

User Manual
Page 12
...E1000 Series and Celeron 400 Series processors. • Ensure that all power cables are not bent. ASUS will process Return Merchandise Authorization (RMA) requests only if the motherboard comes with the cap on the socket and the socket contacts are unplugged before installing the CPU.... the DDR2 DIMM sockets: DIMM_A1 DIMM_B1 P5KPL-AM SE P5KPL-AM SE 240-pin DDR2 DIMM sockets Channel Channel A Channel B Sockets DIMM_A1 DIMM_B1 1.4.2 Memory configurations You may install 256MB, 512MB, 1GB, 2GB, and 4GB unbuffered ECC/non-ECC DDR2 DIMMs into the DIMM sockets. 1-3 ASUS P5KPL-AM SE
...E1000 Series and Celeron 400 Series processors. • Ensure that all power cables are not bent. ASUS will process Return Merchandise Authorization (RMA) requests only if the motherboard comes with the cap on the socket and the socket contacts are unplugged before installing the CPU.... the DDR2 DIMM sockets: DIMM_A1 DIMM_B1 P5KPL-AM SE P5KPL-AM SE 240-pin DDR2 DIMM sockets Channel Channel A Channel B Sockets DIMM_A1 DIMM_B1 1.4.2 Memory configurations You may install 256MB, 512MB, 1GB, 2GB, and 4GB unbuffered ECC/non-ECC DDR2 DIMMs into the DIMM sockets. 1-3 ASUS P5KPL-AM SE

User Manual
Page 17
... clear the Real Time Clock (RTC) RAM in CMOS, which include system setup information such as system •words. CLRTC 12 23 P5KPL-AM SE Normal (Default) Clear RTC P5KPL-AM SE Clear RTC RAM Chapter 1: Product introduction 1-8 Turn OFF the computer and unplug the power cord. 2. Move the jumper cap from pins ... do not help, remove the onboard battery and move the cap back to clear the CMOS RTC RAM data. You can clear the CMOS memory of date, time, and system setup parameters by erasing the CMOS RTC RAM data. Shut down the key during the boot process and enter...
... clear the Real Time Clock (RTC) RAM in CMOS, which include system setup information such as system •words. CLRTC 12 23 P5KPL-AM SE Normal (Default) Clear RTC P5KPL-AM SE Clear RTC RAM Chapter 1: Product introduction 1-8 Turn OFF the computer and unplug the power cord. 2. Move the jumper cap from pins ... do not help, remove the onboard battery and move the cap back to clear the CMOS RTC RAM data. You can clear the CMOS memory of date, time, and system setup parameters by erasing the CMOS RTC RAM data. Shut down the key during the boot process and enter...
User Manual
Page 30
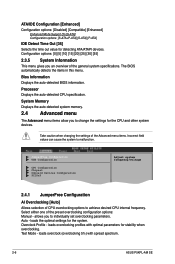
...to individually set overclocking parameters. Overclock Profile - Bios Information Displays the auto-detected BIOS information. System Memory Displays the auto-detected system memory. 2.4 Advanced menu The Advanced menu items allow you to malfunction. Take caution when changing the settings...BIOS automatically detects the items in this menu. Select either one of the general system specifications. loads overclocking profiles with spread spectrum. 2-6 ASUS P5KPL-AM SE Test Mode - Configuration options: [0] [5] [10] [15] [20] [25] [30] [35] 2.3.5 System Information This menu ...
...to individually set overclocking parameters. Overclock Profile - Bios Information Displays the auto-detected BIOS information. System Memory Displays the auto-detected system memory. 2.4 Advanced menu The Advanced menu items allow you to malfunction. Take caution when changing the settings...BIOS automatically detects the items in this menu. Select either one of the general system specifications. loads overclocking profiles with spread spectrum. 2-6 ASUS P5KPL-AM SE Test Mode - Configuration options: [0] [5] [10] [15] [20] [25] [30] [35] 2.3.5 System Information This menu ...
User Manual
Page 34
... [Yes], BIOS assigns an IRQ to PCI VGA card if the card requests for PCI/PnP devices. Configuration options: [Disabled] [Enabled] 2-10 ASUS P5KPL-AM SE South Bridge Configuration Audio Controller [Azalia] Allows you to set to [No], BIOS does not assign an IRQ to the PCI VGA card even if...] When set HD Audio mode. The menu includes setting IRQ and DMA channel resources for either PCI/PnP or legacy ISA devices, and setting the memory size block for legacy ISA devices. Configuration options: [Azalia] [All Disabled] Front Panel Support Type [HD Audio] Allows you to [No], BIOS configures...
... [Yes], BIOS assigns an IRQ to PCI VGA card if the card requests for PCI/PnP devices. Configuration options: [Disabled] [Enabled] 2-10 ASUS P5KPL-AM SE South Bridge Configuration Audio Controller [Azalia] Allows you to set to [No], BIOS does not assign an IRQ to the PCI VGA card even if...] When set HD Audio mode. The menu includes setting IRQ and DMA channel resources for either PCI/PnP or legacy ISA devices, and setting the memory size block for legacy ISA devices. Configuration options: [Azalia] [All Disabled] Front Panel Support Type [HD Audio] Allows you to [No], BIOS configures...


