User Manual
Page 3
... Motherboard layout 1-2 1.2.2 Layout contents 1-2 1.3 Central Processing Unit (CPU 1-3 1.4 System memory 1-3 1.4.1 Overview 1-3 1.4.2 Memory configurations 1-3 1.5 Expansion slots 1-7 1.5.1 PCI slot 1-7 1.5.2 PCI Express x1 slot 1-7 1.5.3 PCI Express x16 slot 1-7 1.6 Jumpers 1-7 1.7 Connectors 1-9 1.7.1 Rear panel ports 1-9 1.7.2 Internal connectors 1-10 1.8 Software support 1-15 1.8.1 Installing an operating system 1-15 1.8.2 Support DVD information 1-15 Chapter 2: BIOS information 2.1 Managing and updating your BIOS 2-1 2.1.1 ASUS Update utility 2-1 2.1.2 ASUS EZ Flash...
... Motherboard layout 1-2 1.2.2 Layout contents 1-2 1.3 Central Processing Unit (CPU 1-3 1.4 System memory 1-3 1.4.1 Overview 1-3 1.4.2 Memory configurations 1-3 1.5 Expansion slots 1-7 1.5.1 PCI slot 1-7 1.5.2 PCI Express x1 slot 1-7 1.5.3 PCI Express x16 slot 1-7 1.6 Jumpers 1-7 1.7 Connectors 1-9 1.7.1 Rear panel ports 1-9 1.7.2 Internal connectors 1-10 1.8 Software support 1-15 1.8.1 Installing an operating system 1-15 1.8.2 Support DVD information 1-15 Chapter 2: BIOS information 2.1 Managing and updating your BIOS 2-1 2.1.1 ASUS Update utility 2-1 2.1.2 ASUS EZ Flash...
User Manual
Page 9
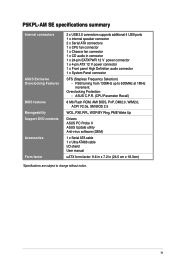
...BIOS features Manageability Support DVD contents Accessories Form factor 2 x USB 2.0 connectors supports additional 4 USB ports 1 x internal speaker connector 2 x Serial ATA connectors 1 x CPU fan connector 1 x Chassis fan connector 1 x CD audio in (24.5 cm x 18.3cm) *Specifications are subject to 600MHz at 1MHz increment. Overclocking Protection: - ASUS C.P.R. (CPU Parameter Recall) 8 Mb Flash ROM, AMI BIOS, PnP, DMI2.0, WfM2.0, ACPI V2.0a, SM BIOS 2.5 WOL, PXE,RPL, WOR BY Ring, PME Wake Up Drivers ASUS PC Probe II ASUS Update utility Anti-virus software (OEM) 1 x Serial ATA cable...
...BIOS features Manageability Support DVD contents Accessories Form factor 2 x USB 2.0 connectors supports additional 4 USB ports 1 x internal speaker connector 2 x Serial ATA connectors 1 x CPU fan connector 1 x Chassis fan connector 1 x CD audio in (24.5 cm x 18.3cm) *Specifications are subject to 600MHz at 1MHz increment. Overclocking Protection: - ASUS C.P.R. (CPU Parameter Recall) 8 Mb Flash ROM, AMI BIOS, PnP, DMI2.0, WfM2.0, ACPI V2.0a, SM BIOS 2.5 WOL, PXE,RPL, WOR BY Ring, PME Wake Up Drivers ASUS PC Probe II ASUS Update utility Anti-virus software (OEM) 1 x Serial ATA cable...

User Manual
Page 16
... x1 network cards, SCSI cards, and other cards that comply with the PCI Express specifications. 1.5.3 PCI Express x16 slot This motherboard supports PCI Express x16 graphics cards that can provide 500mA on the +5VSB lead for installation details. Set to +5VSB to wake up from S1 sleep mode (CPU stopped, DRAM refreshed, system running in low power mode) using the connected USB devices. Failure to CPU, DRAM in slow refresh, power supply in sleep mode. 1-7 ASUS P5KPL-AM SE USB device wake-up feature requires a power supply that comply with your expansion card for the USB port...
... x1 network cards, SCSI cards, and other cards that comply with the PCI Express specifications. 1.5.3 PCI Express x16 slot This motherboard supports PCI Express x16 graphics cards that can provide 500mA on the +5VSB lead for installation details. Set to +5VSB to wake up from S1 sleep mode (CPU stopped, DRAM refreshed, system running in low power mode) using the connected USB devices. Failure to CPU, DRAM in slow refresh, power supply in sleep mode. 1-7 ASUS P5KPL-AM SE USB device wake-up feature requires a power supply that comply with your expansion card for the USB port...
User Manual
Page 18
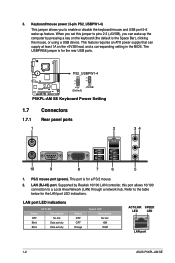
... P5KPL-AM SE +5V +5VSB (Default) P5KPL-AM SE Keyboard Power Setting 1.7 1.7.1 1 Connectors Rear panel ports 2 34 10 9 8 7 6 5 1. When you set this jumper to pins 2-3 (+5VSB), you to enable or disable the keyboard/mouse and USB port 5-6 wake-up the computer by Realtek 10/100 LAN controller, this port allows 10/100 connection to the table below for the rear USB ports. Supported by pressing a key on the +5VSB lead, and a corresponding setting in the BIOS. This feature requires an ATX power supply...
... P5KPL-AM SE +5V +5VSB (Default) P5KPL-AM SE Keyboard Power Setting 1.7 1.7.1 1 Connectors Rear panel ports 2 34 10 9 8 7 6 5 1. When you set this jumper to pins 2-3 (+5VSB), you to enable or disable the keyboard/mouse and USB port 5-6 wake-up the computer by Realtek 10/100 LAN controller, this port allows 10/100 connection to the table below for the rear USB ports. Supported by pressing a key on the +5VSB lead, and a corresponding setting in the BIOS. This feature requires an ATX power supply...
User Manual
Page 20
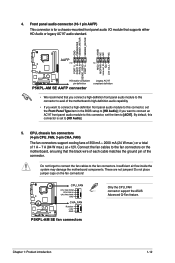
... following modes to a slot opening at the back of the system chassis. The USB module cable is for the Ultra DMA 100/66/33 signal cable. PIN1 P5KPL-AM SE NOTE:Orient the red markings on the IDE connector is set as "Cable-Select," ensure that supports up to PIN 1. These USB connectors comply with USB 2.0 specification that all other device jumpers have the same setting. P5KPL-AM SE IDE connector 3. 2. IDE connector (40-1 pin PRI_IDE) The onboard IDE connector is...
... following modes to a slot opening at the back of the system chassis. The USB module cable is for the Ultra DMA 100/66/33 signal cable. PIN1 P5KPL-AM SE NOTE:Orient the red markings on the IDE connector is set as "Cable-Select," ensure that supports up to PIN 1. These USB connectors comply with USB 2.0 specification that all other device jumpers have the same setting. P5KPL-AM SE IDE connector 3. 2. IDE connector (40-1 pin PRI_IDE) The onboard IDE connector is...
User Manual
Page 21
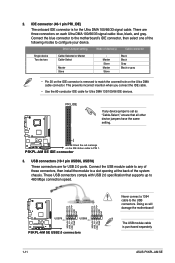
... a chassis-mounted front panel audio I/O module that the black wire of each cable matches the ground pin of 1 A ~ 7 A (84 W max.) at +12V. Insufficient air flow inside the system may damage the motherboard components. Do not place jumper caps on the motherboard, ensuring that supports either HD Audio or legacy AC'97 audio standard. Front panel audio connector (10-1 pin AAFP) This connector is set the Front Panel Type item in the BIOS setup to...
... a chassis-mounted front panel audio I/O module that the black wire of each cable matches the ground pin of 1 A ~ 7 A (84 W max.) at +12V. Insufficient air flow inside the system may damage the motherboard components. Do not place jumper caps on the motherboard, ensuring that supports either HD Audio or legacy AC'97 audio standard. Front panel audio connector (10-1 pin AAFP) This connector is set the Front Panel Type item in the BIOS setup to...
User Manual
Page 24
... the Support DVD Place the Support DVD to your hardware. • Motherboard settings and hardware options vary. To run the DVD. 1-15 ASUS P5KPL-AM SE Refer to the optical drive. The DVD automatically displays the Drivers menu if Autorun is NOT enabled in this section for better compatibility and system stability. 1.8.2 Support DVD information The Support DVD that comes with the motherboard package contains the drivers, software applications, and utilities that you can install to locate the file...
... the Support DVD Place the Support DVD to your hardware. • Motherboard settings and hardware options vary. To run the DVD. 1-15 ASUS P5KPL-AM SE Refer to the optical drive. The DVD automatically displays the Drivers menu if Autorun is NOT enabled in this section for better compatibility and system stability. 1.8.2 Support DVD information The Support DVD that comes with the motherboard package contains the drivers, software applications, and utilities that you can install to locate the file...
User Manual
Page 25
... original motherboard BIOS file to a bootable USB flash disk in case you to avoid network traffic, or click Auto Select then click Next. Quit all its features. b. Updating from the ftp site, then click Next. Installing ASUS Update: 1. Download the BIOS file from a BIOS file a. Place the Support DVD into the optical drive. Click the Utilities > Install ASUS Update. Follow the onscreen instructions. Click Start > Programs > ASUS > ASUS Update > ASUS Update. 2. Select Update BIOS from the Internet a. From the dropdown list, select any of updating itself...
... original motherboard BIOS file to a bootable USB flash disk in case you to avoid network traffic, or click Auto Select then click Next. Quit all its features. b. Updating from the ftp site, then click Next. Installing ASUS Update: 1. Download the BIOS file from a BIOS file a. Place the Support DVD into the optical drive. Click the Utilities > Install ASUS Update. Follow the onscreen instructions. Click Start > Programs > ASUS > ASUS Update > ASUS Update. 2. Select Update BIOS from the Internet a. From the dropdown list, select any of updating itself...
User Manual
Page 26
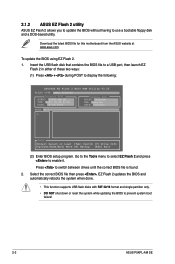
... or reset the system while updating the BIOS to display the following: ASUSTek EZ Flash 2 BIOS ROM Utility V3.25 FLASH TYPE: MXIC 25L8005 Current ROM BOARD: P5KPL-AM SE VER: 0309 (H:00 B:01) DATE: 09/28/2008 Update ROM BOARD: Unknown VER: Unknown DATE: Unknown PATH: A:\ A: Note [Enter] Select or Load [Tab] Switch [V] Drive Info [Up/Down/Home/End] Move [B] Backup [ESC] Exit (2) Enter BIOS setup program. Download the latest BIOS file for this motherboard from the ASUS...
... or reset the system while updating the BIOS to display the following: ASUSTek EZ Flash 2 BIOS ROM Utility V3.25 FLASH TYPE: MXIC 25L8005 Current ROM BOARD: P5KPL-AM SE VER: 0309 (H:00 B:01) DATE: 09/28/2008 Update ROM BOARD: Unknown VER: Unknown DATE: Unknown PATH: A:\ A: Note [Enter] Select or Load [Tab] Switch [V] Drive Info [Up/Down/Home/End] Move [B] Backup [ESC] Exit (2) Enter BIOS setup program. Download the latest BIOS file for this motherboard from the ASUS...
User Manual
Page 28
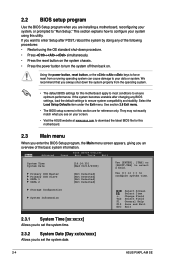
... system date. 2-4 ASUS P5KPL-AM SE Using the power button, reset button, or the ++ keys to force reset from the operating system. • The default BIOS settings for this utility. Use [+] or [-] to select a field. We recommend that you always shut down procedure. • Press ++ simultaneously. • Press the reset button on the system chassis. • Press the power button to "Run Setup." Storage Configuration System Information Select Screen Select Item +- Main Advanced BIOS SETUP UTILITY Power Boot Tools Exit...
... system date. 2-4 ASUS P5KPL-AM SE Using the power button, reset button, or the ++ keys to force reset from the operating system. • The default BIOS settings for this utility. Use [+] or [-] to select a field. We recommend that you always shut down procedure. • Press ++ simultaneously. • Press the reset button on the system chassis. • Press the power button to "Run Setup." Storage Configuration System Information Select Screen Select Item +- Main Advanced BIOS SETUP UTILITY Power Boot Tools Exit...
User Manual
Page 29
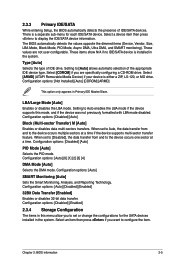
... values are specifically configuring a CD-ROM drive. Type [Auto] Selects the type of IDE/SATA devices. Configuration options: [Not Installed] [Auto] [CDROM] [ARMD] This option only appears in the system. LBA/Large Mode [Auto] Enables or disables the LBA mode. Setting to set or change the configurations for each IDE/SATA device. Configuration options: [Auto] [0] [1] [2] [3] [4] DMA Mode [Auto] Selects the DMA mode. Configuration options: [Disabled] [Enabled] 2.3.4 Storage Configuration The items in the system. Chapter 2: BIOS information 2-5 There is installed in Primary IDE Master...
... values are specifically configuring a CD-ROM drive. Type [Auto] Selects the type of IDE/SATA devices. Configuration options: [Not Installed] [Auto] [CDROM] [ARMD] This option only appears in the system. LBA/Large Mode [Auto] Enables or disables the LBA mode. Setting to set or change the configurations for each IDE/SATA device. Configuration options: [Auto] [0] [1] [2] [3] [4] DMA Mode [Auto] Selects the DMA mode. Configuration options: [Disabled] [Enabled] 2.3.4 Storage Configuration The items in the system. Chapter 2: BIOS information 2-5 There is installed in Primary IDE Master...
User Manual
Page 30
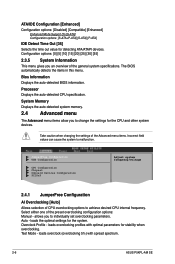
...the preset overclocking configuration options: Manual - Bios Information Displays the auto-detected BIOS information. loads the optimal settings for the CPU and other system devices. Select either one of CPU overclocking options to malfunction. Overclock Profile - allows you to change the settings for the system. loads overclocking profiles with spread spectrum. 2-6 ASUS P5KPL-AM SE Configuration options: [0] [5] [10] [15] [20] [25] [30] [35] 2.3.5 System Information This menu gives you to individually set overclocking parameters. System Memory Displays the auto-detected...
...the preset overclocking configuration options: Manual - Bios Information Displays the auto-detected BIOS information. loads the optimal settings for the CPU and other system devices. Select either one of CPU overclocking options to malfunction. Overclock Profile - allows you to change the settings for the system. loads overclocking profiles with spread spectrum. 2-6 ASUS P5KPL-AM SE Configuration options: [0] [5] [10] [15] [20] [25] [30] [35] 2.3.5 System Information This menu gives you to individually set overclocking parameters. System Memory Displays the auto-detected...
User Manual
Page 32
... display the configuration options. Configuration options: [Disabled] [Enabled] [Auto] USB 2.0 Controller Mode [HiSpeed] Allows you enable the USB 2.0 Controller item. CPU Ratio Setting [Auto] Sets the ration between CPU core clock and the FSB frequency. Key in CMOS, then the actual and set the USB 2.0 controller mode to boot legacy operating systems that the BIOS automatically detects. Configuration options: [FullSpeed ] [HiSpeed ] 2.4.3 CPU Configuration The items in this item. If detected, the USB controller legacy mode is set in ratio numbers directly. The Module Version...
... display the configuration options. Configuration options: [Disabled] [Enabled] [Auto] USB 2.0 Controller Mode [HiSpeed] Allows you enable the USB 2.0 Controller item. CPU Ratio Setting [Auto] Sets the ration between CPU core clock and the FSB frequency. Key in CMOS, then the actual and set the USB 2.0 controller mode to boot legacy operating systems that the BIOS automatically detects. Configuration options: [FullSpeed ] [HiSpeed ] 2.4.3 CPU Configuration The items in this item. If detected, the USB controller legacy mode is set in ratio numbers directly. The Module Version...

User Manual
Page 33
... graphics controller to use the EIST. Configuration options: [IGD] [PCI/IGD] [PCI/PEG] [PEG/IGD] [PEG/PCI] Internal Graphics Mode Select [Enabled, 8MB] Allows you to change the advanced chipset settings. Configuration options: [Disabled] [Enabled, 1MB] [Enabled, 8MB] PEG Port Configuration PEG Force x1 [Disabled] Allows you to enabled or disable the remapping of system memory used by the Interanal graphics device. Configuration options: [Enabled] [Disabled] 2.4.4 Chipset The Chipset menu allows you to display the sub-menu. Configuration options: [Disabled] [Enabled] Configure DRAM...
... graphics controller to use the EIST. Configuration options: [IGD] [PCI/IGD] [PCI/PEG] [PEG/IGD] [PEG/PCI] Internal Graphics Mode Select [Enabled, 8MB] Allows you to change the advanced chipset settings. Configuration options: [Disabled] [Enabled, 1MB] [Enabled, 8MB] PEG Port Configuration PEG Force x1 [Disabled] Allows you to enabled or disable the remapping of system memory used by the Interanal graphics device. Configuration options: [Enabled] [Disabled] 2.4.4 Chipset The Chipset menu allows you to display the sub-menu. Configuration options: [Disabled] [Enabled] Configure DRAM...
User Manual
Page 34
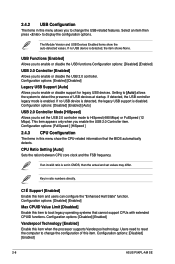
... Devices Configuration Onboard PCIE 10/100M LAN [Enabled] Allows you to change the advanced settings for legacy ISA devices. This item appears only when the Onboard LAN item is installed in the system. The menu includes setting IRQ and DMA channel resources for either PCI/PnP or legacy ISA devices, and setting the memory size block for PCI/PnP devices. Configuration options: [Disabled] [Enabled] 2-10 ASUS P5KPL-AM SE Configuration options: [Azalia] [All Disabled] Front Panel Support Type [HD Audio] Allows you to set to Enabled. South Bridge Configuration Audio Controller...
... Devices Configuration Onboard PCIE 10/100M LAN [Enabled] Allows you to change the advanced settings for legacy ISA devices. This item appears only when the Onboard LAN item is installed in the system. The menu includes setting IRQ and DMA channel resources for either PCI/PnP or legacy ISA devices, and setting the memory size block for PCI/PnP devices. Configuration options: [Disabled] [Enabled] 2-10 ASUS P5KPL-AM SE Configuration options: [Azalia] [All Disabled] Front Panel Support Type [HD Audio] Allows you to set to Enabled. South Bridge Configuration Audio Controller...
User Manual
Page 35
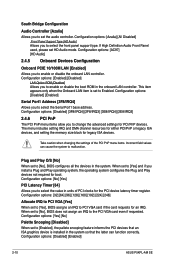
... settings for use of PCI/PnP devices. Configuration options: [Disabled] [Enabled] 2.5.3 ACPI APIC Support [Enabled] Allows you to enable or disable the Advanced Configuration and Power Interface (ACPI) support in the S1 state. IRQ-xx assigned to [PCI Device] When set to display the configuration options. Select an item then press to [PCI Device], the specific IRQ is included in a low power mode. APM Configuration Hardware Monitor 2.5.1 Suspend Mode [Auto] Allows you to enter the ACPI S1 (Power on Suspend) sleep state. When signaled by OS. 2.5.2 ACPI 2.0 Support [Disabled...
... settings for use of PCI/PnP devices. Configuration options: [Disabled] [Enabled] 2.5.3 ACPI APIC Support [Enabled] Allows you to enable or disable the Advanced Configuration and Power Interface (ACPI) support in the S1 state. IRQ-xx assigned to [PCI Device] When set to display the configuration options. Select an item then press to [PCI Device], the specific IRQ is included in a low power mode. APM Configuration Hardware Monitor 2.5.1 Suspend Mode [Auto] Allows you to enter the ACPI S1 (Power on Suspend) sleep state. When signaled by OS. 2.5.2 ACPI 2.0 Support [Disabled...

User Manual
Page 36
... motherboard, the field shows N/A. Configuration options: [Disabled] [Space Bar] [Ctrl-Esc] [Power Key] Power On By PS/2 Mouse [Disabled] When set to [Enabled], this parameter allows you to use specific keys on the keyboard to display the detected speed. 2-12 ASUS P5KPL-AM SE Select Ignored if you do not wish to display the detected temperatures. Select Ignored if you do not wish to turn on the system. This feature requires an ATX power supply...
... motherboard, the field shows N/A. Configuration options: [Disabled] [Space Bar] [Ctrl-Esc] [Power Key] Power On By PS/2 Mouse [Disabled] When set to [Enabled], this parameter allows you to use specific keys on the keyboard to display the detected speed. 2-12 ASUS P5KPL-AM SE Select Ignored if you do not wish to display the detected temperatures. Select Ignored if you do not wish to turn on the system. This feature requires an ATX power supply...
User Manual
Page 37
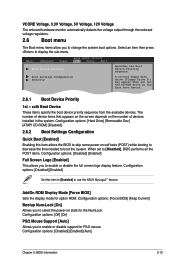
... the system boot options. Main Advanced Power BIOS SETUP UTILITY Boot Tools Exit Boot Device Priority Boot Settings Configuration Security Specifies the Boot Device Priority sequence. VCORE Voltage, 3.3V Voltage, 5V Voltage, 12V Voltage The onboard hardware monitor automatically detects the voltage output through the onboard voltage regulators. 2.6 Boot menu The Boot menu items allow you to enable or disable support for PS/2 mouse. Configuration options: [Hard Drive] [Removable Dev.] [ATAPI CD-ROM] [Disabled] 2.6.2 Boot Settings Configuration Quick Boot [Enabled] Enabling this item...
... the system boot options. Main Advanced Power BIOS SETUP UTILITY Boot Tools Exit Boot Device Priority Boot Settings Configuration Security Specifies the Boot Device Priority sequence. VCORE Voltage, 3.3V Voltage, 5V Voltage, 12V Voltage The onboard hardware monitor automatically detects the voltage output through the onboard voltage regulators. 2.6 Boot menu The Boot menu items allow you to enable or disable support for PS/2 mouse. Configuration options: [Hard Drive] [Removable Dev.] [ATAPI CD-ROM] [Disabled] 2.6.2 Boot Settings Configuration Quick Boot [Enabled] Enabling this item...
User Manual
Page 38
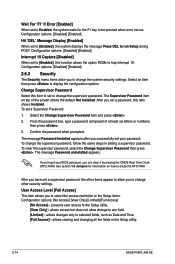
... Password uninstalled appears. Configuration options: [Disabled] [Enabled] Hit 'DEL' Message Display [Enabled] When set or change the supervisor password, follow the same steps in the Setup utility. 2-14 ASUS P5KPL-AM SE allows viewing and changing all the fields in setting a supervisor password. After you can clear it by erasing the CMOS Real Time Clock (RTC) RAM. To set to [Enabled], this item shows Installed. If you forget your password. Wait For 'F1' If Error [Enabled] When set to Enabled...
... Password uninstalled appears. Configuration options: [Disabled] [Enabled] Hit 'DEL' Message Display [Enabled] When set or change the supervisor password, follow the same steps in the Setup utility. 2-14 ASUS P5KPL-AM SE allows viewing and changing all the fields in setting a supervisor password. After you can clear it by erasing the CMOS Real Time Clock (RTC) RAM. To set to [Enabled], this item shows Installed. If you forget your password. Wait For 'F1' If Error [Enabled] When set to Enabled...

User Manual
Page 39
... screen shows the default Not Installed. Clear User Password Select this item to display the sub-menu. Select an item then press to clear the user password. Select the Change User Password item and press . 2. The message Password Installed appears after you to confirm your password successfully. To change the user password. Configuration options: [Setup] [Always] 2.7 Tools menu The Tools menu items allow you set to run the utility to [Setup], BIOS checks for details. 2.7.2 AI NET 2 Check Realtek LAN cable [Disabled] Enables...
... screen shows the default Not Installed. Clear User Password Select this item to display the sub-menu. Select an item then press to clear the user password. Select the Change User Password item and press . 2. The message Password Installed appears after you to confirm your password successfully. To change the user password. Configuration options: [Setup] [Always] 2.7 Tools menu The Tools menu items allow you set to run the utility to [Setup], BIOS checks for details. 2.7.2 AI NET 2 Check Realtek LAN cable [Disabled] Enables...


