
P5GD2-X User's Manual for English Edition
Page 7
... the product, make sure all power cables from the existing system before you add a device. • Before connecting or removing signal cables from connectors, slots, sockets and circuitry. • Avoid dust, humidity, and temperature extremes. If you are unplugged. • Seek professional assistance before using an adapter or extension cord. vii...
... the product, make sure all power cables from the existing system before you add a device. • Before connecting or removing signal cables from connectors, slots, sockets and circuitry. • Avoid dust, humidity, and temperature extremes. If you are unplugged. • Seek professional assistance before using an adapter or extension cord. vii...
P5GD2-X User's Manual for English Edition
Page 10
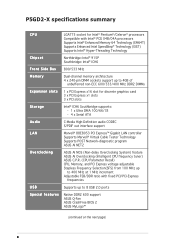
P5GD2-X specifications summary CPU LGA775 socket for Intel® Pentium®/Celeron® processors Compatible with Intel® PCG 04B/04A processors Supports Intel® Enhanced Memory 64 Technology (...Express™ Gigabit LAN controller Supports Marvell® Virtual Cable Tester Technology Supports POST Network-diagnostic program ASUS AI NET2 Overclocking ASUS AI NOS (Non-delay Overclocking System) feature ASUS AI Overclocking (Intelligent CPU frequency tuner) ASUS C.P.R. (CPU Parameter Recall) CPU, Memory, and PCI Express voltage adjustable Stepless Frequency Selection(SFS) from...
P5GD2-X specifications summary CPU LGA775 socket for Intel® Pentium®/Celeron® processors Compatible with Intel® PCG 04B/04A processors Supports Intel® Enhanced Memory 64 Technology (...Express™ Gigabit LAN controller Supports Marvell® Virtual Cable Tester Technology Supports POST Network-diagnostic program ASUS AI NET2 Overclocking ASUS AI NOS (Non-delay Overclocking System) feature ASUS AI Overclocking (Intelligent CPU frequency tuner) ASUS C.P.R. (CPU Parameter Recall) CPU, Memory, and PCI Express voltage adjustable Stepless Frequency Selection(SFS) from...
P5GD2-X User's Manual for English Edition
Page 14
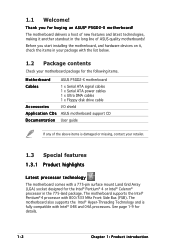
... your retailer. 1.3 Special features 1.3.1 Product highlights Latest processor technology The motherboard comes with a 775-pin surface mount Land Grid Array (LGA) socket designed for details. 1-2 Chapter 1: Product introduction 1.1 Welcome! See page 1-9 for the Intel® Pentium® 4 or Intel® ... in your package with the list below. 1.2 Package contents Check your motherboard package for the following items. Motherboard ASUS P5GD2-X motherboard Cables 1 x Serial ATA signal cables 1 x Serial ATA power cables 1 x Ultra DMA cables 1 x Floppy disk drive cable ...
... your retailer. 1.3 Special features 1.3.1 Product highlights Latest processor technology The motherboard comes with a 775-pin surface mount Land Grid Array (LGA) socket designed for details. 1-2 Chapter 1: Product introduction 1.1 Welcome! See page 1-9 for the Intel® Pentium® 4 or Intel® ... in your package with the list below. 1.2 Package contents Check your motherboard package for the following items. Motherboard ASUS P5GD2-X motherboard Cables 1 x Serial ATA signal cables 1 x Serial ATA power cables 1 x Ultra DMA cables 1 x Floppy disk drive cable ...
P5GD2-X User's Manual for English Edition
Page 18
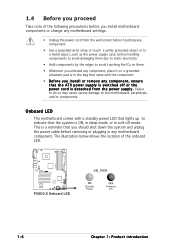
... h e p o w e r s u p p l y . This is a reminder that the system is switched off mode. P5GD2-X ® P5GD2-X Onboard LED SB_PWR ON Standby Power OFF Powered Off 1-6 Chapter 1: Product introduction The illustration below shows the location of the following precautions before... you install motherboard components or change any motherboard settings. • Unplug the power cord from the wall socket...
... h e p o w e r s u p p l y . This is a reminder that the system is switched off mode. P5GD2-X ® P5GD2-X Onboard LED SB_PWR ON Standby Power OFF Powered Off 1-6 Chapter 1: Product introduction The illustration below shows the location of the following precautions before... you install motherboard components or change any motherboard settings. • Unplug the power cord from the wall socket...
P5GD2-X User's Manual for English Edition
Page 21
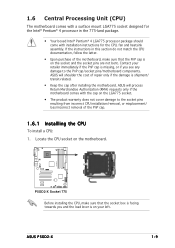
... misplacement/ loss/incorrect removal of repair only if the damage is on the motherboard. ASUS P5GD2-X 1-9 1.6 Central Processing Unit (CPU) The motherboard comes with a surface mount LGA775 socket designed for the CPU, fan and heatsink assembly. Contact your left. ASUS will shoulder the cost of the PnP cap. 1.6.1 Installling the CPU To install a CPU...
... misplacement/ loss/incorrect removal of repair only if the damage is on the motherboard. ASUS P5GD2-X 1-9 1.6 Central Processing Unit (CPU) The motherboard comes with a surface mount LGA775 socket designed for the CPU, fan and heatsink assembly. Contact your left. ASUS will shoulder the cost of the PnP cap. 1.6.1 Installling the CPU To install a CPU...
P5GD2-X User's Manual for English Edition
Page 22
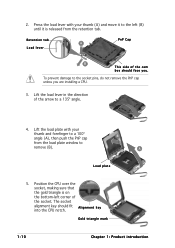
...Cap B This side of the cam box should fit A l i g n m e n t k e y into the CPU notch. Lift the load lever in the direction of the socket. Gold triangle mark 1-10 Chapter 1: Product introduction Lift the load plate with your thumb and forefinger to a 100º angle (A), then push the PnP cap... from the retention tab. Position the CPU over the socket, making sure that the gold triangle is on the bottom-left (B) until it to remove (B). B A Load plate 5. 2. Press the load lever ...
...Cap B This side of the cam box should fit A l i g n m e n t k e y into the CPU notch. Lift the load lever in the direction of the socket. Gold triangle mark 1-10 Chapter 1: Product introduction Lift the load plate with your thumb and forefinger to a 100º angle (A), then push the PnP cap... from the retention tab. Position the CPU over the socket, making sure that the gold triangle is on the bottom-left (B) until it to remove (B). B A Load plate 5. 2. Press the load lever ...
P5GD2-X User's Manual for English Edition
Page 23
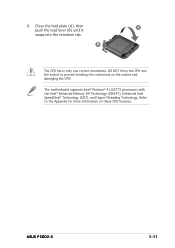
Close the load plate (A), then A push the load lever (B) until it snaps into the socket to the Appendix for more information on the socket and damaging the CPU! B The CPU fits in only one correct orientation. DO NOT force the CPU into the retention tab. ASUS P5GD2-X 1-11 The motherboard supports Intel® Pentium® 4 LGA775 processors with the Intel® Enhanced Memory 64 Technology (EM64T), Enhanced Intel SpeedStep® Technology (EIST), and Hyper-Threading Technology. 6. Refer to prevent bending the connectors on these CPU features.
Close the load plate (A), then A push the load lever (B) until it snaps into the socket to the Appendix for more information on the socket and damaging the CPU! B The CPU fits in only one correct orientation. DO NOT force the CPU into the retention tab. ASUS P5GD2-X 1-11 The motherboard supports Intel® Pentium® 4 LGA775 processors with the Intel® Enhanced Memory 64 Technology (EM64T), Enhanced Intel SpeedStep® Technology (EIST), and Hyper-Threading Technology. 6. Refer to prevent bending the connectors on these CPU features.
P5GD2-X User's Manual for English Edition
Page 28
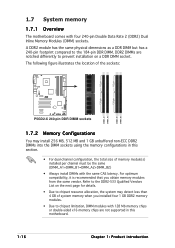
... 1.7.1 Overview The motherboard comes with the same CAS latency. The following figure illustrates the location of the sockets: 112 pin 112 pin P5GD2-X ® 128 pin 128 pin DIMM_A1 DIMM_A2 DIMM_B1 DIMM_B2 P5GD2-X 240-pin DDR DIMM sockets 1.7.2 Memory Configurations You may detect less than 4 GB of memory module(s) installed per channel must be...
... 1.7.1 Overview The motherboard comes with the same CAS latency. The following figure illustrates the location of the sockets: 112 pin 112 pin P5GD2-X ® 128 pin 128 pin DIMM_A1 DIMM_A2 DIMM_B1 DIMM_B2 P5GD2-X 240-pin DDR DIMM sockets 1.7.2 Memory Configurations You may detect less than 4 GB of memory module(s) installed per channel must be...
P5GD2-X User's Manual for English Edition
Page 31
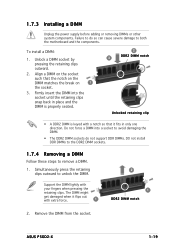
... that it flips out with your fingers when pressing the retaining clips. Remove the DIMM from the socket. Firmly insert the DIMM into a socket to avoid damaging the DIMM. • The DDR2 DIMM sockets do so can cause severe damage to remove a DIMM. 1. Support the DIMM lightly with extra force. 1 2 1 DDR2 DIMM notch... outward to unlock the DIMM. 1.7.3 Installing a DIMM Unplug the power supply before adding or removing DIMMs or other system components. To install a DIMM: 1. Unlock a DIMM socket by pressing the retaining clips outward. 2. ASUS P5GD2-X 1-19
... that it flips out with your fingers when pressing the retaining clips. Remove the DIMM from the socket. Firmly insert the DIMM into a socket to avoid damaging the DIMM. • The DDR2 DIMM sockets do so can cause severe damage to remove a DIMM. 1. Support the DIMM lightly with extra force. 1 2 1 DDR2 DIMM notch... outward to unlock the DIMM. 1.7.3 Installing a DIMM Unplug the power supply before adding or removing DIMMs or other system components. To install a DIMM: 1. Unlock a DIMM socket by pressing the retaining clips outward. 2. ASUS P5GD2-X 1-19


