
Motherboard Installation Guide
Page 49
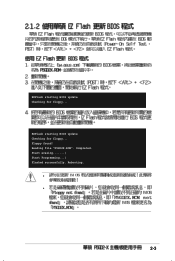
Completed. Floppy found! Rebooting. • • 2-3 EZFlash starting BIOS update Checking for floppy... Reading file "P5GD2X.ROM". EZFlash starting BIOS update Checking for floppy... Start erasing.......| Start Programming...| Flashed successfully.
Completed. Floppy found! Rebooting. • • 2-3 EZFlash starting BIOS update Checking for floppy... Reading file "P5GD2X.ROM". EZFlash starting BIOS update Checking for floppy... Start erasing.......| Start Programming...| Flashed successfully.
Motherboard Installation Guide
Page 52
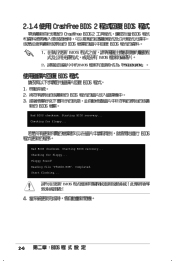
Bad BIOS checksum. Starting BIOS recovery... Bad BIOS checksum. Floppy found! Start flashing... 2-6 Starting BIOS recovery... Checking for floppy... Completed. Checking for floppy... Reading file "P5GD2X.ROM".
Bad BIOS checksum. Starting BIOS recovery... Bad BIOS checksum. Floppy found! Start flashing... 2-6 Starting BIOS recovery... Checking for floppy... Completed. Checking for floppy... Reading file "P5GD2X.ROM".

Motherboard Installation Guide
Page 53
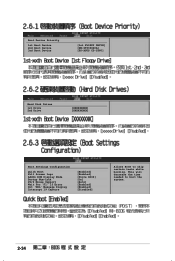
Checking for CD-ROM... CD-ROM found ! Starting BIOS recovery... Floppy not found . Completed. Start flashing... 2-7 Bad BIOS checksum. Bad BIOS checksum. Checking for floppy... Reading file "P5GD2X.ROM". Checking for floppy... Starting BIOS recovery...
Checking for CD-ROM... CD-ROM found ! Starting BIOS recovery... Floppy not found . Completed. Start flashing... 2-7 Bad BIOS checksum. Bad BIOS checksum. Checking for floppy... Reading file "P5GD2X.ROM". Checking for floppy... Starting BIOS recovery...
Motherboard Installation Guide
Page 80
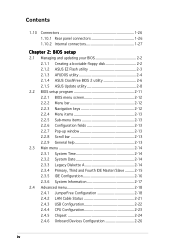
Boot Device Priority 1st Boot Device 2nd Boot Device 3rd Boot Device [1st FLOPPY DRIVE] [PM-ST330620A] [PS-ASUS CD-S360] Hard Disk Drives 1st Drive 2nd Drive [XXXXXXXXX] [XXXXXXXXX] Boot Settings Configuration Quick Boot Full Screen Logo AddOn ROM Display Mode Bootup Num-Lock PS/2 Mouse Support Wait For 'F1' If Error Hit 'DEL' Message Display Interrupt 19 Capture [Enabled] [Enabled] [Force BIOS] [On] [Auto] [Enabled] [Enabled] [Disabled] Allows BIOS to boot the system. 2-34 This will decrease the time needed to skip certain tests while booting.
Boot Device Priority 1st Boot Device 2nd Boot Device 3rd Boot Device [1st FLOPPY DRIVE] [PM-ST330620A] [PS-ASUS CD-S360] Hard Disk Drives 1st Drive 2nd Drive [XXXXXXXXX] [XXXXXXXXX] Boot Settings Configuration Quick Boot Full Screen Logo AddOn ROM Display Mode Bootup Num-Lock PS/2 Mouse Support Wait For 'F1' If Error Hit 'DEL' Message Display Interrupt 19 Capture [Enabled] [Enabled] [Force BIOS] [On] [Auto] [Enabled] [Enabled] [Disabled] Allows BIOS to boot the system. 2-34 This will decrease the time needed to skip certain tests while booting.
P5GD2-X User's Manual for English Edition
Page 4
Contents 1.10 Connectors 1-26 1.10.1 Rear panel connectors 1-26 1.10.2 Internal connectors 1-27 Chapter 2: BIOS setup 2.1 Managing and updating your BIOS 2-2 2.1.1 Creating a bootable floppy disk 2-2 2.1.2 ASUS EZ Flash utility 2-3 2.1.3 AFUDOS utility 2-4 2.1.4 ASUS CrashFree BIOS 2 utility 2-6 2.1.5 ASUS Update utility 2-8 2.2 BIOS setup program 2-11 2.2.1 BIOS menu screen 2-12 2.2.2 Menu bar 2-12 2.2.3 Navigation keys 2-12 2.2.4 Menu items 2-13 2.2.5 Sub-menu items 2-13...
Contents 1.10 Connectors 1-26 1.10.1 Rear panel connectors 1-26 1.10.2 Internal connectors 1-27 Chapter 2: BIOS setup 2.1 Managing and updating your BIOS 2-2 2.1.1 Creating a bootable floppy disk 2-2 2.1.2 ASUS EZ Flash utility 2-3 2.1.3 AFUDOS utility 2-4 2.1.4 ASUS CrashFree BIOS 2 utility 2-6 2.1.5 ASUS Update utility 2-8 2.2 BIOS setup program 2-11 2.2.1 BIOS menu screen 2-12 2.2.2 Menu bar 2-12 2.2.3 Navigation keys 2-12 2.2.4 Menu items 2-13 2.2.5 Sub-menu items 2-13...
P5GD2-X User's Manual for English Edition
Page 8
...you need when installing and configuring the motherboard. It includes description of the standard package. ASUS websites The ASUS website provides updated information on the motherboard. • Chapter 2: BIOS setup This chapter tells how to the following parts: • Chapter 1: Product introduction ...This chapter describes the features of the support CD that may have to the ASUS contact information. 2. About this guide is ...
...you need when installing and configuring the motherboard. It includes description of the standard package. ASUS websites The ASUS website provides updated information on the motherboard. • Chapter 2: BIOS setup This chapter tells how to the following parts: • Chapter 1: Product introduction ...This chapter describes the features of the support CD that may have to the ASUS contact information. 2. About this guide is ...
P5GD2-X User's Manual for English Edition
Page 10
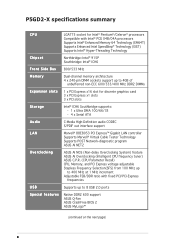
P5GD2-X specifications summary CPU LGA775 socket for Intel® Pentium®/Celeron® processors ... Supports Marvell® Virtual Cable Tester Technology Supports POST Network-diagnostic program ASUS AI NET2 Overclocking ASUS AI NOS (Non-delay Overclocking System) feature ASUS AI Overclocking (Intelligent CPU frequency tuner) ASUS C.P.R. (CPU Parameter Recall) CPU, Memory, and PCI Express voltage adjustable... frequencies USB Supports up to 8 USB 2.0 ports Special features Native DDR2 600 support ASUS Q-Fan ASUS CrashFree BIOS 2 ASUS MyLogo™ (continued on the next page) x
P5GD2-X specifications summary CPU LGA775 socket for Intel® Pentium®/Celeron® processors ... Supports Marvell® Virtual Cable Tester Technology Supports POST Network-diagnostic program ASUS AI NET2 Overclocking ASUS AI NOS (Non-delay Overclocking System) feature ASUS AI Overclocking (Intelligent CPU frequency tuner) ASUS C.P.R. (CPU Parameter Recall) CPU, Memory, and PCI Express voltage adjustable... frequencies USB Supports up to 8 USB 2.0 ports Special features Native DDR2 600 support ASUS Q-Fan ASUS CrashFree BIOS 2 ASUS MyLogo™ (continued on the next page) x
P5GD2-X User's Manual for English Edition
Page 11
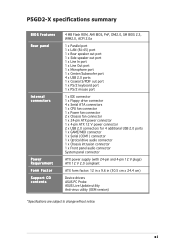
P5GD2-X specifications summary BIOS features Rear panel Internal connectors Power Requirement Form Factor Support CD contents 4 MB Flash ROM, AMI BIOS, PnP, DMI2.0, SM BIOS 2.3, WfM2.0, ACPI 2.0a 1 x Parallel port 1 x LAN (RJ-45) port 1 x Rear speaker out port 1 x Side speaker out port 1 x Line In port 1 x Line Out port 1 x Microphone ... (with 24-pin and 4-pin 12 V plugs) ATX 12 V 2.0 compliant ATX form factor: 12 in x 9.6 in (30.5 cm x 24.4 cm) Device drivers ASUS PC Probe ASUS Live Update utility Anti-virus utility (OEM version) *Specifications are subject to change without notice. xi
P5GD2-X specifications summary BIOS features Rear panel Internal connectors Power Requirement Form Factor Support CD contents 4 MB Flash ROM, AMI BIOS, PnP, DMI2.0, SM BIOS 2.3, WfM2.0, ACPI 2.0a 1 x Parallel port 1 x LAN (RJ-45) port 1 x Rear speaker out port 1 x Side speaker out port 1 x Line In port 1 x Line Out port 1 x Microphone ... (with 24-pin and 4-pin 12 V plugs) ATX 12 V 2.0 compliant ATX form factor: 12 in x 9.6 in (30.5 cm x 24.4 cm) Device drivers ASUS PC Probe ASUS Live Update utility Anti-virus utility (OEM version) *Specifications are subject to change without notice. xi
P5GD2-X User's Manual for English Edition
Page 17
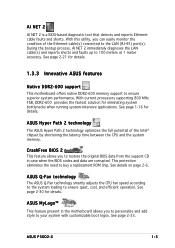
...system loading to buy a replacement ROM chip. See page 2-33. ASUS Hyper Path 2 technology The ASUS Hyper Path 2 technology optimizes the full potential of the Ethernet cable(s) connected to restore the original BIOS data from the support CD in the motherboard allows you can easily ... the latency time between the CPU and the system memory. ASUS MyLogo™ This feature present in case when the BIOS codes and data are corrupted. CrashFree BIOS 2 This feature allows you to the LAN (RJ-45) port(s). ASUS P5GD2-X 1-5 During the bootup process, AI NET 2 immediately diagnoses...
...system loading to buy a replacement ROM chip. See page 2-33. ASUS Hyper Path 2 technology The ASUS Hyper Path 2 technology optimizes the full potential of the Ethernet cable(s) connected to restore the original BIOS data from the support CD in the motherboard allows you can easily ... the latency time between the CPU and the system memory. ASUS MyLogo™ This feature present in case when the BIOS codes and data are corrupted. CrashFree BIOS 2 This feature allows you to the LAN (RJ-45) port(s). ASUS P5GD2-X 1-5 During the bootup process, AI NET 2 immediately diagnoses...
P5GD2-X User's Manual for English Edition
Page 32
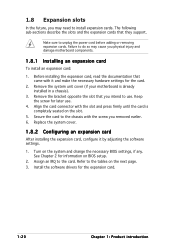
Secure the card to the tables on the system and change the necessary BIOS settings, if any. Assign an IRQ to unplug the power cord before adding or removing expansion cards. Refer to the chassis with the slot and ...press firmly until the card is already installed in a chassis). 3. Remove the system unit cover (if your motherboard is completely seated on BIOS setup. 2. The following sub-sections describe the slots and the expansion cards that you intend to install expansion cards. Keep the screw for the card...
Secure the card to the tables on the system and change the necessary BIOS settings, if any. Assign an IRQ to unplug the power cord before adding or removing expansion cards. Refer to the chassis with the slot and ...press firmly until the card is already installed in a chassis). 3. Remove the system unit cover (if your motherboard is completely seated on BIOS setup. 2. The following sub-sections describe the slots and the expansion cards that you intend to install expansion cards. Keep the screw for the card...
P5GD2-X User's Manual for English Edition
Page 35
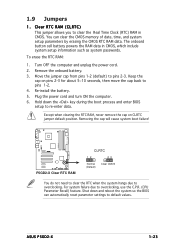
...cord. 2. Re-install the battery. 5. Removing the cap will cause system boot failure! ASUS P5GD2-X 1-23 Clear RTC RAM (CLRTC) This jumper allows you to overclocking. Hold down and reboot the system so the BIOS can clear the CMOS memory of date, time, and system setup parameters by erasing the CMOS... RTC RAM data. Shut down the key during the boot process and enter BIOS setup to default values. Remove the onboard battery. 3. For system failure due to pins 1-2. 4. Keep the cap on CLRTC jumper default position. ...
...cord. 2. Re-install the battery. 5. Removing the cap will cause system boot failure! ASUS P5GD2-X 1-23 Clear RTC RAM (CLRTC) This jumper allows you to overclocking. Hold down and reboot the system so the BIOS can clear the CMOS memory of date, time, and system setup parameters by erasing the CMOS... RTC RAM data. Shut down the key during the boot process and enter BIOS setup to default values. Remove the onboard battery. 3. For system failure due to pins 1-2. 4. Keep the cap on CLRTC jumper default position. ...
P5GD2-X User's Manual for English Edition
Page 37
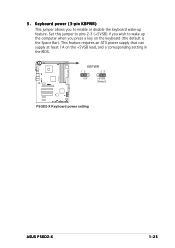
This feature requires an ATX power supply that can supply at least 1A on the keyboard (the default is the Space Bar). KBPWR 12 23 P5GD2-X +5V +5VSB (Default) ® P5GD2-X Keyboard power setting ASUS P5GD2-X 1-25 Set this jumper to pins 2-3 (+5VSB) if you press a key on the +5VSB lead, and a corresponding setting in the BIOS. 3. Keyboard power (3-pin KBPWR) This jumper allows you to wake up the computer when you wish to enable or disable the keyboard wake-up feature.
This feature requires an ATX power supply that can supply at least 1A on the keyboard (the default is the Space Bar). KBPWR 12 23 P5GD2-X +5V +5VSB (Default) ® P5GD2-X Keyboard power setting ASUS P5GD2-X 1-25 Set this jumper to pins 2-3 (+5VSB) if you press a key on the +5VSB lead, and a corresponding setting in the BIOS. 3. Keyboard power (3-pin KBPWR) This jumper allows you to wake up the computer when you wish to enable or disable the keyboard wake-up feature.
P5GD2-X User's Manual for English Edition
Page 46
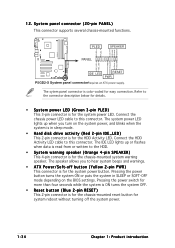
The speaker allows you turn on the system power, and blinks when the system is in SLEEP or SOFT-OFF mode depending on the BIOS settings. Pressing the power switch for more than four seconds while the system is ON turns the system OFF. • Reset button (Blue ...system beeps and warnings. • ATX Power/Soft-off the system power. 1-34 Chapter 1: Product introduction PWR Ground Reset Ground IDE_LED RESET PWR P5GD2-X System panel connecto*rRequires an ATX power supply. The sytem panel connector is for the system power button. Refer to this connector. Connect the ...
The speaker allows you turn on the system power, and blinks when the system is in SLEEP or SOFT-OFF mode depending on the BIOS settings. Pressing the power switch for more than four seconds while the system is ON turns the system OFF. • Reset button (Blue ...system beeps and warnings. • ATX Power/Soft-off the system power. 1-34 Chapter 1: Product introduction PWR Ground Reset Ground IDE_LED RESET PWR P5GD2-X System panel connecto*rRequires an ATX power supply. The sytem panel connector is for the system power button. Refer to this connector. Connect the ...
P5GD2-X User's Manual for English Edition
Page 47
Detailed descriptions of the BIOS parameters are also provided. 2 BIOS setup ASUS P5GD2-X 2-1 This chapter tells how to change the system settings through the BIOS Setup menus.
Detailed descriptions of the BIOS parameters are also provided. 2 BIOS setup ASUS P5GD2-X 2-1 This chapter tells how to change the system settings through the BIOS Setup menus.
P5GD2-X User's Manual for English Edition
Page 48
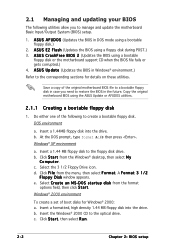
... drive. c. Select the 3 1/2 Floppy Drive icon. D O S s t a r t u p d i s k from the format options field, then click S t a r t. Windows® XP environment a. b. A S U S E Z F l a s h (Updates the BIOS using the ASUS Update or AFUDOS utilities. 2.1.1 Creating a bootable floppy disk 1. e. Select C r e a t e a n M S - A S U S C r a s h F r e e B I O S 2 (Updates the BIOS using a bootable floppy disk.) 2. Save a copy of boot disks for details on these utilities. 2.1 Managing and updating your...
... drive. c. Select the 3 1/2 Floppy Drive icon. D O S s t a r t u p d i s k from the format options field, then click S t a r t. Windows® XP environment a. b. A S U S E Z F l a s h (Updates the BIOS using the ASUS Update or AFUDOS utilities. 2.1.1 Creating a bootable floppy disk 1. e. Select C r e a t e a n M S - A S U S C r a s h F r e e B I O S 2 (Updates the BIOS using a bootable floppy disk.) 2. Save a copy of boot disks for details on these utilities. 2.1 Managing and updating your...

P5GD2-X User's Manual for English Edition
Page 49
.... 3. error message appears if there is found, EZ Flash performs the BIOS update process and automatically reboots the system when done. ASUS P5GD2-X 2-3 e. Floppy found !" Make sure that contains the BIOS file to P5GD2X.ROM. R O M. 2. Insert the floppy disk that you to update the BIOS without having to display the following. Reading file "P5GD2X.ROM...
.... 3. error message appears if there is found, EZ Flash performs the BIOS update process and automatically reboots the system when done. ASUS P5GD2-X 2-3 e. Floppy found !" Make sure that contains the BIOS file to P5GD2X.ROM. R O M. 2. Insert the floppy disk that you to update the BIOS without having to display the following. Reading file "P5GD2X.ROM...
P5GD2-X User's Manual for English Edition
Page 50
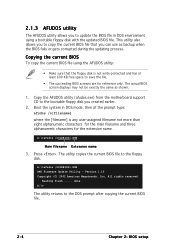
...floppy disk. Copying the current BIOS To copy the current BIOS file using a bootable floppy disk with the updated BIOS file. Reading flash ..... Press . The utility copies the current BIOS file to the DOS prompt after copying the current BIOS file. 2-4 Chapter 2: BIOS setup A:\>afudos /oOLDBIOS1.ROM ...Copyright (C) 2002 American Megatrends, Inc. Copy the AFUDOS utility (afudos.exe) from the motherboard support CD to copy the current BIOS file that the floppy disk is any user-assigned filename not more than eight alphanumeric characters for the main filename and three ...
...floppy disk. Copying the current BIOS To copy the current BIOS file using a bootable floppy disk with the updated BIOS file. Reading flash ..... Press . The utility copies the current BIOS file to the DOS prompt after copying the current BIOS file. 2-4 Chapter 2: BIOS setup A:\>afudos /oOLDBIOS1.ROM ...Copyright (C) 2002 American Megatrends, Inc. Copy the AFUDOS utility (afudos.exe) from the motherboard support CD to copy the current BIOS file that the floppy disk is any user-assigned filename not more than eight alphanumeric characters for the main filename and three ...
P5GD2-X User's Manual for English Edition
Page 51
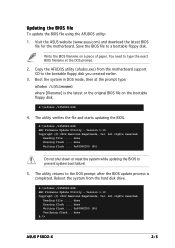
... created earlier. 3. Reading file ..... done A:\> ASUS P5GD2-X 2-5 All rights reserved. A:\>afudos /iP5GD2X.ROM AMI Firmware Update Utility - done Writing flash .... 0x0008CC00 (9%) Do not shut down or reset the system while updating the BIOS to prevent system boot failure! 5. Visit the ASUS website (www.asus.com) and download the latest BIOS file for the motherboard. A:\>afudos /iP5GD2X...
... created earlier. 3. Reading file ..... done A:\> ASUS P5GD2-X 2-5 All rights reserved. A:\>afudos /iP5GD2X.ROM AMI Firmware Update Utility - done Writing flash .... 0x0008CC00 (9%) Do not shut down or reset the system while updating the BIOS to prevent system boot failure! 5. Visit the ASUS website (www.asus.com) and download the latest BIOS file for the motherboard. A:\>afudos /iP5GD2X...
P5GD2-X User's Manual for English Edition
Page 52
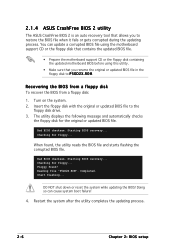
... floppy disk for floppy... Starting BIOS recovery... Starting BIOS recovery... Reading file "P5GD2X.ROM". 2.1.4 ASUS CrashFree BIOS 2 utility The ASUS CrashFree BIOS 2 is an auto recovery tool that you to the floppy disk drive. 3. Bad BIOS checksum. Checking for the original or updated BIOS file. Recovering the BIOS from a floppy disk To recover the BIOS from a floppy disk: 1. Checking for...
... floppy disk for floppy... Starting BIOS recovery... Starting BIOS recovery... Reading file "P5GD2X.ROM". 2.1.4 ASUS CrashFree BIOS 2 utility The ASUS CrashFree BIOS 2 is an auto recovery tool that you to the floppy disk drive. 3. Bad BIOS checksum. Checking for the original or updated BIOS file. Recovering the BIOS from a floppy disk To recover the BIOS from a floppy disk: 1. Checking for...
P5GD2-X User's Manual for English Edition
Page 53
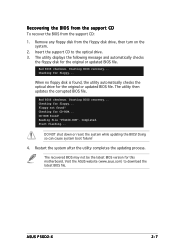
...) to the optical drive. 3. Insert the support CD to download the latest BIOS file. Checking for the original or updated BIOS file. Starting BIOS recovery... Reading file "P5GD2X.ROM". DO NOT shut down or reset the system while updating the BIOS! ASUS P5GD2-X 2-7 The utility displays the following message and automatically checks the floppy disk for...
...) to the optical drive. 3. Insert the support CD to download the latest BIOS file. Checking for the original or updated BIOS file. Starting BIOS recovery... Reading file "P5GD2X.ROM". DO NOT shut down or reset the system while updating the BIOS! ASUS P5GD2-X 2-7 The utility displays the following message and automatically checks the floppy disk for...


