
User Manual
Page 1
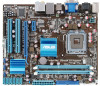
Motherboard P5G43T-M PRO
Motherboard P5G43T-M PRO

User Manual
Page 3
Contents Notices...vi Safety information vii About this guide viii P5G43T-M PRO specifications summary ix Chapter 1: Product introduction 1.1 Welcome 1-1 1.2 Package contents 1-1 1.3 Special features 1-1 1.3.1 Product highlights 1-1 1.3.2 Innovative ASUS features 1-2 1.4 Before you proceed 1-4 1.5 Motherboard overview 1-5 1.5.1 Placement direction 1-5 1.5.2 Screw holes 1-5 1.5.3 Motherboard layout 1-6 1.5.4 Layout contents 1-6 1.6 Central Processing Unit (CPU 1-7 1.6.1 Installing the CPU 1-7 1.6.2 Installing the CPU heatsink and fan 1-10 1.6.3 Uninstalling...
Contents Notices...vi Safety information vii About this guide viii P5G43T-M PRO specifications summary ix Chapter 1: Product introduction 1.1 Welcome 1-1 1.2 Package contents 1-1 1.3 Special features 1-1 1.3.1 Product highlights 1-1 1.3.2 Innovative ASUS features 1-2 1.4 Before you proceed 1-4 1.5 Motherboard overview 1-5 1.5.1 Placement direction 1-5 1.5.2 Screw holes 1-5 1.5.3 Motherboard layout 1-6 1.5.4 Layout contents 1-6 1.6 Central Processing Unit (CPU 1-7 1.6.1 Installing the CPU 1-7 1.6.2 Installing the CPU heatsink and fan 1-10 1.6.3 Uninstalling...
User Manual
Page 11
... line of the above items is damaged or missing, contact your motherboard package for the following items. Motherboard Cables Accessories Application DVD Documentation ASUS P5G43T-M PRO motherboard 2 x Serial ATA cables 1 x Ultra DMA 133/100/66 cable 1 x I/O shield ASUS motherboard support DVD User Manual If any of ASUS quality motherboards! Chapter 1 Product introduction 1.1 Welcome! Before you for 3D graphics and other...
... line of the above items is damaged or missing, contact your motherboard package for the following items. Motherboard Cables Accessories Application DVD Documentation ASUS P5G43T-M PRO motherboard 2 x Serial ATA cables 1 x Ultra DMA 133/100/66 cable 1 x I/O shield ASUS motherboard support DVD User Manual If any of ASUS quality motherboards! Chapter 1 Product introduction 1.1 Welcome! Before you for 3D graphics and other...
User Manual
Page 13
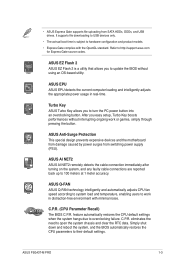
... pressing the button. C.P.R. (CPU Parameter Recall) The BIOS C.P.R. ASUS EZ Flash 2 ASUS EZ Flash 2 is subject to 100 meters at 1 meter accuracy. ASUS Anti-Surge Protection This special design prevents expensive devices and the motherboard from damage caused by power surges from SATA HDDs, ODDs, and...the PC power button into an overclocking button. Turbo Key ASUS Turbo Key allows you to their default settings. ASUS P5G43T-M PRO 1-3 After you to open the system chassis and clear the RTC data. ASUS AI NET2 ASUS AI NET2 remotely detects the cable connection immediately after turning ...
... pressing the button. C.P.R. (CPU Parameter Recall) The BIOS C.P.R. ASUS EZ Flash 2 ASUS EZ Flash 2 is subject to 100 meters at 1 meter accuracy. ASUS Anti-Surge Protection This special design prevents expensive devices and the motherboard from damage caused by power surges from SATA HDDs, ODDs, and...the PC power button into an overclocking button. Turbo Key ASUS Turbo Key allows you to their default settings. ASUS P5G43T-M PRO 1-3 After you to open the system chassis and clear the RTC data. ASUS AI NET2 ASUS AI NET2 remotely detects the cable connection immediately after turning ...
User Manual
Page 14
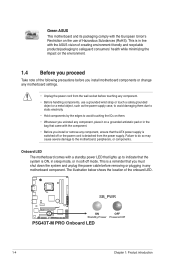
... with the European Union's Restriction on the environment. 1.4 Before you proceed Take note of the onboard LED. SB_PWR P5G43T-M PRO ON OFF Standby Power Powered Off P5G43T-M PRO Onboard LED 1-4 Chapter 1: Product introduction Green ASUS This motherboard and its packaging comply with the component. • Before you install or remove any component, ensure that the ATX...
... with the European Union's Restriction on the environment. 1.4 Before you proceed Take note of the onboard LED. SB_PWR P5G43T-M PRO ON OFF Standby Power Powered Off P5G43T-M PRO Onboard LED 1-4 Chapter 1: Product introduction Green ASUS This motherboard and its packaging comply with the component. • Before you install or remove any component, ensure that the ATX...
User Manual
Page 15
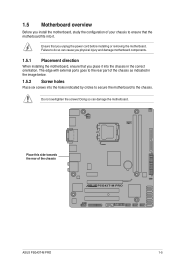
... this side towards the rear of the chassis as indicated in the correct orientation. 1.5 Motherboard overview Before you install the motherboard, study the configuration of your chassis to ensure that the motherboard fits into it into the chassis in the image below. 1.5.2 Screw holes Place six ...screws into the holes indicated by circles to secure the motherboard to the chassis. The edge with external ports goes to the rear part of the chassis P5G43T-M PRO ASUS P5G43T-M PRO 1-5 Ensure that you unplug the power cord before installing or removing the...
... this side towards the rear of the chassis as indicated in the correct orientation. 1.5 Motherboard overview Before you install the motherboard, study the configuration of your chassis to ensure that the motherboard fits into it into the chassis in the image below. 1.5.2 Screw holes Place six ...screws into the holes indicated by circles to secure the motherboard to the chassis. The edge with external ports goes to the rear part of the chassis P5G43T-M PRO ASUS P5G43T-M PRO 1-5 Ensure that you unplug the power cord before installing or removing the...
User Manual
Page 17
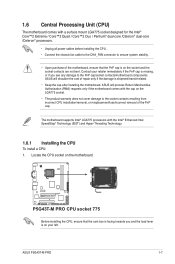
... cover damage to the PnP cap/socket contacts/motherboard components. The motherboard supports Intel® LGA775 processors with the Intel® Enhanced Intel SpeedStep® Technology (EIST) and Hyper-Threading Technology. 1.6.1 Installing the CPU To install a CPU: 1. ASUS will shoulder the cost of the PnP cap. ASUS P5G43T-M PRO 1-7 Contact your retailer immediately if the PnP...
... cover damage to the PnP cap/socket contacts/motherboard components. The motherboard supports Intel® LGA775 processors with the Intel® Enhanced Intel SpeedStep® Technology (EIST) and Hyper-Threading Technology. 1.6.1 Installing the CPU To install a CPU: 1. ASUS will shoulder the cost of the PnP cap. ASUS P5G43T-M PRO 1-7 Contact your retailer immediately if the PnP...
User Manual
Page 21
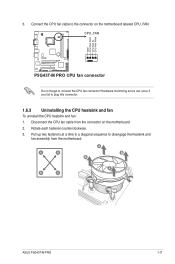
...IN CPU FAN PWM P5G43T-M PRO P5G43T-M PRO CPU fan connector Do not forget to plug this connector. 1.6.3 Uninstalling the CPU heatsink and fan To uninstall the CPU heatsink and fan: 1. Disconnect the CPU fan cable from the motherboard. A B A B B A B A ASUS P5G43T-M PRO 1-11 Connect the CPU... fan cable to disengage the heatsink and fan assembly from the connector on the motherboard labeled CPU_FAN. Pull up two fasteners at a time in a...
...IN CPU FAN PWM P5G43T-M PRO P5G43T-M PRO CPU fan connector Do not forget to plug this connector. 1.6.3 Uninstalling the CPU heatsink and fan To uninstall the CPU heatsink and fan: 1. Disconnect the CPU fan cable from the motherboard. A B A B B A B A ASUS P5G43T-M PRO 1-11 Connect the CPU... fan cable to disengage the heatsink and fan assembly from the connector on the motherboard labeled CPU_FAN. Pull up two fasteners at a time in a...

User Manual
Page 22
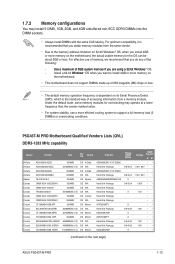
The figure illustrates the location of the DDR3 DIMM sockets: DIMM_A1 DIMM_B1 Channel Channel A Channel B Sockets DIMM_A1 DIMM_B1 P5G43T-M PRO P5G43T-M PRO 240-pin DDR3 DIMM sockets 1-12 Chapter 1: Product introduction Rotate each fastener clockwise to ensure correct orientation when reinstalling. 1.7 System memory 1.7.1 Overview The motherboard comes with two Double Data Rate 3 (DDR3) Dual Inline Memory Modules (DIMM) sockets. Carefully remove the heatsink and fan assembly from the motherboard. 5. 4.
The figure illustrates the location of the DDR3 DIMM sockets: DIMM_A1 DIMM_B1 Channel Channel A Channel B Sockets DIMM_A1 DIMM_B1 P5G43T-M PRO P5G43T-M PRO 240-pin DDR3 DIMM sockets 1-12 Chapter 1: Product introduction Rotate each fastener clockwise to ensure correct orientation when reinstalling. 1.7 System memory 1.7.1 Overview The motherboard comes with two Double Data Rate 3 (DDR3) Dual Inline Memory Modules (DIMM) sockets. Carefully remove the heatsink and fan assembly from the motherboard. 5. 4.
User Manual
Page 23
... 4GB unbuffered non‑ECC DDR3 DIMMs into the DIMM sockets. • Always install DIMMs with the same CAS latency. P5G43T-M PRO Motherboard Qualified Vendors Lists (QVL) DDR3-1333 MHz capability Vendor A-Data A-Data A-Data A-Data Apacer Corsair Corsair Corsair Corsair Corsair ...•• •• •• 1.8V •• 1.8V •• •• (continued on the next page) ASUS P5G43T-M PRO 1-13 Install a 64-bit �W�i�nd�o�w��s® OS when you want to support a full memory load (2 DIMMs...
... 4GB unbuffered non‑ECC DDR3 DIMMs into the DIMM sockets. • Always install DIMMs with the same CAS latency. P5G43T-M PRO Motherboard Qualified Vendors Lists (QVL) DDR3-1333 MHz capability Vendor A-Data A-Data A-Data A-Data Apacer Corsair Corsair Corsair Corsair Corsair ...•• •• •• 1.8V •• 1.8V •• •• (continued on the next page) ASUS P5G43T-M PRO 1-13 Install a 64-bit �W�i�nd�o�w��s® OS when you want to support a full memory load (2 DIMMs...
User Manual
Page 27
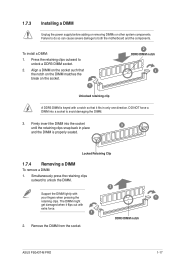
... retaining clips outward to both the motherboard and the components. Support the DIMM lightly with a notch so that the notch on the DIMM matches the break on the socket such that it flips out with extra force. 1 2. Remove the DIMM from the socket. 2 1 DDR3 DIMM notch ASUS P5G43T-M PRO 1-17 To install a DIMM: 1. Align...
... retaining clips outward to both the motherboard and the components. Support the DIMM lightly with a notch so that the notch on the DIMM matches the break on the socket such that it flips out with extra force. 1 2. Remove the DIMM from the socket. 2 1 DDR3 DIMM notch ASUS P5G43T-M PRO 1-17 To install a DIMM: 1. Align...
User Manual
Page 31
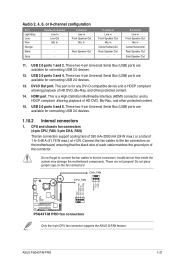
...ASUS P5G43T-M PRO 1-21 USB 2.0 ports 1 and 2. This port is for connecting USB 2.0 devices. 13. Connect the fan cables to the fan connectors. HDMI port. These two 4-pin Universal Serial Bus (USB) ports are available for connecting USB 2.0 devices. 12. Insufficient air flow inside the system may damage the motherboard... components. CHA_FAN CPU_FAN GND CPU FAN PWR CPU FAN IN CPU FAN PWM Rotation +12V GND P5G43T-M PRO P5G43T-M PRO fan connectors Only the 4-pin CPU fan connector supports the ASUS Q-FAN feature. CPU and chassis fan...
...ASUS P5G43T-M PRO 1-21 USB 2.0 ports 1 and 2. This port is for connecting USB 2.0 devices. 13. Connect the fan cables to the fan connectors. HDMI port. These two 4-pin Universal Serial Bus (USB) ports are available for connecting USB 2.0 devices. 12. Insufficient air flow inside the system may damage the motherboard... components. CHA_FAN CPU_FAN GND CPU FAN PWR CPU FAN IN CPU FAN PWM Rotation +12V GND P5G43T-M PRO P5G43T-M PRO fan connectors Only the 4-pin CPU fan connector supports the ASUS Q-FAN feature. CPU and chassis fan...
User Manual
Page 34
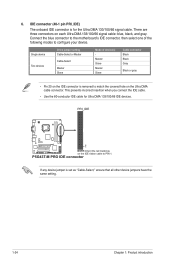
... blue connector to the motherboard's IDE connector, then select one of device(s) Master Slave Master Slave Cable connector Black Black Gray Black or gray • Pin 20 on the IDE connector is removed to match the covered hole on the Ultra DMA cable connector. PRI_IDE PIN1 P5G43T-M PRO NOTE:Orient the red... incorrect insertion when you connect the IDE cable. • Use the 80-conductor IDE cable for the Ultra DMA 133/100/66 signal cable. P5G43T-M PRO IDE connector If any device jumper is for Ultra DMA 133/100/66 IDE devices. IDE connector (40-1 pin PRI_IDE) The onboard IDE connector ...
... blue connector to the motherboard's IDE connector, then select one of device(s) Master Slave Master Slave Cable connector Black Black Gray Black or gray • Pin 20 on the IDE connector is removed to match the covered hole on the Ultra DMA cable connector. PRI_IDE PIN1 P5G43T-M PRO NOTE:Orient the red... incorrect insertion when you connect the IDE cable. • Use the 80-conductor IDE cable for the Ultra DMA 133/100/66 signal cable. P5G43T-M PRO IDE connector If any device jumper is for Ultra DMA 133/100/66 IDE devices. IDE connector (40-1 pin PRI_IDE) The onboard IDE connector ...
User Manual
Page 36
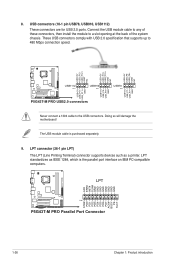
...as a printer. USB+5V USB_P8USB_P8+ GND NC USB+5V USB_P10USB_P10+ GND NC USB+5V USB_P12USB_P12+ GND NC USB+5V USB_P7USB_P7+ GND P5G43T-M PRO USB1112 PIN 1 USB910 PIN 1 USB+5V USB_P11USB_P11+ GND P5G43T-M PRO USB2.0 connectors USB+5V USB_P9USB_P9+ GND USB78 PIN 1 Never connect a 1394 cable to 480 Mbps connection speed. USB connectors (10-1... ERR# INIT# SLIN# GND GND GND GND GND GND GND GND STB# PD0 PD1 PD2 PD3 PD4 PD5 PD6 PD7 ACK# BUSY PE SLCT P5G43T-M PRO PIN 1 P5G43T-M PRO Parallel Port Connector 1-26 Chapter 1: Product introduction Doing so will damage the motherboard!
...as a printer. USB+5V USB_P8USB_P8+ GND NC USB+5V USB_P10USB_P10+ GND NC USB+5V USB_P12USB_P12+ GND NC USB+5V USB_P7USB_P7+ GND P5G43T-M PRO USB1112 PIN 1 USB910 PIN 1 USB+5V USB_P11USB_P11+ GND P5G43T-M PRO USB2.0 connectors USB+5V USB_P9USB_P9+ GND USB78 PIN 1 Never connect a 1394 cable to 480 Mbps connection speed. USB connectors (10-1... ERR# INIT# SLIN# GND GND GND GND GND GND GND GND STB# PD0 PD1 PD2 PD3 PD4 PD5 PD6 PD7 ACK# BUSY PE SLCT P5G43T-M PRO PIN 1 P5G43T-M PRO Parallel Port Connector 1-26 Chapter 1: Product introduction Doing so will damage the motherboard!
User Manual
Page 37
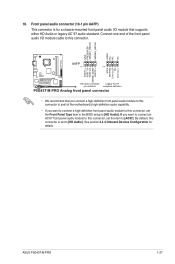
10. Connect one end of the motherboard's high-definition audio capability. • If you want to connect an AC'97 front panel audio module to this connector to [HD Audio]. See section 2.4.4 ... MICPWR Line out_R NC Line out_L PORT1 L PORT1 R PORT2 R SENSE_SEND PORT2 L P5G43T-M PRO HD-audio-compliant Legacy AC'97 pin definition compliant definition P5G43T-M PRO Analog front panel connector • We recommend that supports either HD Audio or legacy AC`97 audio standard. ASUS P5G43T-M PRO 1-27 If you connect a high-definition front panel audio module to...
10. Connect one end of the motherboard's high-definition audio capability. • If you want to connect an AC'97 front panel audio module to this connector to [HD Audio]. See section 2.4.4 ... MICPWR Line out_R NC Line out_L PORT1 L PORT1 R PORT2 R SENSE_SEND PORT2 L P5G43T-M PRO HD-audio-compliant Legacy AC'97 pin definition compliant definition P5G43T-M PRO Analog front panel connector • We recommend that supports either HD Audio or legacy AC`97 audio standard. ASUS P5G43T-M PRO 1-27 If you connect a high-definition front panel audio module to...
User Manual
Page 39
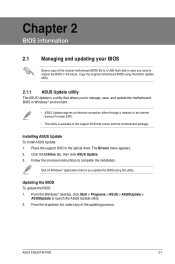
... future. Chapter 2 BIOS information 2.1 Managing and updating your BIOS Save a copy of the updating process: ASUS P5G43T-M PRO 2-1 Copy the original motherboard BIOS using this utility. Quit all Windows® applications before you update the BIOS using the ASUS Update utility. 2.1.1 ASUS Update utility The ASUS Update is available in the support DVD that comes with the...
... future. Chapter 2 BIOS information 2.1 Managing and updating your BIOS Save a copy of the updating process: ASUS P5G43T-M PRO 2-1 Copy the original motherboard BIOS using this utility. Quit all Windows® applications before you update the BIOS using the ASUS Update utility. 2.1.1 ASUS Update utility The ASUS Update is available in the support DVD that comes with the...
User Manual
Page 41
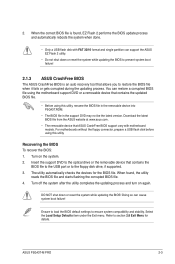
... 2.8 Exit Menu for the BIOS file. For motherboards without the floppy connector, prepare a USB flash disk before using the motherboard support DVD or a removable device that allows you to the optical drive or the removable device that ASUS CrashFree BIOS support vary with FAT 32/16 format... process and turn on the system. 2. Refer to ensure system compatibility and stability. ASUS P5G43T-M PRO 2-3 You can restore a corrupted BIOS file using this utility, rename the BIOS file in the removable device into P5G43T.ROM. • The BIOS file in the support DVD may not be the latest...
... 2.8 Exit Menu for the BIOS file. For motherboards without the floppy connector, prepare a USB flash disk before using the motherboard support DVD or a removable device that allows you to the optical drive or the removable device that ASUS CrashFree BIOS support vary with FAT 32/16 format... process and turn on the system. 2. Refer to ensure system compatibility and stability. ASUS P5G43T-M PRO 2-3 You can restore a corrupted BIOS file using this utility, rename the BIOS file in the removable device into P5G43T.ROM. • The BIOS file in the support DVD may not be the latest...
User Manual
Page 55
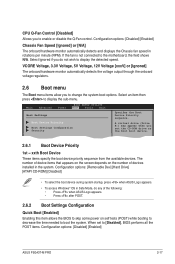
...Boot Device Priority sequence. Select an item then press to the motherboard, the field shows N/A. A virtual drive (Drive B:) may appear when you to [Disabled], BIOS performs all the POST items. Configuration options: [Disabled] [Enabled] ASUS P5G43T-M PRO 2-17 Select Ignored if you to display the detected speed. ... options: [Removable Dev] [Hard Drive] [ATAPI CD-ROM] [Disabled] • To select the boot device suring system startup, press when ASUS Logo appears. • To access Windows® OS in Safe Mode, do not wish to enable or disable the Q-Fan control. CPU Q-...
...Boot Device Priority sequence. Select an item then press to the motherboard, the field shows N/A. A virtual drive (Drive B:) may appear when you to [Disabled], BIOS performs all the POST items. Configuration options: [Disabled] [Enabled] ASUS P5G43T-M PRO 2-17 Select Ignored if you to display the detected speed. ... options: [Removable Dev] [Hard Drive] [ATAPI CD-ROM] [Disabled] • To select the boot device suring system startup, press when ASUS Logo appears. • To access Windows® OS in Safe Mode, do not wish to enable or disable the Q-Fan control. CPU Q-...


