User Manual
Page 10
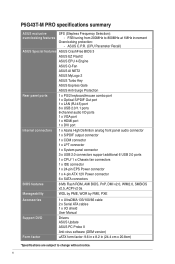
... 3 x USB 2.0 connectors support additional 6 USB 2.0 ports 1 x CPU/ 1 x Chassis fan connectors 1 x IDE connector 1 x 24-pin EPS Power connector 1 x 4-pin ATX 12V Power connector 6 x SATA connectors BIOS features 8 Mb Flash ROM, AMI BIOS, PnP, DMI v2.0, WfM2.0, SMBIOS v2.5, ACPI v2 0a Manageability WOL by PME, WOR by PME, PXE Accessories Support DVD Form factor 1 x UltraDMA 133/100/66 cable 2 x Serial ATA cables 1 x I/O shield User Manual Drivers ASUS Update ASUS PC Probe II Anti-virus software (OEM version) uATX form factor: 9.6 in x 8.2 in (24.4 cm x 20.8cm) *Specifications are...
... 3 x USB 2.0 connectors support additional 6 USB 2.0 ports 1 x CPU/ 1 x Chassis fan connectors 1 x IDE connector 1 x 24-pin EPS Power connector 1 x 4-pin ATX 12V Power connector 6 x SATA connectors BIOS features 8 Mb Flash ROM, AMI BIOS, PnP, DMI v2.0, WfM2.0, SMBIOS v2.5, ACPI v2 0a Manageability WOL by PME, WOR by PME, PXE Accessories Support DVD Form factor 1 x UltraDMA 133/100/66 cable 2 x Serial ATA cables 1 x I/O shield User Manual Drivers ASUS Update ASUS PC Probe II Anti-virus software (OEM version) uATX form factor: 9.6 in x 8.2 in (24.4 cm x 20.8cm) *Specifications are...
User Manual
Page 12
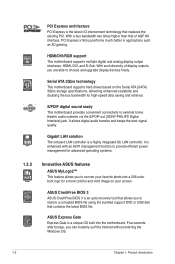
.../s technology This motherboard supports hard drives based on the Serial ATA (SATA) 3Gb/s storage specifications, delivering enhanced scalability and doubling the bus bandwidth for a more colorful and vivid image on your screen. HDMI/DVI/RGB support This motherboard supports multiple digital and analog display output interfaces: HDMI, DVI, and D-Sub. Gigabit LAN solution The onboard LAN controller is the latest I/O interconnect technology that contains the latest BIOS file. It is enhanced with an ACPI management...
.../s technology This motherboard supports hard drives based on the Serial ATA (SATA) 3Gb/s storage specifications, delivering enhanced scalability and doubling the bus bandwidth for a more colorful and vivid image on your screen. HDMI/DVI/RGB support This motherboard supports multiple digital and analog display output interfaces: HDMI, DVI, and D-Sub. Gigabit LAN solution The onboard LAN controller is the latest I/O interconnect technology that contains the latest BIOS file. It is enhanced with an ACPI management...
User Manual
Page 13
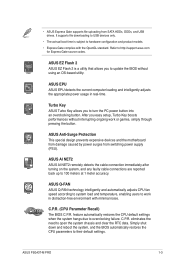
... the button. ASUS Q-FAN ASUS Q-FAN technology intelligently and automatically adjusts CPU fan speed according to system load and temperature, enabling users to 100 meters at 1 meter accuracy. feature automatically restores the CPU default settings when the system hangs due to their default settings. After you to update the BIOS without interrupting ongoing work in real-time. • ASUS Express Gate supports file uploading from switching power supply (PSU). It supports file downloading to USB devices only. • The actrual boot time is a utility that...
... the button. ASUS Q-FAN ASUS Q-FAN technology intelligently and automatically adjusts CPU fan speed according to system load and temperature, enabling users to 100 meters at 1 meter accuracy. feature automatically restores the CPU default settings when the system hangs due to their default settings. After you to update the BIOS without interrupting ongoing work in real-time. • ASUS Express Gate supports file uploading from switching power supply (PSU). It supports file downloading to USB devices only. • The actrual boot time is a utility that...
User Manual
Page 28
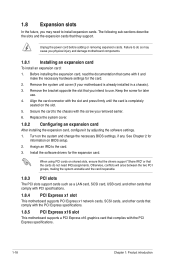
... change the necessary BIOS settings, if any. Failure to do not need to use . 4. Assign an IRQ to the chassis with the PCI Express specifications. 1-18 Chapter 1: Product introduction Otherwise, conflicts will arise between the two PCI groups, making the system unstable and the card inoperable. 1.8.3 PCI slots The PCI slots support cards such as a LAN card, SCSI card, USB card, and other cards that comply with PCI specifications. 1.8.4 PCI Express x1 slot This motherboard supports PCI Express x1 network cards, SCSI cards, and other cards...
... change the necessary BIOS settings, if any. Failure to do not need to use . 4. Assign an IRQ to the chassis with the PCI Express specifications. 1-18 Chapter 1: Product introduction Otherwise, conflicts will arise between the two PCI groups, making the system unstable and the card inoperable. 1.8.3 PCI slots The PCI slots support cards such as a LAN card, SCSI card, USB card, and other cards that comply with PCI specifications. 1.8.4 PCI Express x1 slot This motherboard supports PCI Express x1 network cards, SCSI cards, and other cards...

User Manual
Page 38
... avail all motherboard features. Click an icon to display Support DVD/ motherboard information Click an item to locate the file ASSETUP.EXE from the BIN folder. The DVD automatically displays the Drivers menu if Autorun is for better compatibility and system stability. 1.11.2 Support DVD information The Support DVD that comes with the motherboard package contains the drivers, software applications, and utilities that you can install to change at www.asus.com for...
... avail all motherboard features. Click an icon to display Support DVD/ motherboard information Click an item to locate the file ASSETUP.EXE from the BIN folder. The DVD automatically displays the Drivers menu if Autorun is for better compatibility and system stability. 1.11.2 Support DVD information The Support DVD that comes with the motherboard package contains the drivers, software applications, and utilities that you can install to change at www.asus.com for...
User Manual
Page 39
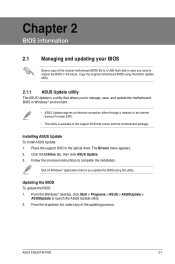
... Windows® desktop, click Start > Programs > ASUS > ASUSUpdate > ASUSUpdate to complete the installation. Installing ASUS Update To install ASUS Update: 1. Click the Utilities tab, then click ASUS Update. 3. The Drivers menu appears. 2. From the dropdown list, select any of the original motherboard BIOS file to a USB flash disk in case you need to manage, save, and update the motherboard BIOS in Windows® environment. • ASUS Update requires an Internet connection either through a network or an Internet Service Provider (ISP). • This utility is a utility...
... Windows® desktop, click Start > Programs > ASUS > ASUSUpdate > ASUSUpdate to complete the installation. Installing ASUS Update To install ASUS Update: 1. Click the Utilities tab, then click ASUS Update. 3. The Drivers menu appears. 2. From the dropdown list, select any of the original motherboard BIOS file to a USB flash disk in case you need to manage, save, and update the motherboard BIOS in Windows® environment. • ASUS Update requires an Internet connection either through a network or an Internet Service Provider (ISP). • This utility is a utility...
User Manual
Page 40
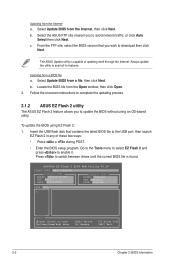
... to download then click Next. Locate the BIOS file from the Internet a. Updating from the Open window, then click Open. 3. Select Update BIOS from the Internet, then click Next. Insert the USB flash disk that you to the USB port, then launch EZ Flash 2 in any of updating itself through the Internet. ASUSTek EZ Flash 2 BIOS ROM Utility V3.36 FLASH TYPE: MXIC 25L8005 Current ROM BOARD: P5G43T-M PRO VER: 0201 DATE: 03/03/2009 Update ROM BOARD...
... to download then click Next. Locate the BIOS file from the Internet a. Updating from the Open window, then click Open. 3. Select Update BIOS from the Internet, then click Next. Insert the USB flash disk that you to the USB port, then launch EZ Flash 2 in any of updating itself through the Internet. ASUSTek EZ Flash 2 BIOS ROM Utility V3.36 FLASH TYPE: MXIC 25L8005 Current ROM BOARD: P5G43T-M PRO VER: 0201 DATE: 03/03/2009 Update ROM BOARD...
User Manual
Page 41
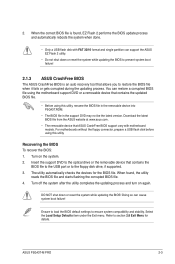
... BIOS file using the motherboard support DVD or a removable device that allows you to section 2.8 Exit Menu for the BIOS file. When the correct BIOS file is an auto recovery tool that contains the updated BIOS file. • Before using this utility, rename the BIOS file in the removable device into P5G43T.ROM. • The BIOS file in the support DVD may not be the latest version. Turn on again. Ensure to load the BIOS default settings to the floppy disk drive, if supported. 3. You can cause system boot failure! Download the latest BIOS file...
... BIOS file using the motherboard support DVD or a removable device that allows you to section 2.8 Exit Menu for the BIOS file. When the correct BIOS file is an auto recovery tool that contains the updated BIOS file. • Before using this utility, rename the BIOS file in the removable device into P5G43T.ROM. • The BIOS file in the support DVD may not be the latest version. Turn on again. Ensure to load the BIOS default settings to the floppy disk drive, if supported. 3. You can cause system boot failure! Download the latest BIOS file...
User Manual
Page 44
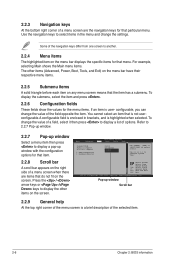
... 2: BIOS information Use [+] or [-] to display a list of options. Select Screen Select Item +- To change the value of a field, select it then press to configure system Time. Main Advanced BIOS SETUP UTILITY Power Boot Tools Exit Suspend Mode ACPI 2.0 Support ACPI APIC support APM Configuration Hardware Monitor [Auto] [Disabled] [EDniOsapabtbilloendesd] Enabled Use [ENTER], [TAB] or [SHIFT-TAB] to select items in brackets, and is user- For example, selecting Main shows the Main menu items. The other items on the screen. 2.2.3 Navigation keys...
... 2: BIOS information Use [+] or [-] to display a list of options. Select Screen Select Item +- To change the value of a field, select it then press to configure system Time. Main Advanced BIOS SETUP UTILITY Power Boot Tools Exit Suspend Mode ACPI 2.0 Support ACPI APIC support APM Configuration Hardware Monitor [Auto] [Disabled] [EDniOsapabtbilloendesd] Enabled Use [ENTER], [TAB] or [SHIFT-TAB] to select items in brackets, and is user- For example, selecting Main shows the Main menu items. The other items on the screen. 2.2.3 Navigation keys...

User Manual
Page 45
... if no Serial ATA device is either a ZIP, LS-120, or MO drive. Select [ARMD] (ATAPI Removable Media Device) if your device is installed in the system. Select a device item then press to set the system date. 2.3.3 SATA 1-6 While entering Setup, the BIOS automatically detects the presence of the appropriate SATA device type. These values are specifically configuring a CD-ROM drive. Configuration options: [Not Installed] [Auto] [CDROM] [ARMD] ASUS P5G43T-M PRO 2-7 2.3 Main menu When you enter the BIOS Setup program, the Main menu screen appears...
... if no Serial ATA device is either a ZIP, LS-120, or MO drive. Select [ARMD] (ATAPI Removable Media Device) if your device is installed in the system. Select a device item then press to set the system date. 2.3.3 SATA 1-6 While entering Setup, the BIOS automatically detects the presence of the appropriate SATA device type. These values are specifically configuring a CD-ROM drive. Configuration options: [Not Installed] [Auto] [CDROM] [ARMD] ASUS P5G43T-M PRO 2-7 2.3 Main menu When you enter the BIOS Setup program, the Main menu screen appears...
User Manual
Page 46
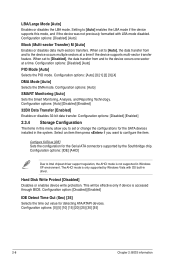
... value for the SATA devices installed in Windows XP environment. When set to [Auto], the data transfer from and to set or change the configurations for detecting ATA/ATAPI devices. LBA/Large Mode [Auto] Enables or disables the LBA mode. When set to [Disabled], the data transfer from and to Intel chipset driver support regulation, the AHCI mode is accessed through BIOS. Configuration options: [Disabled] [Auto] Block (Multi-sector Transfer) M [Auto] Enables or disables data multi-sectors transfers. Configuration options: [IDE] [AHCI] Due to the...
... value for the SATA devices installed in Windows XP environment. When set to [Auto], the data transfer from and to set or change the configurations for detecting ATA/ATAPI devices. LBA/Large Mode [Auto] Enables or disables the LBA mode. When set to [Disabled], the data transfer from and to Intel chipset driver support regulation, the AHCI mode is accessed through BIOS. Configuration options: [Disabled] [Auto] Block (Multi-sector Transfer) M [Auto] Enables or disables data multi-sectors transfers. Configuration options: [IDE] [AHCI] Due to the...
User Manual
Page 47
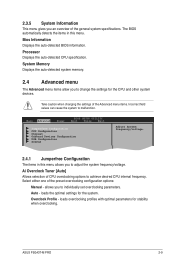
... menu The Advanced menu items allow you to change the settings for the CPU and other system devices. Select either one of the general system specifications. Processor Displays the auto-detected CPU specification. Main Advanced Power BIOS SETUP UTILITY Boot Tools Exit Jumperfree Configuration CPU Configuration Chipset Onboard Devices Configuration USB Configuration PCIPnP Adjust System frequency/voltage. 2.4.1 Jumperfree Configuration The items in this menu allows you to adjust the system frequency/voltage. loads the optimal settings for stability when overclocking. Auto...
... menu The Advanced menu items allow you to change the settings for the CPU and other system devices. Select either one of the general system specifications. Processor Displays the auto-detected CPU specification. Main Advanced Power BIOS SETUP UTILITY Boot Tools Exit Jumperfree Configuration CPU Configuration Chipset Onboard Devices Configuration USB Configuration PCIPnP Adjust System frequency/voltage. 2.4.1 Jumperfree Configuration The items in this menu allows you to adjust the system frequency/voltage. loads the optimal settings for stability when overclocking. Auto...
User Manual
Page 49
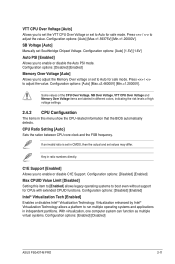
...[Disabled] [Enabled] Max CPUID Value Limit [Disabled] Setting this menu show the CPU-related information that the BIOS automatically detects. With virtualization, one computer system can function as multiple virtual systems. Configuration options: [Enabled] [Disabled] ASUS P5G43T-M PRO 2-11 Configuration options: [Disabled] [Enabled] Memory Over Voltage [Auto] Allows you to adjust the Memory Over voltage or set to boot even without support for safe mode. CPU Ratio Setting [Auto] Sets the ration between CPU core clock and the FSB frequency. VTT CPU Over Voltage [Auto] Allows you to set...
...[Disabled] [Enabled] Max CPUID Value Limit [Disabled] Setting this menu show the CPU-related information that the BIOS automatically detects. With virtualization, one computer system can function as multiple virtual systems. Configuration options: [Enabled] [Disabled] ASUS P5G43T-M PRO 2-11 Configuration options: [Disabled] [Enabled] Memory Over Voltage [Auto] Allows you to adjust the Memory Over voltage or set to boot even without support for safe mode. CPU Ratio Setting [Auto] Sets the ration between CPU core clock and the FSB frequency. VTT CPU Over Voltage [Auto] Allows you to set...
User Manual
Page 50
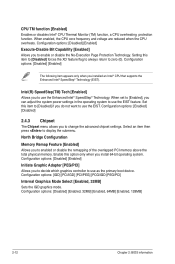
.../PCI] Internal Graphics Mode Select [Enabled, 32MB] Sets the IGD graphics mode. Setting this option only when you install 64-bit operating system. North Bridge Configuration Memory Remap Feature [Enabled] Allows you installed an Intel® CPU that supports the Enhanced Intel® SpeedStep® Technology (EIST). Intel(R) SpeedStep(TM) Tech [Enabled] Allows you to decide which graphics controller to enable or disable the No-Execution Page Protection Technology. Select an item then press to use...
.../PCI] Internal Graphics Mode Select [Enabled, 32MB] Sets the IGD graphics mode. Setting this option only when you install 64-bit operating system. North Bridge Configuration Memory Remap Feature [Enabled] Allows you installed an Intel® CPU that supports the Enhanced Intel® SpeedStep® Technology (EIST). Intel(R) SpeedStep(TM) Tech [Enabled] Allows you to decide which graphics controller to enable or disable the No-Execution Page Protection Technology. Select an item then press to use...

User Manual
Page 51
...or disable the onboard LAN controller. Configuration options: [AC97] [HD Audio] Onboard PCIE GbE LAN [Enabled] Allows you to set to select the Parallel Port base addresses. This item appears only when the Onboard LAN item is set the Parallel Port ECP DMA. Configuration options: [IRQ5] [IRQ7] ASUS P5G43T-M PRO 2-13 2.4.4 Onboard Devices Configuration High Definition Audio [Enabled] Allows you to Enabled. Configuration options: [Enabled] [Disabled] Front Panel Type [HD Audio] Allows you to select the front panel support type. Configuration options: [Enabled] [Disabled] Serial Port1...
...or disable the onboard LAN controller. Configuration options: [AC97] [HD Audio] Onboard PCIE GbE LAN [Enabled] Allows you to set to select the Parallel Port base addresses. This item appears only when the Onboard LAN item is set the Parallel Port ECP DMA. Configuration options: [IRQ5] [IRQ7] ASUS P5G43T-M PRO 2-13 2.4.4 Onboard Devices Configuration High Definition Audio [Enabled] Allows you to Enabled. Configuration options: [Enabled] [Disabled] Front Panel Type [HD Audio] Allows you to select the front panel support type. Configuration options: [Enabled] [Disabled] Serial Port1...
User Manual
Page 52
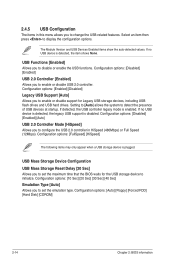
... mode is detected, the item shows None. 2.4.5 USB Configuration The items in HiSpeed (480Mbps) or Full Speed (12Mbps). Configuration options: [Enabled] [Disabled] Legacy USB Support [Auto] Allows you to enable or disable support for the USB storage device to display the configuration options. Configuration options: [Disabled] [Enabled] [Auto] USB 2.0 Controller Mode [HiSpeed] Allows you to configure the USB 2.0 controller in this menu allows you to change the USB-related features. Configuration options: [Auto] [Floppy] [Forced FDD] [Hard Disk] [CDROM] 2-14 Chapter 2: BIOS...
... mode is detected, the item shows None. 2.4.5 USB Configuration The items in HiSpeed (480Mbps) or Full Speed (12Mbps). Configuration options: [Enabled] [Disabled] Legacy USB Support [Auto] Allows you to enable or disable support for the USB storage device to display the configuration options. Configuration options: [Disabled] [Enabled] [Auto] USB 2.0 Controller Mode [HiSpeed] Allows you to configure the USB 2.0 controller in this menu allows you to change the USB-related features. Configuration options: [Auto] [Floppy] [Forced FDD] [Hard Disk] [CDROM] 2-14 Chapter 2: BIOS...
User Manual
Page 53
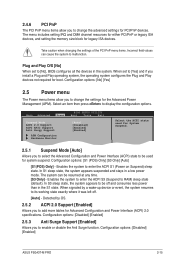
... Plug and Play devices not required for boot. Configuration options: [Disabled] [Enabled] 2.5.3 Anti Surge Support [Enabled] Allows you to select the Advanced Configuration and Power Interface (ACPI) state to be used for System Suspend. 2.5.1 Suspend Mode [Auto] Allows you to enable or disable the Anti Surge function. Configuration options: [Disabled] [Enabled] ASUS P5G43T-M PRO 2-15 Plug and Play O/S [No] When set to [Yes] and if you to add more tables for Advanced Configuration and Power Interface (ACPI) 2.0 specifications. In S3 sleep...
... Plug and Play devices not required for boot. Configuration options: [Disabled] [Enabled] 2.5.3 Anti Surge Support [Enabled] Allows you to select the Advanced Configuration and Power Interface (ACPI) state to be used for System Suspend. 2.5.1 Suspend Mode [Auto] Allows you to enable or disable the Anti Surge function. Configuration options: [Disabled] [Enabled] ASUS P5G43T-M PRO 2-15 Plug and Play O/S [No] When set to [Yes] and if you to add more tables for Advanced Configuration and Power Interface (ACPI) 2.0 specifications. In S3 sleep...
User Manual
Page 55
... if you to change the system boot options. Select an item then press to the motherboard, the field shows N/A. If the fan is not connected to display the sub-menu. Configuration options: [Removable Dev] [Hard Drive] [ATAPI CD-ROM] [Disabled] • To select the boot device suring system startup, press when ASUS Logo appears. • To access Windows® OS in Safe Mode, do not wish to display the detected speed. The number of...
... if you to change the system boot options. Select an item then press to the motherboard, the field shows N/A. If the fan is not connected to display the sub-menu. Configuration options: [Removable Dev] [Hard Drive] [ATAPI CD-ROM] [Disabled] • To select the boot device suring system startup, press when ASUS Logo appears. • To access Windows® OS in Safe Mode, do not wish to display the detected speed. The number of...
User Manual
Page 56
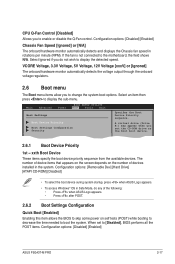
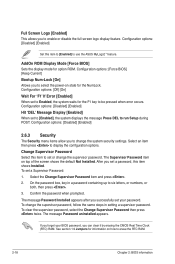
... on how to enable or disable the full screen logo display feature. To change the supervisor password. To set to [Enabled], the system displays the message Press DEL to use the ASUS MyLogo2™ feature. See section 1.9 Jumpers for option ROM. Change Supervisor Password Select this item to [Enabled] to run Setup during POST. AddOn ROM Display Mode [Force BIOS] Sets the display mode for information on top of the screen shows the default Not Installed. Select an item...
... on how to enable or disable the full screen logo display feature. To change the supervisor password. To set to [Enabled], the system displays the message Press DEL to use the ASUS MyLogo2™ feature. See section 1.9 Jumpers for option ROM. Change Supervisor Password Select this item to [Enabled] to run Setup during POST. AddOn ROM Display Mode [Force BIOS] Sets the display mode for information on top of the screen shows the default Not Installed. Select an item...

User Manual
Page 58
... press to configure options for user action. Main Advanced Power BIOS SETUP UTILITY Boot Tools Exit ASUS EZ Flash 2 Express Gate Enter OS Timer Reset User Data AI NET 2 [Auto] [10 Seconds] [No] Press ENTER to select and update BIOS. MTFS (read only) 2.7.1 ASUS EZ Flash 2 Allows you to display the sub-menu. Configuration options: [Enabled] [Disabled] [Auto] Enter OS Timer [10 Seconds] Sets countdown duration that the system waits at the first screen of the Atheros LAN cable during the Power-On Self...
... press to configure options for user action. Main Advanced Power BIOS SETUP UTILITY Boot Tools Exit ASUS EZ Flash 2 Express Gate Enter OS Timer Reset User Data AI NET 2 [Auto] [10 Seconds] [No] Press ENTER to select and update BIOS. MTFS (read only) 2.7.1 ASUS EZ Flash 2 Allows you to display the sub-menu. Configuration options: [Enabled] [Disabled] [Auto] Enter OS Timer [10 Seconds] Sets countdown duration that the system waits at the first screen of the Atheros LAN cable during the Power-On Self...


