User Manual
Page 2
... this email address). SPECIFICATIONS AND INFORMATION CONTAINED IN THIS MANUAL ARE FURNISHED FOR INFORMATIONAL USE ONLY, AND ARE SUBJECT TO CHANGE AT ANY TIME WITHOUT NOTICE, AND SHOULD NOT BE CONSTRUED AS A COMMITMENT BY ASUS. If however you encounter any problems in the GPL) for the GPL Software, and/or the complete corresponding source code of the product...
... this email address). SPECIFICATIONS AND INFORMATION CONTAINED IN THIS MANUAL ARE FURNISHED FOR INFORMATIONAL USE ONLY, AND ARE SUBJECT TO CHANGE AT ANY TIME WITHOUT NOTICE, AND SHOULD NOT BE CONSTRUED AS A COMMITMENT BY ASUS. If however you encounter any problems in the GPL) for the GPL Software, and/or the complete corresponding source code of the product...
User Manual
Page 13
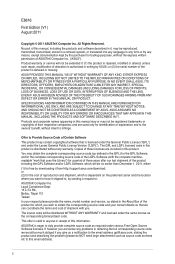
ASUS Turbo Key ASUS Turbo Key allows you to update the BIOS from switching power supply (PSU). ASUS Q-Fan ASUS Q-Fan technology intelligently adjusts the CPU fan speed according to system loading to their default settings. ASUS M5A78L-M LX Series 1-3 C.P.R. After the easy setup, Turbo Key boosts performances without performing complicated BIOS changes. ASUS Anti-Surge Protection This special design prevents expensive devices and the motherboard from damage caused by simply unlocking the extra cores, without interrupting ongoing work or games, simply through pressing...
ASUS Turbo Key ASUS Turbo Key allows you to update the BIOS from switching power supply (PSU). ASUS Q-Fan ASUS Q-Fan technology intelligently adjusts the CPU fan speed according to system loading to their default settings. ASUS M5A78L-M LX Series 1-3 C.P.R. After the easy setup, Turbo Key boosts performances without performing complicated BIOS changes. ASUS Anti-Surge Protection This special design prevents expensive devices and the motherboard from damage caused by simply unlocking the extra cores, without interrupting ongoing work or games, simply through pressing...
User Manual
Page 17
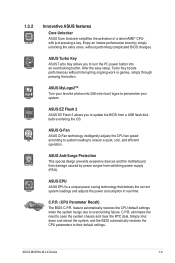
... AUDIO CHA_FAN RTL 8111E PCIEX1_1 AMD® 760G Super I/O PCIEX16 M5A78L-M LX PLUS PCIEX1_2 CLRTC Lithium Cell CMOS Power AMD® SB710 16Mb BIOS 7 ALC 887 SPDIF_OUT AAFP SB_PWR PCI1 USB910 USB78 USBPW5-10 SPEAKER USB56 F_PANEL SATA3G_2 SATA3G_4 SATA3G_1 SATA3G_3 14 13 12 11 10 98 2 1.5.4 Layout contents Connectors/Jumpers/Slots Page Connectors/Jumpers/Slots Page 1. DDR3 DIMM sockets 1-11 13. Serial ATA connectors (7-pin SATA1-6) 1-23 14. Speaker connector (4- USB device wake-up (3-pin...
... AUDIO CHA_FAN RTL 8111E PCIEX1_1 AMD® 760G Super I/O PCIEX16 M5A78L-M LX PLUS PCIEX1_2 CLRTC Lithium Cell CMOS Power AMD® SB710 16Mb BIOS 7 ALC 887 SPDIF_OUT AAFP SB_PWR PCI1 USB910 USB78 USBPW5-10 SPEAKER USB56 F_PANEL SATA3G_2 SATA3G_4 SATA3G_1 SATA3G_3 14 13 12 11 10 98 2 1.5.4 Layout contents Connectors/Jumpers/Slots Page Connectors/Jumpers/Slots Page 1. DDR3 DIMM sockets 1-11 13. Serial ATA connectors (7-pin SATA1-6) 1-23 14. Speaker connector (4- USB device wake-up (3-pin...
User Manual
Page 27
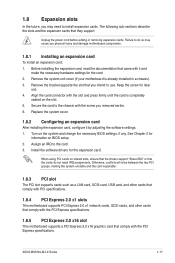
... installed in a chassis). 3. Keep the screw for the card. 2. Align the card connector with it by adjusting the software settings. 1. See Chapter 2 for the expansion card. Install the software drivers for information on the system and change the necessary BIOS settings, if any. 1.8 Expansion slots In the future, you physical injury and damage motherboard components. 1.8.1 Installing an expansion card To install an expansion card: 1. Secure the card to the chassis with the PCI Express specifications. ASUS M5A78L-M LX Series...
... installed in a chassis). 3. Keep the screw for the card. 2. Align the card connector with it by adjusting the software settings. 1. See Chapter 2 for the expansion card. Install the software drivers for information on the system and change the necessary BIOS settings, if any. 1.8 Expansion slots In the future, you physical injury and damage motherboard components. 1.8.1 Installing an expansion card To install an expansion card: 1. Secure the card to the chassis with the PCI Express specifications. ASUS M5A78L-M LX Series...

User Manual
Page 29
... supply at least 1A on the keyboard. USB device wake-up (3-pin USBPW1-4, USBPW5-10) Set these jumpers to +5VSB to wake up the compurer from S1 sleep mode (CPU stopped, DRAM refreshed, system running in low power mode) using the connected USB devices. KBPWR 12 23 +5V +5VSB (Default) M5A78L-M LX PLUS M5A78L-M LX PLUS Keyboard power setting ASUS M5A78L-M LX Series 1-19 This feature requires an ATX power supply that can wake up feature. Set these jumpers to +5V to CPU, DRAM in slow refresh, power supply in the BIOS...
... supply at least 1A on the keyboard. USB device wake-up (3-pin USBPW1-4, USBPW5-10) Set these jumpers to +5VSB to wake up the compurer from S1 sleep mode (CPU stopped, DRAM refreshed, system running in low power mode) using the connected USB devices. KBPWR 12 23 +5V +5VSB (Default) M5A78L-M LX PLUS M5A78L-M LX PLUS Keyboard power setting ASUS M5A78L-M LX Series 1-19 This feature requires an ATX power supply that can wake up feature. Set these jumpers to +5V to CPU, DRAM in slow refresh, power supply in the BIOS...
User Manual
Page 33
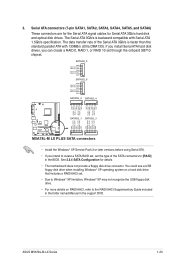
... GND M5A78L-M LX PLUS SATA3G_1 SATA3G_3 M5A78L-M LX PLUS SATA connectors • Install the Windows® XP Service Pack 3 or later versions before using Serial ATA. • If you can create a RAID 0, RAID 1, or RAID 10 set the type of the Serial ATA 3Gb/s is backward compatible with 133MB/s (Ultra DMA133). ASUS M5A78L-M LX Series 1-23 If you install Serial ATA hard disk drives, you intend to the RAID/AHCI Supplementary Guide included in the folder named Manual in the BIOS. Serial ATA connectors (7-pin SATA1...
... GND M5A78L-M LX PLUS SATA3G_1 SATA3G_3 M5A78L-M LX PLUS SATA connectors • Install the Windows® XP Service Pack 3 or later versions before using Serial ATA. • If you can create a RAID 0, RAID 1, or RAID 10 set the type of the Serial ATA 3Gb/s is backward compatible with 133MB/s (Ultra DMA133). ASUS M5A78L-M LX Series 1-23 If you install Serial ATA hard disk drives, you intend to the RAID/AHCI Supplementary Guide included in the folder named Manual in the BIOS. Serial ATA connectors (7-pin SATA1...
User Manual
Page 35
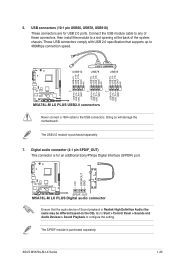
... M5A78L-M LX PLUS PIN 1 PIN 1 PIN 1 M5A78L-M LX PLUS USB2.0 connectors Never connect a 1394 cable to configure the setting. Go to Start > Control Panel > Sounds and Audio Devices > Sound Playback to the USB connectors. Doing so will damage the motherboard! The USB 2.0 module is purchased separately. Connect the USB module cable to any of these connectors, then install the module to 480Mbps connection speed. ASUS M5A78L-M LX Series 1-25 6. These USB connectors comply with USB 2.0 specification that the audio device of the system chassis. Digital audio connector...
... M5A78L-M LX PLUS PIN 1 PIN 1 PIN 1 M5A78L-M LX PLUS USB2.0 connectors Never connect a 1394 cable to configure the setting. Go to Start > Control Panel > Sounds and Audio Devices > Sound Playback to the USB connectors. Doing so will damage the motherboard! The USB 2.0 module is purchased separately. Connect the USB module cable to any of these connectors, then install the module to 480Mbps connection speed. ASUS M5A78L-M LX Series 1-25 6. These USB connectors comply with USB 2.0 specification that the audio device of the system chassis. Digital audio connector...
User Manual
Page 37
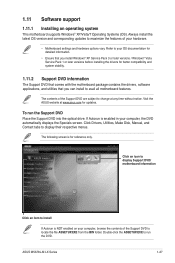
... the drivers, software applications, and utilities that you install Windows® XP Service Pack 3 or later versions / Windows® Vista Service Pack 1 or later versions before installing the drivers for reference only. ASUS M5A78L-M LX Series 1-27 The contents of the Support DVD to run the Support DVD Place the Support DVD into the optical drive. To run the DVD. If Autorun is NOT enabled on your computer, the DVD automatically displays the Specials screen. Click Drivers, Utilities, Make Disk, Manual, and...
... the drivers, software applications, and utilities that you install Windows® XP Service Pack 3 or later versions / Windows® Vista Service Pack 1 or later versions before installing the drivers for reference only. ASUS M5A78L-M LX Series 1-27 The contents of the Support DVD to run the Support DVD Place the Support DVD into the optical drive. To run the DVD. If Autorun is NOT enabled on your computer, the DVD automatically displays the Specials screen. Click Drivers, Utilities, Make Disk, Manual, and...
User Manual
Page 39
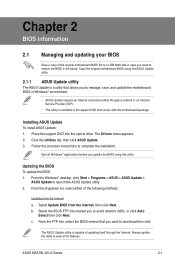
... original motherboard BIOS file to a USB flash disk in case you need to restore the BIOS in the support DVD that comes with the motherboard package. Quit all its features. Select Update BIOS from the Internet a. Place the support DVD into the optical drive. From the FTP site, select the BIOS version that allows you update the BIOS using the ASUS Update utility. 2.1.1 ASUS Update utility The ASUS Update is available in the future. From the Windows® desktop, click Start > Programs > ASUS > ASUS Update > ASUS Update...
... original motherboard BIOS file to a USB flash disk in case you need to restore the BIOS in the support DVD that comes with the motherboard package. Quit all its features. Select Update BIOS from the Internet a. Place the support DVD into the optical drive. From the FTP site, select the BIOS version that allows you update the BIOS using the ASUS Update utility. 2.1.1 ASUS Update utility The ASUS Update is available in the future. From the Windows® desktop, click Start > Programs > ASUS > ASUS Update > ASUS Update...
User Manual
Page 40
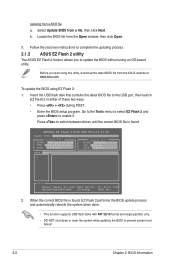
... NOT shut down or reset the system while updating the BIOS to complete the updating process. 2.1.2 ASUS EZ Flash 2 utility The ASUS EZ Flash 2 feature allows you start using EZ Flash 2: 1. ASUSTek EZ Flash 2 BIOS ROM Utility V3.44 FLASH TYPE: EON 25P/F16 Current ROM BOARD: M5A78L-M LX PLUS VER: 0302 (H:01 B:00) DATE: 08/14/2011 Update ROM BOARD: Unknown VER: Unknown DATE: Unknown PATH: C:\ C: Note [Enter] Select or Load [Tab] Switch [Up/Down/Home/End...
... NOT shut down or reset the system while updating the BIOS to complete the updating process. 2.1.2 ASUS EZ Flash 2 utility The ASUS EZ Flash 2 feature allows you start using EZ Flash 2: 1. ASUSTek EZ Flash 2 BIOS ROM Utility V3.44 FLASH TYPE: EON 25P/F16 Current ROM BOARD: M5A78L-M LX PLUS VER: 0302 (H:01 B:00) DATE: 08/14/2011 Update ROM BOARD: Unknown VER: Unknown DATE: Unknown PATH: C:\ C: Note [Enter] Select or Load [Tab] Switch [Up/Down/Home/End...
User Manual
Page 41
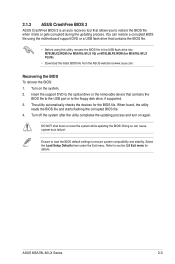
... M5A78L-M LX PLUS). • Download the latest BIOS file from the ASUS website at www.asus.com. Select the Load Setup Defaults item under the Exit menu. Insert the support DVD to the optical drive or the removable device that contains the BIOS file to the USB port or to ensure system compatibility and stability. You can cause system boot failure! When found, the utility reads the BIOS file and starts flashing the corrupted BIOS file. 4. 2.1.3 ASUS CrashFree BIOS 3 ASUS CrashFree BIOS 3 is an auto recovery...
... M5A78L-M LX PLUS). • Download the latest BIOS file from the ASUS website at www.asus.com. Select the Load Setup Defaults item under the Exit menu. Insert the support DVD to the optical drive or the removable device that contains the BIOS file to the USB port or to ensure system compatibility and stability. You can cause system boot failure! When found, the utility reads the BIOS file and starts flashing the corrupted BIOS file. 4. 2.1.3 ASUS CrashFree BIOS 3 ASUS CrashFree BIOS 3 is an auto recovery...
User Manual
Page 45
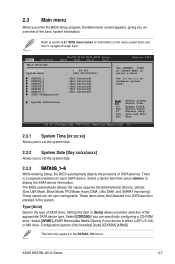
... configure system Time. Refer to section 2.2.1 BIOS menu screen for each SATA device. There is either a ZIP, LS-120, or MO drive. Select a device item then press to set the system time. 2.3.2 System Date [Day xx/xx/xxxx] Allows you to display the SATA device information. Type [Auto] Selects the type of SATA devices. 2.3 Main menu When you enter the BIOS Setup program, the Main menu screen appears, giving you are not user-configurable. Select Screen Select Item +- ASUS M5A78L-M LX Series 2-7 Change...
... configure system Time. Refer to section 2.2.1 BIOS menu screen for each SATA device. There is either a ZIP, LS-120, or MO drive. Select a device item then press to set the system time. 2.3.2 System Date [Day xx/xx/xxxx] Allows you to display the SATA device information. Type [Auto] Selects the type of SATA devices. 2.3 Main menu When you enter the BIOS Setup program, the Main menu screen appears, giving you are not user-configurable. Select Screen Select Item +- ASUS M5A78L-M LX Series 2-7 Change...
User Manual
Page 46
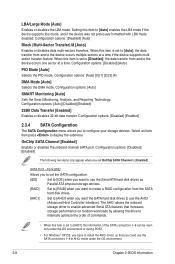
... to display the submenu. Configuration options: [Auto] [Disabled] [Enabled] 32Bit Data Transfer [Enabled] Enables or disables 32-bit data transfer. Configuration options: [Auto] [0] [1] [2] [3] [4] DMA Mode [Auto] Selects the DMA mode. Configuration options: [Disabled] [Enabled] The following two items only appear when you to [AHCI] when you could use the AHCI (Advanced Host Controller Interface). LBA/Large Mode [Auto] Enables or disables the LBA mode. Setting this item is set the SATA configuration. [IDE] Set to [IDE] when you want to use the Serial ATA hard disk drives...
... to display the submenu. Configuration options: [Auto] [Disabled] [Enabled] 32Bit Data Transfer [Enabled] Enables or disables 32-bit data transfer. Configuration options: [Auto] [0] [1] [2] [3] [4] DMA Mode [Auto] Selects the DMA mode. Configuration options: [Disabled] [Enabled] The following two items only appear when you to [AHCI] when you could use the AHCI (Advanced Host Controller Interface). LBA/Large Mode [Auto] Enables or disables the LBA mode. Setting this item is set the SATA configuration. [IDE] Set to [IDE] when you want to use the Serial ATA hard disk drives...
User Manual
Page 47
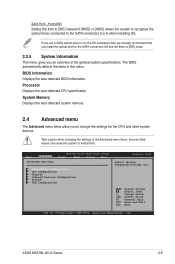
... can cause the system to change the settings for the CPU and other system devices. If you use a SATA optical drive to run the OS installation disk, we strongly recommend that you install the optical dirve to the SATA connectors 5/6 and set them to [IDE] mode. 2.3.5 System Information This menu gives you to malfunction. SATA Port5 - Main Advanced Advanced Settings M5A78L-M LX PLUS BIOS Setup Power Boot Tools Exit JumperFree Configuration CPU Configuration Chipset Onboard Devices Configuration PCIPnP USB Configuration Version 0302 Adjust System Frequency/Voltage etc.
... can cause the system to change the settings for the CPU and other system devices. If you use a SATA optical drive to run the OS installation disk, we strongly recommend that you install the optical dirve to the SATA connectors 5/6 and set them to [IDE] mode. 2.3.5 System Information This menu gives you to malfunction. SATA Port5 - Main Advanced Advanced Settings M5A78L-M LX PLUS BIOS Setup Power Boot Tools Exit JumperFree Configuration CPU Configuration Chipset Onboard Devices Configuration PCIPnP USB Configuration Version 0302 Adjust System Frequency/Voltage etc.
User Manual
Page 48
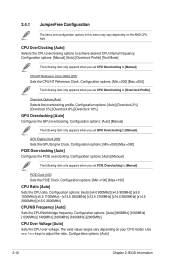
...x15.0 3000MHz] CPU/NB Frequency [Auto] Sets the CPU/Northbridge frequency. CPU/HT Reference Clock (MHz) [200] Sets the CPU/HT Reference Clock. PCIE Clock [100] Sets the PCIE Clock. Overclock Options [Auto] Selects the overclocking profile. Configuration options: [Auto] [800MHz] [1000MHz] [1200MHz] [1400MHz] [1600MHz] [1800MHz] [2000MHz] CPU Over Voltage [Auto] Sets the CPU over voltage. CPU OverClocking [Auto] Selects the CPU overclocking options to adjust the ratio. Use / keys to achieve desired CPU internal frequency. Configuration options: [Auto] [Manual] The following item...
...x15.0 3000MHz] CPU/NB Frequency [Auto] Sets the CPU/Northbridge frequency. CPU/HT Reference Clock (MHz) [200] Sets the CPU/HT Reference Clock. PCIE Clock [100] Sets the PCIE Clock. Overclock Options [Auto] Selects the overclocking profile. Configuration options: [Auto] [800MHz] [1000MHz] [1200MHz] [1400MHz] [1600MHz] [1800MHz] [2000MHz] CPU Over Voltage [Auto] Sets the CPU over voltage. CPU OverClocking [Auto] Selects the CPU overclocking options to adjust the ratio. Use / keys to achieve desired CPU internal frequency. Configuration options: [Auto] [Manual] The following item...

User Manual
Page 52
...] [Max] [User] Internal Graphics Primary Video Controller [GFX0-GPP-IGFX-PCI] Selects the primary display adapter. Configuration options: [GFX0-GPP-IGFX-PCI] [GPPGFX0-IGFX-PCI] [PCI-GFX0-GPP-IGFX] [IGFX-GFX0-GPP-PCI] GFX0:primary video controller on a PCIe x16 slot GPP: primary video controller on a PCIe x1 slot IGFX: onboard display output port PCI: primary video controller on a PCI slot UMA Frame Buffer Size [Auto] Selects the UMA frame buffer size. 2.4.3 Chipset NorthBridge Configuration DRAM Controller Configuration Bank Interleaving [Auto] Allows you to enable or disable memory remapping...
...] [Max] [User] Internal Graphics Primary Video Controller [GFX0-GPP-IGFX-PCI] Selects the primary display adapter. Configuration options: [GFX0-GPP-IGFX-PCI] [GPPGFX0-IGFX-PCI] [PCI-GFX0-GPP-IGFX] [IGFX-GFX0-GPP-PCI] GFX0:primary video controller on a PCIe x16 slot GPP: primary video controller on a PCIe x1 slot IGFX: onboard display output port PCI: primary video controller on a PCI slot UMA Frame Buffer Size [Auto] Selects the UMA frame buffer size. 2.4.3 Chipset NorthBridge Configuration DRAM Controller Configuration Bank Interleaving [Auto] Allows you to enable or disable memory remapping...
User Manual
Page 53
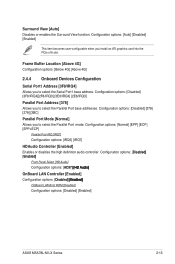
...65533;�] OnBoard LAN Controller [Enabled] Configuration options: [�D�i�s�a�b�l�e�d E���n����a���b��l�e���d��] OnBoard LAN Boot ROM [Disabled] Configuration options: [Disabled] [Enabled] ASUS M5A78L-M LX Series 2-15 Configuration options: [Disabled] [378] [278] [3BC] Parallel Port Mode [Normal] Allows you install an ATI graphics card into the PCIe x16 slot. Surround View [Auto] Disables or enables the...
...65533;�] OnBoard LAN Controller [Enabled] Configuration options: [�D�i�s�a�b�l�e�d E���n����a���b��l�e���d��] OnBoard LAN Boot ROM [Disabled] Configuration options: [Disabled] [Enabled] ASUS M5A78L-M LX Series 2-15 Configuration options: [Disabled] [378] [278] [3BC] Parallel Port Mode [Normal] Allows you install an ATI graphics card into the PCIe x16 slot. Surround View [Auto] Disables or enables the...
User Manual
Page 54
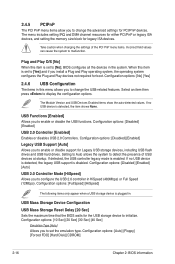
... for Legacy USB storage devices, including USB flash drives and USB hard drives. Configuration options: [Disabled] [Enabled] [Auto] USB 2.0 Controller Mode [HiSpeed] Allows you to configure the USB 2.0 controller in this item is plugged in the system. Configuration options: [Auto] [Floppy] [Forced FDD] [Hard Disk] [CDROM] 2-16 Chapter 2: BIOS information Configuration options: [Disabled] [Enabled] Legacy USB Support [Auto] Allows you to set to [No], BIOS configures all the devices in . Setting to Auto allows the system to detect the presence of the PCI PnP menu items...
... for Legacy USB storage devices, including USB flash drives and USB hard drives. Configuration options: [Disabled] [Enabled] [Auto] USB 2.0 Controller Mode [HiSpeed] Allows you to configure the USB 2.0 controller in this item is plugged in the system. Configuration options: [Auto] [Floppy] [Forced FDD] [Hard Disk] [CDROM] 2-16 Chapter 2: BIOS information Configuration options: [Disabled] [Enabled] Legacy USB Support [Auto] Allows you to set to [No], BIOS configures all the devices in . Setting to Auto allows the system to detect the presence of the PCI PnP menu items...
User Manual
Page 55
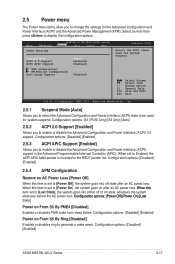
... Interrupt Controller (APIC). When set to be used for system suspend. Select an item then press to enable or disable the Advanced Configuration and Power Interface (ACPI) 2.0 support. Main Advanced Power Settings M5A78L-M LX PLUS BIOS Setup Power Boot Tools Exit Suspend Mode [Auto] ACPI 2.0 Support [Enabled] ACPI APIC Support [Enabled] APM Configuration HW Monitor Configuration Anti Surge Support [Enabled] Version 0302 Select the ACPI state used for System Suspend. Select Screen Select Item +- Configuration options: [Disabled] [Enabled] ASUS M5A78L-M LX Series 2-17...
... Interrupt Controller (APIC). When set to be used for system suspend. Select an item then press to enable or disable the Advanced Configuration and Power Interface (ACPI) 2.0 support. Main Advanced Power Settings M5A78L-M LX PLUS BIOS Setup Power Boot Tools Exit Suspend Mode [Auto] ACPI 2.0 Support [Enabled] ACPI APIC Support [Enabled] APM Configuration HW Monitor Configuration Anti Surge Support [Enabled] Version 0302 Select the ACPI state used for System Suspend. Select Screen Select Item +- Configuration options: [Disabled] [Enabled] ASUS M5A78L-M LX Series 2-17...
User Manual
Page 57
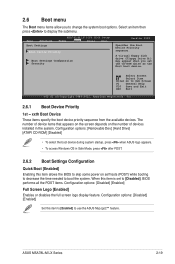
... to skip some power on the number of devices installed in Safe Mode, press after POST. 2.6.2 Boot Settings Configuration Quick Boot [Enabled] Enabling this item is set the CD-ROM drive as the first boot device. Configuration options: [Removable Dev.] [Hard Drive] [ATAPI CD-ROM] [Disabled] • To select the boot device during system startup, press when ASUS logo appears. • To access Windows OS in the system. When this item allows the BIOS to change the system boot options. ASUS M5A78L-M LX Series 2-19 Select an...
... to skip some power on the number of devices installed in Safe Mode, press after POST. 2.6.2 Boot Settings Configuration Quick Boot [Enabled] Enabling this item is set the CD-ROM drive as the first boot device. Configuration options: [Removable Dev.] [Hard Drive] [ATAPI CD-ROM] [Disabled] • To select the boot device during system startup, press when ASUS logo appears. • To access Windows OS in the system. When this item allows the BIOS to change the system boot options. ASUS M5A78L-M LX Series 2-19 Select an...


