User Manual
Page 3
Chapter 4: System Recovery System Recovery 4-2 Using Hidden Partition 4-2 Using the Recovery DVD 4-3 Using USB Flash Disk 4-4 Chapter 5: Installing Windows® XP Preparing to install Windows® XP 5-2 Installing Windows® XP 5-2 Support CD information 5-4 Running the ... batteries A-9 Declaration of Conformity(R&TTE directive 1999/5/EC A-10 GNU General Public License A-11 Copyright Information A-22 Limitation of Liability A-23 Service and Support A-23 ASUS Eee PC iii
Chapter 4: System Recovery System Recovery 4-2 Using Hidden Partition 4-2 Using the Recovery DVD 4-3 Using USB Flash Disk 4-4 Chapter 5: Installing Windows® XP Preparing to install Windows® XP 5-2 Installing Windows® XP 5-2 Support CD information 5-4 Running the ... batteries A-9 Declaration of Conformity(R&TTE directive 1999/5/EC A-10 GNU General Public License A-11 Copyright Information A-22 Limitation of Liability A-23 Service and Support A-23 ASUS Eee PC iii
User Manual
Page 4
... applications differ by models and territories. System Recovery Provides information on getting started with the Eee PC. 3. IMPORTANT! Vital information that must be differences between your Eee PC as follows: WARNING! Using the Eee PC Provides information on the Eee PC's components. 2. TIP: Tips for special ... safely and effectively.These notes have different degrees of importance as being correct. Please accept your Eee PC and the pictures shown in the Eee PC and how to data, components, or persons. Important information that must be followed for This ...
... applications differ by models and territories. System Recovery Provides information on getting started with the Eee PC. 3. IMPORTANT! Vital information that must be differences between your Eee PC as follows: WARNING! Using the Eee PC Provides information on the Eee PC's components. 2. TIP: Tips for special ... safely and effectively.These notes have different degrees of importance as being correct. Please accept your Eee PC and the pictures shown in the Eee PC and how to data, components, or persons. Important information that must be followed for This ...
User Manual
Page 43
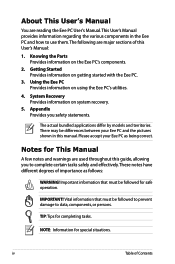
A virtual floppy disk drive (Floppy Drive B: ) may appear when you change or system recovery. Boot Booster The Boot Booster item in BIOS setup helps shorten your Eee PC bootup time. Follow the instructions below to Sub Screen F1 General Help F10 Save and Exit ESC Exit ... bootup to save the configuration and restart Eee PC. If you complete hardware change any Eee PC components or perform system recovery (from USB flash disk, external optical drive or hidden partition). Set Boot Booster to enable Boot Booster after you fail to enter the BIOS setup. ASUS Eee PC 3-7
A virtual floppy disk drive (Floppy Drive B: ) may appear when you change or system recovery. Boot Booster The Boot Booster item in BIOS setup helps shorten your Eee PC bootup time. Follow the instructions below to Sub Screen F1 General Help F10 Save and Exit ESC Exit ... bootup to save the configuration and restart Eee PC. If you complete hardware change any Eee PC components or perform system recovery (from USB flash disk, external optical drive or hidden partition). Set Boot Booster to enable Boot Booster after you fail to enter the BIOS setup. ASUS Eee PC 3-7
User Manual
Page 48
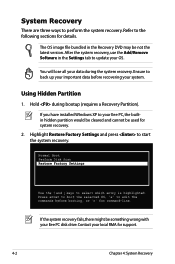
...WIndows XP to perform the system recovery. Contact your local RMA for details. The OS image file bundled in the Settings tab to the following sections for support. 4-2 Chapter 4: System Recovery System Recovery There are three ways to your Eee PC, the builtin hidden partition would ...be cleared and cannot be used for system recovery. 2. Refer to update your OS. Using Hidden Partition 1. If the system recovery fails, there might be not the ...
...WIndows XP to perform the system recovery. Contact your local RMA for details. The OS image file bundled in the Settings tab to the following sections for support. 4-2 Chapter 4: System Recovery System Recovery There are three ways to your Eee PC, the builtin hidden partition would ...be cleared and cannot be used for system recovery. 2. Refer to update your OS. Using Hidden Partition 1. If the system recovery fails, there might be not the ...
User Manual
Page 49
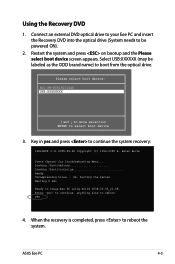
... select boot device 3. Key in yes and press to image Eee PC using build 2008.03.05_21.08. Peter Anvin . Waiting 5 Sec Ready to continue the system recovery: ISOLINUX 3.11 2005-09-02 Copyright (C) 1994-2005 H. ASUS Eee PC 4-3 Restart the system and press on bootup and the Please ...select boot device screen appears. Loading /boot/vmlinuz Loading /boot/initrd.gz Ready. Enter "yes" to continue, anything else to boot from the optical drive. Using the Recovery DVD 1. Connect an ...
... select boot device 3. Key in yes and press to image Eee PC using build 2008.03.05_21.08. Peter Anvin . Waiting 5 Sec Ready to continue the system recovery: ISOLINUX 3.11 2005-09-02 Copyright (C) 1994-2005 H. ASUS Eee PC 4-3 Restart the system and press on bootup and the Please ...select boot device screen appears. Loading /boot/vmlinuz Loading /boot/initrd.gz Ready. Enter "yes" to continue, anything else to boot from the optical drive. Using the Recovery DVD 1. Connect an ...

User Manual
Page 50
...and make it bootable. Connect your data on the left and select ASUS Linux USB Flash Utility. 3. Back up important data before using the USB disk as a recovery disk. Select Copy Eee PC image files to perform system recovery: 1. Note that PC/NB at the same time. 2. Using USB Flash Disk You ...need another PC and a USB flash disk (larger than 2GB) to another PC/NB (bundled with Windows XP or later version...
...and make it bootable. Connect your data on the left and select ASUS Linux USB Flash Utility. 3. Back up important data before using the USB disk as a recovery disk. Select Copy Eee PC image files to perform system recovery: 1. Note that PC/NB at the same time. 2. Using USB Flash Disk You ...need another PC and a USB flash disk (larger than 2GB) to another PC/NB (bundled with Windows XP or later version...

User Manual
Page 51
4. Eject the Support CD, insert the Recovery DVD, and click Run. 5. A dialog box appears. Follow the instructions to eject the USB disk and replug it to continue.The system starts formatting your PC/NB. Click Yes to your USB flash disk. 6. Click Retry to complete the process. ASUS Eee PC 4-5 Click OK to continue. 7.
4. Eject the Support CD, insert the Recovery DVD, and click Run. 5. A dialog box appears. Follow the instructions to eject the USB disk and replug it to continue.The system starts formatting your PC/NB. Click Yes to your USB flash disk. 6. Click Retry to complete the process. ASUS Eee PC 4-5 Click OK to continue. 7.

User Manual
Page 52
... Loading /boot/vmlinuz Loading /boot/initrd.gz Ready. ISOLINUX 3.11 2005-09-02 Copyright (C) 1994-2005 H. yes 11 When the recovery is completed, remove the USB flash disk and press to reboot. Press for Troubleshooting Menu... Peter Anvin . Uncompressing Linux... Restart the system... "yes" to continue, anything else to reboot the system. 4-6 Chapter 4: System Recovery Connect the USB flash disk to continue the system recovery. Key in yes and press to your Eee PC. 9. Waiting 5 Sec Ready to image Eee PC using build 2008.03.05_21.08. 8. Ok, booting the kernel.
... Loading /boot/vmlinuz Loading /boot/initrd.gz Ready. ISOLINUX 3.11 2005-09-02 Copyright (C) 1994-2005 H. yes 11 When the recovery is completed, remove the USB flash disk and press to reboot. Press for Troubleshooting Menu... Peter Anvin . Uncompressing Linux... Restart the system... "yes" to continue, anything else to reboot the system. 4-6 Chapter 4: System Recovery Connect the USB flash disk to continue the system recovery. Key in yes and press to your Eee PC. 9. Waiting 5 Sec Ready to image Eee PC using build 2008.03.05_21.08. 8. Ok, booting the kernel.
User Manual
Page 3
Eee Docking...3-7 Eee @Vibe...3-7 Eee Sharing...3-8 Eee Xperience...3-8 Eee Tools...3-9 Microsoft® Office Trial...3-10 Support DVD & System Recovery Support DVD information 4-2 Running the support DVD 4-2 Drivers menu...4-3 Utilities menu...4-3 Contact...4-3 Other information 4-3 System Recovery...4-4 Using the Support DVD 4-4 Using Recovery Partition 4-5 Boot Booster...4-6 Appendix Declarations and Safety Statements A-2 Federal ... Lithium Cautions (for lithium-ion batteries A-9 Copyright Information...A-11 Limitation of Liability...A-12 Service and Support...A-12 ASUS Eee PC iii
Eee Docking...3-7 Eee @Vibe...3-7 Eee Sharing...3-8 Eee Xperience...3-8 Eee Tools...3-9 Microsoft® Office Trial...3-10 Support DVD & System Recovery Support DVD information 4-2 Running the support DVD 4-2 Drivers menu...4-3 Utilities menu...4-3 Contact...4-3 Other information 4-3 System Recovery...4-4 Using the Support DVD 4-4 Using Recovery Partition 4-5 Boot Booster...4-6 Appendix Declarations and Safety Statements A-2 Federal ... Lithium Cautions (for lithium-ion batteries A-9 Copyright Information...A-11 Limitation of Liability...A-12 Service and Support...A-12 ASUS Eee PC iii
User Manual
Page 4
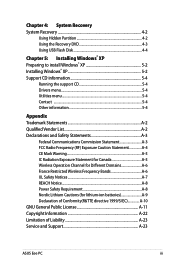
... on the Eee PC's components. 2. Important information that must be followed to prevent damage to complete certain tasks safely and effectively.These notes have different degrees of Contents iv Table of importance as being correct. Knowing the Parts Provides information on support DVD contents and system recovery. 5. Support DVD and System Recovery Gives you...
... on the Eee PC's components. 2. Important information that must be followed to prevent damage to complete certain tasks safely and effectively.These notes have different degrees of Contents iv Table of importance as being correct. Knowing the Parts Provides information on support DVD contents and system recovery. 5. Support DVD and System Recovery Gives you...

User Manual
Page 43
Support DVD information System Recovery Boot Booster 4 Support DVD & System Recovery
Support DVD information System Recovery Boot Booster 4 Support DVD & System Recovery

User Manual
Page 44
... change without notice. 4-2 Chapter 4: Support DVD & System Recovery Running the support DVD Insert the support DVD in the external optical drive.The DVD automatically displays the Drivers menu if Autorun is NOT enabled in your computer. Click an icon to display support DVD/ Eee PC information Click an item to install If Autorun... by models and are subject to locate the file ASSETUP.EXE from the BIN folder. Support DVD information The support DVD that comes with the Eee PC package contains the drivers, software applications, and utilities that you can install to run the DVD.
... change without notice. 4-2 Chapter 4: Support DVD & System Recovery Running the support DVD Insert the support DVD in the external optical drive.The DVD automatically displays the Drivers menu if Autorun is NOT enabled in your computer. Click an icon to display support DVD/ Eee PC information Click an item to install If Autorun... by models and are subject to locate the file ASSETUP.EXE from the BIN folder. Support DVD information The support DVD that comes with the Eee PC package contains the drivers, software applications, and utilities that you can install to run the DVD.
User Manual
Page 46
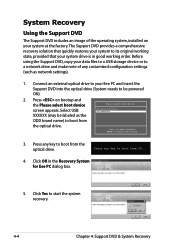
Before using the Support DVD, copy your Eee PC and insert the Support DVD into the optical drive (System needs to be labeled as network settings). 1. Press on your system at the factory.The Support DVD provides a comprehensive recovery solution that quickly restores your system to its original working.... Select USB: XXXXXX (may be powered ON). 2. Click OK in good working state, provided that your system drive is in the Recovery System for Eee PC dialog box. 5. Connect an external optical drive to your data files to a USB storage device or to a network drive and make...
Before using the Support DVD, copy your Eee PC and insert the Support DVD into the optical drive (System needs to be labeled as network settings). 1. Press on your system at the factory.The Support DVD provides a comprehensive recovery solution that quickly restores your system to its original working.... Select USB: XXXXXX (may be powered ON). 2. Click OK in good working state, provided that your system drive is in the Recovery System for Eee PC dialog box. 5. Connect an external optical drive to your data files to a USB storage device or to a network drive and make...

User Manual
Page 47
... and follow the onscreen instructions to start the system recovery. 3. Using the Recovery Partition: 1. ASUS Eee PC 4-5 Refer to restart the Eee PC. Press during the system recovery. Ensure to back up your important data before your system. 6. Using Recovery Partition About the Recovery Partition The Recovery Partition is completed, eject the the Support DVD from USB flash disk, external optical...
... and follow the onscreen instructions to start the system recovery. 3. Using the Recovery Partition: 1. ASUS Eee PC 4-5 Refer to restart the Eee PC. Press during the system recovery. Ensure to back up your important data before your system. 6. Using Recovery Partition About the Recovery Partition The Recovery Partition is completed, eject the the Support DVD from USB flash disk, external optical...
User Manual
Page 48
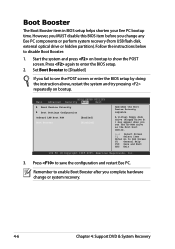
...to disable Boot Booster: 1. Boot Booster The Boot Booster item in BIOS setup helps shorten your Eee PC bootup time. Follow the instructions below to save the configuration and restart Eee PC. Start the system and press on bootup. Set Boot Booster to Sub Screen F1 General Help ..., American Megatrends, Inc. 3. A virtual floppy disk drive (Floppy Drive B: ) may appear when you complete hardware change any Eee PC components or perform system recovery (from USB flash disk, external optical drive or hidden partition). Remember to enable Boot Booster after you set the CD-ROM drive...
...to disable Boot Booster: 1. Boot Booster The Boot Booster item in BIOS setup helps shorten your Eee PC bootup time. Follow the instructions below to save the configuration and restart Eee PC. Start the system and press on bootup. Set Boot Booster to Sub Screen F1 General Help ..., American Megatrends, Inc. 3. A virtual floppy disk drive (Floppy Drive B: ) may appear when you complete hardware change any Eee PC components or perform system recovery (from USB flash disk, external optical drive or hidden partition). Remember to enable Boot Booster after you set the CD-ROM drive...


