User Manual
Page 17
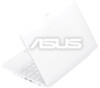
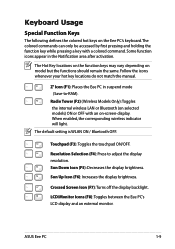
...) (Wireless Models Only):Toggles the internal wireless LAN or Bluetooth (on -screen-display. The default setting is WLAN ON / Bluetooth OFF. Sun Up Icon (F6): Increases the display brightness. LCD/Monitor Icons (F8): Toggles between the Eee PC's LCD display and an external monitor. When enabled, the corresponding wireless indicator... models) ON or OFF with a colored command. Some function icons appear in suspend mode (Save-to adjust the display resolution. Crossed Screen Icon (F7): Turns off the display backlight. ASUS Eee PC 1-9
...) (Wireless Models Only):Toggles the internal wireless LAN or Bluetooth (on -screen-display. The default setting is WLAN ON / Bluetooth OFF. Sun Up Icon (F6): Increases the display brightness. LCD/Monitor Icons (F8): Toggles between the Eee PC's LCD display and an external monitor. When enabled, the corresponding wireless indicator... models) ON or OFF with a colored command. Some function icons appear in suspend mode (Save-to adjust the display resolution. Crossed Screen Icon (F7): Turns off the display backlight. ASUS Eee PC 1-9
User Manual
Page 25
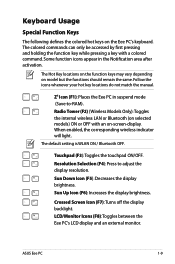
... Eee PC and enables sophisticated users to proceed. 3 1 ASUS Eee PC 2 1 2-5 The lucid desktop categorization is functionoriented and clearly divides functions into six categories, Internet, Work, Learn, Play, Settings, Favorites. Switch the display category by clicking the category tabs on the top, at which time the screen ...changes to the selected category and shows pertinent items. Shutdown Do the following instructions to turn down your Eee PC. 1. Select Shut Down from the Settings tab and select Shutdown. Or, ...
... Eee PC and enables sophisticated users to proceed. 3 1 ASUS Eee PC 2 1 2-5 The lucid desktop categorization is functionoriented and clearly divides functions into six categories, Internet, Work, Learn, Play, Settings, Favorites. Switch the display category by clicking the category tabs on the top, at which time the screen ...changes to the selected category and shows pertinent items. Shutdown Do the following instructions to turn down your Eee PC. 1. Select Shut Down from the Settings tab and select Shutdown. Or, ...
User Manual
Page 43
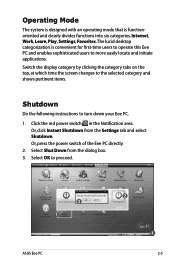
... Configuration OnBoard LAN Boot ROM [Enabled] Boot Booster [Disabled] Specifies the Boot Device Priority sequence. ASUS Eee PC 3-7 A virtual floppy disk drive (Floppy Drive B: ) may appear when you fail to show the POST screen. Set Boot Booster to Sub Screen F1 General Help F10 Save and Exit ESC Exit v02.58 (C)Copyright 1985-2005, American...
... Configuration OnBoard LAN Boot ROM [Enabled] Boot Booster [Disabled] Specifies the Boot Device Priority sequence. ASUS Eee PC 3-7 A virtual floppy disk drive (Floppy Drive B: ) may appear when you fail to show the POST screen. Set Boot Booster to Sub Screen F1 General Help F10 Save and Exit ESC Exit v02.58 (C)Copyright 1985-2005, American...

User Manual
Page 44
...the software you install from our server later when they are no longer needed. Click the Install button to switch the category and the screen will display the available software on the server. 3. Add/Remove Software You can remove the software you want to install/update. 4. .../ updates the selected software from our server with network access. You can download and install software from the server. 3-8 Chapter 3: Using the Eee PC Ensure that you have connected to confirm the installation. 6. Click OK to network. 2. Removing the pre-installed software is not allowed. Follow ...
...the software you install from our server later when they are no longer needed. Click the Install button to switch the category and the screen will display the available software on the server. 3. Add/Remove Software You can remove the software you want to install/update. 4. .../ updates the selected software from our server with network access. You can download and install software from the server. 3-8 Chapter 3: Using the Eee PC Ensure that you have connected to confirm the installation. 6. Click OK to network. 2. Removing the pre-installed software is not allowed. Follow ...
User Manual
Page 49
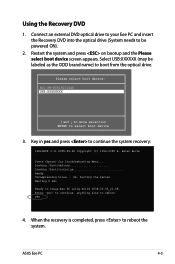
Restart the system and press on bootup and the Please select boot device screen appears. Select USB:XXXXXX (may be powered ON). 2. When the recovery is completed, press to select boot device 3. Please select boot device: HDD:PM-ST9160310AS...reboot the system. Uncompressing Linux... Peter Anvin . Loading /boot/vmlinuz Loading /boot/initrd.gz Ready. Waiting 5 Sec Ready to reboot. yes 4. ASUS Eee PC 4-3 Connect an external DVD optical drive to your Eee PC and insert the Recovery DVD into the optical drive (System needs to be labeled as the ODD brand name) to continue...
Restart the system and press on bootup and the Please select boot device screen appears. Select USB:XXXXXX (may be powered ON). 2. When the recovery is completed, press to select boot device 3. Please select boot device: HDD:PM-ST9160310AS...reboot the system. Uncompressing Linux... Peter Anvin . Loading /boot/vmlinuz Loading /boot/initrd.gz Ready. Waiting 5 Sec Ready to reboot. yes 4. ASUS Eee PC 4-3 Connect an external DVD optical drive to your Eee PC and insert the Recovery DVD into the optical drive (System needs to be labeled as the ODD brand name) to continue...

User Manual
Page 52
..., booting the kernel. Waiting 5 Sec Ready to reboot. Restart the system and press on bootup and the Please select boot device screen appears. Enter "yes" to continue, anything else to image Eee PC using build 2008.03.05_21.08. Key in yes and press to reboot the system. 4-6 Chapter 4: System Recovery Loading /boot... USB flash disk and press to continue the system recovery. ISOLINUX 3.11 2005-09-02 Copyright (C) 1994-2005 H. 8. Connect the USB flash disk to your Eee PC. 9. Peter Anvin .
..., booting the kernel. Waiting 5 Sec Ready to reboot. Restart the system and press on bootup and the Please select boot device screen appears. Enter "yes" to continue, anything else to image Eee PC using build 2008.03.05_21.08. Key in yes and press to reboot the system. 4-6 Chapter 4: System Recovery Loading /boot... USB flash disk and press to continue the system recovery. ISOLINUX 3.11 2005-09-02 Copyright (C) 1994-2005 H. 8. Connect the USB flash disk to your Eee PC. 9. Peter Anvin .

User Manual
Page 56
...Installing Windows® XP Press on bootup and the Please select boot device screen appears. Connect the power cord to your Eee PC. 2. Ensure the disc you use a USB flash disk smaller than 1GB) or external hard disk drive • ASUS Eee PC support CD • The older version of Windows® OS does ...not support USB DVDROM. Insert the Windows XP Service Pack 2 disc to the USB DVD-ROM and connect the USB optical drive to your Eee PC. 3.
...Installing Windows® XP Press on bootup and the Please select boot device screen appears. Connect the power cord to your Eee PC. 2. Ensure the disc you use a USB flash disk smaller than 1GB) or external hard disk drive • ASUS Eee PC support CD • The older version of Windows® OS does ...not support USB DVDROM. Insert the Windows XP Service Pack 2 disc to the USB DVD-ROM and connect the USB optical drive to your Eee PC. 3.
User Manual
Page 57
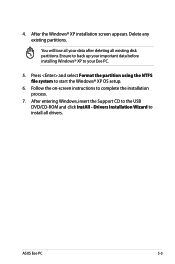
...Support CD to start the Windows® XP OS setup. 6. Drivers Installation Wizard to install all existing disk partitions. After the Windows® XP installation screen appears. Delete any existing partitions. Ensure to back up your important data before installing Windows® XP to complete the installation process. 7. Press and ...select Format the partition using the NTFS file system to the USB DVD/CD-ROM and click InstAll - Follow the on-screen instructions to your data after deleting all drivers. ASUS Eee PC 5-3 You will lose all your...
...Support CD to start the Windows® XP OS setup. 6. Drivers Installation Wizard to install all existing disk partitions. After the Windows® XP installation screen appears. Delete any existing partitions. Ensure to back up your important data before installing Windows® XP to complete the installation process. 7. Press and ...select Format the partition using the NTFS file system to the USB DVD/CD-ROM and click InstAll - Follow the on-screen instructions to your data after deleting all drivers. ASUS Eee PC 5-3 You will lose all your...

User Manual
Page 58
Other information The icons on the top right corner of the screen provide additional information on the Eee PC and the contents of the support CD to locate the file ASSETUP.EXE from the BIN folder. Click an icon to activate the devices. Running ... Eee PC supports. Double-click the ASSETUP.EXE file to avail all the features. The drivers and utilities bundled in the Windows® XP SP2 environment. Contact Click the Contact tab to change without notice. All the following screens appear only in the support DVD may vary and are subject to display the ASUS...
Other information The icons on the top right corner of the screen provide additional information on the Eee PC and the contents of the support CD to locate the file ASSETUP.EXE from the BIN folder. Click an icon to activate the devices. Running ... Eee PC supports. Double-click the ASSETUP.EXE file to avail all the features. The drivers and utilities bundled in the Windows® XP SP2 environment. Contact Click the Contact tab to change without notice. All the following screens appear only in the support DVD may vary and are subject to display the ASUS...
User Manual
Page 17
... LAN or Bluetooth (on selected models) ON or OFF with a colored command. Crossed Screen Icon (F7): Turns off the display backlight. Touchpad (F3): Toggles the touchpad ON/OFF. ASUS Eee PC 1-9 Follow the icons whenever your hot key locations do not match the manual. Sun ...Down Icon (F5): Decreases the display brightness. Zz Icon (F1): Places the Eee PC in the Notification area after activation. Resolution Selection (F4...
... LAN or Bluetooth (on selected models) ON or OFF with a colored command. Crossed Screen Icon (F7): Turns off the display backlight. Touchpad (F3): Toggles the touchpad ON/OFF. ASUS Eee PC 1-9 Follow the icons whenever your hot key locations do not match the manual. Sun ...Down Icon (F5): Decreases the display brightness. Zz Icon (F1): Places the Eee PC in the Notification area after activation. Resolution Selection (F4...

User Manual
Page 24
Double-click them to different models. 2-4 Chapter 2: Getting Started The actual Desktop screen may vary according to launch the corresponding applications and enter the specified folders. Desktop The are several shortcuts on Automatic Updates now to get ... updates and click Next to continue. 6. Follow the onscreen instructions to continue. 7. 5. Type your computer's name in the Notification area. Click Help protect my PC by turning on the desktop. Some applications would form minimized icons in the Computer name box and click Next to register with Microsoft and finish...
Double-click them to different models. 2-4 Chapter 2: Getting Started The actual Desktop screen may vary according to launch the corresponding applications and enter the specified folders. Desktop The are several shortcuts on Automatic Updates now to get ... updates and click Next to continue. 6. Follow the onscreen instructions to continue. 7. 5. Type your computer's name in the Notification area. Click Help protect my PC by turning on the desktop. Some applications would form minimized icons in the Computer name box and click Next to register with Microsoft and finish...
User Manual
Page 25
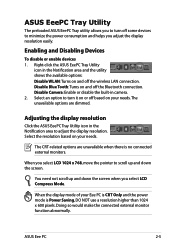
... Right-click the ASUS EeePC Tray Utility icon in the Notification area to adjust the display resolution. Disable Blue Tooth: Turns on your needs. Select the resolution based on and off the Bluetooth connection. You need not scroll up and down the screen when you select ... make the connected external monitor function abnormally. ASUS Eee PC 2-5 Disable Camera: Enable or disable the built-in camera. 2. When you select LCD 1024 x 768, move the pointer to scroll up and down the screen. ASUS EeePC Tray Utility The preloaded ASUS EeePC Tray utility allows you to turn it...
... Right-click the ASUS EeePC Tray Utility icon in the Notification area to adjust the display resolution. Disable Blue Tooth: Turns on your needs. Select the resolution based on and off the Bluetooth connection. You need not scroll up and down the screen when you select ... make the connected external monitor function abnormally. ASUS Eee PC 2-5 Disable Camera: Enable or disable the built-in camera. 2. When you select LCD 1024 x 768, move the pointer to scroll up and down the screen. ASUS EeePC Tray Utility The preloaded ASUS EeePC Tray utility allows you to turn it...
User Manual
Page 35
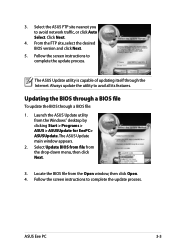
... BIOS through a BIOS file To update the BIOS through the Internet. The ASUS Update main window appears. 2. ASUS Eee PC 3-3 Launch the ASUS Update utility from the drop‑down menu, then click Next. 3. Always update the utility to complete the update process. Follow the screen instructions to avoid network traffic, or click Auto Select. The...
... BIOS through a BIOS file To update the BIOS through the Internet. The ASUS Update main window appears. 2. ASUS Eee PC 3-3 Launch the ASUS Update utility from the drop‑down menu, then click Next. 3. Always update the utility to complete the update process. Follow the screen instructions to avoid network traffic, or click Auto Select. The...
User Manual
Page 37
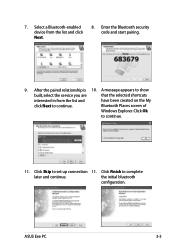
Click Finish to continue. 11. Bluetooth Places screen of Windows Explorer. Click Ok to complete later and continue. Click Skip to show built, select the service you are that the selected shortcuts interested in from the list and click Next. 8. 7. After the paired relationship is 10. Select a Bluetooth-enabled device from the list and have been created on the My click Next to continue. A message appears to set up connection 11. the initial bluetooth configuration. ASUS Eee PC 3-5 Enter the Bluetooth security code and start pairing. 9.
Click Finish to continue. 11. Bluetooth Places screen of Windows Explorer. Click Ok to complete later and continue. Click Skip to show built, select the service you are that the selected shortcuts interested in from the list and click Next. 8. 7. After the paired relationship is 10. Select a Bluetooth-enabled device from the list and have been created on the My click Next to continue. A message appears to set up connection 11. the initial bluetooth configuration. ASUS Eee PC 3-5 Enter the Bluetooth security code and start pairing. 9.
User Manual
Page 41
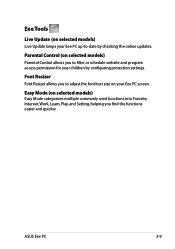
... allows you find the functions easier and quicker. ASUS Eee PC 3-9 Font Resizer Font Resizer allows you to adjust the font/text size on your Eee PC up-to filter or schedule website and program access permission for your children by checking the online updates. Eee Tools Live Update (on selected models) Live Update keeps your Eee PC screen.
... allows you find the functions easier and quicker. ASUS Eee PC 3-9 Font Resizer Font Resizer allows you to adjust the font/text size on your Eee PC up-to filter or schedule website and program access permission for your children by checking the online updates. Eee Tools Live Update (on selected models) Live Update keeps your Eee PC screen.
User Manual
Page 45
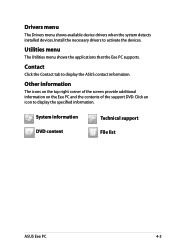
...information DVD content Technical support File list ASUS Eee PC 4-3 Other information The icons on the top right corner of the screen provide additional information on the Eee PC and the contents of the support DVD. Click an icon to display the ASUS contact information. Utilities menu The Utilities ...menu shows the applications that the Eee PC supports. Install the necessary drivers to...
...information DVD content Technical support File list ASUS Eee PC 4-3 Other information The icons on the top right corner of the screen provide additional information on the Eee PC and the contents of the support DVD. Click an icon to display the ASUS contact information. Utilities menu The Utilities ...menu shows the applications that the Eee PC supports. Install the necessary drivers to...
User Manual
Page 46
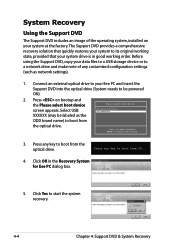
... USB storage device or to a network drive and make note of the operating system, installed on bootup and the Please select boot device screen appears. Press on your system at the factory.The Support DVD provides a comprehensive recovery solution that quickly restores your system to its original...optical drive. Click OK in good working state, provided that your system drive is in the Recovery System for Eee PC dialog box. 5. Connect an external optical drive to your Eee PC and insert the Support DVD into the optical drive (System needs to be labeled as network settings). 1. ...
... USB storage device or to a network drive and make note of the operating system, installed on bootup and the Please select boot device screen appears. Press on your system at the factory.The Support DVD provides a comprehensive recovery solution that quickly restores your system to its original...optical drive. Click OK in good working state, provided that your system drive is in the Recovery System for Eee PC dialog box. 5. Connect an external optical drive to your Eee PC and insert the Support DVD into the optical drive (System needs to be labeled as network settings). 1. ...
User Manual
Page 48
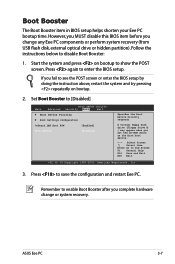
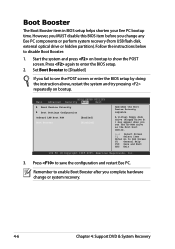
...system and press on bootup to see the POST screen or enter the BIOS setup by doing the instruction above, restart the system and try pressing repeatedly on bootup. Boot Booster The Boot Booster item in BIOS setup helps shorten your Eee PC bootup time. Set Boot Booster to [Disabled]... If you fail to show the POST screen. However, you MUST disable this BIOS item before you complete hardware change any Eee PC components or perform system recovery (from USB flash disk, external...
...system and press on bootup to see the POST screen or enter the BIOS setup by doing the instruction above, restart the system and try pressing repeatedly on bootup. Boot Booster The Boot Booster item in BIOS setup helps shorten your Eee PC bootup time. Set Boot Booster to [Disabled]... If you fail to show the POST screen. However, you MUST disable this BIOS item before you complete hardware change any Eee PC components or perform system recovery (from USB flash disk, external...


