User Manual
Page 3
Chapter 4: System Recovery System Recovery 4-2 Using Hidden Partition 4-2 Using the Recovery DVD 4-3 Using USB Flash Disk 4-4 Chapter 5: Installing Windows® XP Preparing to install Windows® XP 5-2 Installing Windows® XP 5-2 Support CD information 5-4 Running the support CD 5-4 Drivers menu 5-4 Utilities menu 5-4 Contact ...5-4 Other information 5-4 Appendix Trademark Statements A-2 Qualified Vendor List A-2... directive 1999/5/EC A-10 GNU General Public License A-11 Copyright Information A-22 Limitation of Liability A-23 Service and Support A-23 ASUS Eee PC iii
Chapter 4: System Recovery System Recovery 4-2 Using Hidden Partition 4-2 Using the Recovery DVD 4-3 Using USB Flash Disk 4-4 Chapter 5: Installing Windows® XP Preparing to install Windows® XP 5-2 Installing Windows® XP 5-2 Support CD information 5-4 Running the support CD 5-4 Drivers menu 5-4 Utilities menu 5-4 Contact ...5-4 Other information 5-4 Appendix Trademark Statements A-2 Qualified Vendor List A-2... directive 1999/5/EC A-10 GNU General Public License A-11 Copyright Information A-22 Limitation of Liability A-23 Service and Support A-23 ASUS Eee PC iii
User Manual
Page 43
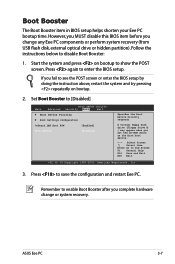
...bootup to show the POST screen. ASUS Eee PC 3-7 Start the system and press on bootup. 2. Boot Booster The Boot Booster item in BIOS setup helps shorten your Eee PC bootup time. Press again to save the configuration and restart Eee PC. If you set the CD-ROM drive as the first boot ...device. ←→ Select Screen ↑↓ Select Item Enter Go to enable Boot Booster after you change or system recovery. Remember to...
...bootup to show the POST screen. ASUS Eee PC 3-7 Start the system and press on bootup. 2. Boot Booster The Boot Booster item in BIOS setup helps shorten your Eee PC bootup time. Press again to save the configuration and restart Eee PC. If you set the CD-ROM drive as the first boot ...device. ←→ Select Screen ↑↓ Select Item Enter Go to enable Boot Booster after you change or system recovery. Remember to...

User Manual
Page 50
Connect your USB flash disk (size larger than 2GB) for Eee PC recovery is correct if you have several USB flash disks connected to the PC. 4-4 Chapter 4: System Recovery To use your data on the left and select ASUS Linux USB Flash Utility. 3. You will lose all your USB ...PC/NB at the same time. 2. Back up important data before using the USB disk as a recovery disk. Using USB Flash Disk You need another PC and a USB flash disk (larger than 2GB) to another PC/NB (bundled with Windows XP or later version) and insert the Support CD to that the disk for Eee PC system recovery...
Connect your USB flash disk (size larger than 2GB) for Eee PC recovery is correct if you have several USB flash disks connected to the PC. 4-4 Chapter 4: System Recovery To use your data on the left and select ASUS Linux USB Flash Utility. 3. You will lose all your USB ...PC/NB at the same time. 2. Back up important data before using the USB disk as a recovery disk. Using USB Flash Disk You need another PC and a USB flash disk (larger than 2GB) to another PC/NB (bundled with Windows XP or later version) and insert the Support CD to that the disk for Eee PC system recovery...

User Manual
Page 51
Eject the Support CD, insert the Recovery DVD, and click Run. 5. Follow the instructions to eject the USB disk and replug it to continue.The system starts formatting your PC/NB. Click Retry to complete the process. ASUS Eee PC 4-5 A dialog box appears. Click OK to continue. 7. Click Yes to your USB flash disk. 6. 4.
Eject the Support CD, insert the Recovery DVD, and click Run. 5. Follow the instructions to eject the USB disk and replug it to continue.The system starts formatting your PC/NB. Click Retry to complete the process. ASUS Eee PC 4-5 A dialog box appears. Click OK to continue. 7. Click Yes to your USB flash disk. 6. 4.
User Manual
Page 46
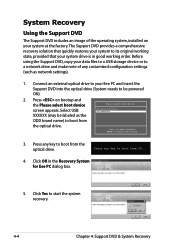
... Recovery Using the Support DVD The Support DVD includes an image of any customized configuration settings (such as the Please select boot device: HDD:PM-ST9160310AS USB:XXXXXXXX ODD brand name) to boot from the optical drive. ↑ and ↓ to move selection ENTER to boot from CD... to your system drive is in the Recovery System for Eee PC dialog box. 5. Press on your system at the factory.The Support DVD provides a comprehensive recovery solution that quickly restores your system to its original working state, provided that your Eee PC and insert the Support DVD into the ...
... Recovery Using the Support DVD The Support DVD includes an image of any customized configuration settings (such as the Please select boot device: HDD:PM-ST9160310AS USB:XXXXXXXX ODD brand name) to boot from the optical drive. ↑ and ↓ to move selection ENTER to boot from CD... to your system drive is in the Recovery System for Eee PC dialog box. 5. Press on your system at the factory.The Support DVD provides a comprehensive recovery solution that quickly restores your system to its original working state, provided that your Eee PC and insert the Support DVD into the ...
User Manual
Page 48
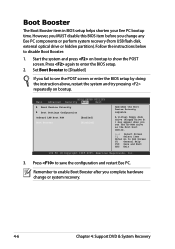
... v02.58 (C)Copyright 1985-2005, American Megatrends, Inc. 3. A virtual floppy disk drive (Floppy Drive B: ) may appear when you set the CD-ROM drive as the first boot device. ←→ Select Screen ↑↓ Select Item Enter Go to enter the BIOS setup. 2. Press... try pressing repeatedly on bootup to enable Boot Booster after you change or system recovery. 4-6 Chapter 4: Support DVD & System Recovery Boot Booster The Boot Booster item in BIOS setup helps shorten your Eee PC bootup time. However, you MUST disable this BIOS item before you complete hardware change...
... v02.58 (C)Copyright 1985-2005, American Megatrends, Inc. 3. A virtual floppy disk drive (Floppy Drive B: ) may appear when you set the CD-ROM drive as the first boot device. ←→ Select Screen ↑↓ Select Item Enter Go to enter the BIOS setup. 2. Press... try pressing repeatedly on bootup to enable Boot Booster after you change or system recovery. 4-6 Chapter 4: Support DVD & System Recovery Boot Booster The Boot Booster item in BIOS setup helps shorten your Eee PC bootup time. However, you MUST disable this BIOS item before you complete hardware change...


