User Manual
Page 2
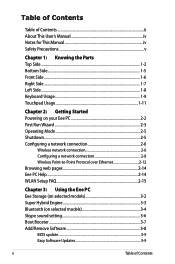
... Side...1-8 Keyboard Usage 1-9 Touchpad Usage 1-11 Chapter 2: Getting Started Powering on your Eee PC 2-2 First Run Wizard 2-3 Operating Mode 2-5 Shutdown...2-5 Configuring a network connection 2-6 Wireless network connection 2-6 Configuring a network connection 2-8 Wireless Point-to-Point Protocol over Ethernet 2-12 Browsing web pages 2-14 Eee PC Help...2-14 WLAN Setup FAQ 2-15 Chapter 3: Using the Eee PC Eee Storage (on selected models 3-2 Super Hybrid Engine 3-3 Bluetooth (on selected models 3-4 Skype sound setting 3-6 Boot Booster...3-7 Add/Remove Software 3-8 BIOS update...
... Side...1-8 Keyboard Usage 1-9 Touchpad Usage 1-11 Chapter 2: Getting Started Powering on your Eee PC 2-2 First Run Wizard 2-3 Operating Mode 2-5 Shutdown...2-5 Configuring a network connection 2-6 Wireless network connection 2-6 Configuring a network connection 2-8 Wireless Point-to-Point Protocol over Ethernet 2-12 Browsing web pages 2-14 Eee PC Help...2-14 WLAN Setup FAQ 2-15 Chapter 3: Using the Eee PC Eee Storage (on selected models 3-2 Super Hybrid Engine 3-3 Bluetooth (on selected models 3-4 Skype sound setting 3-6 Boot Booster...3-7 Add/Remove Software 3-8 BIOS update...
User Manual
Page 3
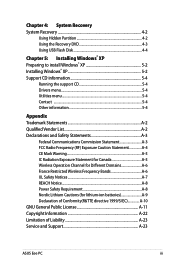
...4-2 Using the Recovery DVD 4-3 Using USB Flash Disk 4-4 Chapter 5: Installing Windows® XP Preparing to install Windows® XP 5-2 Installing Windows® XP 5-2 Support CD information 5-4 Running the support CD 5-4 Drivers menu 5-4 Utilities menu 5-4 Contact ...5-4 Other information 5-4 Appendix Trademark Statements A-2 Qualified Vendor List A-2 Declarations and Safety Statements A-3 Federal Communications Commission Statement A-3 FCC Radio Frequency (RF) Exposure Caution Statement A-4 CE Mark Warning A-5 IC Radiation Exposure Statement for Canada A-5 Wireless Operation...
...4-2 Using the Recovery DVD 4-3 Using USB Flash Disk 4-4 Chapter 5: Installing Windows® XP Preparing to install Windows® XP 5-2 Installing Windows® XP 5-2 Support CD information 5-4 Running the support CD 5-4 Drivers menu 5-4 Utilities menu 5-4 Contact ...5-4 Other information 5-4 Appendix Trademark Statements A-2 Qualified Vendor List A-2 Declarations and Safety Statements A-3 Federal Communications Commission Statement A-3 FCC Radio Frequency (RF) Exposure Caution Statement A-4 CE Mark Warning A-5 IC Radiation Exposure Statement for Canada A-5 Wireless Operation...
User Manual
Page 4
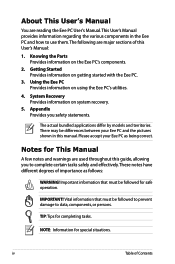
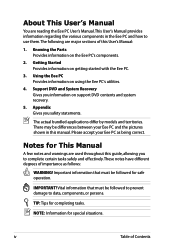
... damage to use them. Getting Started Provides information on the Eee PC's components. 2. Vital information that must be followed for special situations. About This User's Manual You are reading the Eee PC User's Manual.This User's Manual provides information regarding the various components in this manual. NOTE: Information for safe operation. Knowing the Parts Provides information on getting started with the Eee PC. 3. IMPORTANT! Please accept your Eee PC and the...
... damage to use them. Getting Started Provides information on the Eee PC's components. 2. Vital information that must be followed for special situations. About This User's Manual You are reading the Eee PC User's Manual.This User's Manual provides information regarding the various components in this manual. NOTE: Information for safe operation. Knowing the Parts Provides information on getting started with the Eee PC. 3. IMPORTANT! Please accept your Eee PC and the...
User Manual
Page 5
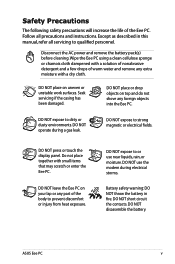
... or enter the Eee PC. DO NOT disassemble the battery. Follow all servicing to or use the modem during a gas leak. DO NOT place or drop objects on uneven or unstable work surfaces. Do not place together with a dry cloth. Except as described in fire. DO NOT operate during electrical storms. Battery safety warning: DO NOT throw the battery in this manual...
... or enter the Eee PC. DO NOT disassemble the battery. Follow all servicing to or use the modem during a gas leak. DO NOT place or drop objects on uneven or unstable work surfaces. Do not place together with a dry cloth. Except as described in fire. DO NOT operate during electrical storms. Battery safety warning: DO NOT throw the battery in this manual...
User Manual
Page 11
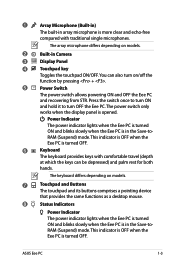
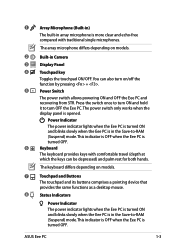
... keyboard differs depending on models. 7 Touchpad and Buttons The touchpad and its buttons comprises a pointing device that provides the same functions as a desktop mouse. 8 Status Indicators Power Indicator The power indicator lights when the Eee PC is turned ON and blinks slowly when the Eee PC is turned OFF. This indicator is OFF when the Eee PC is in the Save-toRAM (Suspend) mode. ASUS Eee PC 1-3 You can be depressed) and palm rest for both hands. The power switch only works...
... keyboard differs depending on models. 7 Touchpad and Buttons The touchpad and its buttons comprises a pointing device that provides the same functions as a desktop mouse. 8 Status Indicators Power Indicator The power indicator lights when the Eee PC is turned ON and blinks slowly when the Eee PC is turned OFF. This indicator is OFF when the Eee PC is in the Save-toRAM (Suspend) mode. ASUS Eee PC 1-3 You can be depressed) and palm rest for both hands. The power switch only works...
User Manual
Page 17
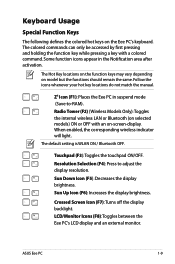
... manual. Resolution Selection (F4): Press to -RAM). LCD/Monitor Icons (F8): Toggles between the Eee PC's LCD display and an external monitor. Zz Icon (F1): Places the Eee PC in the Notification area after activation. The default setting is WLAN ON / Bluetooth OFF. When enabled, the corresponding wireless indicator will light. Sun Up Icon (F6): Increases the display brightness. ASUS Eee PC 1-9 The Hot Key locations on the function keys may vary depending on -screen-display. Radio Tower (F2) (Wireless Models Only):Toggles the internal wireless LAN...
... manual. Resolution Selection (F4): Press to -RAM). LCD/Monitor Icons (F8): Toggles between the Eee PC's LCD display and an external monitor. Zz Icon (F1): Places the Eee PC in the Notification area after activation. The default setting is WLAN ON / Bluetooth OFF. When enabled, the corresponding wireless indicator will light. Sun Up Icon (F6): Increases the display brightness. ASUS Eee PC 1-9 The Hot Key locations on the function keys may vary depending on -screen-display. Radio Tower (F2) (Wireless Models Only):Toggles the internal wireless LAN...
User Manual
Page 25
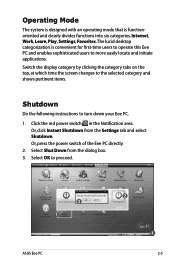
... which time the screen changes to the selected category and shows pertinent items. Shutdown Do the following instructions to proceed. 3 1 ASUS Eee PC 2 1 2-5 Or, click Instant Shutdown from the dialog box. 3. Select Shut Down from the Settings tab and select Shutdown. The lucid desktop categorization is functionoriented and clearly divides functions into six categories, Internet, Work, Learn, Play, Settings, Favorites. Operating Mode The system...
... which time the screen changes to the selected category and shows pertinent items. Shutdown Do the following instructions to proceed. 3 1 ASUS Eee PC 2 1 2-5 Or, click Instant Shutdown from the dialog box. 3. Select Shut Down from the Settings tab and select Shutdown. The lucid desktop categorization is functionoriented and clearly divides functions into six categories, Internet, Work, Learn, Play, Settings, Favorites. Operating Mode The system...
User Manual
Page 35
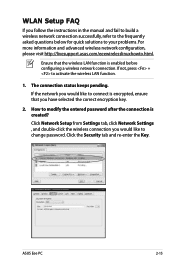
... entered password after the connection is encrypted, ensure that the wireless LAN function is enabled before configuring a wireless network connection. Click Network Setup from Settings tab, click Network Settings , and double-click the wireless connection you would like to connect is created? If the network you would like to change password. ASUS Eee PC 2-15 WLAN Setup FAQ If you follow the instructions in the manual and fail to build a wireless network connection successfully, refer to the frequently asked questions below for quick...
... entered password after the connection is encrypted, ensure that the wireless LAN function is enabled before configuring a wireless network connection. Click Network Setup from Settings tab, click Network Settings , and double-click the wireless connection you would like to connect is created? If the network you would like to change password. ASUS Eee PC 2-15 WLAN Setup FAQ If you follow the instructions in the manual and fail to build a wireless network connection successfully, refer to the frequently asked questions below for quick...
User Manual
Page 43
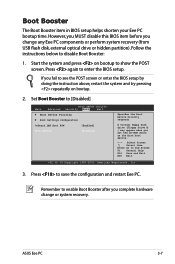
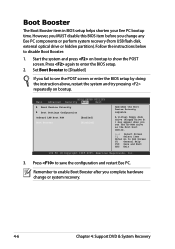
... BIOS SETUP UTILITY Advanced Security Boot Exit Boot Device Priority Boot Settings Configuration OnBoard LAN Boot ROM [Enabled] Boot Booster [Disabled] Specifies the Boot Device Priority sequence. Start the system and press on bootup. 2. Remember to Sub Screen F1 General Help F10 Save and Exit ESC Exit v02.58 (C)Copyright 1985-2005, American Megatrends, Inc. 3. However, you MUST disable this BIOS item before you complete hardware change any Eee PC components or perform system recovery (from USB flash disk, external...
... BIOS SETUP UTILITY Advanced Security Boot Exit Boot Device Priority Boot Settings Configuration OnBoard LAN Boot ROM [Enabled] Boot Booster [Disabled] Specifies the Boot Device Priority sequence. Start the system and press on bootup. 2. Remember to Sub Screen F1 General Help F10 Save and Exit ESC Exit v02.58 (C)Copyright 1985-2005, American Megatrends, Inc. 3. However, you MUST disable this BIOS item before you complete hardware change any Eee PC components or perform system recovery (from USB flash disk, external...
User Manual
Page 48
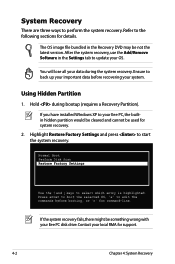
... have installed WIndows XP to back up your Eee PC, the builtin hidden partition would be cleared and cannot be used for support. 4-2 Chapter 4: System Recovery After the system recovery, use the Add/Remove Software in the Recovery DVD may be something wrong with your data during bootup (requires a Recovery Partition). Contact your OS. Using Hidden Partition 1. Hold during the system recovery. Normal Boot Perform Disk Scan Restore Factory Settings Use the ↑ and ↓ keys to update...
... have installed WIndows XP to back up your Eee PC, the builtin hidden partition would be cleared and cannot be used for support. 4-2 Chapter 4: System Recovery After the system recovery, use the Add/Remove Software in the Recovery DVD may be something wrong with your data during bootup (requires a Recovery Partition). Contact your OS. Using Hidden Partition 1. Hold during the system recovery. Normal Boot Perform Disk Scan Restore Factory Settings Use the ↑ and ↓ keys to update...
User Manual
Page 49
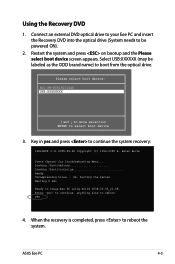
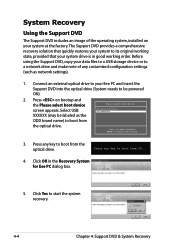
... select boot device 3. Press for Troubleshooting Menu... Please select boot device: HDD:PM-ST9160310AS USB:XXXXXXXX ↑ and ↓ to move selection ENTER to image Eee PC using build 2008.03.05_21.08. Enter "yes" to continue, anything else to reboot the system. ASUS Eee PC 4-3 Using the Recovery DVD 1. Peter Anvin . Ok, booting the kernel. When the recovery is completed, press to reboot. Key in yes and press to boot from the optical drive. yes...
... select boot device 3. Press for Troubleshooting Menu... Please select boot device: HDD:PM-ST9160310AS USB:XXXXXXXX ↑ and ↓ to move selection ENTER to image Eee PC using build 2008.03.05_21.08. Enter "yes" to continue, anything else to reboot the system. ASUS Eee PC 4-3 Using the Recovery DVD 1. Peter Anvin . Ok, booting the kernel. When the recovery is completed, press to reboot. Key in yes and press to boot from the optical drive. yes...
User Manual
Page 57
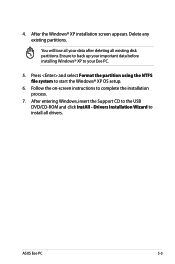
... before installing Windows® XP to your data after deleting all drivers. After entering Windows, insert the Support CD to complete the installation process. 7. ASUS Eee PC 5-3 Drivers Installation Wizard to start the Windows® XP OS setup. 6. Follow the on-screen instructions to the USB DVD/CD-ROM and click InstAll - Delete any existing partitions. 4. After the Windows® XP installation screen appears. Press and select Format the partition using the NTFS file system to install all existing disk partitions.
... before installing Windows® XP to your data after deleting all drivers. After entering Windows, insert the Support CD to complete the installation process. 7. ASUS Eee PC 5-3 Drivers Installation Wizard to start the Windows® XP OS setup. 6. Follow the on-screen instructions to the USB DVD/CD-ROM and click InstAll - Delete any existing partitions. 4. After the Windows® XP installation screen appears. Press and select Format the partition using the NTFS file system to install all existing disk partitions.

User Manual
Page 58
... the support CD Insert the support CD in the external optical drive.The CD automatically displays the Drivers menu if Autorun is NOT enabled in the Windows® XP SP2 environment. Contact Click the Contact tab to activate the devices. All the following screens appear only in your computer. Install the necessary drivers to display the ASUS contact information. If Autorun is enabled in the support DVD may vary...
... the support CD Insert the support CD in the external optical drive.The CD automatically displays the Drivers menu if Autorun is NOT enabled in the Windows® XP SP2 environment. Contact Click the Contact tab to activate the devices. All the following screens appear only in your computer. Install the necessary drivers to display the ASUS contact information. If Autorun is enabled in the support DVD may vary...
User Manual
Page 4
....The following are major sections of this guide, allowing you to complete certain tasks safely and effectively.These notes have different degrees of Contents Notes for safe operation. Using the Eee PC Provides information on support DVD contents and system recovery. 5. Support DVD and System Recovery Gives you safety statements. About This User's Manual You are reading the Eee PC User's Manual.This User's Manual provides information regarding the various components...
....The following are major sections of this guide, allowing you to complete certain tasks safely and effectively.These notes have different degrees of Contents Notes for safe operation. Using the Eee PC Provides information on support DVD contents and system recovery. 5. Support DVD and System Recovery Gives you safety statements. About This User's Manual You are reading the Eee PC User's Manual.This User's Manual provides information regarding the various components...
User Manual
Page 11
... models. 7 Touchpad and Buttons The touchpad and its buttons comprises a pointing device that provides the same functions as a desktop mouse. 8 Status Indicators Power Indicator The power indicator lights when the Eee PC is turned ON and blinks slowly when the Eee PC is more clear and echo-free compared with comfortable travel (depth at which the keys can also turn on/off the function by pressing + . 5 Power Switch The power switch allows powering ON and OFF the Eee PC and recovering from STR. Power Indicator...
... models. 7 Touchpad and Buttons The touchpad and its buttons comprises a pointing device that provides the same functions as a desktop mouse. 8 Status Indicators Power Indicator The power indicator lights when the Eee PC is turned ON and blinks slowly when the Eee PC is more clear and echo-free compared with comfortable travel (depth at which the keys can also turn on/off the function by pressing + . 5 Power Switch The power switch allows powering ON and OFF the Eee PC and recovering from STR. Power Indicator...
User Manual
Page 17
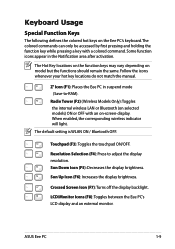
...-to adjust the display resolution. The Hot Key locations on the function keys may vary depending on the Eee PC's keyboard. The default setting is WLAN ON / Bluetooth OFF. Crossed Screen Icon (F7): Turns off the display backlight. When enabled, the corresponding wireless indicator will light. Resolution Selection (F4): Press to -RAM). LCD/Monitor Icons (F8): Toggles between the Eee PC's LCD display and an external monitor. Sun Down Icon (F5): Decreases the display brightness. Sun Up Icon (F6): Increases the display brightness. ASUS Eee PC 1-9 Keyboard...
...-to adjust the display resolution. The Hot Key locations on the function keys may vary depending on the Eee PC's keyboard. The default setting is WLAN ON / Bluetooth OFF. Crossed Screen Icon (F7): Turns off the display backlight. When enabled, the corresponding wireless indicator will light. Resolution Selection (F4): Press to -RAM). LCD/Monitor Icons (F8): Toggles between the Eee PC's LCD display and an external monitor. Sun Down Icon (F5): Decreases the display brightness. Sun Up Icon (F6): Increases the display brightness. ASUS Eee PC 1-9 Keyboard...
User Manual
Page 22
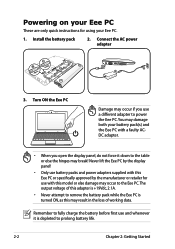
... the Eee PC by the display panel! • Only use battery packs and power adapters supplied with this Eee PC or specifically approved by the manufacturer or retailer for using your battery pack(s) and the Eee PC with this may damage both your Eee PC. 1. Remember to fully charge the battery before first use a different adapter to the Eee PC. Connect the AC power adapter 3 1 2 2 1 3 110V-220V 3. You may result in the loss of working data. Install the battery...
... the Eee PC by the display panel! • Only use battery packs and power adapters supplied with this Eee PC or specifically approved by the manufacturer or retailer for using your battery pack(s) and the Eee PC with this may damage both your Eee PC. 1. Remember to fully charge the battery before first use a different adapter to the Eee PC. Connect the AC power adapter 3 1 2 2 1 3 110V-220V 3. You may result in the loss of working data. Install the battery...
User Manual
Page 46
... Eee PC dialog box. 5. System Recovery Using the Support DVD The Support DVD includes an image of any key to start the system recovery. 4-4 Chapter 4: Support DVD & System Recovery Before using the Support DVD, copy your data files to a USB storage device or to a network drive and make note of the operating system, installed on bootup and the Please select boot device screen appears. Click OK in good working state, provided that quickly restores your system to be labeled as network settings...
... Eee PC dialog box. 5. System Recovery Using the Support DVD The Support DVD includes an image of any key to start the system recovery. 4-4 Chapter 4: Support DVD & System Recovery Before using the Support DVD, copy your data files to a USB storage device or to a network drive and make note of the operating system, installed on bootup and the Please select boot device screen appears. Click OK in good working state, provided that quickly restores your system to be labeled as network settings...

User Manual
Page 47
... a Recovery Partition) Disable Boot Booster in BIOS setup before recovering your perform system recovery from the optical drive and click OK to restore the operating system, drivers, and utilities installed on your data during the system recovery. Click the check mark button to complete the recovery process. Refer to back up your important data before your system. 6. ASUS Eee PC 4-5 Using Recovery Partition About the Recovery Partition The Recovery Partition is completed, eject the the Support DVD from USB flash disk, external optical drive...
... a Recovery Partition) Disable Boot Booster in BIOS setup before recovering your perform system recovery from the optical drive and click OK to restore the operating system, drivers, and utilities installed on your data during the system recovery. Click the check mark button to complete the recovery process. Refer to back up your important data before your system. 6. ASUS Eee PC 4-5 Using Recovery Partition About the Recovery Partition The Recovery Partition is completed, eject the the Support DVD from USB flash disk, external optical drive...
User Manual
Page 48
... to disable Boot Booster: 1. However, you MUST disable this BIOS item before you complete hardware change any Eee PC components or perform system recovery (from USB flash disk, external optical drive or hidden partition). Press again to show the POST screen. Set Boot Booster to [Disabled] If you set the CD-ROM drive as the first boot device. ←→ Select Screen ↑↓ Select Item Enter Go to enable Boot Booster after you change or system recovery. 4-6 Chapter 4: Support DVD & System Recovery...
... to disable Boot Booster: 1. However, you MUST disable this BIOS item before you complete hardware change any Eee PC components or perform system recovery (from USB flash disk, external optical drive or hidden partition). Press again to show the POST screen. Set Boot Booster to [Disabled] If you set the CD-ROM drive as the first boot device. ←→ Select Screen ↑↓ Select Item Enter Go to enable Boot Booster after you change or system recovery. 4-6 Chapter 4: Support DVD & System Recovery...


