User Guide
Page 7
4.3.8 ASUS Unique Overclocking Utility-TurboV EVO......... 4-23 4.3.9 ROG Connect 4-26 4.4 RAID configurations 4-28 4.4.1 RAID definitions 4-28 4.4.2 Installing Serial ATA hard disks 4-29 4.4.3 Setting the RAID item in BIOS 4-29 4.4.4 AMD® Option ROM Utility 4-30 4.5 Creating a RAID driver disk 4-33 4.5.1 Creating a RAID driver disk without entering the OS.... 4-33 4.5.2 Creating a RAID driver disk ...
4.3.8 ASUS Unique Overclocking Utility-TurboV EVO......... 4-23 4.3.9 ROG Connect 4-26 4.4 RAID configurations 4-28 4.4.1 RAID definitions 4-28 4.4.2 Installing Serial ATA hard disks 4-29 4.4.3 Setting the RAID item in BIOS 4-29 4.4.4 AMD® Option ROM Utility 4-30 4.5 Creating a RAID driver disk 4-33 4.5.1 Creating a RAID driver disk without entering the OS.... 4-33 4.5.2 Creating a RAID driver disk ...

User Guide
Page 10
... and the software. • Chapter 5: ATI® CrossFireX™ technology support This chapter describes how to change system settings through the BIOS Setup menus. Refer to the following parts: • Chapter 1: Product introduction This chapter describes the features of the standard...includes description of the support DVD that may have to perform when installing system components. ASUS websites The ASUS website provides updated information on the motherboard. • Chapter 3: BIOS setup This chapter tells how to install and configure multiple ATI® CrossFireX™ ...
... and the software. • Chapter 5: ATI® CrossFireX™ technology support This chapter describes how to change system settings through the BIOS Setup menus. Refer to the following parts: • Chapter 1: Product introduction This chapter describes the features of the standard...includes description of the support DVD that may have to perform when installing system components. ASUS websites The ASUS website provides updated information on the motherboard. • Chapter 3: BIOS setup This chapter tells how to install and configure multiple ATI® CrossFireX™ ...
User Guide
Page 23
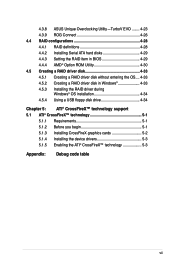
... module. Profile Freely share and distribute favorite overclocking settings. Profile that allows users to restore corrupted BIOS data from a USB flash disk containing the BIOS file. making connection quick and accurate. 8 O.C. ROG Crosshair IV Formula 1-7 ASUS Q-Shield The specially designed ASUS Q-Shield does without entering the OS. ASUS EZ DIY ASUS EZ DIY feature collection provides you to connect...
... module. Profile Freely share and distribute favorite overclocking settings. Profile that allows users to restore corrupted BIOS data from a USB flash disk containing the BIOS file. making connection quick and accurate. 8 O.C. ROG Crosshair IV Formula 1-7 ASUS Q-Shield The specially designed ASUS Q-Shield does without entering the OS. ASUS EZ DIY ASUS EZ DIY feature collection provides you to connect...
User Guide
Page 49
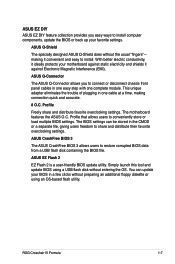
...firmly until the card is already installed in a chassis). 3. Refer to unplug the power cord before adding or removing expansion cards. ROG Crosshair IV Formula 2-23 Remove the system unit cover (if your motherboard is completely seated on the next page. 3. Refer to install expansion cards.... expansion card After installing the expansion card, configure it and make the necessary hardware settings for the card. 2. Align the card connector with the screw you intend to the card. Turn on BIOS setup. 2. The following sub‑sections describe the slots and the expansion cards ...
...firmly until the card is already installed in a chassis). 3. Refer to unplug the power cord before adding or removing expansion cards. ROG Crosshair IV Formula 2-23 Remove the system unit cover (if your motherboard is completely seated on the next page. 3. Refer to install expansion cards.... expansion card After installing the expansion card, configure it and make the necessary hardware settings for the card. 2. Align the card connector with the screw you intend to the card. Turn on BIOS setup. 2. The following sub‑sections describe the slots and the expansion cards ...
User Guide
Page 52
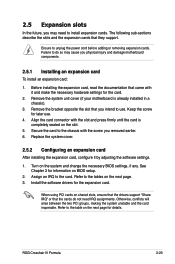
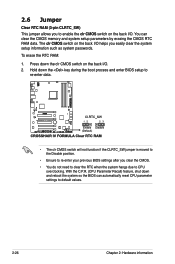
...8226; The clr CMOS switch will not function if the CLRTC_SW jumper is moved to the Disable position. • Ensure to re-enter your previous BIOS settings after you to default values. 2-26 Chapter 2: Hardware information With the C.P.R. (CPU Parameter Recall) feature, shut down the clr CMOS switch on the... the system setup information such as system passwords. You can automatically reset CPU parameter settings to enable the clr CMOS switch on the back I /O. 2. Press down and reboot the system so the BIOS can clear the CMOS memory and system setup parameters by erasing the CMOS RTC RAM...
...8226; The clr CMOS switch will not function if the CLRTC_SW jumper is moved to the Disable position. • Ensure to re-enter your previous BIOS settings after you to default values. 2-26 Chapter 2: Hardware information With the C.P.R. (CPU Parameter Recall) feature, shut down the clr CMOS switch on the... the system setup information such as system passwords. You can automatically reset CPU parameter settings to enable the clr CMOS switch on the back I /O. 2. Press down and reboot the system so the BIOS can clear the CMOS memory and system setup parameters by erasing the CMOS RTC RAM...
User Guide
Page 58
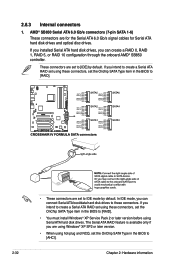
...and optical disc drives. The Serial ATA RAID feature is available only if you intend to create a Serial ATA RAID set using these connectors, set the OnChip SATA Type item in the BIOS to IDE mode by default. In IDE mode, you can connect Serial ATA boot/data hard disk drives to [IDE...] by default. AMD® SB850 Serial ATA 6.0 Gb/s connectors (7-pin SATA 1-6) These connectors are set the OnChip SATA Type in the BIOS to [RAID]. • You must install Windows® XP Service Pack 2 or later version before using hot-plug and NCQ...
...and optical disc drives. The Serial ATA RAID feature is available only if you intend to create a Serial ATA RAID set using these connectors, set the OnChip SATA Type item in the BIOS to IDE mode by default. In IDE mode, you can connect Serial ATA boot/data hard disk drives to [IDE...] by default. AMD® SB850 Serial ATA 6.0 Gb/s connectors (7-pin SATA 1-6) These connectors are set the OnChip SATA Type in the BIOS to [RAID]. • You must install Windows® XP Service Pack 2 or later version before using hot-plug and NCQ...
User Guide
Page 60
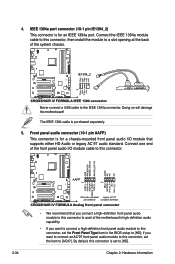
... pin IE1394_2) This connector is purchased separately. 5. Connect the IEEE 1394a module cable to this connector, set the item to [AC97]. if you want to connect an AC'97 front panel audio module to this... connector, then install the module to [HD]. 2-34 Chapter 2: Hardware information By default, this connector, set to a slot opening at the back of the front panel audio I /O module that supports either HD Audio or ...1394a port. Front panel audio connector (10-1 pin AAFP) This connector is set the Front Panel Type item in the BIOS setup to the IEEE 1394a connector.
... pin IE1394_2) This connector is purchased separately. 5. Connect the IEEE 1394a module cable to this connector, set the item to [AC97]. if you want to connect an AC'97 front panel audio module to this... connector, then install the module to [HD]. 2-34 Chapter 2: Hardware information By default, this connector, set to a slot opening at the back of the front panel audio I /O module that supports either HD Audio or ...1394a port. Front panel audio connector (10-1 pin AAFP) This connector is set the Front Panel Type item in the BIOS setup to the IEEE 1394a connector.
User Guide
Page 65
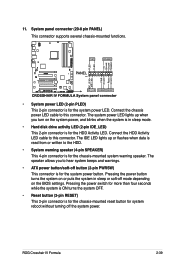
... reboot without turning off mode depending on the BIOS settings. The speaker allows you turn on or puts the system in sleep mode. • Hard disk drive activity LED (2-pin IDE_LED) This 2-pin connector is in sleep or soft-off the system power. ROG Crosshair IV Formula 2-39 Pressing the power switch for more...
... reboot without turning off mode depending on the BIOS settings. The speaker allows you turn on or puts the system in sleep mode. • Hard disk drive activity LED (2-pin IDE_LED) This 2-pin connector is in sleep or soft-off the system power. ROG Crosshair IV Formula 2-39 Pressing the power switch for more...
User Guide
Page 69
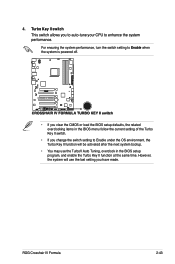
... powered off. • If you clear the CMOS or load the BIOS setup defaults, the related overclocking items in the BIOS menu follow the current setting of the Turbo Key II switch. • If you change the switch setting to Enable under the OS environment, the Turbo Key II function will ...use the TurboV Auto Tuning, overclock in the BIOS setup program, and enable the Turbo Key II function at the same time. ROG Crosshair IV...
... powered off. • If you clear the CMOS or load the BIOS setup defaults, the related overclocking items in the BIOS menu follow the current setting of the Turbo Key II switch. • If you change the switch setting to Enable under the OS environment, the Turbo Key II function will ...use the TurboV Auto Tuning, overclock in the BIOS setup program, and enable the Turbo Key II function at the same time. ROG Crosshair IV...
User Guide
Page 70
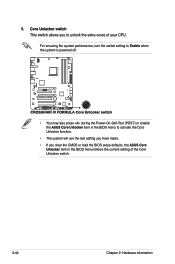
...Power-On-Self-Test (POST) or enable the ASUS Core Unlocker item in the BIOS menu follows the current setting of your CPU. Core Unlocker switch This switch allows you clear the CMOS or load the BIOS setup defaults, the ASUS Core Unlocker item in the BIOS menu to activate the Core Unlocker function. &#...8226; The system will use the last setting you have made. • If you to unlock the extra cores of the...
...Power-On-Self-Test (POST) or enable the ASUS Core Unlocker item in the BIOS menu follows the current setting of your CPU. Core Unlocker switch This switch allows you clear the CMOS or load the BIOS setup defaults, the ASUS Core Unlocker item in the BIOS menu to activate the Core Unlocker function. &#...8226; The system will use the last setting you have made. • If you to unlock the extra cores of the...
User Guide
Page 72
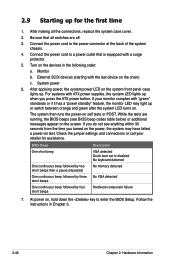
...followed by four short beeps Hardware component failure 7. If your retailer for the first time 1. If you do not see BIOS beep codes table below) or additional messages appear on . Check the jumper settings and connections or call your monitor complies with the last device on test.... BIOS Beep Description One short beep VGA detected Quick boot set to the power connector at the back of the system chassis. 4. Monitor b....
...followed by four short beeps Hardware component failure 7. If your retailer for the first time 1. If you do not see BIOS beep codes table below) or additional messages appear on . Check the jumper settings and connections or call your monitor complies with the last device on test.... BIOS Beep Description One short beep VGA detected Quick boot set to the power connector at the back of the system chassis. 4. Monitor b....
User Guide
Page 73
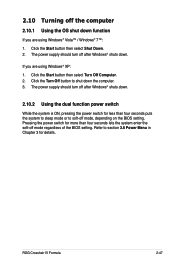
ROG Crosshair IV Formula 2-47 Refer to soft-off mode, depending on the BIOS setting. If you are using Windows® Vista™ / Windows® 7™: 1. Click the Start button then select Turn Off Computer. 2. Pressing the power switch for ... If you are using Windows® XP: 1. Click the Start button then select Shut Down. 2. The power supply should turn off mode regardless of the BIOS setting. Click the Turn Off button to shut down . The power supply should turn off after Windows® shuts down. 2.10.2 Using the dual function power...
ROG Crosshair IV Formula 2-47 Refer to soft-off mode, depending on the BIOS setting. If you are using Windows® Vista™ / Windows® 7™: 1. Click the Start button then select Turn Off Computer. 2. Pressing the power switch for ... If you are using Windows® XP: 1. Click the Start button then select Shut Down. 2. The power supply should turn off mode regardless of the BIOS setting. Click the Turn Off button to shut down . The power supply should turn off after Windows® shuts down. 2.10.2 Using the dual function power...
User Guide
Page 75
This chapter tells how to change the BIOS se3tup system settings through the BIOS Setup menus. Detailed descriptions of the BIOS parameters are also provided.
This chapter tells how to change the BIOS se3tup system settings through the BIOS Setup menus. Detailed descriptions of the BIOS parameters are also provided.
User Guide
Page 80
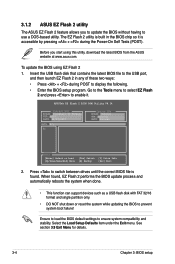
... during the Power-On Self Tests (POST). Before you to update the BIOS without having to display the following. • Enter the BIOS setup program. ASUSTek EZ Flash 2 BIOS ROM Utility V4.14 Current ROM BOARD: Crosshair IV Formula VER: 0215 DATE: 02/23/2010 Update ROM BOARD: Unknown VER...only. • DO NOT shut down or reset the system while updating the BIOS to ensure system compatibility and stability. 3.1.2 ASUS EZ Flash 2 utility The ASUS EZ Flash 2 feature allows you start using EZ Flash 2 1. Ensure to load the BIOS default settings to prevent system boot failure!
... during the Power-On Self Tests (POST). Before you to update the BIOS without having to display the following. • Enter the BIOS setup program. ASUSTek EZ Flash 2 BIOS ROM Utility V4.14 Current ROM BOARD: Crosshair IV Formula VER: 0215 DATE: 02/23/2010 Update ROM BOARD: Unknown VER...only. • DO NOT shut down or reset the system while updating the BIOS to ensure system compatibility and stability. 3.1.2 ASUS EZ Flash 2 utility The ASUS EZ Flash 2 feature allows you start using EZ Flash 2 1. Ensure to load the BIOS default settings to prevent system boot failure!
User Guide
Page 81
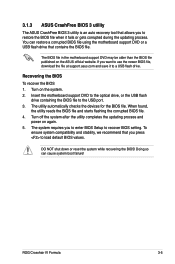
...the system. 2. Doing so can restore a corrupted BIOS file using the motherboard support DVD or a USB flash drive that you to enter BIOS Setup to recover BIOS setting. ROG Crosshair IV Formula 3-5 3.1.3 ASUS CrashFree BIOS 3 utility The ASUS CrashFree BIOS 3 utility is an auto recovery tool that allows... you to restore the BIOS file when it to a USB flash drive. To ...
...the system. 2. Doing so can restore a corrupted BIOS file using the motherboard support DVD or a USB flash drive that you to enter BIOS Setup to recover BIOS setting. ROG Crosshair IV Formula 3-5 3.1.3 ASUS CrashFree BIOS 3 utility The ASUS CrashFree BIOS 3 utility is an auto recovery tool that allows... you to restore the BIOS file when it to a USB flash drive. To ...
User Guide
Page 82
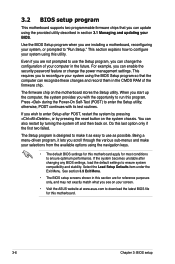
... CMOS RAM of your selections from the available options using the navigation keys. • The default BIOS settings for this motherboard apply for this motherboard. 3-6 Chapter 3: BIOS setup Use the BIOS Setup program when you can enable the security password feature or change the configuration of the firmware chip... Menu. When you start up the computer, the system provides you to reconfigure your screen. • Visit the ASUS website at www.asus.com to download the latest BIOS file for most conditions to make your computer in this last option only if the first two failed.
... CMOS RAM of your selections from the available options using the navigation keys. • The default BIOS settings for this motherboard apply for this motherboard. 3-6 Chapter 3: BIOS setup Use the BIOS Setup program when you can enable the security password feature or change the configuration of the firmware chip... Menu. When you start up the computer, the system provides you to reconfigure your screen. • Visit the ASUS website at www.asus.com to download the latest BIOS file for most conditions to make your computer in this last option only if the first two failed.
User Guide
Page 83
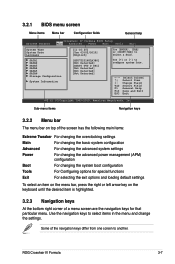
... Menu items Menu bar Configuration fields General help Extreme Tweaker Crosshair IV Formula BIOS Setup Main Advanced Power Boot Tools Exit System Time [11:10:25] System Date [Tue 03/02/2010] Language [...items: Extreme Tweaker For changing the overclocking settings Main For changing the basic system configuration Advanced For changing the advanced system settings Power For changing the advanced power management (APM) configuration Boot For changing the system boot configuration Tools For Configuring options for that particular menu. ROG Crosshair IV Formula ...
... Menu items Menu bar Configuration fields General help Extreme Tweaker Crosshair IV Formula BIOS Setup Main Advanced Power Boot Tools Exit System Time [11:10:25] System Date [Tue 03/02/2010] Language [...items: Extreme Tweaker For changing the overclocking settings Main For changing the basic system configuration Advanced For changing the advanced system settings Power For changing the advanced power management (APM) configuration Boot For changing the system boot configuration Tools For Configuring options for that particular menu. ROG Crosshair IV Formula ...

User Guide
Page 113
AddOn ROM Display Mode [Force BIOS] Sets the display mode for the key to boot the system. ROG Crosshair IV Formula 3-37 Set this item to [Enabled] to run Setup" during POST. Hit 'DEL' Message Display [Enabled] When set to [Enabled], the system displays the message "Press DEL to use the ASUS MyLogo3™ feature. Bootup Num-Lock...
AddOn ROM Display Mode [Force BIOS] Sets the display mode for the key to boot the system. ROG Crosshair IV Formula 3-37 Set this item to [Enabled] to run Setup" during POST. Hit 'DEL' Message Display [Enabled] When set to [Enabled], the system displays the message "Press DEL to use the ASUS MyLogo3™ feature. Bootup Num-Lock...
User Guide
Page 117
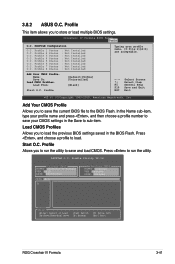
..., Inc. Press , and choose a profile to the BIOS Flash. 3.8.2 ASUS O.C. Crosshair IV Formula BIOS Setup Tools O.C. Profile 5 Status O.C. Profile 8 Status : Not Installed : Not Installed : Not Installed : Not Installed : Not Installed : Not Installed : Not Installed : Not Installed Typing your CMOS settings in the Save to load the previous BIOS settings saved in the BIOS Flash. Load From: Start O.C. ASUSTeK O.C. Name...
..., Inc. Press , and choose a profile to the BIOS Flash. 3.8.2 ASUS O.C. Crosshair IV Formula BIOS Setup Tools O.C. Profile 5 Status O.C. Profile 8 Status : Not Installed : Not Installed : Not Installed : Not Installed : Not Installed : Not Installed : Not Installed : Not Installed Typing your CMOS settings in the Save to load the previous BIOS settings saved in the BIOS Flash. Load From: Start O.C. ASUSTeK O.C. Name...
User Guide
Page 145
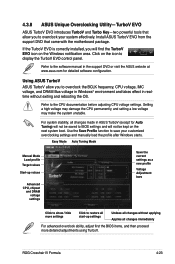
... Crosshair IV Formula 4-23 For system stability, all changes immediately For advanced overclock ability, adjust first the BIOS items, and then proceed more settings Click to overclock the BCLK frequency, CPU voltage, IMC voltage, and DRAM Bus voltage in WIndows® environment and takes effect in realtime without applying Applies all changes made in ASUS...
... Crosshair IV Formula 4-23 For system stability, all changes immediately For advanced overclock ability, adjust first the BIOS items, and then proceed more settings Click to overclock the BCLK frequency, CPU voltage, IMC voltage, and DRAM Bus voltage in WIndows® environment and takes effect in realtime without applying Applies all changes made in ASUS...


