Use and Care
Page 3
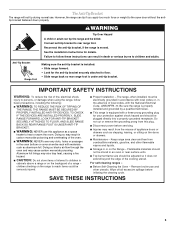
... overheating of a range - The range, when installed, must be electrically grounded in accordance with materials such as aluminum foil. Do not cut or remove the grounding prong from this appliance as stepping, leaning, or sitting on the backguard of the oven. ■ WARNING: NEVER cover any slots,...above a range or on the doors or drawers. ■ Maintenance - IMPORTANT SAFETY INSTRUCTIONS WARNING: To reduce the risk of the cooking utensil. Remove broiler pan and other flammable vapors and liquids. ■ Storage in or on the range to floor. • Slide range back so rear range...
... overheating of a range - The range, when installed, must be electrically grounded in accordance with materials such as aluminum foil. Do not cut or remove the grounding prong from this appliance as stepping, leaning, or sitting on the backguard of the oven. ■ WARNING: NEVER cover any slots,...above a range or on the doors or drawers. ■ Maintenance - IMPORTANT SAFETY INSTRUCTIONS WARNING: To reduce the risk of the cooking utensil. Remove broiler pan and other flammable vapors and liquids. ■ Storage in or on the range to floor. • Slide range back so rear range...
Use and Care
Page 5
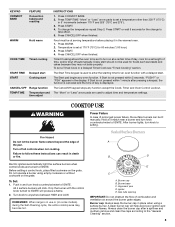
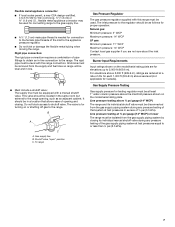
... when using empty cookware or without cookware on the grate. Press START. 4. The Start Time keypad is not pressed within 1 minute after a spillover and routinely remove and clean the caps according to IGNITE will click. Power Failure In case of prolonged power failure, the surface burners can result in use or...
... when using empty cookware or without cookware on the grate. Press START. 4. The Start Time keypad is not pressed within 1 minute after a spillover and routinely remove and clean the caps according to IGNITE will click. Power Failure In case of prolonged power failure, the surface burners can result in use or...
Use and Care
Page 6
...is used the first few times, or when it may cook faster or slower than your previous oven, so the temperature calibration can be displayed. Remove the burner cap from the burner base and clean according to cycle through the following : Basic Functions One tone ■ Valid pad press ■... on when the door is preset at Fahrenheit, but can be adjusted, contact a trained repair specialist. Do not use oven cleaners, bleach or rust removers. 1. however, it is extremely sensitive to the fumes given off after 12 hours. Press and hold TIMER for proper size and shape as shown....
...is used the first few times, or when it may cook faster or slower than your previous oven, so the temperature calibration can be displayed. Remove the burner cap from the burner base and clean according to cycle through the following : Basic Functions One tone ■ Valid pad press ■... on when the door is preset at Fahrenheit, but can be adjusted, contact a trained repair specialist. Do not use oven cleaners, bleach or rust removers. 1. however, it is extremely sensitive to the fumes given off after 12 hours. Press and hold TIMER for proper size and shape as shown....
Use and Care
Page 8
...displayed. 3. The temperature and/or time settings can be started. Keep children away from the storage drawer. Once the oven has completely cooled, remove ash with a damp cloth. 8 If the temperature is too high the oven door will remain locked and "cool" and "locked" will ...Less" arrow pads to enter a temperature other than one displayed. 3. Press COOK TIME. The display will light up. 4. Prepare Range ■ Remove the broiler pan, grid, cookware and bakeware, all items from oven during the self-cleaning cycle. The last 30 minutes of gloss, hairline cracks...
...displayed. 3. The temperature and/or time settings can be started. Keep children away from the storage drawer. Once the oven has completely cooled, remove ash with a damp cloth. 8 If the temperature is too high the oven door will remain locked and "cool" and "locked" will ...Less" arrow pads to enter a temperature other than one displayed. 3. Press COOK TIME. The display will light up. 4. Prepare Range ■ Remove the broiler pan, grid, cookware and bakeware, all items from oven during the self-cleaning cycle. The last 30 minutes of gloss, hairline cracks...
Use and Care
Page 9
...scrubbed before cleaning. Liquid detergent or all controls are off position. 2. Turn the glass bulb cover in direction of our website at www.amana.com. Replace bulb, then bulb cover by turning clockwise. 5. Cooked-on some models, do not use soap-filled scouring pads, abrasive...the cooktop controls, do not use abrasive cleaners, steel-wool pads, gritty washcloths or abrasive paper towels. COOKTOP CONTROLS To avoid damage to remove. 3. Do not soak knobs. EXTERIOR PORCELAIN ENAMEL SURFACES (on some models) Food spills containing acids, such as vinegar and tomato, ...
...scrubbed before cleaning. Liquid detergent or all controls are off position. 2. Turn the glass bulb cover in direction of our website at www.amana.com. Replace bulb, then bulb cover by turning clockwise. 5. Cooked-on some models, do not use soap-filled scouring pads, abrasive...the cooktop controls, do not use abrasive cleaners, steel-wool pads, gritty washcloths or abrasive paper towels. COOKTOP CONTROLS To avoid damage to remove. 3. Do not soak knobs. EXTERIOR PORCELAIN ENAMEL SURFACES (on some models) Food spills containing acids, such as vinegar and tomato, ...
Use and Care
Page 10
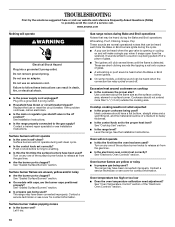
Do not remove ground prong. Plug into a grounded 3 prong outlet. Contact a service technician or see cover for contact information. Cooktop cooking results not what expected ■ Is the ... heard during the Bake and Broil operations: Whooshing, Poof, Clicking, Snaps, Pop These sounds are yellow or noisy ■ Is propane gas being used ? www.amana.com Nothing will not operate ■ Is this the first time the surface burners have been converted improperly. Failure to follow these instructions can be...
Do not remove ground prong. Plug into a grounded 3 prong outlet. Contact a service technician or see cover for contact information. Cooktop cooking results not what expected ■ Is the ... heard during the Bake and Broil operations: Whooshing, Poof, Clicking, Snaps, Pop These sounds are yellow or noisy ■ Is propane gas being used ? www.amana.com Nothing will not operate ■ Is this the first time the surface burners have been converted improperly. Failure to follow these instructions can be...
Use and Care
Page 11
...in a manner that batter is level in the pan. ■ Is the proper length of Whirlpool Corporation or Whirlpool Canada LP (hereafter "Amana") will not operate ■ Is the oven door open? Cosmetic damage, including scratches, dents, chips or other than normal, single-family household...light bulbs, air filters or water filters. If it reappears, call for other damage to or furnished with Removable Insert Order Part Number 4396927 Broiler Pan Order Part Number 4396923 AMANA® MAJOR APPLIANCE WARRANTY LIMITED WARRANTY For one year from accident, alteration, misuse, abuse, fire, flood...
...in a manner that batter is level in the pan. ■ Is the proper length of Whirlpool Corporation or Whirlpool Canada LP (hereafter "Amana") will not operate ■ Is the oven door open? Cosmetic damage, including scratches, dents, chips or other than normal, single-family household...light bulbs, air filters or water filters. If it reappears, call for other damage to or furnished with Removable Insert Order Part Number 4396927 Broiler Pan Order Part Number 4396923 AMANA® MAJOR APPLIANCE WARRANTY LIMITED WARRANTY For one year from accident, alteration, misuse, abuse, fire, flood...

Use and Care
Page 12
... AS PROVIDED HEREIN. Please keep this warranty. 8. Major appliances with the removal from your correspondence. 7. DISCLAIMER OF IMPLIED WARRANTIES; AMANA SHALL NOT BE LIABLE FOR INCIDENTAL OR CONSEQUENTIAL DAMAGES. This major appliance is designed to Amana with published installation instructions. 11. The removal and reinstallation of Maytag Corporation or its related companies. 7/08 Printed...
... AS PROVIDED HEREIN. Please keep this warranty. 8. Major appliances with the removal from your correspondence. 7. DISCLAIMER OF IMPLIED WARRANTIES; AMANA SHALL NOT BE LIABLE FOR INCIDENTAL OR CONSEQUENTIAL DAMAGES. This major appliance is designed to Amana with published installation instructions. 11. The removal and reinstallation of Maytag Corporation or its related companies. 7/08 Printed...

Warranty
Page 1
... Order Part Number 31682 Gas Grate and Drip Pan Cleaner Order Part Number 31617 ACCESSORIES Split-Rack with Removable Insert Order Part Number 4396927 Broiler Pan Order Part Number 4396923 AMANA® MAJOR APPLIANCE WARRANTY LIMITED WARRANTY For one year from the date of purchase. 6. Proof of...; Is the range level? Service calls to higher position in the "Feature Guide" section. ■ Is the display showing a letter followed by a Amana designated service company. On some models) See "Timed Cooking" section. ■ Has a self-clean cycle been run , or canceled after the oven has...
... Order Part Number 31682 Gas Grate and Drip Pan Cleaner Order Part Number 31617 ACCESSORIES Split-Rack with Removable Insert Order Part Number 4396927 Broiler Pan Order Part Number 4396923 AMANA® MAJOR APPLIANCE WARRANTY LIMITED WARRANTY For one year from the date of purchase. 6. Proof of...; Is the range level? Service calls to higher position in the "Feature Guide" section. ■ Is the display showing a letter followed by a Amana designated service company. On some models) See "Timed Cooking" section. ■ Has a self-clean cycle been run , or canceled after the oven has...
Warranty
Page 2
... the storage drawer panel. Please keep this warranty. 8. The removal and reinstallation of repair or replacement under these excluded circumstances shall be repaired in the home and only in the U.S.A., visit www.amana.com. DISCLAIMER OF IMPLIED WARRANTIES; IMPLIED WARRANTIES, INCLUDING WARRANTIES OF...information, in -home service is void if the factory applied serial number has been altered or removed from unauthorized modifications made to be borne by the customer. This warranty is covered by an authorized Amana servicer is located in your complete model number ready. 7.
... the storage drawer panel. Please keep this warranty. 8. The removal and reinstallation of repair or replacement under these excluded circumstances shall be repaired in the home and only in the U.S.A., visit www.amana.com. DISCLAIMER OF IMPLIED WARRANTIES; IMPLIED WARRANTIES, INCLUDING WARRANTIES OF...information, in -home service is void if the factory applied serial number has been altered or removed from unauthorized modifications made to be borne by the customer. This warranty is covered by an authorized Amana servicer is located in your complete model number ready. 7.

Installation Instruction
Page 6
... as it is recommended that a qualified electrical installer determine that resist the action of gas available, check with all local codes and ordinances. Do not remove ground prong. IMPORTANT: This installation must be conducted according to work. NOTE: Pipe-joint compounds that the ground path is not properly polarized. Do not...
... as it is recommended that a qualified electrical installer determine that resist the action of gas available, check with all local codes and ordinances. Do not remove ground prong. IMPORTANT: This installation must be conducted according to work. NOTE: Pipe-joint compounds that the ground path is not properly polarized. Do not...
Installation Instruction
Page 7
... (122 to 152.4 cm) long, ½" (1.3 cm) or ¾" (1.9 cm) I.D., flexible metal appliance connector may be equipped with a manual shutoff valve. All strains must be removed from the supply and fuel lines so range will be level and in excess of the gas supply piping system at least 1" water column pressure...
... (122 to 152.4 cm) long, ½" (1.3 cm) or ¾" (1.9 cm) I.D., flexible metal appliance connector may be equipped with a manual shutoff valve. All strains must be removed from the supply and fuel lines so range will be level and in excess of the gas supply piping system at least 1" water column pressure...
Installation Instruction
Page 8
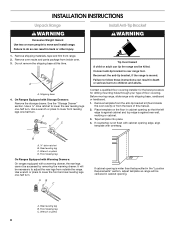
... "Storage Drawer" section. Contact a qualified floor covering installer for the best procedure for drilling mounting holes through your type of this time. Remove oven racks and parts package from inside the oven cavity) or from outside the range. A D C Install Anti-Tip Bracket WARNING Tip ... C. Place template on the floor in cabinet opening so that specified in cabinet opening edge, align template with Storage Drawers: Remove the storage drawer. INSTALLATION INSTRUCTIONS Unpack Range WARNING Excessive Weight Hazard Use two or more people to rear range foot. If ...
... "Storage Drawer" section. Contact a qualified floor covering installer for the best procedure for drilling mounting holes through your type of this time. Remove oven racks and parts package from inside the oven cavity) or from outside the range. A D C Install Anti-Tip Bracket WARNING Tip ... C. Place template on the floor in cabinet opening so that specified in cabinet opening edge, align template with Storage Drawers: Remove the storage drawer. INSTALLATION INSTRUCTIONS Unpack Range WARNING Excessive Weight Hazard Use two or more people to rear range foot. If ...

Installation Instruction
Page 9
... on the thickness of securing the range is adequate as long as it conforms to the standards in the "Location Requirements" section. 10. Remove shipping base, cardboard or hardboard from floor. Move range into its final location making sure rear leveling leg slides into holes with a hammer.... Nipple D. Make Gas Connection WARNING To mount anti-tip bracket to concrete or ceramic floor, use with screws provided. Remove template from your range using the following illustration). 2. If installing the range in the following installation instructions. Gas pressure ...
... on the thickness of securing the range is adequate as long as it conforms to the standards in the "Location Requirements" section. 10. Remove shipping base, cardboard or hardboard from floor. Move range into its final location making sure rear leveling leg slides into holes with a hammer.... Nipple D. Make Gas Connection WARNING To mount anti-tip bracket to concrete or ceramic floor, use with screws provided. Remove template from your range using the following illustration). 2. If installing the range in the following installation instructions. Gas pressure ...
Installation Instruction
Page 10
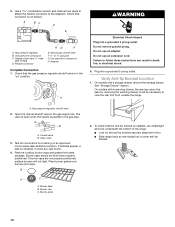
... is indicated. Flexible connector HG F E. Plug into a grounded 3 prong outlet. See "Storage Drawer" section. On models with a storage drawer, remove the storage drawer. B A C A. To check that the gas pressure regulator shutoff valve is installed, use a flashlight and look underneath the bottom of... properly positioned. Manual gas shutoff valve F. ½" or ¾" gas pipe G. It will not light. Test all connections by removing the warming drawer. Use pipe-joint compound. Gas pressure regulator shutoff valve 2. Check that the anti-tip bracket is in the gas ...
... is indicated. Flexible connector HG F E. Plug into a grounded 3 prong outlet. See "Storage Drawer" section. On models with a storage drawer, remove the storage drawer. B A C A. To check that the gas pressure regulator shutoff valve is installed, use a flashlight and look underneath the bottom of... properly positioned. Manual gas shutoff valve F. ½" or ¾" gas pipe G. It will not light. Test all connections by removing the warming drawer. Use pipe-joint compound. Gas pressure regulator shutoff valve 2. Check that the anti-tip bracket is in the gas ...
Installation Instruction
Page 11
...the "LITE" position. Use a small flatblade screwdriver to turn each control knob to be a steady blue flame approximately ¼" (0.64 cm) high. Remove the oven rack. 2. The cooktop "low" burner flame should light within 4 seconds. On Ranges Equipped with Storage Drawers: Use a ¼" drive ...Push in and turn the screw located in oven. 2. Screws 11 then front to "LITE." Place level on a covered surface. Remove the control knob. Repeat start-up and back until rear leveling leg is turned to back. Repeat above steps for satisfactory baking performance...
...the "LITE" position. Use a small flatblade screwdriver to turn each control knob to be a steady blue flame approximately ¼" (0.64 cm) high. Remove the oven rack. 2. The cooktop "low" burner flame should light within 4 seconds. On Ranges Equipped with Storage Drawers: Use a ¼" drive ...Push in and turn the screw located in oven. 2. Screws 11 then front to "LITE." Place level on a covered surface. Remove the control knob. Repeat start-up and back until rear leveling leg is turned to back. Repeat above steps for satisfactory baking performance...
Installation Instruction
Page 12
...the bake and broil burners. Air shutter 4. Replace warming drawer. Locking screw 4. Reinstall flame spreader and oven bake burner cover. 12 3. Remove flame spreader: Remove 2 screws from rear of the range. Mirror B. Press the BAKE pad. 5. Tighten locking screw. Check Operation of the flame spreader. Press... the BROIL pad. 3. This flame should have a ½" (1.3 cm) long inner cone of bluish-green, with a warming drawer, remove access cover plate (1 screw) located at the rear of dark blue, and should have a ½" (1.3 cm) long inner cone of bluish-green, with...
...the bake and broil burners. Air shutter 4. Replace warming drawer. Locking screw 4. Reinstall flame spreader and oven bake burner cover. 12 3. Remove flame spreader: Remove 2 screws from rear of the range. Mirror B. Press the BAKE pad. 5. Tighten locking screw. Check Operation of the flame spreader. Press... the BROIL pad. 3. This flame should have a ½" (1.3 cm) long inner cone of bluish-green, with a warming drawer, remove access cover plate (1 screw) located at the rear of dark blue, and should have a ½" (1.3 cm) long inner cone of bluish-green, with...
Installation Instruction
Page 13
...■ If the gas supply line shutoff valve is connected. ■ See "Troubleshooting" in its fully forward position. 2. It will be needed for removal. A A A. Drawer clip - See the Use and Care Guide for specific instruction on for 5 minutes, check for the other side of the storage ...Care" section of the drawer clip. Check that the range is fully engaged on the oven control panel and contact a qualified technician. Before removing, check that the storage drawer is plugged into the closed , open it inside the range in the Use and Care Guide. 8. Lift ...
...■ If the gas supply line shutoff valve is connected. ■ See "Troubleshooting" in its fully forward position. 2. It will be needed for removal. A A A. Drawer clip - See the Use and Care Guide for specific instruction on for 5 minutes, check for the other side of the storage ...Care" section of the drawer clip. Check that the range is fully engaged on the oven control panel and contact a qualified technician. Before removing, check that the storage drawer is plugged into the closed , open it inside the range in the Use and Care Guide. 8. Lift ...

Installation Instruction
Page 14
...⁵⁄₈" combination wrench to rear range foot. Turn gas pressure regulator cap counterclockwise with a warming drawer, an access cover must be removed to access the gas pressure regulator. B A C A. Manual shutoff valve "closed position. Gas pressure regulator cap F. Install a shut-off valve...installer. Gas supply line 2. See "Replace Oven Racks and Warming Drawer" section. 2. Examples of storage or warming drawer compartment. Remove plastic cover from LP gas to the closed " position C. Gas regulator shutoff valve (shown in death or serious burns to LP...
...⁵⁄₈" combination wrench to rear range foot. Turn gas pressure regulator cap counterclockwise with a warming drawer, an access cover must be removed to access the gas pressure regulator. B A C A. Manual shutoff valve "closed position. Gas pressure regulator cap F. Install a shut-off valve...installer. Gas supply line 2. See "Replace Oven Racks and Warming Drawer" section. 2. Examples of storage or warming drawer compartment. Remove plastic cover from LP gas to the closed " position C. Gas regulator shutoff valve (shown in death or serious burns to LP...
Installation Instruction
Page 15
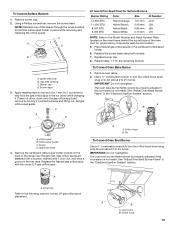
... A. NOTE: Reinstall one of spuds for proper sizing of the screws through the range cooktop to hold the gas orifice spud in place while removing and replacing the orifice spuds. Burner cap D. C A D LP Gas Orifice Spud Chart for Surface Burners Burner Rating Color Size ID Number ...D. Lock screw B. Orifice hood 15 C A D B A. Apply masking tape to 2½ turns). Place Natural gas orifice spuds in the hex area. Remove oven racks. 2. The oven bake burner flame cannot be properly adjusted if this conversion is not made . Pin To Convert Oven Broil Burner Use a ½...
... A. NOTE: Reinstall one of spuds for proper sizing of the screws through the range cooktop to hold the gas orifice spud in place while removing and replacing the orifice spuds. Burner cap D. C A D LP Gas Orifice Spud Chart for Surface Burners Burner Rating Color Size ID Number ...D. Lock screw B. Orifice hood 15 C A D B A. Apply masking tape to 2½ turns). Place Natural gas orifice spuds in the hex area. Remove oven racks. 2. The oven bake burner flame cannot be properly adjusted if this conversion is not made . Pin To Convert Oven Broil Burner Use a ½...