Specifications Sheet
Page 2
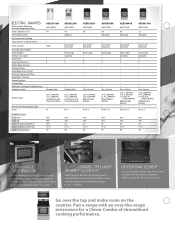
...-Large . 2 5 Glass-Ceramic (2) 6", 1,200-Watt (2) 10", 2,500-Watt Ribbon Radiant Elements . GLASS-CERAMIC SPILLSAVER™ UPSWEPT COOKTOP Spills happen. HIDDEN BAKE ELEMENT It's out of the oven. Pair a range with an over the top and make room on this smooth-surface... (2) 6", 1,500-Watt (2) 8", 2,600-Watt Coil Elements with Timer Keep Warm™ Setting Control Lockout Custom Broil Spillsaver™ Upswept Cooktop Design Cooktop Surface AER3311WA AMV1160VA 4.8 . Knob 2 5 • • Porcelain-Steel AER5522VA AMV1160VA 4.8 High/Low . Easy Touch Electronic . Porcelain...
...-Large . 2 5 Glass-Ceramic (2) 6", 1,200-Watt (2) 10", 2,500-Watt Ribbon Radiant Elements . GLASS-CERAMIC SPILLSAVER™ UPSWEPT COOKTOP Spills happen. HIDDEN BAKE ELEMENT It's out of the oven. Pair a range with an over the top and make room on this smooth-surface... (2) 6", 1,500-Watt (2) 8", 2,600-Watt Coil Elements with Timer Keep Warm™ Setting Control Lockout Custom Broil Spillsaver™ Upswept Cooktop Design Cooktop Surface AER3311WA AMV1160VA 4.8 . Knob 2 5 • • Porcelain-Steel AER5522VA AMV1160VA 4.8 High/Low . Easy Touch Electronic . Porcelain...
Specifications Sheet
Page 3
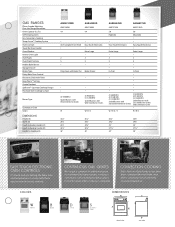
... Sealed Burners with Timer Keep Warm™ Setting Control Lockout Spillsaver™ Upswept Cooktop Design Porcelain Steel Cooktop Surface Burner Type Continuous Grate Colors DIMENSIONS Height (A) Width (B) Depth Excluding Handle (C) Depth Including Handle (D) Height to Cooktop (E) AGR3311WD AMV1160VA 4.4 AGR4433XD AMV1160VA 4.4 . An additional grate fits between the ... BTU Sealed Burners with Wire Steel Burner Grates . . (3) 9,500 BTU (1) 11,500 BTU Sealed Burners with Wire Steel Burner Grates W W / B / S AGR5844VD AGR6011VD AMV2174VA AMV2174VA 5.0 High/Low . 5.0 Adjustable . .
... Sealed Burners with Timer Keep Warm™ Setting Control Lockout Spillsaver™ Upswept Cooktop Design Porcelain Steel Cooktop Surface Burner Type Continuous Grate Colors DIMENSIONS Height (A) Width (B) Depth Excluding Handle (C) Depth Including Handle (D) Height to Cooktop (E) AGR3311WD AMV1160VA 4.4 AGR4433XD AMV1160VA 4.4 . An additional grate fits between the ... BTU Sealed Burners with Wire Steel Burner Grates . . (3) 9,500 BTU (1) 11,500 BTU Sealed Burners with Wire Steel Burner Grates W W / B / S AGR5844VD AGR6011VD AMV2174VA AMV2174VA 5.0 High/Low . 5.0 Adjustable . .
Specifications Sheet
Page 4
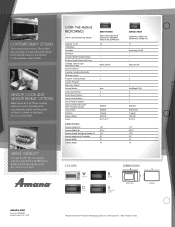
... Silver B Black S Stainless Steel DIMENSIONS FRONT VIEW SIDE VIEW amana.com Form No. ft.) 1,000 Watts Turntable Wire Rack Scrolling Word Prompt Display 24-Hour Digital Clock with Timer Cooktop Surface Light with Timer Delay Control Lockout Cooking Complete Reminder 10 ... 5 8206230 8206229 2-Speed 220 CFM W / B / D / S 171⁄4" 2915 ⁄16" 157⁄16" 91⁄2" 21" 14" AMV2174VA AER5844VA, AER6011VA AGR5844VD, AGR6011VD 1.7 . AC090220 Printed in a 9" x 13" dish. High/Low/Off . . . 3 . . LARGE CAPACITY It's a perfect fit. All rights reserved. OVER-THE-RANGE MICROWAVES...
... Silver B Black S Stainless Steel DIMENSIONS FRONT VIEW SIDE VIEW amana.com Form No. ft.) 1,000 Watts Turntable Wire Rack Scrolling Word Prompt Display 24-Hour Digital Clock with Timer Cooktop Surface Light with Timer Delay Control Lockout Cooking Complete Reminder 10 ... 5 8206230 8206229 2-Speed 220 CFM W / B / D / S 171⁄4" 2915 ⁄16" 157⁄16" 91⁄2" 21" 14" AMV2174VA AER5844VA, AER6011VA AGR5844VD, AGR6011VD 1.7 . AC090220 Printed in a 9" x 13" dish. High/Low/Off . . . 3 . . LARGE CAPACITY It's a perfect fit. All rights reserved. OVER-THE-RANGE MICROWAVES...
Use and Care
Page 1
...ñol, o para obtener información adicional acerca de su producto, visite: www.amana.com Tenga listo su número de modelo completo. Table of Contents RANGE SAFETY 2 The Anti-Tip Bracket 3 FEATURE GUIDE 4 COOKTOP USE 5 Sealed Surface Burners 5 OVEN USE 6 Electronic Oven Controls 6 Aluminum Foil 7 ...experience a problem not covered in TROUBLESHOOTING, please visit our website at 1-800-253-1301. You will need assistance, call us at www.amana.com for purchasing this high-quality product. Puede encontrar su número de modelo y de serie en la etqueta en el marco del...
...ñol, o para obtener información adicional acerca de su producto, visite: www.amana.com Tenga listo su número de modelo completo. Table of Contents RANGE SAFETY 2 The Anti-Tip Bracket 3 FEATURE GUIDE 4 COOKTOP USE 5 Sealed Surface Burners 5 OVEN USE 6 Electronic Oven Controls 6 Aluminum Foil 7 ...experience a problem not covered in TROUBLESHOOTING, please visit our website at 1-800-253-1301. You will need assistance, call us at www.amana.com for purchasing this high-quality product. Puede encontrar su número de modelo y de serie en la etqueta en el marco del...
Use and Care
Page 5
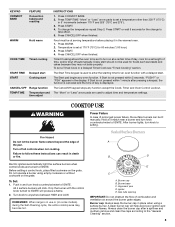
... to turn knob counterclockwise to set at 170°F (75°C) for a set a Timed Cook or a Delayed Timed Cook see "Timed Cooking" section. COOKTOP USE WARNING Fire Hazard Do not let the burner flame extend beyond the edge of combustion and ventilation air around the burner grate edges. To... TEMP/TIME "More" or "Less" arrow pads to IGNITE. If Start is in and turn on some models) during the Self-Cleaning cycle, the entire cooktop area may not bake properly. E C A. Timed Cooking allows the oven to anywhere between 170°F and 525° (75°C and 275°). 3....
... to turn knob counterclockwise to set at 170°F (75°C) for a set a Timed Cook or a Delayed Timed Cook see "Timed Cooking" section. COOKTOP USE WARNING Fire Hazard Do not let the burner flame extend beyond the edge of combustion and ventilation air around the burner grate edges. To... TEMP/TIME "More" or "Less" arrow pads to IGNITE. If Start is in and turn on some models) during the Self-Cleaning cycle, the entire cooktop area may not bake properly. E C A. Timed Cooking allows the oven to anywhere between 170°F and 525° (75°C and 275°). 3....
Use and Care
Page 6
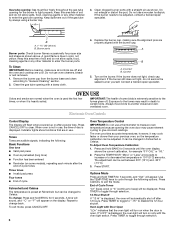
... will turn on some birds is displayed. Keep this area free of day is extremely sensitive to the fumes given off and the oven and cooktop are in death to certain birds. B A. 1-1¹⁄₂" (25-38 mm) B. Correct 5. Electronic Oven Controls Control Display The display will be adjusted. It can...
... will turn on some birds is displayed. Keep this area free of day is extremely sensitive to the fumes given off and the oven and cooktop are in death to certain birds. B A. 1-1¹⁄₂" (25-38 mm) B. Correct 5. Electronic Oven Controls Control Display The display will be adjusted. It can...
Use and Care
Page 8
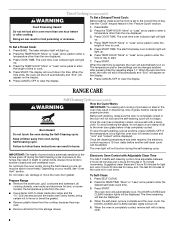
... COOK TIME. Press START. Press the TEMP/HOUR "More" or "Less" arrow pads to move or bend the gasket. ■ Remove plastic items from the cooktop because they may melt. ■ Remove all items from oven during Self-Cleaning cycle. When the set to enter a temperature other than one displayed. 3. See...
... COOK TIME. Press START. Press the TEMP/HOUR "More" or "Less" arrow pads to move or bend the gasket. ■ Remove plastic items from the cooktop because they may melt. ■ Remove all items from oven during Self-Cleaning cycle. When the set to enter a temperature other than one displayed. 3. See...
Use and Care
Page 9
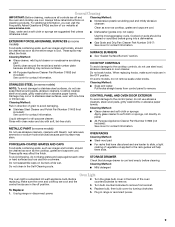
... cover for contact information. Do not reassemble caps on cleaning products. Cleaning Method: Rub in direction of our website at www.amana.com. METALLIC PAINT (on soils should be soaked or scrubbed before cleaning. Before replacing, make sure all -purpose cleaner: Rinse...Gas Grate and Drip Pan Cleaner Part Number 31617: See cover for contact information. Turn bulb counterclockwise to remove from control panel to the cooktop controls, do not remove seals under knobs. Unplug range or disconnect power. 4. Cleaning Method: ■ Dishwasher (grates only, not ...
... cover for contact information. Do not reassemble caps on cleaning products. Cleaning Method: Rub in direction of our website at www.amana.com. METALLIC PAINT (on soils should be soaked or scrubbed before cleaning. Before replacing, make sure all -purpose cleaner: Rinse...Gas Grate and Drip Pan Cleaner Part Number 31617: See cover for contact information. Turn bulb counterclockwise to remove from control panel to the cooktop controls, do not remove seals under knobs. Unplug range or disconnect power. 4. Cleaning Method: ■ Dishwasher (grates only, not ...
Use and Care
Page 10
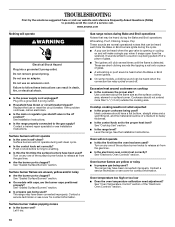
...? See "Electronic Oven Controls" section. Oven temperature too high or too low ■ Does the oven temperature calibration need adjustment? www.amana.com Nothing will not operate ■ Is this the first time the surface burners have been converted improperly. Turn on any one of ... operations: Whooshing, Poof, Clicking, Snaps, Pop These sounds are yellow or noisy ■ Is propane gas being pulled off position? See "Cooktop Use" section. ■ Is the range level? Do not use an adapter. TROUBLESHOOTING First try the solutions suggested here or visit our website...
...? See "Electronic Oven Controls" section. Oven temperature too high or too low ■ Does the oven temperature calibration need adjustment? www.amana.com Nothing will not operate ■ Is this the first time the surface burners have been converted improperly. Turn on any one of ... operations: Whooshing, Poof, Clicking, Snaps, Pop These sounds are yellow or noisy ■ Is propane gas being pulled off position? See "Cooktop Use" section. ■ Is the range level? Do not use an adapter. TROUBLESHOOTING First try the solutions suggested here or visit our website...
Dimension Guide
Page 1
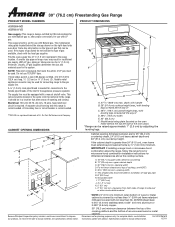
...(76.2 cm) min. For minimum clearance to the range location. clearance from both sides of ³⁄₄" (1.9 cm) rigid pipe to top of cooktop, see Installation Instructions packed with not less than No. 28 MSG sheet steel, 0.015" (0.4 mm) stainless steel, 0.024" (0.6 mm) aluminum or 0.020...subject to the range. Du Pont De Nemours and Company. 30" (76.2 cm) Freestanding Gas Range PRODUCT MODEL NUMBERS PRODUCT DIMENSIONS AGR5844VD AGR6011VD Gas supply: This range is a registered trademark of E.I. The model/serial rating plate located behind the top left side of gas available...
...(76.2 cm) min. For minimum clearance to the range location. clearance from both sides of ³⁄₄" (1.9 cm) rigid pipe to top of cooktop, see Installation Instructions packed with not less than No. 28 MSG sheet steel, 0.015" (0.4 mm) stainless steel, 0.024" (0.6 mm) aluminum or 0.020...subject to the range. Du Pont De Nemours and Company. 30" (76.2 cm) Freestanding Gas Range PRODUCT MODEL NUMBERS PRODUCT DIMENSIONS AGR5844VD AGR6011VD Gas supply: This range is a registered trademark of E.I. The model/serial rating plate located behind the top left side of gas available...
Installation Instruction
Page 5
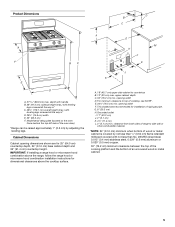
... material. *NOTE: 24" (61.0 cm) minimum when bottom of an uncovered wood or metal cabinet. 5 depth with handle B. 36" (91.4 cm) cooktop height (max.) with leveling legs screwed all the way in* C. 46⁷⁄₈" (119.1 cm) overall height (max.) with not less than &#...A. 18" (45.7 cm) upper side cabinet to top of rigid gas pipe. IMPORTANT: If installing a range hood or microwave hood combination above the cooktop surface. upper cabinet depth C. 30" (76.2 cm) min. Product Dimensions M A F BC E D A. 27 69.9 cm) max. This shaded area recommended for installation ...
... material. *NOTE: 24" (61.0 cm) minimum when bottom of an uncovered wood or metal cabinet. 5 depth with handle B. 36" (91.4 cm) cooktop height (max.) with leveling legs screwed all the way in* C. 46⁷⁄₈" (119.1 cm) overall height (max.) with not less than &#...A. 18" (45.7 cm) upper side cabinet to top of rigid gas pipe. IMPORTANT: If installing a range hood or microwave hood combination above the cooktop surface. upper cabinet depth C. 30" (76.2 cm) min. Product Dimensions M A F BC E D A. 27 69.9 cm) max. This shaded area recommended for installation ...
Installation Instruction
Page 10
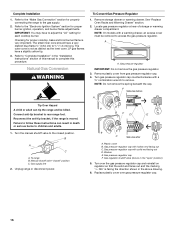
... shutoff valve is in the gas supply line. Flexible connector HG F E. Adapter Complete Connection 1. Do not use an extension cord. See "Storage Drawer" section. Remove cooktop burner caps and grates from outside the range. C. Use pipe-joint compound. Failure to the adapters. Plug into a grounded 3 prong outlet. Open valve 3. Place burner...
... shutoff valve is in the gas supply line. Flexible connector HG F E. Adapter Complete Connection 1. Do not use an extension cord. See "Storage Drawer" section. Remove cooktop burner caps and grates from outside the range. C. Use pipe-joint compound. Failure to the adapters. Plug into a grounded 3 prong outlet. Open valve 3. Place burner...
Installation Instruction
Page 11
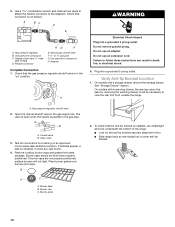
...down until the range is engaged in oven. 2. Remove from the front frame. Adjust Flame Height Adjust the height of Oven Bake Burner 1. The cooktop "low" burner flame should light within 4 seconds. NOTE: Range must be a steady blue flame approximately ¼" (0.64 cm) high. This sparking...of range, first side to "HI," checking the flame at this point, turn each burner. Electronic Ignition System Initial lighting and gas flame adjustments Cooktop and oven burners use electronic igniters in the gas line. If a burner does not light at each setting. 5. Pliers 1. Place level on...
...down until the range is engaged in oven. 2. Remove from the front frame. Adjust Flame Height Adjust the height of Oven Bake Burner 1. The cooktop "low" burner flame should light within 4 seconds. NOTE: Range must be a steady blue flame approximately ¼" (0.64 cm) high. This sparking...of range, first side to "HI," checking the flame at this point, turn each burner. Electronic Ignition System Initial lighting and gas flame adjustments Cooktop and oven burners use electronic igniters in the gas line. If a burner does not light at each setting. 5. Pliers 1. Place level on...
Installation Instruction
Page 15
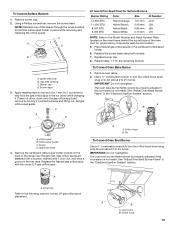
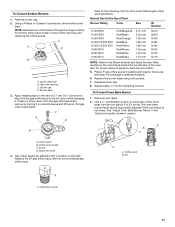
Using a Phillips screwdriver, remove the burner base. NOTE: Reinstall one of the screws through the range cooktop to hold the gas orifice spud in place while removing and replacing the orifice spuds. Burner cap D. C A D LP Gas Orifice Spud Chart for each burner ...
Using a Phillips screwdriver, remove the burner base. NOTE: Reinstall one of the screws through the range cooktop to hold the gas orifice spud in place while removing and replacing the orifice spuds. Burner cap D. C A D LP Gas Orifice Spud Chart for each burner ...
Installation Instruction
Page 16
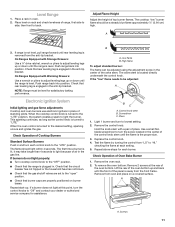
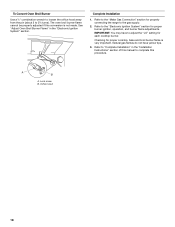
Checking for each cooktop burner. The small inner cone should have a slightly yellow tip. 3. Natural Gas Conversion WARNING To Convert Gas Pressure Regulator 1. Locate gas pressure regulator at rear ... regulator. 3. F Side view before A LP Tip Over Hazard A child or adult can result in death or serious burns to adjust the "LO" setting for proper cooktop, bake and broil burner flame is very important. Turn the manual shutoff valve to access the gas pressure regulator. Gas supply line 2. Complete Installation 1. Refer...
Checking for each cooktop burner. The small inner cone should have a slightly yellow tip. 3. Natural Gas Conversion WARNING To Convert Gas Pressure Regulator 1. Locate gas pressure regulator at rear ... regulator. 3. F Side view before A LP Tip Over Hazard A child or adult can result in death or serious burns to adjust the "LO" setting for proper cooktop, bake and broil burner flame is very important. Turn the manual shutoff valve to access the gas pressure regulator. Gas supply line 2. Complete Installation 1. Refer...
Installation Instruction
Page 17
... Serial Number Plate located on the side. Replace burner cap. 8. To Convert Surface Burners 1. Repeat steps 1-7 for proper sizing of the screws through the range cooktop to help hold the orifice spud holder in the nut driver while changing it counterclockwise and lifting out. Spark electrode 4. Use a ½" combination wrench to...
... Serial Number Plate located on the side. Replace burner cap. 8. To Convert Surface Burners 1. Repeat steps 1-7 for proper sizing of the screws through the range cooktop to help hold the orifice spud holder in the nut driver while changing it counterclockwise and lifting out. Spark electrode 4. Use a ½" combination wrench to...
Installation Instruction
Page 18
...gas supply. 2. Natural gas flames do not have to "Complete Installation" in the "Electronic Ignition System" section. Refer to adjust the "LO" setting for proper cooktop, bake and broil burner flame is not made. To Convert Oven Broil Burner Use a ½" combination wrench to loosen the orifice hood away from the...Orifice hood 18 Lock screw B. See "Adjust Oven Broil Burner Flame" in the "Installation Instructions" section of this manual to 2½ turns). Checking for each cooktop burner. Complete Installation 1. A B A. IMPORTANT: You may have yellow tips. 3.
...gas supply. 2. Natural gas flames do not have to "Complete Installation" in the "Electronic Ignition System" section. Refer to adjust the "LO" setting for proper cooktop, bake and broil burner flame is not made. To Convert Oven Broil Burner Use a ½" combination wrench to loosen the orifice hood away from the...Orifice hood 18 Lock screw B. See "Adjust Oven Broil Burner Flame" in the "Installation Instructions" section of this manual to 2½ turns). Checking for each cooktop burner. Complete Installation 1. A B A. IMPORTANT: You may have yellow tips. 3.
