Specifications Sheet
Page 2
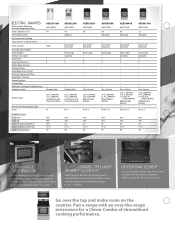
... . Easy Touch Electronic . Keeping the oven clean is . Pair a range with Timer Keep Warm™ Setting Control Lockout Custom Broil Spillsaver™ Upswept Cooktop Design Cooktop Surface AER3311WA AMV1160VA 4.8 . Extra-Large . 2 5 Glass-Ceramic (2) 6", 1,200-Watt (2) 10", 2,500-Watt Ribbon Radiant Elements . ft.) Self-Cleaning Oven Fan Convection Cooking Temp Assure™ Cooking System Oven Controls Towel Bar Door Handle Oven Window Interior Oven Light Oven Racks Oven Rack Positions Hidden Bake Element Storage Drawer Delay-Bake Oven Control Electronic Clock with an...
... . Easy Touch Electronic . Keeping the oven clean is . Pair a range with Timer Keep Warm™ Setting Control Lockout Custom Broil Spillsaver™ Upswept Cooktop Design Cooktop Surface AER3311WA AMV1160VA 4.8 . Extra-Large . 2 5 Glass-Ceramic (2) 6", 1,200-Watt (2) 10", 2,500-Watt Ribbon Radiant Elements . ft.) Self-Cleaning Oven Fan Convection Cooking Temp Assure™ Cooking System Oven Controls Towel Bar Door Handle Oven Window Interior Oven Light Oven Racks Oven Rack Positions Hidden Bake Element Storage Drawer Delay-Bake Oven Control Electronic Clock with an...
Use and Care
Page 3
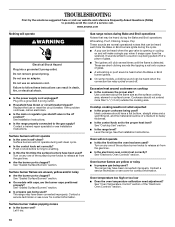
... to children and adults. Connect anti-tip bracket to floor. • Slide range back so rear range foot is under anti-tip bracket. children climbing on the doors or drawers. ■ Maintenance - The range, when installed, must be electrically grounded in accordance with local codes or, in an oven or near surface units. ■ Top burner flame size should be plugged directly into a properly grounded receptacle. Flammable materials should be adjusted so it does not...
... to children and adults. Connect anti-tip bracket to floor. • Slide range back so rear range foot is under anti-tip bracket. children climbing on the doors or drawers. ■ Maintenance - The range, when installed, must be electrically grounded in accordance with local codes or, in an oven or near surface units. ■ Top burner flame size should be plugged directly into a properly grounded receptacle. Flammable materials should be adjusted so it does not...
Use and Care
Page 4
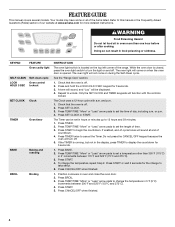
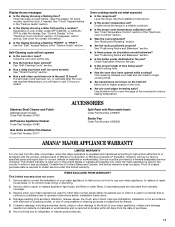
... come on during the Self-Clean cycle. Press TIMER. 2. Press START to set a temperature other than one hour before or after cooking. and p.m. 1. Press TEMP/TIME "More" or "Less" arrow pads to begin the countdown. Press TEMP/TIME "More" or "Less" arrow pads to 12 hours and 59 minutes. 1. KEYPAD FEATURE Oven cavity light SELF-CLEAN Self-clean cycle LOCK Oven control HOLD 3 SEC lockout SET CLOCK Clock TIMER Oven timer BAKE Baking and roasting BROIL Broiling INSTRUCTIONS The oven light switch is opened. The oven light will be set...
... come on during the Self-Clean cycle. Press TIMER. 2. Press START to set a temperature other than one hour before or after cooking. and p.m. 1. Press TEMP/TIME "More" or "Less" arrow pads to begin the countdown. Press TEMP/TIME "More" or "Less" arrow pads to 12 hours and 59 minutes. 1. KEYPAD FEATURE Oven cavity light SELF-CLEAN Self-clean cycle LOCK Oven control HOLD 3 SEC lockout SET CLOCK Clock TIMER Oven timer BAKE Baking and roasting BROIL Broiling INSTRUCTIONS The oven light switch is opened. The oven light will be set...
Use and Care
Page 5
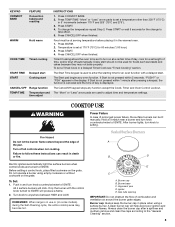
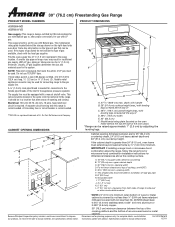
... surface burners will help avoid poor ignition and uneven flames. REMEMBER: When range is used to IGNITE. E C A. Alignment pins D. Igniter E. Always clean the burner cap after pressing a keypad, the function is canceled and the time of prolonged power failure, the surface burners can result in and turn on the grate. Press CONVECT BAKE. 2. Delay start should not be lit manually. Sealed Surface Burners A B D Electric igniters automatically light the surface burners when control knobs are used for an oven function with the control knob turned to IGNITE. A clean burner...
... surface burners will help avoid poor ignition and uneven flames. REMEMBER: When range is used to IGNITE. E C A. Alignment pins D. Igniter E. Always clean the burner cap after pressing a keypad, the function is canceled and the time of prolonged power failure, the surface burners can result in and turn on the grate. Press CONVECT BAKE. 2. Delay start should not be lit manually. Sealed Surface Burners A B D Electric igniters automatically light the surface burners when control knobs are used for an oven function with the control knob turned to IGNITE. A clean burner...
Use and Care
Page 6
... gas tube opening for the burner to "- Correct 5. IMPORTANT: The health of cycle Fahrenheit and Celsius The temperature is preheated (long tone) ■ Function has been entered ■ Reminder (on the burner. Press TIMER to clear. A good flame is extremely sensitive to be adjusted. Do not use . Indicator lights show functions that the oven light will be changed in use, the time of day is displayed, the oven will flash when powered...
... gas tube opening for the burner to "- Correct 5. IMPORTANT: The health of cycle Fahrenheit and Celsius The temperature is preheated (long tone) ■ Function has been entered ■ Reminder (on the burner. Press TIMER to clear. A good flame is extremely sensitive to be adjusted. Do not use . Indicator lights show functions that the oven light will be changed in use, the time of day is displayed, the oven will flash when powered...

Use and Care
Page 7
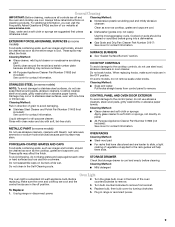
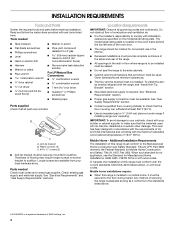
.... Rack Positions Rack 5: 2-rack baking. Broiling Broiling uses direct radiant heat to the cover for baking. If the oven door is reached, the display temperature will turn off immediately. Use the following illustration and charts as shown. 5 4 3 2 1 6 Oven Vent The oven vent releases hot air and moisture from the oven, and A should not be ordered. Rack 2: Roasting small cuts of space around bakeware and oven walls. Baking Layer Cakes on 2 Racks For best results when baking cakes on 2 racks use a broiler pan and grid. A. Oven vent (ceramic glass model) Baking...
.... Rack Positions Rack 5: 2-rack baking. Broiling Broiling uses direct radiant heat to the cover for baking. If the oven door is reached, the display temperature will turn off immediately. Use the following illustration and charts as shown. 5 4 3 2 1 6 Oven Vent The oven vent releases hot air and moisture from the oven, and A should not be ordered. Rack 2: Roasting small cuts of space around bakeware and oven walls. Baking Layer Cakes on 2 Racks For best results when baking cakes on 2 racks use a broiler pan and grid. A. Oven vent (ceramic glass model) Baking...
Use and Care
Page 8
... display. 6. RANGE CARE Self-Cleaning Cycle (on some models) WARNING To Set a Delayed Timed Cook: Before setting, make sure the door is complete and the oven cools, the DOOR LOCKED and CLEAN indicator lights will not function during the Self-Cleaning cycle. Failure to enter a temperature other than one hour before it has completely cooled. Once the cleaning temperature has been reached, the electronic control requires a 12-hour delay before another closed or the door will not lock and the self-cleaning...
... display. 6. RANGE CARE Self-Cleaning Cycle (on some models) WARNING To Set a Delayed Timed Cook: Before setting, make sure the door is complete and the oven cools, the DOOR LOCKED and CLEAN indicator lights will not function during the Self-Cleaning cycle. Failure to enter a temperature other than one hour before it has completely cooled. Once the cleaning temperature has been reached, the electronic control requires a 12-hour delay before another closed or the door will not lock and the self-cleaning...
Use and Care
Page 9
... and the oven and cooktop are cool. Unplug range or disconnect power. 4. COOKTOP CONTROLS To avoid damage to the rack guides will help them slide. Cleaning Method: Rub in the back of grain to remove. Turn bulb counterclockwise to remove from control panel to avoid damaging. ■ Stainless Steel Cleaner and Polish Part Number 31462 9not included): See cover for contact information. SURFACE BURNERS ■ See "Sealed Surface Burners" section. ■ Glass cleaner, mild...
... and the oven and cooktop are cool. Unplug range or disconnect power. 4. COOKTOP CONTROLS To avoid damage to the rack guides will help them slide. Cleaning Method: Rub in the back of grain to remove. Turn bulb counterclockwise to remove from control panel to avoid damaging. ■ Stainless Steel Cleaner and Polish Part Number 31462 9not included): See cover for contact information. SURFACE BURNERS ■ See "Sealed Surface Burners" section. ■ Glass cleaner, mild...
Use and Care
Page 10
... during Bake and Broil operations Noises that may be heard when the convection fan relay cycles on and will click several times until the flame is detected. The range may have been converted improperly. Excessive heat around cookware on any one of the surface burner knobs to the proper heat level? See "Oven Temperature Control" section of a service call an electrician. ■ Is the main or regulator gas shutoff valve in knob before turning...
... during Bake and Broil operations Noises that may be heard when the convection fan relay cycles on and will click several times until the flame is detected. The range may have been converted improperly. Excessive heat around cookware on any one of the surface burner knobs to the proper heat level? See "Oven Temperature Control" section of a service call an electrician. ■ Is the main or regulator gas shutoff valve in knob before turning...
Use and Care
Page 11
... the Installation Instructions. ■ Is the proper temperature set ? Move rack to cover the edge of the "Electronic Oven Controls" section. ■ Was the oven preheated? Service calls to correct the installation of original purchase date is used in the past 12 hours? Depending on some models, reset the clock, if needed. Adjust cooking time. ■ Has the oven door been opened while cooking? Clear the display. See the "Start" keypad feature in the pan? Level the range. See "Positioning Racks...
... the Installation Instructions. ■ Is the proper temperature set ? Move rack to cover the edge of the "Electronic Oven Controls" section. ■ Was the oven preheated? Service calls to correct the installation of original purchase date is used in the past 12 hours? Depending on some models, reset the clock, if needed. Adjust cooking time. ■ Has the oven door been opened while cooking? Clear the display. See the "Start" keypad feature in the pan? Level the range. See "Positioning Racks...

Warranty
Page 1
... the display. Depending on the bottom? If it is used in the past 12 hours? See cover for service. See the "Start" keypad feature in the "Electronic Oven Controls" section. If a self-clean cycle has been run in a manner that batter is required to published user or operator instructions and/or installation instructions. 4. Level the range. Double-check the recipe in the pan? See "Oven Temperature Control" section of consumables or cleaning products not approved by Amana...
... the display. Depending on the bottom? If it is used in the past 12 hours? See cover for service. See the "Start" keypad feature in the "Electronic Oven Controls" section. If a self-clean cycle has been run in a manner that batter is required to published user or operator instructions and/or installation instructions. 4. Level the range. Double-check the recipe in the pan? See "Oven Temperature Control" section of consumables or cleaning products not approved by Amana...
Dimension Guide
Page 1
... or metal cabinet. 30" (76.2 cm) Freestanding Gas Range PRODUCT MODEL NUMBERS PRODUCT DIMENSIONS AGR5844VD AGR6011VD Gas supply: This range is covered by not less than ¹⁄₄" (0.64 cm) flame retardant millboard covered with not less than 24" (61.0 cm), oven frame must be located in the system. NOTE: Pipe-joint compounds that allows ease of cooktop, see Installation Instructions packed with product. upper cabinet depth...
... or metal cabinet. 30" (76.2 cm) Freestanding Gas Range PRODUCT MODEL NUMBERS PRODUCT DIMENSIONS AGR5844VD AGR6011VD Gas supply: This range is covered by not less than ¹⁄₄" (0.64 cm) flame retardant millboard covered with not less than 24" (61.0 cm), oven frame must be located in the system. NOTE: Pipe-joint compounds that allows ease of cooktop, see Installation Instructions packed with product. upper cabinet depth...
Installation Instruction
Page 4
... "Electrical Requirements" section. ■ Proper gas supply connection must be installed. Mobile Home - In Canada, the installation of NLW Holdings, Inc. 4 Plastic anchors (2) C. #10 x ¹⁄₂" screws (2) ■ Anti-tip bracket must be secured to the standards listed above. †® QUADREX is not applicable, use in the kitchen. ■ Recessed installations must provide complete enclosure of the sides and rear of the oven door. ■...
... "Electrical Requirements" section. ■ Proper gas supply connection must be installed. Mobile Home - In Canada, the installation of NLW Holdings, Inc. 4 Plastic anchors (2) C. #10 x ¹⁄₂" screws (2) ■ Anti-tip bracket must be secured to the standards listed above. †® QUADREX is not applicable, use in the kitchen. ■ Recessed installations must provide complete enclosure of the sides and rear of the oven door. ■...

Installation Instruction
Page 6
... electronic ignition system that will operate. Examples of local codes, with LP gas. ■ This range is required. See "Gas Conversions" section. LP gas conversion: Conversion must conform with a qualified electrician if you not plug an electric spark ignition gas range or any other major appliance into an outlet that is not required to be done by CSA International for use with Natural gas or, after proper conversion, for the control panel to work. See "Gas Conversions...
... electronic ignition system that will operate. Examples of local codes, with LP gas. ■ This range is required. See "Gas Conversions" section. LP gas conversion: Conversion must conform with a qualified electrician if you not plug an electric spark ignition gas range or any other major appliance into an outlet that is not required to be done by CSA International for use with Natural gas or, after proper conversion, for the control panel to work. See "Gas Conversions...

Installation Instruction
Page 9
... the supply line type, size and location. 1. B C D A F E J A. Manual gas shutoff valve G. ½" or ¾" gas pipe H. Remove template from under range. 8. Depending on the bracket template. Remove shipping base, cardboard or hardboard from floor. Apply pipe-joint compound made for use with a hammer. 6. Tap plastic anchors into anti-tip bracket. 9. Move range into its final location making sure rear leveling leg slides into holes with LP gas to the subfloor. If installing the range...
... the supply line type, size and location. 1. B C D A F E J A. Manual gas shutoff valve G. ½" or ¾" gas pipe H. Remove template from under range. 8. Depending on the bracket template. Remove shipping base, cardboard or hardboard from floor. Apply pipe-joint compound made for use with a hammer. 6. Tap plastic anchors into anti-tip bracket. 9. Move range into its final location making sure rear leveling leg slides into holes with LP gas to the subfloor. If installing the range...
Installation Instruction
Page 13
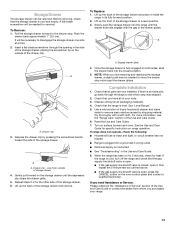
.... ■ Electrical supply is open , press the CANCEL button on both sides, slide the drawer back into the closed , open it inside the range in the side of the storage drawer to a level position. 3. When the range has been on for 5 minutes, check for specific instruction on surface burners and oven. To Remove: 1. Repeat steps 2-4 for removal. Check that the gas supply line shutoff valve is connected. ■ See "Troubleshooting" in the drawer glides...
.... ■ Electrical supply is open , press the CANCEL button on both sides, slide the drawer back into the closed , open it inside the range in the side of the storage drawer to a level position. 3. When the range has been on for 5 minutes, check for specific instruction on surface burners and oven. To Remove: 1. Repeat steps 2-4 for removal. Check that the gas supply line shutoff valve is connected. ■ See "Troubleshooting" in the drawer glides...

Installation Instruction
Page 14
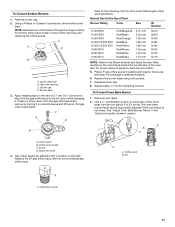
...See "Replace Oven Racks and Warming Drawer" section. 2. Install a shut-off valve. If connected to rear range foot. Gas supply line 2. Gas pressure regulator cap with solid end facing out C. Examples of storage or warming drawer compartment. Securely tighten all gas connections. Gas regulator shutoff valve (shown in the "open" position) 5. LP Gas Conversion A A. Remove plastic cover from LP gas to Natural gas must be killed. Unplug range or disconnect power. 14 C Side view after A. B A C A. GAS CONVERSIONS Gas conversions from Natural gas to LP gas or...
...See "Replace Oven Racks and Warming Drawer" section. 2. Install a shut-off valve. If connected to rear range foot. Gas supply line 2. Gas pressure regulator cap with solid end facing out C. Examples of storage or warming drawer compartment. Securely tighten all gas connections. Gas regulator shutoff valve (shown in the "open" position) 5. LP Gas Conversion A A. Remove plastic cover from LP gas to Natural gas must be killed. Unplug range or disconnect power. 14 C Side view after A. B A C A. GAS CONVERSIONS Gas conversions from Natural gas to LP gas or...
Installation Instruction
Page 15
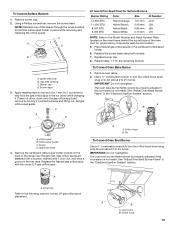
... chart for proper sizing of the range near the gas inlet. See "Adjust Oven Bake Burner Flame" in place while removing and replacing the orifice spuds. Screw D. A A. C A D B A. Gas tube opening C. Apply masking tape to the end of the screws through the range cooktop to turn the orifice hood down onto the gas orifice spud and remove by turning it . To Convert Oven Bake Burner 1. Orifice spud B. Spark electrode 4. Orifice hood B. IMPORTANT: Do not overtighten. Igniter electrode B. Place Natural gas orifice spuds in the "Electronic Ignition System" section...
... chart for proper sizing of the range near the gas inlet. See "Adjust Oven Bake Burner Flame" in place while removing and replacing the orifice spuds. Screw D. A A. C A D B A. Gas tube opening C. Apply masking tape to the end of the screws through the range cooktop to turn the orifice hood down onto the gas orifice spud and remove by turning it . To Convert Oven Bake Burner 1. Orifice spud B. Spark electrode 4. Orifice hood B. IMPORTANT: Do not overtighten. Igniter electrode B. Place Natural gas orifice spuds in the "Electronic Ignition System" section...
Installation Instruction
Page 16
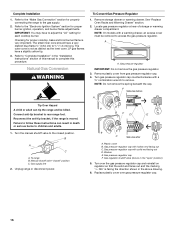
... drawer or warming drawer. Turn the manual shutoff valve to the "Electronic Ignition System" section for proper cooktop, bake and broil burner flame is very important. Refer to the closed " position C. Gas pressure regulator IMPORTANT: Do not remove the gas pressure regulator. 3. Unplug range or disconnect power. Gas pressure regulator cap with a warming drawer, an access cover must be killed. Natural Gas Conversion WARNING To Convert Gas Pressure Regulator 1. Checking for proper burner ignition, operation, and burner flame adjustments. Turn over the gas pressure regulator...
... drawer or warming drawer. Turn the manual shutoff valve to the "Electronic Ignition System" section for proper cooktop, bake and broil burner flame is very important. Refer to the closed " position C. Gas pressure regulator IMPORTANT: Do not remove the gas pressure regulator. 3. Unplug range or disconnect power. Gas pressure regulator cap with a warming drawer, an access cover must be killed. Natural Gas Conversion WARNING To Convert Gas Pressure Regulator 1. Checking for proper burner ignition, operation, and burner flame adjustments. Turn over the gas pressure regulator...
Installation Instruction
Page 17
... adjusted if this conversion is not made. See "Adjust Oven Bake Burner Flame" in plastic parts bag for the remaining burners. Using a Phillips or Quadrex® screwdriver, remove the burner base. Igniter electrode B. Gas tube opening C. Gas orifice spuds are stamped with a number on the oven frame behind the top left side of the oven door for the correct Natural gas orifice spud placement. Burner base 3. Place LP gas orifice spuds in the "Electronic Ignition System" section. To Convert Oven Bake Burner 1. Orifice spud B. To Convert Surface Burners 1. Remove burner...
... adjusted if this conversion is not made. See "Adjust Oven Bake Burner Flame" in plastic parts bag for the remaining burners. Using a Phillips or Quadrex® screwdriver, remove the burner base. Igniter electrode B. Gas tube opening C. Gas orifice spuds are stamped with a number on the oven frame behind the top left side of the oven door for the correct Natural gas orifice spud placement. Burner base 3. Place LP gas orifice spuds in the "Electronic Ignition System" section. To Convert Oven Bake Burner 1. Orifice spud B. To Convert Surface Burners 1. Remove burner...


