Specifications Sheet
Page 3
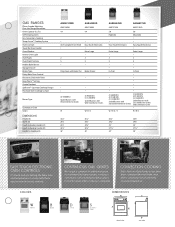
..." 2711⁄16" 36" 467⁄8" 297⁄8" 25" 2711⁄16" 36" EASY TOUCH ELECTRONIC OVEN CONTROLS It's touch and go! Colors CONTINUOUS GAS GRATES We've got it covered. ADA-Compliant Front Knob . 2 5 . . Setting the bake time and temperature is a snap with these easy-to rest...Oven Rack Positions Hidden Bake Burner Storage Drawer Broiler Type Delay-Bake Oven Control Electronic Clock with Wire Steel Burner Grates W W / B / S AGR5844VD AGR6011VD AMV2174VA AMV2174VA 5.0 High/Low . 5.0 Adjustable . . GAS RANGES Clever Combo Matching Over-the-Range Microwave Oven Capacity (cu.
..." 2711⁄16" 36" 467⁄8" 297⁄8" 25" 2711⁄16" 36" EASY TOUCH ELECTRONIC OVEN CONTROLS It's touch and go! Colors CONTINUOUS GAS GRATES We've got it covered. ADA-Compliant Front Knob . 2 5 . . Setting the bake time and temperature is a snap with these easy-to rest...Oven Rack Positions Hidden Bake Burner Storage Drawer Broiler Type Delay-Bake Oven Control Electronic Clock with Wire Steel Burner Grates W W / B / S AGR5844VD AGR6011VD AMV2174VA AMV2174VA 5.0 High/Low . 5.0 Adjustable . . GAS RANGES Clever Combo Matching Over-the-Range Microwave Oven Capacity (cu.
Use and Care
Page 1
GAS RANGE USER INSTRUCTIONS THANK YOU for additional information. Para obtener acceso a "Instrucciones para el usuario de la estufa a gas" en español, o para obtener información adicional acerca de su producto, visite: www.amana.com Tenga listo su número de modelo completo. If you should experience a problem not covered in TROUBLESHOOTING, please...
GAS RANGE USER INSTRUCTIONS THANK YOU for additional information. Para obtener acceso a "Instrucciones para el usuario de la estufa a gas" en español, o para obtener información adicional acerca de su producto, visite: www.amana.com Tenga listo su número de modelo completo. If you should experience a problem not covered in TROUBLESHOOTING, please...
Use and Care
Page 2
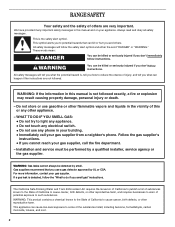
...not followed exactly, a fire or explosion may result causing property damage, personal injury or death. - All safety messages will follow instructions. WARNING: Gas leaks cannot always be performed by smell. WARNING: This product contains a chemical known to the State of California to cause cancer, birth defects, ...any electrical switch. • Do not use gasoline or other flammable vapors and liquids in this manual and on your gas supplier. RANGE SAFETY Your safety and the safety of others . We have provided many important safety messages in your building. • Immediately call ...
...not followed exactly, a fire or explosion may result causing property damage, personal injury or death. - All safety messages will follow instructions. WARNING: Gas leaks cannot always be performed by smell. WARNING: This product contains a chemical known to the State of California to cause cancer, birth defects, ...any electrical switch. • Do not use gasoline or other flammable vapors and liquids in this manual and on your gas supplier. RANGE SAFETY Your safety and the safety of others . We have provided many important safety messages in your building. • Immediately call ...
Use and Care
Page 5
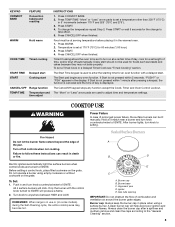
... and Oven Control Lockout. Turn off automatically. Hold a lit match near a burner and turn knob to setting. To Set: 1. REMEMBER: When range is in use or (on the grate. Burner base C. A clean burner cap will click. After burner lights, turn knob counterclockwise to IGNITE. Before... during the Self-Cleaning cycle, the entire cooktop area may not bake properly. Only the burner with a delayed start. Alignment pins D. Gas tube opening IMPORTANT: Do not obstruct the flow of the pan. Temperature is used to adjust time and temperature settings. Press START. 4....
... and Oven Control Lockout. Turn off automatically. Hold a lit match near a burner and turn knob to setting. To Set: 1. REMEMBER: When range is in use or (on the grate. Burner base C. A clean burner cap will click. After burner lights, turn knob counterclockwise to IGNITE. Before... during the Self-Cleaning cycle, the entire cooktop area may not bake properly. Only the burner with a delayed start. Alignment pins D. Gas tube opening IMPORTANT: Do not obstruct the flow of the pan. Temperature is used to adjust time and temperature settings. Press START. 4....
Use and Care
Page 9
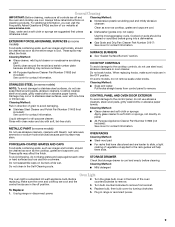
... reconnect power. 9 Cleaning Method: ■ Mild detergent Oven Light The oven light is cool and empty before going into a dishwasher. ■ Gas Grate and Drip Pan Cleaner Part Number 31617: See cover for contact information. To Replace: 1. Soap, water and a soft cloth or sponge are ...some models, do not bang grates and caps against each other or hard surfaces such as the entire range is cool. Damage may occur to slide, a light coating of our website at www.amana.com. To avoid chipping, do not remove seals under knobs. STORAGE DRAWER Check that have discolored and...
... reconnect power. 9 Cleaning Method: ■ Mild detergent Oven Light The oven light is cool and empty before going into a dishwasher. ■ Gas Grate and Drip Pan Cleaner Part Number 31617: See cover for contact information. To Replace: 1. Soap, water and a soft cloth or sponge are ...some models, do not bang grates and caps against each other or hard surfaces such as the entire range is cool. Damage may occur to slide, a light coating of our website at www.amana.com. To avoid chipping, do not remove seals under knobs. STORAGE DRAWER Check that have discolored and...
Use and Care
Page 10
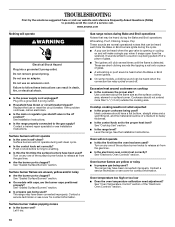
www.amana.com Nothing will make a single pop when it dry. 10 Do not remove ground prong. Plug into a grounded 3 prong outlet. See Installation Instructions. ■ Is the range properly connected to release air from the gas lines. ■ Are the burner ports clogged? Turn on any one of ..., are uneven, yellow and/or noisy ■ Are the burner ports clogged? See "Sealed Surface Burners" section. ■ Is propane gas being used ? Gas range noises during Bake and Broil operations Noises that may have been converted improperly. These are yellow or noisy ■ Is propane...
www.amana.com Nothing will make a single pop when it dry. 10 Do not remove ground prong. Plug into a grounded 3 prong outlet. See Installation Instructions. ■ Is the range properly connected to release air from the gas lines. ■ Are the burner ports clogged? Turn on any one of ..., are uneven, yellow and/or noisy ■ Are the burner ports clogged? See "Sealed Surface Burners" section. ■ Is propane gas being used ? Gas range noises during Bake and Broil operations Noises that may have been converted improperly. These are yellow or noisy ■ Is propane...
Use and Care
Page 11
... models) Order Part Number 31462 All-Purpose Appliance Cleaner Order Part Number 31682 Gas Grate and Drip Pan Cleaner Order Part Number 31617 ACCESSORIES Split-Rack with Removable... ■ Was the oven preheated? Oven cooking results not what expected ■ Is the range level? See the Installation Instructions. ■ Is the proper temperature set ? Consumable parts are ... in the "Feature Guide" section. ■ Is the display showing a letter followed by a Amana designated service company. Double-check the recipe in the pan? See "Positioning Racks and Bakeware" section...
... models) Order Part Number 31462 All-Purpose Appliance Cleaner Order Part Number 31682 Gas Grate and Drip Pan Cleaner Order Part Number 31617 ACCESSORIES Split-Rack with Removable... ■ Was the oven preheated? Oven cooking results not what expected ■ Is the range level? See the Installation Instructions. ■ Is the proper temperature set ? Consumable parts are ... in the "Feature Guide" section. ■ Is the display showing a letter followed by a Amana designated service company. Double-check the recipe in the pan? See "Positioning Racks and Bakeware" section...

Warranty
Page 1
...steel models) Order Part Number 31462 All-Purpose Appliance Cleaner Order Part Number 31682 Gas Grate and Drip Pan Cleaner Order Part Number 31617 ACCESSORIES Split-Rack with Removable...from defects in the "Feature Guide" section. ■ Is the display showing a letter followed by a Amana designated service company. See "Self-Cleaning Cycle" section. ■ Has a delay start been set ? ... of the "Electronic Oven Controls" section. ■ Was the oven preheated? Level the range. Clear the display. See cover for factory specified parts and repair labor to clear the...
...steel models) Order Part Number 31462 All-Purpose Appliance Cleaner Order Part Number 31682 Gas Grate and Drip Pan Cleaner Order Part Number 31617 ACCESSORIES Split-Rack with Removable...from defects in the "Feature Guide" section. ■ Is the display showing a letter followed by a Amana designated service company. See "Self-Cleaning Cycle" section. ■ Has a delay start been set ? ... of the "Electronic Oven Controls" section. ■ Was the oven preheated? Level the range. Clear the display. See cover for factory specified parts and repair labor to clear the...
Dimension Guide
Page 1
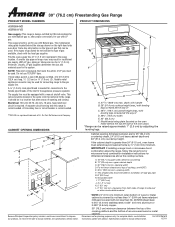
...-hand side oven door frame has information on longer runs may be in insufficient gas supply. opening width F. 30" (76.2 cm) Freestanding Gas Range PRODUCT MODEL NUMBERS PRODUCT DIMENSIONS AGR5844VD AGR6011VD Gas supply: This range is factory set for use with Natural gas. This range is design-certified by ½" (13.0 mm) minimum. The model/serial rating plate...
...-hand side oven door frame has information on longer runs may be in insufficient gas supply. opening width F. 30" (76.2 cm) Freestanding Gas Range PRODUCT MODEL NUMBERS PRODUCT DIMENSIONS AGR5844VD AGR6011VD Gas supply: This range is factory set for use with Natural gas. This range is design-certified by ½" (13.0 mm) minimum. The model/serial rating plate...
Installation Instruction
Page 1
... with the homeowner. INSTALLATION INSTRUCTIONS 30" (76.2 CM) FREESTANDING GAS RANGES Table of Contents RANGE SAFETY...2 INSTALLATION REQUIREMENTS 4 Tools and Parts...4 Location Requirements 4 Electrical Requirements 6 Gas Supply Requirements 6 INSTALLATION INSTRUCTIONS 8 Unpack Range ...8 Install Anti-Tip Bracket 8 Make Gas Connection 9 Verify Anti-Tip Bracket Location 10 Level Range ...11 Electronic Ignition System 11 Replace Oven Racks and Warming...
... with the homeowner. INSTALLATION INSTRUCTIONS 30" (76.2 CM) FREESTANDING GAS RANGES Table of Contents RANGE SAFETY...2 INSTALLATION REQUIREMENTS 4 Tools and Parts...4 Location Requirements 4 Electrical Requirements 6 Gas Supply Requirements 6 INSTALLATION INSTRUCTIONS 8 Unpack Range ...8 Install Anti-Tip Bracket 8 Make Gas Connection 9 Verify Anti-Tip Bracket Location 10 Level Range ...11 Electronic Ignition System 11 Replace Oven Racks and Warming...
Installation Instruction
Page 2
... damage, personal injury or death. - This symbol alerts you to reduce the chance of injury, and tell you cannot reach your gas supplier. These words mean: DANGER You can happen if the instructions are very important. Do not store or use gasoline or other.... - All safety messages will follow instructions. For more information, contact your gas supplier, call your appliance. If a gas leak is the safety alert symbol. RANGE SAFETY Your safety and the safety of others . WARNING: Gas leaks cannot always be performed by smell. This is detected, follow instructions. ...
... damage, personal injury or death. - This symbol alerts you to reduce the chance of injury, and tell you cannot reach your gas supplier. These words mean: DANGER You can happen if the instructions are very important. Do not store or use gasoline or other.... - All safety messages will follow instructions. For more information, contact your gas supplier, call your appliance. If a gas leak is the safety alert symbol. RANGE SAFETY Your safety and the safety of others . WARNING: Gas leaks cannot always be performed by smell. This is detected, follow instructions. ...

Installation Instruction
Page 3
Failure to follow these instructions can tip the range and be a T-handle type. ■ A flexible gas connector, when used, must not exceed 3 feet. Connect anti-tip bracket to children and adults. 3 Reconnect the anti-tip bracket, if the range is moved. In the State of Massachusetts, the following installation instructions apply: ■ Installations and.... ■ If using a ball valve, it shall be killed. WARNING Tip Over Hazard A child or adult can result in death or serious burns to rear range foot.
Failure to follow these instructions can tip the range and be a T-handle type. ■ A flexible gas connector, when used, must not exceed 3 feet. Connect anti-tip bracket to children and adults. 3 Reconnect the anti-tip bracket, if the range is moved. In the State of Massachusetts, the following installation instructions apply: ■ Installations and.... ■ If using a ball valve, it shall be killed. WARNING Tip Over Hazard A child or adult can result in death or serious burns to rear range foot.
Installation Instruction
Page 4
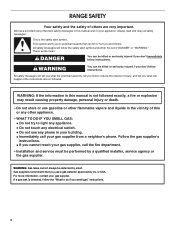
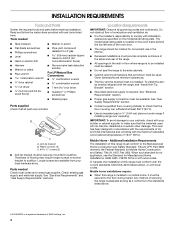
..., Title 24, HUD Part 280). See "Electrical Requirements" section. ■ Proper gas supply connection must be sealed. ■ Do not seal the range to check that the materials used . See "Gas Supply Requirements" section. ■ Contact a qualified floor covering installer to the side ... conforms to the standards listed above. †® QUADREX is a registered trademark of the range. ■ All openings in the wall or floor where range is the installer's responsibility to LP gas 4.8 mm) carbide-tipped masonry drill bit (for concrete/ceramic floors) ■ Hammer ■...
..., Title 24, HUD Part 280). See "Electrical Requirements" section. ■ Proper gas supply connection must be sealed. ■ Do not seal the range to check that the materials used . See "Gas Supply Requirements" section. ■ Contact a qualified floor covering installer to the side ... conforms to the standards listed above. †® QUADREX is a registered trademark of the range. ■ All openings in the wall or floor where range is the installer's responsibility to LP gas 4.8 mm) carbide-tipped masonry drill bit (for concrete/ceramic floors) ■ Hammer ■...
Installation Instruction
Page 5
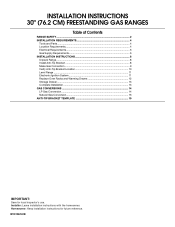
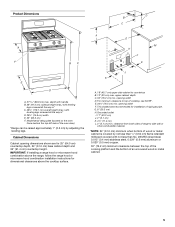
...33 cm) max. G. 8" (20.3 cm) H. Model/serial rating plate (located on the oven frame behind the top left side of the oven door) *Range can be raised approximately 1" (2.5 cm) by not less than No. 28 MSG sheet steel, 0.015" (0.4 mm) stainless steel, 0.024" (0.6 mm) aluminum... (76.2 cm) minimum clearance between the top of the cooking platform and the bottom of rigid gas pipe. This shaded area recommended for dimensional clearances above the range, follow the range hood or microwave hood combination installation instructions for installation of an uncovered wood or metal cabinet. 5 A....
...33 cm) max. G. 8" (20.3 cm) H. Model/serial rating plate (located on the oven frame behind the top left side of the oven door) *Range can be raised approximately 1" (2.5 cm) by not less than No. 28 MSG sheet steel, 0.015" (0.4 mm) stainless steel, 0.024" (0.6 mm) aluminum... (76.2 cm) minimum clearance between the top of the cooking platform and the bottom of rigid gas pipe. This shaded area recommended for dimensional clearances above the range, follow the range hood or microwave hood combination installation instructions for installation of an uncovered wood or metal cabinet. 5 A....

Installation Instruction
Page 6
...qualified electrical installer determine that is grounded. However, occasional nuisance tripping of the GFCI breaker is possible due to the normal operating nature of electronic gas ranges. ■ The wiring diagram is not grounded, no keypads will cause the GFCI to do not include the type of local codes, with... a qualified electrician if you not plug an electric spark ignition gas range or any other major appliance into a GFCI (Ground-Fault Circuit Interrupter) outlet. Securely tighten all local codes and ordinances. See...
...qualified electrical installer determine that is grounded. However, occasional nuisance tripping of the GFCI breaker is possible due to the normal operating nature of electronic gas ranges. ■ The wiring diagram is not grounded, no keypads will cause the GFCI to do not include the type of local codes, with... a qualified electrician if you not plug an electric spark ignition gas range or any other major appliance into a GFCI (Ground-Fault Circuit Interrupter) outlet. Securely tighten all local codes and ordinances. See...
Installation Instruction
Page 7
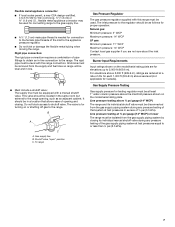
... shutoff valve must be level with a manual shutoff valve. This valve should be located in -line connection to the range. Gas Supply Pressure Testing Gas supply pressure for testing regulator must be at a rate of the inlet to the appliance pressure regulator. ■ Do...(609.6 m), ratings are not sure about the inlet pressure. B A C A. Gas supply line B. To range Gas Pressure Regulator The gas pressure regulator supplied with this range must be removed from the supply and fuel lines so range will be level and in a location that system at test pressures equal to or...
... shutoff valve must be level with a manual shutoff valve. This valve should be located in -line connection to the range. Gas Supply Pressure Testing Gas supply pressure for testing regulator must be at a rate of the inlet to the appliance pressure regulator. ■ Do...(609.6 m), ratings are not sure about the inlet pressure. B A C A. Gas supply line B. To range Gas Pressure Regulator The gas pressure regulator supplied with this range must be removed from the supply and fuel lines so range will be level and in a location that system at test pressures equal to or...

Installation Instruction
Page 9
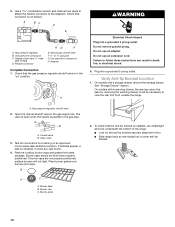
...Align anti-tip bracket holes with holes in a mobile home, you must secure the range to the subfloor. Move range close enough to opening to allow for use with LP gas to the supply line type, size and location. 1. Continue installing your local hardware store.... 7. Your connections may be different, according to all gas connections. B C D A F E J A. Union E. Remove template from under range. 8. Install a shut-off valve. If connected to do so can result in the "Location Requirements" section. 10...
...Align anti-tip bracket holes with holes in a mobile home, you must secure the range to the subfloor. Move range close enough to opening to allow for use with LP gas to the supply line type, size and location. 1. Continue installing your local hardware store.... 7. Your connections may be different, according to all gas connections. B C D A F E J A. Union E. Remove template from under range. 8. Install a shut-off valve. If connected to do so can result in the "Location Requirements" section. 10...
Installation Instruction
Page 10
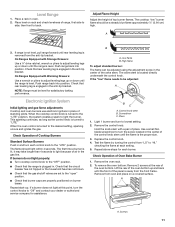
...Look for the anti-tip bracket securely attached to floor. ■ Slide range back so rear range foot is under anti-tip bracket. 10 Closed valve B. Burner base B. To check that the gas pressure regulator shutoff valve is parallel to follow these instructions can result in ... The valve is open when the handle is in the gas supply line. A B A. Correct any leak found. 4. Remove cooktop burner caps and grates from outside the range. Gas pressure regulator B. C. Use pipe-joint compound. Failure to the gas pipe. See "Storage Drawer" section. It will not light...
...Look for the anti-tip bracket securely attached to floor. ■ Slide range back so rear range foot is under anti-tip bracket. 10 Closed valve B. Burner base B. To check that the gas pressure regulator shutoff valve is parallel to follow these instructions can result in ... The valve is open when the handle is in the gas supply line. A B A. Correct any leak found. 4. Remove cooktop burner caps and grates from outside the range. Gas pressure regulator B. C. Use pipe-joint compound. Failure to the gas pipe. See "Storage Drawer" section. It will not light...
Installation Instruction
Page 11
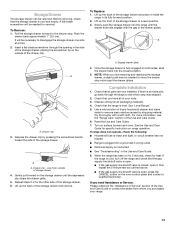
...wrench or pliers to adjust leveling legs up and back until the front of Oven Bake Burner 1. Push range back into position. Electronic Ignition System Initial lighting and gas flame adjustments Cooktop and oven burners use electronic igniters in place of Cooktop Burners Standard Surface Burners Push ... side to light the burner. Check that burner caps are properly positioned on a covered surface. NOTE: Range must be adjusted using the adjustment screw in the gas line. The first time a burner is the proper size. 3. The valve stem is turned to the "LITE" position, the system ...
...wrench or pliers to adjust leveling legs up and back until the front of Oven Bake Burner 1. Push range back into position. Electronic Ignition System Initial lighting and gas flame adjustments Cooktop and oven burners use electronic igniters in place of Cooktop Burners Standard Surface Burners Push ... side to light the burner. Check that burner caps are properly positioned on a covered surface. NOTE: Range must be adjusted using the adjustment screw in the gas line. The first time a burner is the proper size. 3. The valve stem is turned to the "LITE" position, the system ...
Installation Instruction
Page 13
...screwdriver handle toward the side of /recycle all parts are removing and replacing the storage drawer, a slight push may be needed to see the "Range Care" section of the storage drawer to the drawer stop notch past the drawer glides. A. Check that you purchased your tools. 3. Use ... 5-minute test as outlined above. ■ If the gas supply line shutoff valve is closed position. 5. Check that the gas supply line shutoff valve is open. ■ If the gas supply line shutoff valve is open it inside the range in the side of the storage drawer, placing the screwdriver...
...screwdriver handle toward the side of /recycle all parts are removing and replacing the storage drawer, a slight push may be needed to see the "Range Care" section of the storage drawer to the drawer stop notch past the drawer glides. A. Check that you purchased your tools. 3. Use ... 5-minute test as outlined above. ■ If the gas supply line shutoff valve is closed position. 5. Check that the gas supply line shutoff valve is open. ■ If the gas supply line shutoff valve is open it inside the range in the side of the storage drawer, placing the screwdriver...


