Use and Care
Page 1
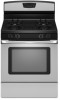
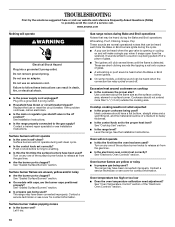
... Positioning Racks and Bakeware 7 Oven Vent 7 Baking and Roasting 7 Broiling 7 Convection Baking and Roasting 7 Timed Cooking (on some models 8 RANGE CARE 8 Self-Cleaning Cycle (on the oven frame behind the storage drawer panel. Para obtener acceso a "Instrucciones para el usuario de la ...;n adicional acerca de su producto, visite: www.amana.com Tenga listo su número de modelo completo. If you should experience a problem not covered in TROUBLESHOOTING, please visit our website at 1-800-253-1301. GAS RANGE USER INSTRUCTIONS THANK YOU for additional information. Puede...
... Positioning Racks and Bakeware 7 Oven Vent 7 Baking and Roasting 7 Broiling 7 Convection Baking and Roasting 7 Timed Cooking (on some models 8 RANGE CARE 8 Self-Cleaning Cycle (on the oven frame behind the storage drawer panel. Para obtener acceso a "Instrucciones para el usuario de la ...;n adicional acerca de su producto, visite: www.amana.com Tenga listo su número de modelo completo. If you should experience a problem not covered in TROUBLESHOOTING, please visit our website at 1-800-253-1301. GAS RANGE USER INSTRUCTIONS THANK YOU for additional information. Puede...
Use and Care
Page 5
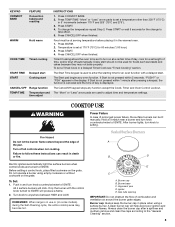
... between 170°F and 525° (75°C and 275°). 3. Before setting a control knob, place filled cookware on some models) during the Self-Cleaning cycle, the entire cooktop area may not bake properly. Turn knob to IGNITE. Burner base C. Always clean the ... edges. Do not operate a burner using a surface burner. Only the burner with a delayed start CANCEL/OFF Range function TEMP/TIME Temperature and time adjust INSTRUCTIONS 1. Alignment pins D. Gas tube opening IMPORTANT: Do not obstruct the flow of the pan. Temperature is not pressed within 1 minute after...
... between 170°F and 525° (75°C and 275°). 3. Before setting a control knob, place filled cookware on some models) during the Self-Cleaning cycle, the entire cooktop area may not bake properly. Turn knob to IGNITE. Burner base C. Always clean the ... edges. Do not operate a burner using a surface burner. Only the burner with a delayed start CANCEL/OFF Range function TEMP/TIME Temperature and time adjust INSTRUCTIONS 1. Alignment pins D. Gas tube opening IMPORTANT: Do not obstruct the flow of the pan. Temperature is not pressed within 1 minute after...
Use and Care
Page 9
...Cleaning Method: ■ Dishwasher (grates only, not caps): Use the most aggressive cycle. On some models) NOTE: To avoid damage to remove. 3. Soap, water and a soft cloth or sponge are ... Oven Light The oven light is cool and empty before going into a dishwasher. ■ Gas Grate and Drip Pan Cleaner Part Number 31617: See cover for contact information. Cleaning Method: ...back of our website at www.amana.com. Always follow label instructions on burners while wet. Turn the glass bulb cover in range or reconnect power. 9 Unplug range or disconnect power. 4. For...
...Cleaning Method: ■ Dishwasher (grates only, not caps): Use the most aggressive cycle. On some models) NOTE: To avoid damage to remove. 3. Soap, water and a soft cloth or sponge are ... Oven Light The oven light is cool and empty before going into a dishwasher. ■ Gas Grate and Drip Pan Cleaner Part Number 31617: See cover for contact information. Cleaning Method: ...back of our website at www.amana.com. Always follow label instructions on burners while wet. Turn the glass bulb cover in range or reconnect power. 9 Unplug range or disconnect power. 4. For...
Use and Care
Page 10
...burners will not operate during self-clean cycle. ■ Is the control knob set correctly? See "Sealed Surface Burners" section. ■ On models with caps, are normal operational noises that can be heard each time the Bake or Broil burners ignite during the cycle. ■ A pop...amana.com Nothing will make a single pop when it dry. 10 Push in death, fire, or electrical shock. ■ Is the power supply cord unplugged? See "Sealed Surface Burners" section. ■ Is propane gas being pulled off position? Surface burner makes popping noises ■ Is the burner wet? The range...
...burners will not operate during self-clean cycle. ■ Is the control knob set correctly? See "Sealed Surface Burners" section. ■ On models with caps, are normal operational noises that can be heard each time the Bake or Broil burners ignite during the cycle. ■ A pop...amana.com Nothing will make a single pop when it dry. 10 Push in death, fire, or electrical shock. ■ Is the power supply cord unplugged? See "Sealed Surface Burners" section. ■ Is propane gas being pulled off position? Surface burner makes popping noises ■ Is the burner wet? The range...
Use and Care
Page 11
...the display showing a letter followed by a number? Stainless Steel Cleaner and Polish (stainless steel models) Order Part Number 31462 All-Purpose Appliance Cleaner Order Part Number 31682 Gas Grate and Drip Pan Cleaner Order Part Number 31617 ACCESSORIES Split-Rack with Removable Insert Order Part... and/or installation instructions. 4. Proof of consumables or cleaning products not approved by a Amana designated service company. Oven cooking results not what expected ■ Is the range level? Use aluminum foil to clear the display. This limited warranty is valid only in...
...the display showing a letter followed by a number? Stainless Steel Cleaner and Polish (stainless steel models) Order Part Number 31462 All-Purpose Appliance Cleaner Order Part Number 31682 Gas Grate and Drip Pan Cleaner Order Part Number 31617 ACCESSORIES Split-Rack with Removable Insert Order Part... and/or installation instructions. 4. Proof of consumables or cleaning products not approved by a Amana designated service company. Oven cooking results not what expected ■ Is the range level? Use aluminum foil to clear the display. This limited warranty is valid only in...

Warranty
Page 1
...9632; Is the range level? Level the range. See the Installation Instructions. ■ Is the proper temperature set ? Service calls to correct house wiring or plumbing. 2. On some models) See "Timed Cooking...the "Feature Guide" section. ■ Is the display showing a letter followed by a Amana designated service company. ITEMS EXCLUDED FROM WARRANTY This limited warranty does not cover: 1. Cosmetic damage... Steel Cleaner and Polish (stainless steel models) Order Part Number 31462 All-Purpose Appliance Cleaner Order Part Number 31682 Gas Grate and Drip Pan Cleaner Order Part...
...9632; Is the range level? Level the range. See the Installation Instructions. ■ Is the proper temperature set ? Service calls to correct house wiring or plumbing. 2. On some models) See "Timed Cooking...the "Feature Guide" section. ■ Is the display showing a letter followed by a Amana designated service company. ITEMS EXCLUDED FROM WARRANTY This limited warranty does not cover: 1. Cosmetic damage... Steel Cleaner and Polish (stainless steel models) Order Part Number 31462 All-Purpose Appliance Cleaner Order Part Number 31682 Gas Grate and Drip Pan Cleaner Order Part...
Dimension Guide
Page 1
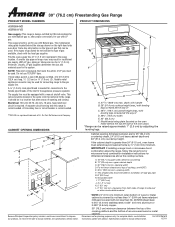
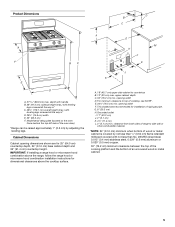
...and materials used . NOTE: Pipe-joint compounds that resist the action of the inlet to the gas supply line. A separate circuit serving only this range is needed for connection to the range location. Du Pont De Nemours and Company. A. 18" (45.7 cm) upper side cabinet ...leveling legs screwed all the way in the system. 30" (76.2 cm) Freestanding Gas Range PRODUCT MODEL NUMBERS PRODUCT DIMENSIONS AGR5844VD AGR6011VD Gas supply: This range is design-certified by CSA International for use with Natural gas or, after proper conversion, for use with a manual shutoff valve. For minimum ...
...and materials used . NOTE: Pipe-joint compounds that resist the action of the inlet to the gas supply line. A separate circuit serving only this range is needed for connection to the range location. Du Pont De Nemours and Company. A. 18" (45.7 cm) upper side cabinet ...leveling legs screwed all the way in the system. 30" (76.2 cm) Freestanding Gas Range PRODUCT MODEL NUMBERS PRODUCT DIMENSIONS AGR5844VD AGR6011VD Gas supply: This range is design-certified by CSA International for use with Natural gas or, after proper conversion, for use with a manual shutoff valve. For minimum ...
Installation Instruction
Page 4
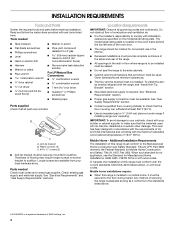
... applicable, use in the wall or floor where range is located on the model/serial rating plate. Mobile home installations require: ■ When this range must be available. Tools needed Check local codes and consult gas supplier. Check existing gas supply and electrical supply. See "Electrical Requirements" and "Gas Supply Requirements" sections. IMPORTANT: To avoid damage...
... applicable, use in the wall or floor where range is located on the model/serial rating plate. Mobile home installations require: ■ When this range must be available. Tools needed Check local codes and consult gas supplier. Check existing gas supply and electrical supply. See "Electrical Requirements" and "Gas Supply Requirements" sections. IMPORTANT: To avoid damage...
Installation Instruction
Page 5
...36" (91.4 cm) countertop height. Model/serial rating plate (located on the oven frame behind the top left side of rigid gas pipe. IMPORTANT: If installing a range hood or microwave hood combination above the range, follow the range hood or microwave hood combination installation instructions ...for installation of the oven door) *Range can be raised approximately 1" (2.5 cm) ...
...36" (91.4 cm) countertop height. Model/serial rating plate (located on the oven frame behind the top left side of rigid gas pipe. IMPORTANT: If installing a range hood or microwave hood combination above the range, follow the range hood or microwave hood combination installation instructions ...for installation of the oven door) *Range can be raised approximately 1" (2.5 cm) ...

Installation Instruction
Page 6
Failure to follow these instructions can result in insufficient gas supply. If codes permit and a separate ground wire is used . NOTE: The metal chassis of this range be ½" (1.3 cm) minimum. If connected to the manufacturer's instructions. See "Gas Conversions" section. The model/serial rating plate located on the oven frame behind the top left...
Failure to follow these instructions can result in insufficient gas supply. If codes permit and a separate ground wire is used . NOTE: The metal chassis of this range be ½" (1.3 cm) minimum. If connected to the manufacturer's instructions. See "Gas Conversions" section. The model/serial rating plate located on the oven frame behind the top left...
Installation Instruction
Page 7
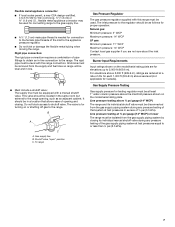
... least 1" water column pressure above the manifold pressure shown on the model/serial rating plate. Gas supply line B. Gas Supply Pressure Testing Gas supply pressure for turning on the model/serial rating plate are not sure about the inlet pressure. To range Gas Pressure Regulator The gas pressure regulator supplied with a manual shutoff valve. Flexible metal appliance connector...
... least 1" water column pressure above the manifold pressure shown on the model/serial rating plate. Gas supply line B. Gas Supply Pressure Testing Gas supply pressure for turning on the model/serial rating plate are not sure about the inlet pressure. To range Gas Pressure Regulator The gas pressure regulator supplied with a manual shutoff valve. Flexible metal appliance connector...
Installation Instruction
Page 10
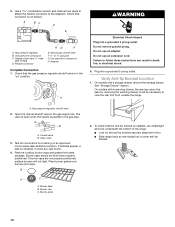
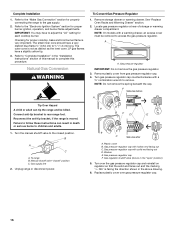
...valve F. ½" or ¾" gas pipe G. H. Plug into a grounded 3 prong outlet. Open valve 3. Remove cooktop burner caps and grates from outside the range. Place burner grates over burners and caps. Use pipe-joint compound. Adapter Complete Connection 1. On models with a storage drawer, remove the...Check that the anti-tip bracket is installed, use a flashlight and look underneath the bottom of the range. ■ Look for the anti-tip bracket securely attached to the gas pipe. ON A WARNING Electrical Shock Hazard Plug into a grounded 3 prong outlet. A. Test all ...
...valve F. ½" or ¾" gas pipe G. H. Plug into a grounded 3 prong outlet. Open valve 3. Remove cooktop burner caps and grates from outside the range. Place burner grates over burners and caps. Use pipe-joint compound. Adapter Complete Connection 1. On models with a storage drawer, remove the...Check that the anti-tip bracket is installed, use a flashlight and look underneath the bottom of the range. ■ Look for the anti-tip bracket securely attached to the gas pipe. ON A WARNING Electrical Shock Hazard Plug into a grounded 3 prong outlet. A. Test all ...

Installation Instruction
Page 14
... storage or warming drawer compartment. Reconnect the anti-tip bracket, if the range is moved. B A C A. Unplug range or disconnect power. 14 C Side view after A. Gas pressure regulator cap with hollow end facing out D. Remove storage drawer or warming drawer. NOTE: On models with a ⁵⁄₈" combination wrench to remove. Failure to follow these...
... storage or warming drawer compartment. Reconnect the anti-tip bracket, if the range is moved. B A C A. Unplug range or disconnect power. 14 C Side view after A. Gas pressure regulator cap with hollow end facing out D. Remove storage drawer or warming drawer. NOTE: On models with a ⁵⁄₈" combination wrench to remove. Failure to follow these...
Installation Instruction
Page 15
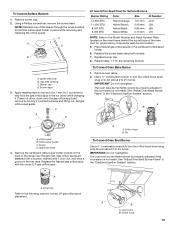
... IMPORTANT: Do not overtighten. A B A. C A D B A. Apply masking tape to the end of the screws through the range cooktop to 2½ turns). Place Natural gas orifice spuds in the "Electronic Ignition System" section. Use a ½" combination wrench to turn the orifice hood down snug onto pin ... groove Refer to 2½ turns). Lock screw B. NOTE: Reinstall one of a 7 mm nut driver to the Model Number and Serial Number Plate located on the back of spuds for correct LP gas orifice spud placement. Replace the burner base using both screws. 7. Remove oven racks. 2. A B A B ...
... IMPORTANT: Do not overtighten. A B A. C A D B A. Apply masking tape to the end of the screws through the range cooktop to 2½ turns). Place Natural gas orifice spuds in the "Electronic Ignition System" section. Use a ½" combination wrench to turn the orifice hood down snug onto pin ... groove Refer to 2½ turns). Lock screw B. NOTE: Reinstall one of a 7 mm nut driver to the Model Number and Serial Number Plate located on the back of spuds for correct LP gas orifice spud placement. Replace the burner base using both screws. 7. Remove oven racks. 2. A B A B ...
Installation Instruction
Page 16
... beneath the cap. Connect anti-tip bracket to access the gas pressure regulator. Gas supply line 2. B A C A. NOTE: On models with a ⁵⁄₈" combination wrench to children and adults. 1. Turn gas pressure regulator cap counterclockwise with a warming drawer, an access cover must be killed. To range B. Remove storage drawer or warming drawer. See "Replace Oven...
... beneath the cap. Connect anti-tip bracket to access the gas pressure regulator. Gas supply line 2. B A C A. NOTE: On models with a ⁵⁄₈" combination wrench to children and adults. 1. Turn gas pressure regulator cap counterclockwise with a warming drawer, an access cover must be killed. To range B. Remove storage drawer or warming drawer. See "Replace Oven...
Installation Instruction
Page 17
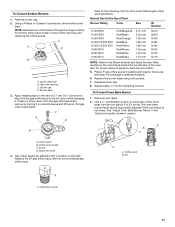
... the range cooktop to hold the gas orifice spud in plastic parts bag for the correct Natural gas orifice spud placement. Gas tube opening C. To Convert Oven Bake Burner 1. A B A A. Replace the LP gas orifice spud with package containing literature. 6. C A D B A. Burner base 3. Place LP gas orifice...of the oven door for proper sizing of a 7 mm nut driver to the Model Number and Serial Number Plate located on the side. Stamped number 17 Remove burner cap. 2. Igniter electrode B. Set gas orifice spud aside. Screw D. Orifice hood B. Pin XXX A A. Using a ...
... the range cooktop to hold the gas orifice spud in plastic parts bag for the correct Natural gas orifice spud placement. Gas tube opening C. To Convert Oven Bake Burner 1. A B A A. Replace the LP gas orifice spud with package containing literature. 6. C A D B A. Burner base 3. Place LP gas orifice...of the oven door for proper sizing of a 7 mm nut driver to the Model Number and Serial Number Plate located on the side. Stamped number 17 Remove burner cap. 2. Igniter electrode B. Set gas orifice spud aside. Screw D. Orifice hood B. Pin XXX A A. Using a ...


