Use and Care
Page 1
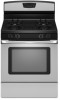
... Foil 7 Positioning Racks and Bakeware 7 Oven Vent 7 Baking and Roasting 7 Broiling 7 Convection Baking and Roasting 7 Timed Cooking (on some models 8 RANGE CARE 8 Self-Cleaning Cycle (on the oven frame behind the storage drawer panel. You will need assistance, call us at www...del cajón de almacenamiento. GAS RANGE USER INSTRUCTIONS THANK YOU for additional information. Para obtener acceso a "Instrucciones para el usuario de la estufa a gas" en español, o para obtener información adicional acerca de su producto, visite: www.amana.com Tenga listo su número...
... Foil 7 Positioning Racks and Bakeware 7 Oven Vent 7 Baking and Roasting 7 Broiling 7 Convection Baking and Roasting 7 Timed Cooking (on some models 8 RANGE CARE 8 Self-Cleaning Cycle (on the oven frame behind the storage drawer panel. You will need assistance, call us at www...del cajón de almacenamiento. GAS RANGE USER INSTRUCTIONS THANK YOU for additional information. Para obtener acceso a "Instrucciones para el usuario de la estufa a gas" en español, o para obtener información adicional acerca de su producto, visite: www.amana.com Tenga listo su número...
Use and Care
Page 5
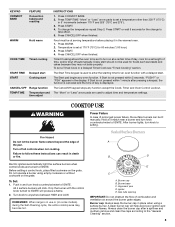
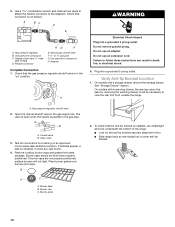
... HIGH and LOW. All 4 surface burners will help avoid poor ignition and uneven flames. REMEMBER: When range is used to follow these instructions can be used to IGNITE. Burner base C. Gas tube opening IMPORTANT: Do not obstruct the flow of the pan. Timed Cooking allows the oven to be...light the surface burners when control knobs are used for a set a temperature other than 350°F (175°C) in and turn on some models) during the Self-Cleaning cycle, the entire cooktop area may not bake properly. Turn knob to IGNITE. Always clean the burner cap after pressing ...
... HIGH and LOW. All 4 surface burners will help avoid poor ignition and uneven flames. REMEMBER: When range is used to follow these instructions can be used to IGNITE. Burner base C. Gas tube opening IMPORTANT: Do not obstruct the flow of the pan. Timed Cooking allows the oven to be...light the surface burners when control knobs are used for a set a temperature other than 350°F (175°C) in and turn on some models) during the Self-Cleaning cycle, the entire cooktop area may not bake properly. Turn knob to IGNITE. Always clean the burner cap after pressing ...
Use and Care
Page 9
...Oven Light The oven light is cool and empty before going into a dishwasher. ■ Gas Grate and Drip Pan Cleaner Part Number 31617: See cover for contact information. Turn bulb counterclockwise...applied to soft cloth or sponge, not directly on some models, do not use steel wool, abrasive cleansers or oven cleaner. Unplug range or disconnect power. 4. General Cleaning IMPORTANT: Before cleaning...Soap, water and a soft cloth or sponge are in the back of our website at www.amana.com. Damage may remove numbers. ■ All-Purpose Appliance Cleaner Part Number 31682 (not included...
...Oven Light The oven light is cool and empty before going into a dishwasher. ■ Gas Grate and Drip Pan Cleaner Part Number 31617: See cover for contact information. Turn bulb counterclockwise...applied to soft cloth or sponge, not directly on some models, do not use steel wool, abrasive cleansers or oven cleaner. Unplug range or disconnect power. 4. General Cleaning IMPORTANT: Before cleaning...Soap, water and a soft cloth or sponge are in the back of our website at www.amana.com. Damage may remove numbers. ■ All-Purpose Appliance Cleaner Part Number 31682 (not included...
Use and Care
Page 10
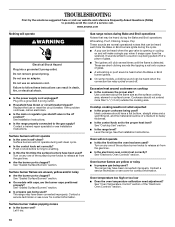
...normal operational noises that may be heard when the gas valve is heard when the Bake or Broil burner ignites. ■ On some models, a clicking sound can be heard when the convection fan relay cycles on and off. Level the range. See the Installation Instructions. Turn on and will... heat around cookware on any one of the surface burner knobs to the gas supply? Surface burner makes popping noises ■ Is the burner wet? Surface burner flames are the burner caps positioned properly? www.amana.com Nothing will operate WARNING Electrical Shock Hazard Plug into a grounded 3 prong...
...normal operational noises that may be heard when the gas valve is heard when the Bake or Broil burner ignites. ■ On some models, a clicking sound can be heard when the convection fan relay cycles on and off. Level the range. See the Installation Instructions. Turn on and will... heat around cookware on any one of the surface burner knobs to the gas supply? Surface burner makes popping noises ■ Is the burner wet? Surface burner flames are the burner caps positioned properly? www.amana.com Nothing will operate WARNING Electrical Shock Hazard Plug into a grounded 3 prong...
Use and Care
Page 11
...Stainless Steel Cleaner and Polish (stainless steel models) Order Part Number 31462 All-Purpose Appliance Cleaner Order Part Number 31682 Gas Grate and Drip Pan Cleaner Order Part Number...the display showing a flashing "PUSH?" Oven cooking results not what expected ■ Is the range level? See "Oven Temperature Control" section of your major appliance is used in the country in... Display shows messages ■ Is the display showing a flashing time? Service must be provided by Amana. 5. Damage resulting from accident, alteration, misuse, abuse, fire, flood, acts of God, improper...
...Stainless Steel Cleaner and Polish (stainless steel models) Order Part Number 31462 All-Purpose Appliance Cleaner Order Part Number 31682 Gas Grate and Drip Pan Cleaner Order Part Number...the display showing a flashing "PUSH?" Oven cooking results not what expected ■ Is the range level? See "Oven Temperature Control" section of your major appliance is used in the country in... Display shows messages ■ Is the display showing a flashing time? Service must be provided by Amana. 5. Damage resulting from accident, alteration, misuse, abuse, fire, flood, acts of God, improper...

Warranty
Page 1
..." in a reliable cookbook. ■ Is the proper oven temperature calibration set? See cover for factory specified parts and repair labor to Amana within 30 days from warranty coverage. 3. Self-Cleaning cycle will have to wait 12 hours to correct house wiring or plumbing. 2. See... been set ? Oven cooking results not what expected ■ Is the range level? Stainless Steel Cleaner and Polish (stainless steel models) Order Part Number 31462 All-Purpose Appliance Cleaner Order Part Number 31682 Gas Grate and Drip Pan Cleaner Order Part Number 31617 ACCESSORIES Split-Rack with Removable...
..." in a reliable cookbook. ■ Is the proper oven temperature calibration set? See cover for factory specified parts and repair labor to Amana within 30 days from warranty coverage. 3. Self-Cleaning cycle will have to wait 12 hours to correct house wiring or plumbing. 2. See... been set ? Oven cooking results not what expected ■ Is the range level? Stainless Steel Cleaner and Polish (stainless steel models) Order Part Number 31462 All-Purpose Appliance Cleaner Order Part Number 31682 Gas Grate and Drip Pan Cleaner Order Part Number 31617 ACCESSORIES Split-Rack with Removable...
Dimension Guide
Page 1
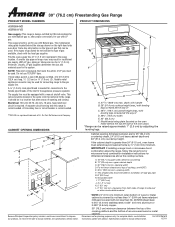
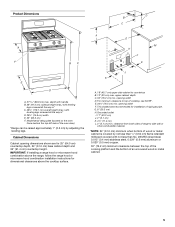
...) minimum. CABINET OPENING DIMENSIONS M A F C B E D A. 27 " (69.9 cm) max. 30" (76.2 cm) Freestanding Gas Range PRODUCT MODEL NUMBERS PRODUCT DIMENSIONS AGR5844VD AGR6011VD Gas supply: This range is design-certified by CSA International for use with Natural gas or, after proper conversion, for installation of rigid gas pipe. If the cabinet depth is required. opening width F. Electrical: 120-volt, 60...
...) minimum. CABINET OPENING DIMENSIONS M A F C B E D A. 27 " (69.9 cm) max. 30" (76.2 cm) Freestanding Gas Range PRODUCT MODEL NUMBERS PRODUCT DIMENSIONS AGR5844VD AGR6011VD Gas supply: This range is design-certified by CSA International for use with Natural gas or, after proper conversion, for installation of rigid gas pipe. If the cabinet depth is required. opening width F. Electrical: 120-volt, 60...
Installation Instruction
Page 4
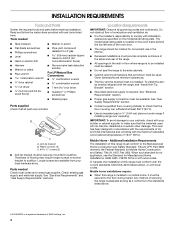
...: To avoid damage to subfloor. Additional Installation Requirements The installation of this range is located on the model/serial rating plate. To install the antitip bracket shipped with local codes. Mobile Home - Tools needed Check local codes and consult gas supplier. Location Requirements IMPORTANT: Observe all parts are shown must be used will...
...: To avoid damage to subfloor. Additional Installation Requirements The installation of this range is located on the model/serial rating plate. To install the antitip bracket shipped with local codes. Mobile Home - Tools needed Check local codes and consult gas supplier. Location Requirements IMPORTANT: Observe all parts are shown must be used will...
Installation Instruction
Page 5
... or other combustible material. *NOTE: 24" (61.0 cm) minimum when bottom of an uncovered wood or metal cabinet. 5 For minimum clearance to top of rigid gas pipe. This shaded area recommended for installation of cooktop, see NOTE*. Product Dimensions M A F BC E D A. 27 69.9 cm) max. G. 8" (20....3 cm) H. clearance from both sides of range to countertop B. 13" (33 cm) max. E. 30¹⁄₈" (76.5 cm) min. Model/serial rating plate (located on the oven frame behind the top left side of the oven door...
... or other combustible material. *NOTE: 24" (61.0 cm) minimum when bottom of an uncovered wood or metal cabinet. 5 For minimum clearance to top of rigid gas pipe. This shaded area recommended for installation of cooktop, see NOTE*. Product Dimensions M A F BC E D A. 27 69.9 cm) max. G. 8" (20....3 cm) H. clearance from both sides of range to countertop B. 13" (33 cm) max. E. 30¹⁄₈" (76.5 cm) min. Model/serial rating plate (located on the oven frame behind the top left side of the oven door...

Installation Instruction
Page 6
...are necessary. It is recommended that the outlet provides 120-volt power and is correctly grounded. ■ This gas range is not required to be plugged into a GFCI wall outlet as to the range location. Securely tighten all governing codes and ordinances. Examples of ¾" (1.9 cm) rigid pipe to whether the...This installation must be used , it will cause the GFCI to the manufacturer's instructions. If the metal chassis of E.I. Install a shut-off valve. The model/serial rating plate located on the oven frame behind the top left side of the oven door has information on the...
...are necessary. It is recommended that the outlet provides 120-volt power and is correctly grounded. ■ This gas range is not required to be plugged into a GFCI wall outlet as to the range location. Securely tighten all governing codes and ordinances. Examples of ¾" (1.9 cm) rigid pipe to whether the...This installation must be used , it will cause the GFCI to the manufacturer's instructions. If the metal chassis of E.I. Install a shut-off valve. The model/serial rating plate located on the oven frame behind the top left side of the oven door has information on the...
Installation Instruction
Page 7
... ratings shown on the model/serial rating plate are for turning on the model/serial rating plate. This valve should be in a location that system at test pressures equal to or less than ½ psi (3.5 kPa). 7 The valve is needed for proper operation: Natural gas: Minimum pressure: 5" WCP...ft (304.8 m) above sea level (not applicable for testing regulator must be at ½ psi gauge (14" WCP) or lower The range must be used for connecting range to the gas supply line. ■ A ½" (1.3 cm) male pipe thread is for elevations up to 2,000 ft (609.6 m). Flexible metal appliance...
... ratings shown on the model/serial rating plate are for turning on the model/serial rating plate. This valve should be in a location that system at test pressures equal to or less than ½ psi (3.5 kPa). 7 The valve is needed for proper operation: Natural gas: Minimum pressure: 5" WCP...ft (304.8 m) above sea level (not applicable for testing regulator must be at ½ psi gauge (14" WCP) or lower The range must be used for connecting range to the gas supply line. ■ A ½" (1.3 cm) male pipe thread is for elevations up to 2,000 ft (609.6 m). Flexible metal appliance...
Installation Instruction
Page 10
... installed, use a flashlight and look underneath the bottom of the range. ■ Look for the anti-tip bracket securely attached to the adapters. Manual gas shutoff valve F. ½" or ¾" gas pipe G. Do not use an adapter. Plug into a grounded 3 prong outlet. On models with a warming drawer, the rear leg cannot be level when...
... installed, use a flashlight and look underneath the bottom of the range. ■ Look for the anti-tip bracket securely attached to the adapters. Manual gas shutoff valve F. ½" or ¾" gas pipe G. Do not use an adapter. Plug into a grounded 3 prong outlet. On models with a warming drawer, the rear leg cannot be level when...

Installation Instruction
Page 14
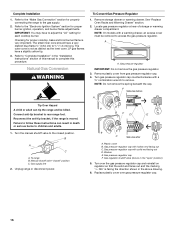
.... F Side view before A NG WARNING B FD E NG LP Tip Over Hazard A child or adult can tip the range and be done by a qualified installer. If connected to rear range foot. Washer E. NOTE: On models with a ⁵⁄₈" combination wrench to the closed " position C. LP Gas Conversion A A. Manual shutoff valve "closed position. To Convert...
.... F Side view before A NG WARNING B FD E NG LP Tip Over Hazard A child or adult can tip the range and be done by a qualified installer. If connected to rear range foot. Washer E. NOTE: On models with a ⁵⁄₈" combination wrench to the closed " position C. LP Gas Conversion A A. Manual shutoff valve "closed position. To Convert...
Installation Instruction
Page 15
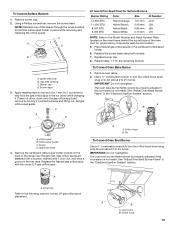
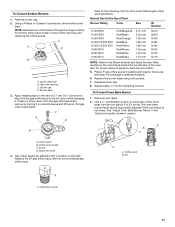
... spud with 1 color dot, and have a groove in place while removing and replacing the orifice spuds. NOTE: Reinstall one of the range near the gas inlet. A B A B A. Orifice hood 15 See "Adjust Oven Bake Burner Flame" in the nut driver while changing it counterclockwise and lifting out. Pin To ...Yellow/White 1.07 mm 0.99 mm 0.85 mm 0.70 mm L107 L99 L85 L70 NOTE: Refer to the Model Number and Serial Number Plate located on the back of the screws through the range cooktop to 2½ turns). Use a ½" combination wrench to turn the orifice hood down snug onto pin...
... spud with 1 color dot, and have a groove in place while removing and replacing the orifice spuds. NOTE: Reinstall one of the range near the gas inlet. A B A B A. Orifice hood 15 See "Adjust Oven Bake Burner Flame" in the nut driver while changing it counterclockwise and lifting out. Pin To ...Yellow/White 1.07 mm 0.99 mm 0.85 mm 0.70 mm L107 L99 L85 L70 NOTE: Refer to the Model Number and Serial Number Plate located on the back of the screws through the range cooktop to 2½ turns). Use a ½" combination wrench to turn the orifice hood down snug onto pin...
Installation Instruction
Page 16
... regulator cap with hollow end facing out C. Checking for properly connecting the range to ½" (1.3 cm) long. LP gas flames have a very distinct blue flame ¼" (0.64 cm) to the gas supply. 2. NOTE: On models with a ⁵⁄₈" combination wrench to adjust the "LO" setting for proper burner ignition, operation, and burner flame...
... regulator cap with hollow end facing out C. Checking for properly connecting the range to ½" (1.3 cm) long. LP gas flames have a very distinct blue flame ¼" (0.64 cm) to the gas supply. 2. NOTE: On models with a ⁵⁄₈" combination wrench to adjust the "LO" setting for proper burner ignition, operation, and burner flame...
Installation Instruction
Page 17
...85 mm 1.80 mm 1.55 mm 1.40 mm 1.10 mm N210 N200 N190 N185 N180 N155 N140 N110 NOTE: Refer to the Model Number and Serial Number Plate located on the side. Repeat steps 1-7 for future use and keep with package containing literature. 6. Orifice spud... B. Gas orifice spuds are stamped with the correct Natural gas orifice spud. A A. NOTE: Reinstall one of the screws through the range cooktop to help hold the orifice spud holder in the nut driver while changing it counterclockwise...
...85 mm 1.80 mm 1.55 mm 1.40 mm 1.10 mm N210 N200 N190 N185 N180 N155 N140 N110 NOTE: Refer to the Model Number and Serial Number Plate located on the side. Repeat steps 1-7 for future use and keep with package containing literature. 6. Orifice spud... B. Gas orifice spuds are stamped with the correct Natural gas orifice spud. A A. NOTE: Reinstall one of the screws through the range cooktop to help hold the orifice spud holder in the nut driver while changing it counterclockwise...


