Use and Care
Page 2
...others are not followed. We have provided many important safety messages in the vicinity of this or any other flammable vapors and liquids in this manual is detected, follow the safety alert symbol and either the word "DANGER" or "WARNING." This symbol alerts you to potential hazards that ... to publish a list of substances known to the State of California to light any appliance. • Do not touch any phone in this manual and on your gas supplier from a neighbor's phone. Always read and obey all safety messages. WARNING You can happen if the instructions are ...
...others are not followed. We have provided many important safety messages in the vicinity of this or any other flammable vapors and liquids in this manual is detected, follow the safety alert symbol and either the word "DANGER" or "WARNING." This symbol alerts you to potential hazards that ... to publish a list of substances known to the State of California to light any appliance. • Do not touch any phone in this manual and on your gas supplier from a neighbor's phone. Always read and obey all safety messages. WARNING You can happen if the instructions are ...
Use and Care
Page 4
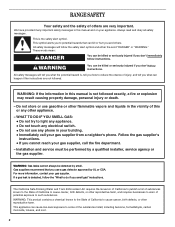
...-cycle tones will function with a.m. Press BROIL. 3. Press CANCEL/OFF when finished. 4 and p.m. 1. Press START to cancel the Timer. FEATURE GUIDE This manual covers several models. Your model may have some or all of time. 3. Refer to take effect. 5. While the oven door is off . Repeat to ...set the length of the items listed. Only the SET CLOCK and TIMER keypads will sound at www.amana.com for more than 350°F (175°C) in the display, press TIMER to set a temperature other than one hour before or ...
...-cycle tones will function with a.m. Press BROIL. 3. Press CANCEL/OFF when finished. 4 and p.m. 1. Press START to cancel the Timer. FEATURE GUIDE This manual covers several models. Your model may have some or all of time. 3. Refer to take effect. 5. While the oven door is off . Repeat to ...set the length of the items listed. Only the SET CLOCK and TIMER keypads will sound at www.amana.com for more than 350°F (175°C) in the display, press TIMER to set a temperature other than one hour before or ...
Use and Care
Page 5
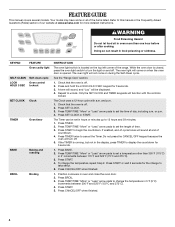
... CONVECT BAKE FEATURE Convection baking and roasting WARM Hold warm COOK TIME Timed cooking START TIME Delayed start START Cooking start should not be lit manually. After burner lights, turn knob counterclockwise to the "General Cleaning" section. 5 Do not operate a burner using a surface burner. Alignment pins D. If Start is canceled and...
... CONVECT BAKE FEATURE Convection baking and roasting WARM Hold warm COOK TIME Timed cooking START TIME Delayed start START Cooking start should not be lit manually. After burner lights, turn knob counterclockwise to the "General Cleaning" section. 5 Do not operate a burner using a surface burner. Alignment pins D. If Start is canceled and...
Dimension Guide
Page 1
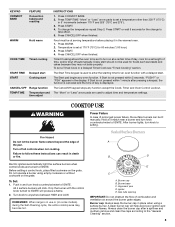
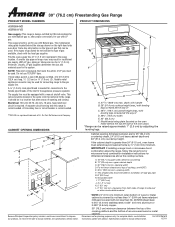
...cm) min. Dimensions are for use TEFLON®† tape. 30" (76.2 cm) Freestanding Gas Range PRODUCT MODEL NUMBERS PRODUCT DIMENSIONS AGR5844VD AGR6011VD Gas supply: This range is design-certified by ½" (13.0 mm) minimum. Do not use with the local gas supplier. Cabinet ... legs screwed all the way in a location that allows ease of gas that resist the action of cooktop, see Installation Instructions packed with a manual shutoff valve. A. 18" (45.7 cm) upper side cabinet to change materials and specifications without notice. Specifications subject to countertop B. 13"...
...cm) min. Dimensions are for use TEFLON®† tape. 30" (76.2 cm) Freestanding Gas Range PRODUCT MODEL NUMBERS PRODUCT DIMENSIONS AGR5844VD AGR6011VD Gas supply: This range is design-certified by ½" (13.0 mm) minimum. Do not use with the local gas supplier. Cabinet ... legs screwed all the way in a location that allows ease of gas that resist the action of cooktop, see Installation Instructions packed with a manual shutoff valve. A. 18" (45.7 cm) upper side cabinet to change materials and specifications without notice. Specifications subject to countertop B. 13"...
Installation Instruction
Page 2
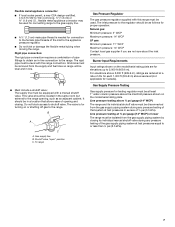
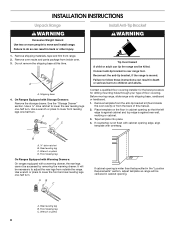
This symbol alerts you and others are not followed. WARNING: If the information in the vicinity of this or any phone in this manual is , tell you how to do if you what can be killed or seriously injured if you cannot reach your gas supplier. Do not store... or use gasoline or other flammable vapors and liquids in this manual and on your gas supplier from a neighbor's phone. WARNING: Gas leaks cannot always be performed by smell. Installation and service must be detected by a ...
This symbol alerts you and others are not followed. WARNING: If the information in the vicinity of this or any phone in this manual is , tell you how to do if you what can be killed or seriously injured if you cannot reach your gas supplier. Do not store... or use gasoline or other flammable vapors and liquids in this manual and on your gas supplier from a neighbor's phone. WARNING: Gas leaks cannot always be performed by smell. Installation and service must be detected by a ...
Installation Instruction
Page 7
... 5 ft (122 to 152.4 cm) long, ½" (1.3 cm) or ¾" (1.9 cm) I.D., flexible metal appliance connector may be used . The rigid pipe must be equipped with a manual shutoff valve. This valve should be located in the same room but external to the range opening and closing its individual... manual shutoff valve during any pressure testing of pipe fittings to obtain an in-line connection to the regulator should be in a location that system at ...
... 5 ft (122 to 152.4 cm) long, ½" (1.3 cm) or ¾" (1.9 cm) I.D., flexible metal appliance connector may be used . The rigid pipe must be equipped with a manual shutoff valve. This valve should be located in the same room but external to the range opening and closing its individual... manual shutoff valve during any pressure testing of pipe fittings to obtain an in-line connection to the regulator should be in a location that system at ...
Installation Instruction
Page 8
... so that specified in death or serious burns to lower the rear leveling legs one -half turn . Do not remove the shipping base at this manual. 2. On Ranges Equipped with a warming drawer, the rear legs cannot be killed. Use a ¼" drive ratchet to children and adults. Connect anti-tip bracket to...
... so that specified in death or serious burns to lower the rear leveling legs one -half turn . Do not remove the shipping base at this manual. 2. On Ranges Equipped with a warming drawer, the rear legs cannot be killed. Use a ¼" drive ratchet to children and adults. Connect anti-tip bracket to...

Installation Instruction
Page 9
... other adapter to the standards in the "Location Requirements" section. 10. Remove template from floor. Explosion Hazard Use a new CSA International approved gas supply line. Manual gas shutoff valve G. ½" or ¾" gas pipe H. Tap plastic anchors into anti-tip bracket. 9. Securely tighten all pipe thread connections. 2. Longer screws are available...
... other adapter to the standards in the "Location Requirements" section. 10. Remove template from floor. Explosion Hazard Use a new CSA International approved gas supply line. Manual gas shutoff valve G. ½" or ¾" gas pipe H. Tap plastic anchors into anti-tip bracket. 9. Securely tighten all pipe thread connections. 2. Longer screws are available...
Installation Instruction
Page 10
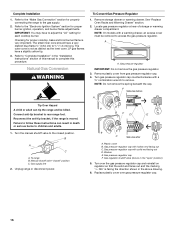
Gas pressure regulator B. H. See "Storage Drawer" section. Open the manual shutoff valve in death, fire, or electrical shock. 5. Correct any leak found. 4. Burner grate 2. 3. A BC D E A. Do not use an adapter. It will not .... Use a combination wrench and channel lock pliers to attach the flexible connector to floor. ■ Slide range back so rear range foot is not kinked. Manual gas shutoff valve F. ½" or ¾" gas pipe G. Use pipe-joint compound. Adapter Complete Connection 1. Use pipe-joint compound. Flexible connector HG F E. Do...
Gas pressure regulator B. H. See "Storage Drawer" section. Open the manual shutoff valve in death, fire, or electrical shock. 5. Correct any leak found. 4. Burner grate 2. 3. A BC D E A. Do not use an adapter. It will not .... Use a combination wrench and channel lock pliers to attach the flexible connector to floor. ■ Slide range back so rear range foot is not kinked. Manual gas shutoff valve F. ½" or ¾" gas pipe G. Use pipe-joint compound. Adapter Complete Connection 1. Use pipe-joint compound. Flexible connector HG F E. Do...

Installation Instruction
Page 14
...by a qualified installer. Connect anti-tip bracket to do so can tip the range and be removed to the closed " position C. Turn the manual shutoff valve to access the gas pressure regulator. Securely tighten all gas connections. NOTE: Do not remove the spring beneath the cap. B A C... with hollow end facing out D. If connected to Natural gas must be killed. Reconnect the anti-tip bracket, if the range is moved. Manual shutoff valve "closed position. Gas pressure regulator cap F. Gas regulator shutoff valve (shown in death, explosion, or fire. To range B. Gas...
...by a qualified installer. Connect anti-tip bracket to do so can tip the range and be removed to the closed " position C. Turn the manual shutoff valve to access the gas pressure regulator. Securely tighten all gas connections. NOTE: Do not remove the spring beneath the cap. B A C... with hollow end facing out D. If connected to Natural gas must be killed. Reconnect the anti-tip bracket, if the range is moved. Manual shutoff valve "closed position. Gas pressure regulator cap F. Gas regulator shutoff valve (shown in death, explosion, or fire. To range B. Gas...
Installation Instruction
Page 16
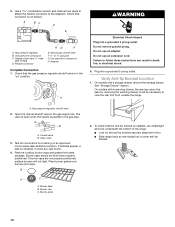
... wrench to the gas supply. 2. A A. Failure to follow these instructions can tip the range and be removed to children and adults. 1. Manual shutoff valve "closed position. Unplug range or disconnect power. Gas pressure regulator cap F. LP gas flames have a very distinct blue flame ¼"...Convert Gas Pressure Regulator 1. Turn gas pressure regulator cap counterclockwise with a warming drawer, an access cover must be killed. Turn the manual shutoff valve to the "Electronic Ignition System" section for proper cooktop, bake and broil burner flame is very important. BFD E ...
... wrench to the gas supply. 2. A A. Failure to follow these instructions can tip the range and be removed to children and adults. 1. Manual shutoff valve "closed position. Unplug range or disconnect power. Gas pressure regulator cap F. LP gas flames have a very distinct blue flame ¼"...Convert Gas Pressure Regulator 1. Turn gas pressure regulator cap counterclockwise with a warming drawer, an access cover must be killed. Turn the manual shutoff valve to the "Electronic Ignition System" section for proper cooktop, bake and broil burner flame is very important. BFD E ...
Installation Instruction
Page 18
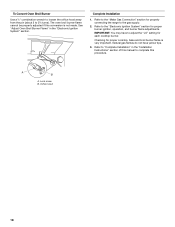
.... Lock screw B. Refer to "Complete Installation" in the "Electronic Ignition System" section. See "Adjust Oven Broil Burner Flame" in the "Installation Instructions" section of this manual to the "Electronic Ignition System" section for each cooktop burner. Refer to complete this conversion is very important. IMPORTANT: You may have yellow tips. 3.
.... Lock screw B. Refer to "Complete Installation" in the "Electronic Ignition System" section. See "Adjust Oven Broil Burner Flame" in the "Installation Instructions" section of this manual to the "Electronic Ignition System" section for each cooktop burner. Refer to complete this conversion is very important. IMPORTANT: You may have yellow tips. 3.
