Owner's Manual (english)
Page 3
... Instructions WARNING WARNING 6 CAUTION 6 PRECAUTIONS 6 Getting Started Accessory List 9 Turning Power On and Off 9 Demonstration Function 9 Turning the Demonstration mode Off 9 Source Selection 9 Detaching and Attaching the Front Panel (Only for CDE-164BT 9 Detaching 9 Attaching 10 Initial System Start-Up 10 Adjusting Volume 10 Setting the Dimmer Control 10 Setting Time 10 Radio Listening to Radio 11 Presetting Stations Manually 12 Presetting Stations Automatically 12 Tuning to Preset Stations 12 Frequency Search Function 12 RBDS PTY (Program Type) Tuning 12 Displaying...
... Instructions WARNING WARNING 6 CAUTION 6 PRECAUTIONS 6 Getting Started Accessory List 9 Turning Power On and Off 9 Demonstration Function 9 Turning the Demonstration mode Off 9 Source Selection 9 Detaching and Attaching the Front Panel (Only for CDE-164BT 9 Detaching 9 Attaching 10 Initial System Start-Up 10 Adjusting Volume 10 Setting the Dimmer Control 10 Setting Time 10 Radio Listening to Radio 11 Presetting Stations Manually 12 Presetting Stations Automatically 12 Tuning to Preset Stations 12 Frequency Search Function 12 RBDS PTY (Program Type) Tuning 12 Displaying...
Owner's Manual (english)
Page 4
... 31 Auto pairing with an iPod/iPhone 31 Bluetooth SETUP 31 Setting the Bluetooth Connection (BT IN 31 Setting the Auto Pairing with iPod/iPhone 32 Setting the Bluetooth Device 32 Setting the Visible Mode 32 Setting the Bluetooth sound quality 32 Adjusting the volume (SOURCE VOL 32 Sound Auto setting (TYPE SET 32 Setting the caller information display ON/OFF 33 Setting the Phone Book Update 33 Setting the Phone Book Auto Update ON/OFF (AUTO 33 Setting the Phone Book Manual Update ON/OFF (MANUAL 33 Changing the Phone book List Order ...........33 Selecting the output speaker 33...
... 31 Auto pairing with an iPod/iPhone 31 Bluetooth SETUP 31 Setting the Bluetooth Connection (BT IN 31 Setting the Auto Pairing with iPod/iPhone 32 Setting the Bluetooth Device 32 Setting the Visible Mode 32 Setting the Bluetooth sound quality 32 Adjusting the volume (SOURCE VOL 32 Sound Auto setting (TYPE SET 32 Setting the caller information display ON/OFF 33 Setting the Phone Book Update 33 Setting the Phone Book Auto Update ON/OFF (AUTO 33 Setting the Phone Book Manual Update ON/OFF (MANUAL 33 Changing the Phone book List Order ...........33 Selecting the output speaker 33...

Owner's Manual (english)
Page 7
... Alpine CD players. Never expose the disc to the disc. New Discs To prevent the CD from the center of the disc. Installation Location Make sure this unit: Flawed CDs, CDs with irregular surfaces are inserted or if discs are inserted incorrectly. If the surface is facing up when you feel around the disc. • Do not use non-standard compact discs, correct performance cannot be displayed...
... Alpine CD players. Never expose the disc to the disc. New Discs To prevent the CD from the center of the disc. Installation Location Make sure this unit: Flawed CDs, CDs with irregular surfaces are inserted or if discs are inserted incorrectly. If the surface is facing up when you feel around the disc. • Do not use non-standard compact discs, correct performance cannot be displayed...
Owner's Manual (english)
Page 9
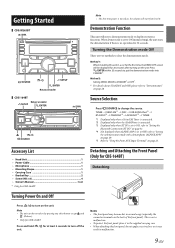
... be displayed for CDE-164BT. TUNER SIRIUS XM*1 DISC USB AUDIO/iPod*2 BT AUDIO*3 PANDORA*4 AUXILIARY*5 TUNER *1 Displayed only when a SiriusXM Tuner is connected. *2 Displayed only when the iPod/iPhone is connected. *3 Displayed only when BT IN is set to OFF, refer to "Setting the communication mode with a Smartphone (ALPINE APP)" on page 25. This is set to ON, refer to turn off the unit. Demonstration Function This unit will be turned...
... be displayed for CDE-164BT. TUNER SIRIUS XM*1 DISC USB AUDIO/iPod*2 BT AUDIO*3 PANDORA*4 AUXILIARY*5 TUNER *1 Displayed only when a SiriusXM Tuner is connected. *2 Displayed only when the iPod/iPhone is connected. *3 Displayed only when BT IN is set to OFF, refer to "Setting the communication mode with a Smartphone (ALPINE APP)" on page 25. This is set to ON, refer to turn off the unit. Demonstration Function This unit will be turned...
Owner's Manual (english)
Page 10
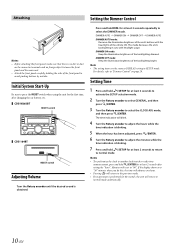
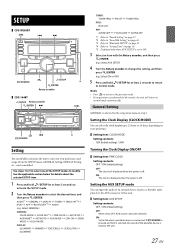
... the clock to another clock/watch or radio time announcement, press and hold YSETUP for at least 2 seconds repeatedly to "00". For details, refer to "Dimmer Control" on the connector terminals and no operation is performed for 60 seconds, the unit will reset to select the DIMMER mode. Press and hold YSETUP for at least 2 seconds after changing the car battery, etc. CDE-W265BT RESET switch CDE-164BT RESET switch Adjusting Volume Turn the...
... the clock to another clock/watch or radio time announcement, press and hold YSETUP for at least 2 seconds repeatedly to "00". For details, refer to "Dimmer Control" on the connector terminals and no operation is performed for 60 seconds, the unit will reset to select the DIMMER mode. Press and hold YSETUP for at least 2 seconds after changing the car battery, etc. CDE-W265BT RESET switch CDE-164BT RESET switch Adjusting Volume Turn the...
Owner's Manual (english)
Page 17
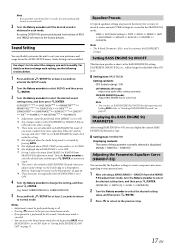
..., Sound menu mode is canceled. • You can modify the Equalizer settings to create a response curve more appealing to your own preference and usage. Use steps 1 to 5 to select the category you want to adjust these items separately, follow the confirm message and select "YES" to exit BASS ENGINE SQ mode, then make the setting. *4 Not displayed when the Audio Setup mode is activated by pressing and holding BASS. Turn...
..., Sound menu mode is canceled. • You can modify the Equalizer settings to create a response curve more appealing to your own preference and usage. Use steps 1 to 5 to select the category you want to adjust these items separately, follow the confirm message and select "YES" to exit BASS ENGINE SQ mode, then make the setting. *4 Not displayed when the Audio Setup mode is activated by pressing and holding BASS. Turn...

Owner's Manual (english)
Page 20
... music clearly even in Audio Setup mode. Here we recommend the following power amplifier setup. will be performed by the time delay between the sound reaching the listener's right versus the left speaker and the rear right speaker is caused by selecting BASS ENGIN in cars with a lot of road noise. Setting item: MX SETTING 1 Turn the Rotary encoder to select the source to which you cannot adjust this unit is connected. BASS...
... music clearly even in Audio Setup mode. Here we recommend the following power amplifier setup. will be performed by the time delay between the sound reaching the listener's right versus the left speaker and the rear right speaker is caused by selecting BASS ENGIN in cars with a lot of road noise. Setting item: MX SETTING 1 Turn the Rotary encoder to select the source to which you cannot adjust this unit is connected. BASS...
Owner's Manual (english)
Page 25
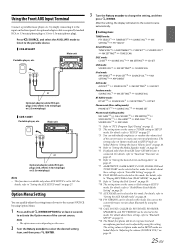
... Note • This function is available only when AUX SETUP is required (standard RCA to 3.5ø mini-phono plug or 3.5ø to activate the Option menu of the current source to "Adjusting the volume (SOURCE VOL)" on the front panel. Option Menu Setting You can be selected in this mode. An optional adapter cable is set to the portable device. CDE-W265BT Main unit Portable player, etc. Using the Front AUX Input Terminal Connect a portable music player, etc.
... Note • This function is available only when AUX SETUP is required (standard RCA to 3.5ø mini-phono plug or 3.5ø to activate the Option menu of the current source to "Adjusting the volume (SOURCE VOL)" on the front panel. Option Menu Setting You can be selected in this mode. An optional adapter cable is set to the portable device. CDE-W265BT Main unit Portable player, etc. Using the Front AUX Input Terminal Connect a portable music player, etc.
Owner's Manual (english)
Page 26
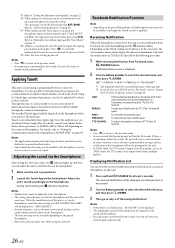
... "Receiving Notification". Receiving Notification When the Smartphone connected to information from Facebook, the unit's back lighting and the V indicator blinks (depending on the TuneIt settings on the phone). To play back Notification by TTS (Text To Speech) again. To select the previous Notification. Through this item to download specific parameters for 30 seconds. Adjust the unit's sound accordingly on the Smartphone. 1 Make sure the unit is output...
... "Receiving Notification". Receiving Notification When the Smartphone connected to information from Facebook, the unit's back lighting and the V indicator blinks (depending on the TuneIt settings on the phone). To play back Notification by TTS (Text To Speech) again. To select the previous Notification. Through this item to download specific parameters for 30 seconds. Adjust the unit's sound accordingly on the Smartphone. 1 Make sure the unit is output...
Owner's Manual (english)
Page 27
... can input the audio of an external device, (such as a Portable audio player) to the AUX connector of this unit. Setting item: AUX SETUP Setting contents: OFF / ON (Initial setting) OFF: When set to OFF, AUX source cannot be modified. Select GENERAL) GENERAL: CLOCK MODE CLOCK ADJ*4 PWR CLOCK AUX SETUP AUX NAME*5 INT MUTE PLAY MODE STAY ON DEMO MODE CLOCK MODE DISPLAY: ILLUMINATI DIMMER TEXTSCROLL SCROLLTYPE ILLUMINATI TUNER: TUNER...
... can input the audio of an external device, (such as a Portable audio player) to the AUX connector of this unit. Setting item: AUX SETUP Setting contents: OFF / ON (Initial setting) OFF: When set to OFF, AUX source cannot be modified. Select GENERAL) GENERAL: CLOCK MODE CLOCK ADJ*4 PWR CLOCK AUX SETUP AUX NAME*5 INT MUTE PLAY MODE STAY ON DEMO MODE CLOCK MODE DISPLAY: ILLUMINATI DIMMER TEXTSCROLL SCROLLTYPE ILLUMINATI TUNER: TUNER...
Owner's Manual (english)
Page 28
... no operation for the selected period. In this unit the DEMO mode will be ON. STANDBY: Quit the demonstration mode. Setting the AUX NAME mode You can change the AUX NAME display in the SETUP mode. Setting item: AUX NAME Setting contents: AUXILIARY (Initial setting) / TV / DVD / PORTABLE / GAME Turning Mute Mode On/Off (INT MUTE) If a device having the interrupt feature is connected, audio will be automatically muted whenever the interrupt signal is received from the unit. For...
... no operation for the selected period. In this unit the DEMO mode will be ON. STANDBY: Quit the demonstration mode. Setting the AUX NAME mode You can change the AUX NAME display in the SETUP mode. Setting item: AUX NAME Setting contents: AUXILIARY (Initial setting) / TV / DVD / PORTABLE / GAME Turning Mute Mode On/Off (INT MUTE) If a device having the interrupt feature is connected, audio will be automatically muted whenever the interrupt signal is received from the unit. For...
Owner's Manual (english)
Page 30
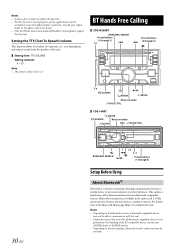
...; 2 Preset buttons (1 through 6) Setup Before Using About Bluetooth® Bluetooth is a wireless technology allowing communication between devices is 12. Bluetooth transmission is not guaranteed. For details, refer to the Bluetooth Home page (http://www.bluetooth.com). This enables a hands-free call or data transmission between Bluetooth compatible devices. Setting the TTS (Text To Speech) volume This function allows for details. • Only the iPhone and certain...
...; 2 Preset buttons (1 through 6) Setup Before Using About Bluetooth® Bluetooth is a wireless technology allowing communication between devices is 12. Bluetooth transmission is not guaranteed. For details, refer to the Bluetooth Home page (http://www.bluetooth.com). This enables a hands-free call or data transmission between Bluetooth compatible devices. Setting the TTS (Text To Speech) volume This function allows for details. • Only the iPhone and certain...
Owner's Manual (english)
Page 31
... to normal mode automatically. Auto pairing with an iPod/iPhone When an iPod/iPhone is set to 3WAY. 4 Turn the Rotary encoder to change the head unit display from a Bluetooth compatible device, refer to the Owner's Manual of the connected device(s). • When you search for this unit. Setting item: BT IN Setting contents: OFF / ON (Initial setting) OFF: Hands-Free Phone function and Bluetooth Audio function are disabled. The Bluetooth setup mode is canceled. The SETUP mode is activated. 3 Turn the Rotary encoder to select "BLUETOOTH", and...
... to normal mode automatically. Auto pairing with an iPod/iPhone When an iPod/iPhone is set to 3WAY. 4 Turn the Rotary encoder to change the head unit display from a Bluetooth compatible device, refer to the Owner's Manual of the connected device(s). • When you search for this unit. Setting item: BT IN Setting contents: OFF / ON (Initial setting) OFF: Hands-Free Phone function and Bluetooth Audio function are disabled. The Bluetooth setup mode is canceled. The SETUP mode is activated. 3 Turn the Rotary encoder to select "BLUETOOTH", and...
Owner's Manual (english)
Page 32
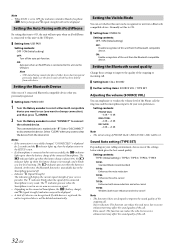
... displayed. Setting the Bluetooth Device Select one of the Phone call . Setting item: CALL SOUND Further setting items: SOURCE VOL / TYPE SET Adjusting the volume (SOURCE VOL) You can reduce the echo, but excessive enhancement may affect the sound quality of your own preferences. The connected device is marked with iPod/iPhone By setting this item to ON, the unit will auto pair when an iPod/iPhone is connected to this unit successfully, the C indicator lights...
... displayed. Setting the Bluetooth Device Select one of the Phone call . Setting item: CALL SOUND Further setting items: SOURCE VOL / TYPE SET Adjusting the volume (SOURCE VOL) You can reduce the echo, but excessive enhancement may affect the sound quality of your own preferences. The connected device is marked with iPod/iPhone By setting this item to ON, the unit will auto pair when an iPod/iPhone is connected to this unit successfully, the C indicator lights...
Owner's Manual (english)
Page 33
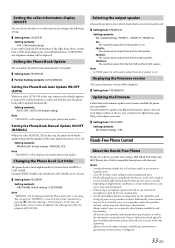
... speaker. FRONT-LR: The sound be activated by pressing t when the ordering is still in the Owner's Manual are based upon the latest available information and are believed to update your Bluetooth firmware, please visit your local Alpine website or choose your service provider's network. Setting the Phone Book Update You can update the phone book automatically or manually. Setting item: PB UPDATE Further Setting contents: AUTO/MANUAL Setting the Phone Book Auto Update ON/OFF (AUTO...
... speaker. FRONT-LR: The sound be activated by pressing t when the ordering is still in the Owner's Manual are based upon the latest available information and are believed to update your Bluetooth firmware, please visit your local Alpine website or choose your service provider's network. Setting the Phone Book Update You can update the phone book automatically or manually. Setting item: PB UPDATE Further Setting contents: AUTO/MANUAL Setting the Phone Book Auto Update ON/OFF (AUTO...
Owner's Manual (english)
Page 47
... memory is activated. 2 Turn the Rotary encoder to select ALERT MEMO, and then press ENTER. 3 Turn the Rotary encoder to select TUNE SCAN, and then press /ENTER. The display then shows the stored Band and preset number (for example, SXM1-3 is shown when preset 3 of memory locations still available for 60 seconds, the setting mode is selected). Notes • Compatible with SXV200 or later tuner models...
... memory is activated. 2 Turn the Rotary encoder to select ALERT MEMO, and then press ENTER. 3 Turn the Rotary encoder to select TUNE SCAN, and then press /ENTER. The display then shows the stored Band and preset number (for example, SXM1-3 is shown when preset 3 of memory locations still available for 60 seconds, the setting mode is selected). Notes • Compatible with SXV200 or later tuner models...

Owner's Manual (english)
Page 50
.... Radio Unable to cool. Make sure the antenna is off. - replace the antenna or cable if necessary. make sure the rest of Difficulty If you encounter a problem, please turn the power off . • Improper power lead (Red) and battery lead (Yellow) connections. - Make sure the antenna is wavering. • Moisture condensation in the CD Module. - CD playback sound is fully extended; The unit can display this button, the display changes as...
.... Radio Unable to cool. Make sure the antenna is off. - replace the antenna or cable if necessary. make sure the rest of Difficulty If you encounter a problem, please turn the power off . • Improper power lead (Red) and battery lead (Yellow) connections. - Make sure the antenna is wavering. • Moisture condensation in the CD Module. - CD playback sound is fully extended; The unit can display this button, the display changes as...
Owner's Manual (english)
Page 51
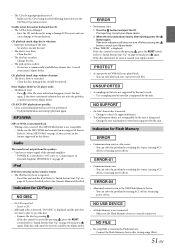
.... POWER IC is switched to "ON", refer to "Connecting to "Initial System Start-Up" on page 15, then rewrite in your Alpine dealer. • When "ERROR" is displayed and the unit does not start to vibration. • Improper mounting of the iPod. Remove the disc by pressing : If the disc cannot be ejected by the unit. Make sure the Flash Memory device is dirty. - Reset this device. Change the disc. •...
.... POWER IC is switched to "ON", refer to "Connecting to "Initial System Start-Up" on page 15, then rewrite in your Alpine dealer. • When "ERROR" is displayed and the unit does not start to vibration. • Improper mounting of the iPod. Remove the disc by pressing : If the disc cannot be ejected by the unit. Make sure the Flash Memory device is dirty. - Reset this device. Change the disc. •...

Owner's Manual (english)
Page 55
... a short-circuit. • Be sure to connect the color coded leads according to the diagram. Never connect left and right channel speaker cables to each other equipment. IMPORTANT Please record the serial number of your Alpine dealer. • The CDE-W265BT/CDE-164BT uses female RCA-type jacks for connection to other units. The serial number or the engraved serial number is located on -board computer). Never cut by...
... a short-circuit. • Be sure to connect the color coded leads according to the diagram. Never connect left and right channel speaker cables to each other equipment. IMPORTANT Please record the serial number of your Alpine dealer. • The CDE-W265BT/CDE-164BT uses female RCA-type jacks for connection to other units. The serial number or the engraved serial number is located on -board computer). Never cut by...
Owner's Manual (english)
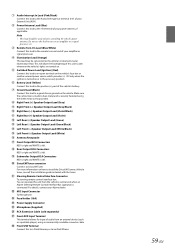
Page 59
... connected. You can operate this to a Flash Memory or to install the SiriusXM Connect Vehicle tuner, consult the installation guide included with the tuner. Steering Remote Control Interface Connector To steering remote control interface box. For details, contact your Alpine dealer. MIC Input Connector To Microphone. Fuse Holder (10A) Power Supply Connector Microphone (Supplied) RCA Extension Cable (sold separately) Front AUX Input Terminal This terminal allows for input...
... connected. You can operate this to a Flash Memory or to install the SiriusXM Connect Vehicle tuner, consult the installation guide included with the tuner. Steering Remote Control Interface Connector To steering remote control interface box. For details, contact your Alpine dealer. MIC Input Connector To Microphone. Fuse Holder (10A) Power Supply Connector Microphone (Supplied) RCA Extension Cable (sold separately) Front AUX Input Terminal This terminal allows for input...


