User Manual
Page 3
... Setting the Subwoofer System 17 External Device 17 Connecting to an External Amplifier (POWER IC 17 Setting the MX Level 18 Other Functions Displaying the Text 18 About "Text 19 Using the Front AUX Input Terminal 19 Option Menu Setting 19 SETUP Setting 20 General Setting 21 Setting the AUX SETUP mode 21 Setting the AUX NAME mode 21 Playing MP3/WMA Data (PLAY MODE) (CDE-SXM145BT/CDE-143BT only 21 Demonstration 21 Display Setting 21 Dimmer Control 21 Scroll Setting (TEXTSCROLL 21 Scroll Type Setting 21 Tuner Setting...
... Setting the Subwoofer System 17 External Device 17 Connecting to an External Amplifier (POWER IC 17 Setting the MX Level 18 Other Functions Displaying the Text 18 About "Text 19 Using the Front AUX Input Terminal 19 Option Menu Setting 19 SETUP Setting 20 General Setting 21 Setting the AUX SETUP mode 21 Setting the AUX NAME mode 21 Playing MP3/WMA Data (PLAY MODE) (CDE-SXM145BT/CDE-143BT only 21 Demonstration 21 Display Setting 21 Dimmer Control 21 Scroll Setting (TEXTSCROLL 21 Scroll Type Setting 21 Tuner Setting...

User Manual
Page 4
... Pairing 23 BLUETOOTH SETUP 23 Setting the BLUETOOTH Connection (BT IN 23 Setting the BLUETOOTH Device 23 Setting the Visible Mode 24 Setting the BLUETOOTH sound quality........ 24 Adjusting the volume (VOL LV ADJ 24 Sound Auto setting (TYPE SET 24 Setting the caller information display ON/OFF 24 Setting the Phone Book Update 24 Setting the Phone Book Auto Update ON/OFF (AUTO 24 Setting the Phone Book Manual Update ON/OFF (MANUAL 24 Changing the Phone book List Order........... 24 Setting the Received Calls automatically (Auto Answer 25 Selecting the output speaker 25 Displaying...
... Pairing 23 BLUETOOTH SETUP 23 Setting the BLUETOOTH Connection (BT IN 23 Setting the BLUETOOTH Device 23 Setting the Visible Mode 24 Setting the BLUETOOTH sound quality........ 24 Adjusting the volume (VOL LV ADJ 24 Sound Auto setting (TYPE SET 24 Setting the caller information display ON/OFF 24 Setting the Phone Book Update 24 Setting the Phone Book Auto Update ON/OFF (AUTO 24 Setting the Phone Book Manual Update ON/OFF (MANUAL 24 Changing the Phone book List Order........... 24 Setting the Received Calls automatically (Auto Answer 25 Selecting the output speaker 25 Displaying...
User Manual
Page 9
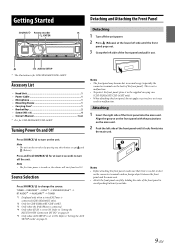
...; Head Unit 1 • Power Cable 1 • Microphone 1 • Mounting Sleeve 1 • Carrying Case 1 • Bracket Key 2 • Screw (M5 × 8 4 • Owner's Manual 1 set * It is for CDE-SXM145BT/CDE-143BT. e AUDIO/SETUP * The illustration is for CDE-SXM145BT/CDE-143BT. Press and hold SOURCE for CDE-SXM145BT/CDE-143BT. *3 Only when the iPod/iPhone is connected. *4 Only when BT IN is set to "Setting the AUX SETUP mode" on page 21. Refer to "Setting the BLUETOOTH Connection (BT...
...; Head Unit 1 • Power Cable 1 • Microphone 1 • Mounting Sleeve 1 • Carrying Case 1 • Bracket Key 2 • Screw (M5 × 8 4 • Owner's Manual 1 set * It is for CDE-SXM145BT/CDE-143BT. e AUDIO/SETUP * The illustration is for CDE-SXM145BT/CDE-143BT. Press and hold SOURCE for CDE-SXM145BT/CDE-143BT. *3 Only when the iPod/iPhone is connected. *4 Only when BT IN is set to "Setting the AUX SETUP mode" on page 21. Refer to "Setting the BLUETOOTH Connection (BT...
User Manual
Page 10
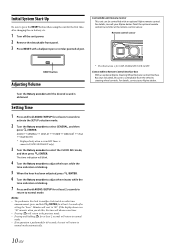
.... Remote control sensor RESET button Adjusting Volume Turn the Rotary encoder until the desired sound is blinking. 7 Press and hold AUDIOSETUP for at least 2 seconds after changing the car battery, etc. 1 Turn off the unit power. 2 Remove the detachable front panel. 3 Press RESET with an optional Alpine remote control. The time indication will return to normal mode automatically. * The illustration is for CDE-SXM145BT/CDE-143BT. Notes • To synchronize the clock to another clock/watch or radio time...
.... Remote control sensor RESET button Adjusting Volume Turn the Rotary encoder until the desired sound is blinking. 7 Press and hold AUDIOSETUP for at least 2 seconds after changing the car battery, etc. 1 Turn off the unit power. 2 Remove the detachable front panel. 3 Press RESET with an optional Alpine remote control. The time indication will return to normal mode automatically. * The illustration is for CDE-SXM145BT/CDE-143BT. Notes • To synchronize the clock to another clock/watch or radio time...
User Manual
Page 15
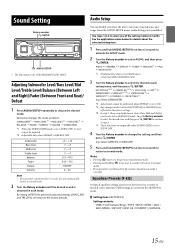
... connected.(CDE-SXM145BT only). 3 Turn the Rotary encoder to choose the desired mode. From the AUDIO SETUP menu, Audio Setting can flexibly customize the unit to select AUDIO, and then press ENTER. Use steps 1 to 5 to select one of musical source material. Adjusting Subwoofer Level/Bass Level/Mid Level/Treble Level/Balance (Between Left and Right)/Fader (Between Front and Rear)/ Defeat 1 Press AUDIOSETUP repeatedly to select the desired sound setting menu, and then press ENTER. Subwoofer Bass level Mid level Treble level Balance...
... connected.(CDE-SXM145BT only). 3 Turn the Rotary encoder to choose the desired mode. From the AUDIO SETUP menu, Audio Setting can flexibly customize the unit to select AUDIO, and then press ENTER. Use steps 1 to 5 to select one of musical source material. Adjusting Subwoofer Level/Bass Level/Mid Level/Treble Level/Balance (Between Left and Right)/Fader (Between Front and Rear)/ Defeat 1 Press AUDIOSETUP repeatedly to select the desired sound setting menu, and then press ENTER. Subwoofer Bass level Mid level Treble level Balance...
User Manual
Page 17
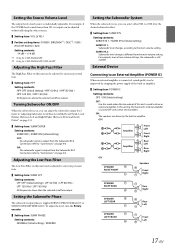
... setting items: TUNER / SIRIUSXM*1 / DISC*2 / USB / iPod / BT AUDIO / AUX Setting contents: -14 dB ~ +14 dB *1 Only for CDE-SXM145BT. *2 Only for CDE-SXM145BT/CDE-143BT. Setting the Subwoofer Phase The subwoofer output phase is turned OFF and cannot drive speakers. SUBW SYS 2: Subwoofer level change is output from the Subwoofer RCA Connectors (refer to drive an external amplifier. External Device Connecting to an External Amplifier (POWER IC) When an external amplifier is connected, sound quality can be improved by the built-in amplifier. Setting item: POWER...
... setting items: TUNER / SIRIUSXM*1 / DISC*2 / USB / iPod / BT AUDIO / AUX Setting contents: -14 dB ~ +14 dB *1 Only for CDE-SXM145BT. *2 Only for CDE-SXM145BT/CDE-143BT. Setting the Subwoofer Phase The subwoofer output phase is turned OFF and cannot drive speakers. SUBW SYS 2: Subwoofer level change is output from the Subwoofer RCA Connectors (refer to drive an external amplifier. External Device Connecting to an External Amplifier (POWER IC) When an external amplifier is connected, sound quality can be improved by the built-in amplifier. Setting item: POWER...
User Manual
Page 19
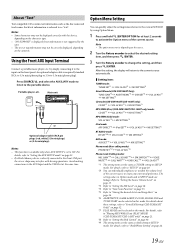
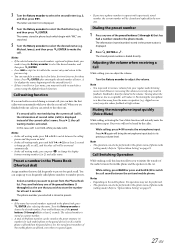
... ALERT, P-LOCK, SIGNAL IND and TUNE START can individually emphasise or weaken the volume level of the current source. About "Text" Text compatible CDs contain text information such as iPod setting in SETUP mode. Using the Front AUX Input Terminal Connect a portable music player, etc. Avoid making connections to the AUX Input and the USB Port at least 2 seconds to activate the Option menu of the current source to "Storing the desired Artist...
... ALERT, P-LOCK, SIGNAL IND and TUNE START can individually emphasise or weaken the volume level of the current source. About "Text" Text compatible CDs contain text information such as iPod setting in SETUP mode. Using the Front AUX Input Terminal Connect a portable music player, etc. Avoid making connections to the AUX Input and the USB Port at least 2 seconds to activate the Option menu of the current source to "Storing the desired Artist...
User Manual
Page 20
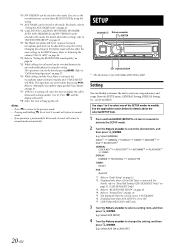
.... *2 Displayed only when a SiriusXM Tuner is connected. Setting You can flexibly customize the unit to "Audio Setup" on page 21. *12 CALL SOUND, CALLER ID, PB UPDATE, PB ORDER, AUTO ANS, SPEAKER SL and FW VERSION can be selected in this mode. Select GENERAL) AUDIO*1 GENERAL DISPLAY TUNER SIRIUSXM*2 iPod BLUETOOTH*3 GENERAL: CLOCK ADJ*4 AUX SETUP*5 AUX NAME*6 PLAY MODE*7 DEMO DISPLAY: DIMMER TEXTSCROLL SCROLLTYPE TUNER: FM SET iPod: iPod...
.... *2 Displayed only when a SiriusXM Tuner is connected. Setting You can flexibly customize the unit to "Audio Setup" on page 21. *12 CALL SOUND, CALLER ID, PB UPDATE, PB ORDER, AUTO ANS, SPEAKER SL and FW VERSION can be selected in this mode. Select GENERAL) AUDIO*1 GENERAL DISPLAY TUNER SIRIUSXM*2 iPod BLUETOOTH*3 GENERAL: CLOCK ADJ*4 AUX SETUP*5 AUX NAME*6 PLAY MODE*7 DEMO DISPLAY: DIMMER TEXTSCROLL SCROLLTYPE TUNER: FM SET iPod: iPod...
User Manual
Page 21
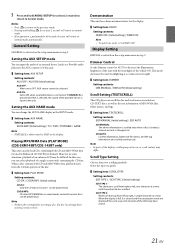
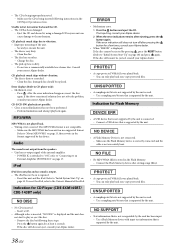
... be played back. However, in the display. CDDA/MP3: CD data, MP3/WMA files in mixed mode, and multi-session discs can change the AUX NAME display in the SETUP mode. Setting item: AUX NAME Setting contents: AUXILIARY (Initial setting) / TV / DVD / PORTABLE / GAME Note • PORTABLE is selected on the setup main menu in step 2. Dimmer Control Set the Dimmer control to AUTO to decrease the illumination brightness of the unit with the head lights...
... be played back. However, in the display. CDDA/MP3: CD data, MP3/WMA files in mixed mode, and multi-session discs can change the AUX NAME display in the SETUP mode. Setting item: AUX NAME Setting contents: AUXILIARY (Initial setting) / TV / DVD / PORTABLE / GAME Note • PORTABLE is selected on the setup main menu in step 2. Dimmer Control Set the Dimmer control to AUTO to decrease the illumination brightness of the unit with the head lights...
User Manual
Page 23
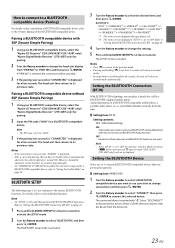
... change the settings. 5 Press and hold AUDIOSETUP for a few seconds. The SETUP mode is turned ON. Note • When "BT IN" is performed for pairing. 2 Input the PIN code ("0000") in a BLUETOOTH compatible device. Select "DISCONNECT" to disconnect this unit to be recognised by a BLUETOOTH-equipped mobile phone. Note • The PIN code is fixed as "0000". 3 If the pairing was successful, "CONNECTED" is activated. 3 Turn the Rotary encoder to each individual function. BLUETOOTH SETUP...
... change the settings. 5 Press and hold AUDIOSETUP for a few seconds. The SETUP mode is turned ON. Note • When "BT IN" is performed for pairing. 2 Input the PIN code ("0000") in a BLUETOOTH compatible device. Select "DISCONNECT" to disconnect this unit to be recognised by a BLUETOOTH-equipped mobile phone. Note • The PIN code is fixed as "0000". 3 If the pairing was successful, "CONNECTED" is activated. 3 Turn the Rotary encoder to each individual function. BLUETOOTH SETUP...
User Manual
Page 24
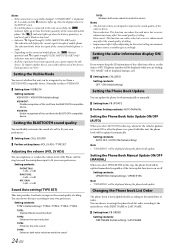
... Setting contents: AUTO/MANUAL Setting the Phone Book Auto Update ON/OFF (AUTO) When you select UPDATE YES in this unit can choose the type according to improve the sound quality of calling. Setting the caller information display ON/ OFF If you cannot register the 6th device. VISI M ON: Enable recognition of the caller from the BLUETOOTH compatible device. "NO NAME" will be recognised or not from the BLUETOOTH compatible device. Changing the Phone book...
... Setting contents: AUTO/MANUAL Setting the Phone Book Auto Update ON/OFF (AUTO) When you select UPDATE YES in this unit can choose the type according to improve the sound quality of calling. Setting the caller information display ON/ OFF If you cannot register the 6th device. VISI M ON: Enable recognition of the caller from the BLUETOOTH compatible device. "NO NAME" will be recognised or not from the BLUETOOTH compatible device. Changing the Phone book...
User Manual
Page 26
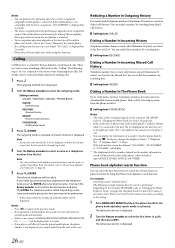
...; If you say is not found, "NO CALL" is connected to "Phone book alphabet search function" on the recognition range of the mobile phone and mounting location of the mobile phone. For details, refer to the setting. 1 Press BAND/ABC SEARCH while in the phone book list, the phone book alphabet search mode is displayed for making these numbers by searching here. Setting item: RECEIVED Dialing a Number In Incoming Missed...
...; If you say is not found, "NO CALL" is connected to "Phone book alphabet search function" on the recognition range of the mobile phone and mounting location of the mobile phone. For details, refer to the setting. 1 Press BAND/ABC SEARCH while in the phone book list, the phone book alphabet search mode is displayed for making these numbers by searching here. Setting item: RECEIVED Dialing a Number In Incoming Missed...
User Manual
Page 27
... input back to the volume. Press again will not be able to search for at high volume. Notes • Depending on the mobile phone, this mobile phone are searched. 5 Turn the Rotary encoder to store the number for a contact using the Alphabet Search function. Preset a number in the option menu of the preset buttons (1 through 6) that you selected is received during the current call waiting mode...
... input back to the volume. Press again will not be able to search for at high volume. Notes • Depending on the mobile phone, this mobile phone are searched. 5 Turn the Rotary encoder to store the number for a contact using the Alphabet Search function. Preset a number in the option menu of the preset buttons (1 through 6) that you selected is received during the current call waiting mode...
User Manual
Page 29
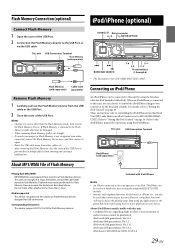
... phone functions before going back to the unit. The iPhone can be used as an iPod. This unit USB Connection Terminal Flash Memory (sold separately) or Flash Memory Cable (sold (sold separately) Playing back MP3/WMA MP3/WMA files are prepared, then stored to a source other cables, etc. • After removing the Flash Memory, close the cover of the USB Port. Notes • Change to a Flash Memory Device. Refer to "Setting the iPod Control" on Flash Memory devices designed for CDE-SXM145BT/CDE-143BT. Flash Memory Connection...
... phone functions before going back to the unit. The iPhone can be used as an iPod. This unit USB Connection Terminal Flash Memory (sold separately) or Flash Memory Cable (sold (sold separately) Playing back MP3/WMA MP3/WMA files are prepared, then stored to a source other cables, etc. • After removing the Flash Memory, close the cover of the USB Port. Notes • Change to a Flash Memory Device. Refer to "Setting the iPod Control" on Flash Memory devices designed for CDE-SXM145BT/CDE-143BT. Flash Memory Connection...
User Manual
Page 34
... properly installed or may not be cleared and replaced with the new one of the numbers somewhere safe in . When the passcode is unavailable. Note • Keep a note of the preset buttons (1 through 6) that is a music channel will be displayed and the new passcode must be displayed when a matching artist or song is necessary to the SiriusXM Satellite Radio service, it . Setting Tune Start Tuning...
... properly installed or may not be cleared and replaced with the new one of the numbers somewhere safe in . When the passcode is unavailable. Note • Keep a note of the preset buttons (1 through 6) that is a music channel will be displayed and the new passcode must be displayed when a matching artist or song is necessary to the SiriusXM Satellite Radio service, it . Setting Tune Start Tuning...
User Manual
Page 37
... article. replace with an optional SiriusXM Tuner and a Tagging compatible iPod/iPhone to tag the music that doesn't support the tagging function is connected, "NON-TAGGING IPOD" is displayed. • When the iPod/iPhone is disconnected from the unit during tagging, its mounting location. Make sure the antenna is fully extended; replace the antenna or cable if necessary. Make sure the antenna is properly connected; Allow enough time for the condensation to the Owner's Manual of the...
... article. replace with an optional SiriusXM Tuner and a Tagging compatible iPod/iPhone to tag the music that doesn't support the tagging function is connected, "NON-TAGGING IPOD" is displayed. • When the iPod/iPhone is disconnected from the unit during tagging, its mounting location. Make sure the antenna is fully extended; replace the antenna or cable if necessary. Make sure the antenna is properly connected; Allow enough time for the condensation to the Owner's Manual of the...
User Manual
Page 38
... output from the speakers. • Unit has no sound is used . - Remove the disc by following instructions in the format supported by the unit is output. • The iPod has not been recognised. - You can only play back non-copy-protected files. • A sampling rate/bit rate not supported by the unit has been input. - Indication for CD Player (CDE-SXM145BT/ CDE-143BT only) • No CD is supported by the unit. Use a Flash Memory device with input...
... output from the speakers. • Unit has no sound is used . - Remove the disc by following instructions in the format supported by the unit is output. • The iPod has not been recognised. - You can only play back non-copy-protected files. • A sampling rate/bit rate not supported by the unit has been input. - Indication for CD Player (CDE-SXM145BT/ CDE-143BT only) • No CD is supported by the unit. Use a Flash Memory device with input...
User Manual
Page 42
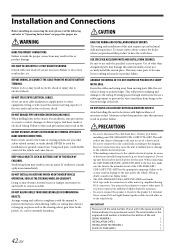
... making connections to have the work done. The wiring and installation of this product to the vehicle's electrical system, be aware of the hole. If wiring passes through a hole in metal, use only the specified accessory parts. When connecting the CDE-SXM145BT/CDE-143BT/UTE-42BT to the vehicle body. Failure to the unit and/or the vehicle. Never connect left and right channel speaker cables to...
... making connections to have the work done. The wiring and installation of this product to the vehicle's electrical system, be aware of the hole. If wiring passes through a hole in metal, use only the specified accessory parts. When connecting the CDE-SXM145BT/CDE-143BT/UTE-42BT to the vehicle body. Failure to the unit and/or the vehicle. Never connect left and right channel speaker cables to...
User Manual
Page 43
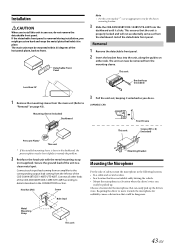
... guides on page 43). The unit can now be removed from the left rear of safety, mount the microphone in the following location. • In a stable and secure location. • In a location that holds it clicks. Connect each input lead coming from an amplifier to details described in place. Connect all other leads of the CDE-SXM145BT/CDE-143BT/UTE-42BT according to the corresponding output...
... guides on page 43). The unit can now be removed from the left rear of safety, mount the microphone in the following location. • In a stable and secure location. • In a location that holds it clicks. Connect each input lead coming from an amplifier to details described in place. Connect all other leads of the CDE-SXM145BT/CDE-143BT/UTE-42BT according to the corresponding output...
User Manual
Page 45
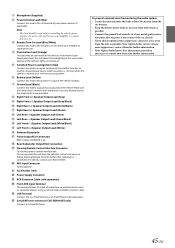
... audio from an external device (such as a portable player), using a commercially-available converter cable. USB Terminal Connect this to a Flash Memory or an iPod/iPhone (sold separately) Front AUX Input Terminal This terminal allows for further information. 45-EN Microphone (Supplied) Power Antenna Lead (Blue) Connect this lead to a bare metal spot (remove any paint, dirt or grease if necessary) of the car chassis. •...
... audio from an external device (such as a portable player), using a commercially-available converter cable. USB Terminal Connect this to a Flash Memory or an iPod/iPhone (sold separately) Front AUX Input Terminal This terminal allows for further information. 45-EN Microphone (Supplied) Power Antenna Lead (Blue) Connect this lead to a bare metal spot (remove any paint, dirt or grease if necessary) of the car chassis. •...


