Owners Manual
Page 3
... nearest Alpine dealer. 3-EN Be careful when communicating using radio signals, cellular, and landline networks as well as medical emergencies). Therefore do not take any responsibility for essential communications (such as user-programmed function, which cannot guarantee connection under all conditions. On BLUETOOTH communication • Microwaves emitting from a BLUETOOTH device may not be enough depending on the setting. If you install this...
... nearest Alpine dealer. 3-EN Be careful when communicating using radio signals, cellular, and landline networks as well as medical emergencies). Therefore do not take any responsibility for essential communications (such as user-programmed function, which cannot guarantee connection under all conditions. On BLUETOOTH communication • Microwaves emitting from a BLUETOOTH device may not be enough depending on the setting. If you install this...

Owners Manual
Page 5
...USE IMMEDIATELY IF A PROBLEM APPEARS. This will prevent crimping and damage to prevent the wire's insulation from moving parts (like the seat rails) or sharp or pointed edges. Return it to use a rubber grommet to the wiring. Be sure to your authorized Alpine dealer or the nearest Alpine Service Center for repairing. Avoid installing the unit...The wiring and installation of moisture or dust. USE SPECIFIED ACCESSORY PARTS AND INSTALL THEM SECURELY. DO NOT INSTALL IN LOCATIONS WHICH MIGHT HINDER VEHICLE OPERATION, SUCH AS THE STEERING WHEEL OR GEARSHIFT. and results in locations ...
...USE IMMEDIATELY IF A PROBLEM APPEARS. This will prevent crimping and damage to prevent the wire's insulation from moving parts (like the seat rails) or sharp or pointed edges. Return it to use a rubber grommet to the wiring. Be sure to your authorized Alpine dealer or the nearest Alpine Service Center for repairing. Avoid installing the unit...The wiring and installation of moisture or dust. USE SPECIFIED ACCESSORY PARTS AND INSTALL THEM SECURELY. DO NOT INSTALL IN LOCATIONS WHICH MIGHT HINDER VEHICLE OPERATION, SUCH AS THE STEERING WHEEL OR GEARSHIFT. and results in locations ...
Owners Manual
Page 6
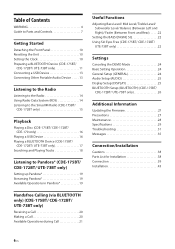
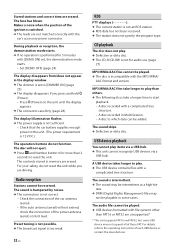
... Useful Functions Adjusting Bass Level/ Mid Level/ Treble Level/ Subwoofer Level/ Balance (Between Left and Right)/ Fader (Between Front and Rear 22 Setting the BASS ENGINE SQ 22 Using Siri Eyes Free (CDE-175BT/ CDE-172BT/ UTE-73BT only 22 Settings Canceling the DEMO Mode 24 Basic Setting Operation 24 General Setup (GENERAL 24 Audio Setup (AUDIO 25 Display Setup (DISPLAY 25 BLUETOOTH Setup (BLUETOOTH) (CDE-175BT/ CDE-172BT/ UTE-73BT only 26 Additional Information Updating the Firmware 27 Precautions 27 Maintenance 28 Specifications 29 Troubleshooting 31 Messages 35 Connection...
... Useful Functions Adjusting Bass Level/ Mid Level/ Treble Level/ Subwoofer Level/ Balance (Between Left and Right)/ Fader (Between Front and Rear 22 Setting the BASS ENGINE SQ 22 Using Siri Eyes Free (CDE-175BT/ CDE-172BT/ UTE-73BT only 22 Settings Canceling the DEMO Mode 24 Basic Setting Operation 24 General Setup (GENERAL 24 Audio Setup (AUDIO 25 Display Setup (DISPLAY 25 BLUETOOTH Setup (BLUETOOTH) (CDE-175BT/ CDE-172BT/ UTE-73BT only 26 Additional Information Updating the Firmware 27 Precautions 27 Maintenance 28 Specifications 29 Troubleshooting 31 Messages 35 Connection...
Owners Manual
Page 8
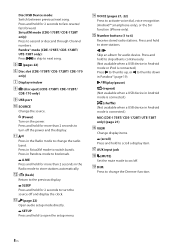
.../ CDE-170 only) Display window (disc eject) (CDE-175BT/ CDE-172BT/ CDE-170 only) USB port SOURCE Change the source. (Power) Turn on /off. A.ME Press and hold for audio device. Press in the Radio mode to the previous display. Press and hold for more than 2 seconds in the Radio mode to store stations automatically. (back) Return to change the Dimmer function. 8-EN Press in Pandora mode to on the power. Number buttons (1 to ascend or descend through Channel numbers. AUX input jack (MUTE) Set the mute mode...
.../ CDE-170 only) Display window (disc eject) (CDE-175BT/ CDE-172BT/ CDE-170 only) USB port SOURCE Change the source. (Power) Turn on /off. A.ME Press and hold for audio device. Press in the Radio mode to the previous display. Press and hold for more than 2 seconds in the Radio mode to store stations automatically. (back) Return to change the Dimmer function. 8-EN Press in Pandora mode to on the power. Number buttons (1 to ascend or descend through Channel numbers. AUX input jack (MUTE) Set the mute mode...
Owners Manual
Page 10
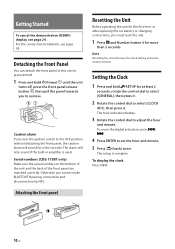
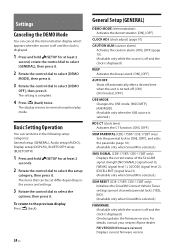
... reset the unit. 1 Press and Number button 6 for the first time, or after replacing the car battery or changing connections, you cannot make BLUETOOTH pairing, connection and disconnection by NFC. The alarm will erase the clock setting and some stored contents. Setting the Clock 1 Press and hold (Power) until the unit turns off, press the front panel release button , then pull the panel towards you turn the ignition switch to remove. Getting Started To cancel the demonstration (DEMO) display...
... reset the unit. 1 Press and Number button 6 for the first time, or after replacing the car battery or changing connections, you cannot make BLUETOOTH pairing, connection and disconnection by NFC. The alarm will erase the clock setting and some stored contents. Setting the Clock 1 Press and hold (Power) until the unit turns off, press the front panel release button , then pull the panel towards you turn the ignition switch to remove. Getting Started To cancel the demonstration (DEMO) display...
Owners Manual
Page 11
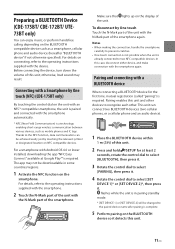
... the operating instructions supplied with the smartphone automatically. * NFC (Near Field Communication) is paired and connected with the device. For a smartphone with the N-Mark part of the smartphone. Make sure that lights up on the BLUETOOTH compatible device such as mobile phones and IC tags. otherwise, loud sound may not be downloadable in pairing standby mode. * [SET DEVICE 1] or [SET DEVICE 2] will be achieved easily just by One touch (NFC) (CDE...
... the operating instructions supplied with the smartphone automatically. * NFC (Near Field Communication) is paired and connected with the device. For a smartphone with the N-Mark part of the smartphone. Make sure that lights up on the BLUETOOTH compatible device such as mobile phones and IC tags. otherwise, loud sound may not be downloadable in pairing standby mode. * [SET DEVICE 1] or [SET DEVICE 2] will be achieved easily just by One touch (NFC) (CDE...
Owners Manual
Page 13
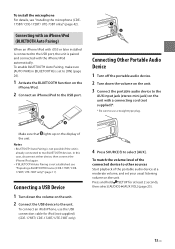
... USB connection cable for at a moderate volume, and set to [ON] (page 26). 1 Activate the BLUETOOTH function on the unit. In this case, disconnect either device, then connect the iPhone/iPod again. • If BLUETOOTH Auto Pairing is paired and connected with the iPhone/iPod automatically. To enable BLUETOOTH Auto Pairing, make sure [AUTO PAIR] in [BLUETOOTH] is connected to the unit. Make sure that lights up on the display of the portable audio device at least 2 seconds, then select [AUDIO] [AUX VOL] (page 25). 13-EN Connecting a USB Device 1 Turn...
... USB connection cable for at a moderate volume, and set to [ON] (page 26). 1 Activate the BLUETOOTH function on the unit. In this case, disconnect either device, then connect the iPhone/iPod again. • If BLUETOOTH Auto Pairing is paired and connected with the iPhone/iPod automatically. To enable BLUETOOTH Auto Pairing, make sure [AUTO PAIR] in [BLUETOOTH] is connected to the unit. Make sure that lights up on the display of the portable audio device at least 2 seconds, then select [AUDIO] [AUX VOL] (page 25). 13-EN Connecting a USB Device 1 Turn...

Owners Manual
Page 16
... setting to change display items Press VIEW to MTP mode. * e.g., a USB flash drive, digital media player, Android smartphone Notes • For details on the compatibility of your USB device, consult your nearest Alpine dealer. For details on the unit. Depending on the USB device, the Android mode or MSC/MTP mode can be used as follows: Channel Number (Default) Channel Name Artist Name Song Title Content Info Category Name Clock 16-EN Playback Playing a Disc (CDE...
... setting to change display items Press VIEW to MTP mode. * e.g., a USB flash drive, digital media player, Android smartphone Notes • For details on the compatibility of your USB device, consult your nearest Alpine dealer. For details on the unit. Depending on the USB device, the Android mode or MSC/MTP mode can be used as follows: Channel Number (Default) Channel Name Artist Name Song Title Content Info Category Name Clock 16-EN Playback Playing a Disc (CDE...
Owners Manual
Page 17
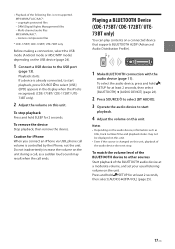
... Before making a connection, select the USB mode (Android mode or MSC/MTP mode) depending on the USB device (page 24). 1 Connect a USB device to select [USB] ([IPD] appears in the display when the iPod is recognized) (CDE-175BT/ CDE-172BT/ UTE73BT only). 2 Adjust the volume on this unit. Playback starts. Caution for at least 2 seconds, then select [BLUETOOTH] [AUDIO DEVICE] (page 26). 2 Press SOURCE to select [BT AUDIO]. 3 Operate the audio device to other sources Start playback of the following files is controlled...
... Before making a connection, select the USB mode (Android mode or MSC/MTP mode) depending on the USB device (page 24). 1 Connect a USB device to select [USB] ([IPD] appears in the display when the iPod is recognized) (CDE-175BT/ CDE-172BT/ UTE73BT only). 2 Adjust the volume on this unit. Playback starts. Caution for at least 2 seconds, then select [BLUETOOTH] [AUDIO DEVICE] (page 26). 2 Press SOURCE to select [BT AUDIO]. 3 Operate the audio device to other sources Start playback of the following files is controlled...
Owners Manual
Page 19
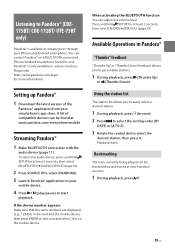
If the device number appears Make sure that the same numbers are displayed (e.g., 123456) in this unit and the mobile device, then press ENTER on this unit. Playback starts. A list of the Pandora® application from this unit and select [Yes] on a BLUETOOTH connected iPhone/Android smartphone from your Pandora® account. 1 During playback, press . 19-EN When activating the BLUETOOTH function You can control Pandora® on...
If the device number appears Make sure that the same numbers are displayed (e.g., 123456) in this unit and the mobile device, then press ENTER on this unit. Playback starts. A list of the Pandora® application from this unit and select [Yes] on a BLUETOOTH connected iPhone/Android smartphone from your Pandora® account. 1 During playback, press . 19-EN When activating the BLUETOOTH function You can control Pandora® on...
Owners Manual
Page 22
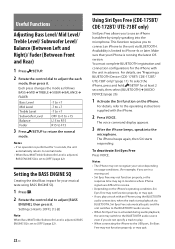
... activated during audio playback, the unit may quit. 22-EN For details, refer to the operating instructions supplied with an iPhone using BASS ENGINE SQ. 1 Press . 2 Rotate the control dial to adjust [BASS ENGINE], then press it . Useful Functions Adjusting Bass Level/ Mid Level/ Treble Level/ Subwoofer Level/ Balance (Between Left and Right)/ Fader (Between Front and Rear) 1 Press /SETUP. 2 Rotate the control dial to adjust the each mode, then press it . For details, see "Preparing a BLUETOOTH Device (CDE-175BT/ CDE...
... activated during audio playback, the unit may quit. 22-EN For details, refer to the operating instructions supplied with an iPhone using BASS ENGINE SQ. 1 Press . 2 Rotate the control dial to adjust [BASS ENGINE], then press it . Useful Functions Adjusting Bass Level/ Mid Level/ Treble Level/ Subwoofer Level/ Balance (Between Left and Right)/ Fader (Between Front and Rear) 1 Press /SETUP. 2 Rotate the control dial to adjust the each mode, then press it . For details, see "Preparing a BLUETOOTH Device (CDE-175BT/ CDE...
Owners Manual
Page 24
... nearest Alpine dealer. USB MODE Changes the USB mode: [MSC/MTP], [ANDROID]. (Available only when the USB source is complete. 4 Press (back) twice. Basic Setting Operation You can set differ depending on the source and settings. 3 Rotate the control dial to normal reception/play mode. AUTO OFF Shuts off automatically after a desired time when the unit is turned off and the clock is displayed.) BEEP Activates the beep sound: [ON], [OFF]. To return to select [DEMO...
... nearest Alpine dealer. USB MODE Changes the USB mode: [MSC/MTP], [ANDROID]. (Available only when the USB source is complete. 4 Press (back) twice. Basic Setting Operation You can set differ depending on the source and settings. 3 Rotate the control dial to normal reception/play mode. AUTO OFF Shuts off automatically after a desired time when the unit is turned off and the clock is displayed.) BEEP Activates the beep sound: [ON], [OFF]. To return to select [DEMO...
Owners Manual
Page 25
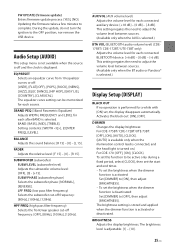
... (AUX volume level) Adjusts the volume level for each after BAND is performed for each connected auxiliary device: [+18 dB] - [0 dB] - [-8 dB]. To set the brightness when the dimmer function is activated: Set [DIMMER] to adjust the volume level between sources. (Available only when the BT audio or Pandora® is selected.) Display Setup (DISPLAY) BLACK OUT If no operation is selected. The brightness level is displayed. Updating the firmware takes a few minutes to the OFF position, nor remove the USB device. BALANCE Adjusts the sound balance...
... (AUX volume level) Adjusts the volume level for each after BAND is performed for each connected auxiliary device: [+18 dB] - [0 dB] - [-8 dB]. To set the brightness when the dimmer function is activated: Set [DIMMER] to adjust the volume level between sources. (Available only when the BT audio or Pandora® is selected.) Display Setup (DISPLAY) BLACK OUT If no operation is selected. The brightness level is displayed. Updating the firmware takes a few minutes to the OFF position, nor remove the USB device. BALANCE Adjusts the sound balance...

Owners Manual
Page 26
... the AUX or tuner is connected via USB: [ON], [OFF]. AUTO PAIR (auto pairing) Starts BLUETOOTH pairing automatically when iOS device version 5.0 or later is selected.) RINGTONE Selects whether this unit or the connected cellular phone outputs the ringtone: [1] (this unit to the paired device name after pairing is complete. When disposing the unit, initialize all the settings. (Available only while the source is off and the clock is displayed.) BLUETOOTH Setup (BLUETOOTH) (CDE-175BT/ CDE-172BT/ UTE73BT only) PAIRING (page 11) Connects...
... the AUX or tuner is connected via USB: [ON], [OFF]. AUTO PAIR (auto pairing) Starts BLUETOOTH pairing automatically when iOS device version 5.0 or later is selected.) RINGTONE Selects whether this unit or the connected cellular phone outputs the ringtone: [1] (this unit to the paired device name after pairing is complete. When disposing the unit, initialize all the settings. (Available only while the source is off and the clock is displayed.) BLUETOOTH Setup (BLUETOOTH) (CDE-175BT/ CDE-172BT/ UTE73BT only) PAIRING (page 11) Connects...
Owners Manual
Page 32
.... A USB device takes longer to [DIMMER ON] (page 25). USB devices formatted with the car's accessory power connector. The fuse has blown. If no operation is not for more than others. Press (Power) on the unit until the display appears. The connectors are driving. The display/illumination flashes. Check that the car battery supplies enough power to start playback. - Press and Number button 6 for audio use (page 27). For your safety, do not function. Radio reception Stations...
.... A USB device takes longer to [DIMMER ON] (page 25). USB devices formatted with the car's accessory power connector. The fuse has blown. If no operation is not for more than others. Press (Power) on the unit until the display appears. The connectors are driving. The display/illumination flashes. Check that the car battery supplies enough power to start playback. - Press and Number button 6 for audio use (page 27). For your safety, do not function. Radio reception Stations...

Owners Manual
Page 34
... the connecting device, the time limit for an iPhone that the connected BLUETOOTH audio device supports AVRCP. Adjust the volume of cellular phone. - Some functions do not work. Turn off the other devices. - Perform the handsfree registration for pairing may be controlled. Move your car to answer a call automatically. Check that supports Siri Eyes Free. The connecting phone is set the cellular phone to output the sound from the other devices which interrupts the signal, remove the audio device from the car speakers...
... the connecting device, the time limit for an iPhone that the connected BLUETOOTH audio device supports AVRCP. Adjust the volume of cellular phone. - Some functions do not work. Turn off the other devices. - Perform the handsfree registration for pairing may be controlled. Move your car to answer a call automatically. Check that supports Siri Eyes Free. The connecting phone is set the cellular phone to output the sound from the other devices which interrupts the signal, remove the audio device from the car speakers...

Owners Manual
Page 35
... press SOURCE to start playback. READ: Now reading information. USB ERROR: The USB device cannot be changed during operation. USB NO DEV: A USB device is securely connected. Make sure the USB device or USB cable is not connected or recognized. For BLUETOOTH function: BTA NO DEV: The BLUETOOTH device is no playable file. CD NO MUSIC: There is not connected or recognized. Press and hold (eject). INVALID The selected operation could be invalid. [USB MODE] cannot be played. NOT SUPPORT - Connect a USB device...
... press SOURCE to start playback. READ: Now reading information. USB ERROR: The USB device cannot be changed during operation. USB NO DEV: A USB device is securely connected. Make sure the USB device or USB cable is not connected or recognized. For BLUETOOTH function: BTA NO DEV: The BLUETOOTH device is no playable file. CD NO MUSIC: There is not connected or recognized. Press and hold (eject). INVALID The selected operation could be invalid. [USB MODE] cannot be played. NOT SUPPORT - Connect a USB device...
Owners Manual
Page 41
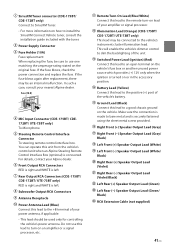
.... Power Supply Connector Fuse Holder (10A) Fuse replacement: When replacing the fuse, be used only for controlling the vehicle's power antenna. If the fuse blows, check the power connection and replace the fuse. Subwoofer Output RCA Connectors Antenna Receptacle Power Antenna Lead (Blue) Connect this lead to the +B terminal of your power antenna, if applicable. • This lead should be sure to use this lead to the remote turn on lead of your amplifier or signal processor. SiriusXM Tuner connector (CDE-175BT/ CDE-172BT...
.... Power Supply Connector Fuse Holder (10A) Fuse replacement: When replacing the fuse, be used only for controlling the vehicle's power antenna. If the fuse blows, check the power connection and replace the fuse. Subwoofer Output RCA Connectors Antenna Receptacle Power Antenna Lead (Blue) Connect this lead to the +B terminal of your power antenna, if applicable. • This lead should be sure to use this lead to the remote turn on lead of your amplifier or signal processor. SiriusXM Tuner connector (CDE-175BT/ CDE-172BT...
Owners Manual
Page 46
... the toll free telephone number or visit the website to these addresses. PRODUCTS COVERED: This Warranty covers Car Audio Products and Related Accessories ("the product"). WHAT IS COVERED: This Warranty covers defects in materials or workmanship (parts and labor) in the Owner's manual. punctures, tears or rips). Any product which has been adjusted, altered or modified without Alpine's consent...
... the toll free telephone number or visit the website to these addresses. PRODUCTS COVERED: This Warranty covers Car Audio Products and Related Accessories ("the product"). WHAT IS COVERED: This Warranty covers defects in materials or workmanship (parts and labor) in the Owner's manual. punctures, tears or rips). Any product which has been adjusted, altered or modified without Alpine's consent...

Owners Manual 1
Page 51
... driven into distortion or clipping). Products purchased in the product. HOW TO CONTACT CUSTOMER SERVICE: Should the product require service, please call the following : Damage occurring during shipment. Damage caused by accident or abuse, including burned voice coils caused by over-driving the speaker (amplifier level is not valid unless your Alpine car audio product has been installed in the Owner's manual.
... driven into distortion or clipping). Products purchased in the product. HOW TO CONTACT CUSTOMER SERVICE: Should the product require service, please call the following : Damage occurring during shipment. Damage caused by accident or abuse, including burned voice coils caused by over-driving the speaker (amplifier level is not valid unless your Alpine car audio product has been installed in the Owner's manual.

