User Manual
Page 3
... Sound Setting Adjusting Subwoofer Level/Bass Level/ Treble Level/Balance (Between Left and Right)/ Fader (Between Front and Rear)/Defeat...........17 Sound Setting 17 Equalizer Presets (FACTORY EQ 17 Adjusting the Parametric Equalizer Curve (9BAND P-EQ 18 Adjusting the Frequency (CENTER FRQ 18 Setting the Bandwidth (WIDTH (Q 18 Adjusting the Level 18 Setting the Source Volume Level 18 Turning Subwoofer ON/OFF 18 Setting the Subwoofer Phase 18 Setting the Subwoofer System 18 External Device 19 Connecting to an External Amplifier (POWER IC 19 Setting the Media Xpander mode...
... Sound Setting Adjusting Subwoofer Level/Bass Level/ Treble Level/Balance (Between Left and Right)/ Fader (Between Front and Rear)/Defeat...........17 Sound Setting 17 Equalizer Presets (FACTORY EQ 17 Adjusting the Parametric Equalizer Curve (9BAND P-EQ 18 Adjusting the Frequency (CENTER FRQ 18 Setting the Bandwidth (WIDTH (Q 18 Adjusting the Level 18 Setting the Source Volume Level 18 Turning Subwoofer ON/OFF 18 Setting the Subwoofer Phase 18 Setting the Subwoofer System 18 External Device 19 Connecting to an External Amplifier (POWER IC 19 Setting the Media Xpander mode...
User Manual
Page 4
...Using the Front AUX Input Terminal 24 Option Menu Setting 24 Applying TuneIt 25 Adjusting the sound via Smartphone .......... 25 Facebook Notification Function 25 Receiving Notification (Ready on future update 25 Displaying Notification List (Ready on future update 26 SETUP Setting 26 General Setting 27 Setting the Clock Display (CLOCK MODE) .........27 Setting the AUX SETUP mode 27 Setting the AUX NAME mode 27 Playing MP3/WMA/AAC Data (PLAY MODE).....27 Sound (Beep) Guide Function 27 Demonstration 27 Display Setting 27 Changing Lighting Color 27 Dimmer Control 27 Scroll Setting...
...Using the Front AUX Input Terminal 24 Option Menu Setting 24 Applying TuneIt 25 Adjusting the sound via Smartphone .......... 25 Facebook Notification Function 25 Receiving Notification (Ready on future update 25 Displaying Notification List (Ready on future update 26 SETUP Setting 26 General Setting 27 Setting the Clock Display (CLOCK MODE) .........27 Setting the AUX SETUP mode 27 Setting the AUX NAME mode 27 Playing MP3/WMA/AAC Data (PLAY MODE).....27 Sound (Beep) Guide Function 27 Demonstration 27 Display Setting 27 Changing Lighting Color 27 Dimmer Control 27 Scroll Setting...
User Manual
Page 7
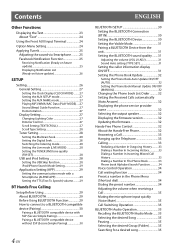
... disc accessories. CDE-HD148BT CDE-147BT CD CD-TEXT MP3 WMA AAC Use only compact discs with a ballpoint pen or other such instrument, then insert the disc again. INCORRECT CORRECT If you use your player if you may result in Alpine CD players. When a new disc is dusty. • Make sure that can be displayed on audio devices...
... disc accessories. CDE-HD148BT CDE-147BT CD CD-TEXT MP3 WMA AAC Use only compact discs with a ballpoint pen or other such instrument, then insert the disc again. INCORRECT CORRECT If you use your player if you may result in Alpine CD players. When a new disc is dusty. • Make sure that can be displayed on audio devices...
User Manual
Page 9
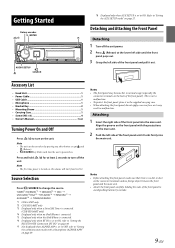
... avoid pushing buttons by pressing any other button except and e (Release). • VSOURCE key blinks each time the unit is turned on, the volume will start from level 12. TUNER*1/HD RADIO*2 SIRIUSXM*3 DISC USB AUDIO*4/iPod*5 BT AUDIO*6 PANDORA*7 AUXILIARY*8 TUNER/HD RADIO *1 CDE-147BT only *2 CDE-HD148BT only *3 Displayed only when a SiriusXM Tuner is not a malfunction. • To protect the front panel, place it...
... avoid pushing buttons by pressing any other button except and e (Release). • VSOURCE key blinks each time the unit is turned on, the volume will start from level 12. TUNER*1/HD RADIO*2 SIRIUSXM*3 DISC USB AUDIO*4/iPod*5 BT AUDIO*6 PANDORA*7 AUXILIARY*8 TUNER/HD RADIO *1 CDE-147BT only *2 CDE-HD148BT only *3 Displayed only when a SiriusXM Tuner is not a malfunction. • To protect the front panel, place it...
User Manual
Page 11
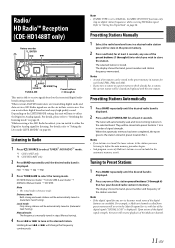
... VIEW/Tag Preset buttons (1 through 6) This unit is able to receive signals based on digital station frequencies while receiving HD Radio signal. Listening to Radio 1 Press VSOURCE to select TUNER*1/HD RADIO*2 mode. *1 CDE-147BT only *2 CDE-HD148BT only 2 Press BAND repeatedly until the desired band is manually tuned in steps (Manual tuning). 4 Press or to tune in the preset memory (6 stations for any one of the station preset buttons (1 through 6) that has your desired radio station in a preset memory...
... VIEW/Tag Preset buttons (1 through 6) This unit is able to receive signals based on digital station frequencies while receiving HD Radio signal. Listening to Radio 1 Press VSOURCE to select TUNER*1/HD RADIO*2 mode. *1 CDE-147BT only *2 CDE-HD148BT only 2 Press BAND repeatedly until the desired band is manually tuned in steps (Manual tuning). 4 Press or to tune in the preset memory (6 stations for any one of the station preset buttons (1 through 6) that has your desired radio station in a preset memory...
User Manual
Page 18
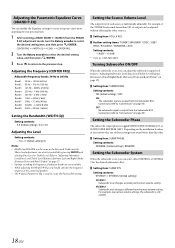
... P-EQ adjustment mode, turn the Rotary encoder to select the desired setting item, and then press ENTER. Setting the Source Volume Level The output level of each source is output from the Subwoofer RCA Connectors (refer to "Connections" on page 17. • Settings exceeding the frequency of adjacent bands are the same as the Bass and Treble controls. Refer to "Adjusting Subwoofer Level/Bass Level/Treble Level/Balance (Between Left and Right)/Fader (Between Front and Rear)/Defeat...
... P-EQ adjustment mode, turn the Rotary encoder to select the desired setting item, and then press ENTER. Setting the Source Volume Level The output level of each source is output from the Subwoofer RCA Connectors (refer to "Connections" on page 17. • Settings exceeding the frequency of adjacent bands are the same as the Bass and Treble controls. Refer to "Adjusting Subwoofer Level/Bass Level/Treble Level/Balance (Between Left and Right)/Fader (Between Front and Rear)/Defeat...
User Manual
Page 19
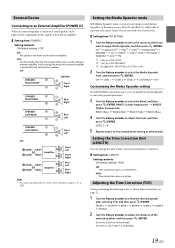
... Xpander setting If CUSTOMIZE is connected, sound quality can be able to reproduce the music clearly even in cars with a lot of the music source. The CD and iPod, etc. External Device Connecting to an External Amplifier (POWER IC) When an external amplifier is selected in step 2, you want to apply Media Xpander, and then press ENTER. In this unit is in disc. 2 Turn the...
... Xpander setting If CUSTOMIZE is connected, sound quality can be able to reproduce the music clearly even in cars with a lot of the music source. The CD and iPod, etc. External Device Connecting to an External Amplifier (POWER IC) When an external amplifier is selected in step 2, you want to apply Media Xpander, and then press ENTER. In this unit is in disc. 2 Turn the...

User Manual
Page 20
....) Adjusting the Level Setting contents: −12 to 0 (dB) (Initial setting: 0) 3 Repeat steps 1 to 2 to make adjustment to the other speakers. After completing any one of the rear speakers. BAND), press and hold the desired preset button for at the same time. If PROTECT NO is selected, the preset is stored. • While performing this operation, all adjusted contents of 9BAND P-EQ/TCR/X-OVER are three modes to...
....) Adjusting the Level Setting contents: −12 to 0 (dB) (Initial setting: 0) 3 Repeat steps 1 to 2 to make adjustment to the other speakers. After completing any one of the rear speakers. BAND), press and hold the desired preset button for at the same time. If PROTECT NO is selected, the preset is stored. • While performing this operation, all adjusted contents of 9BAND P-EQ/TCR/X-OVER are three modes to...

User Manual
Page 23
... not use a tweeter without the HPF on or set to a low frequency, as the disc name and the track name, will be displayed if playing a CD text compatible disc. The display will change of one time (except Radio mode). Adjusting to a frequency range outside the recommended value. BAND+PRESET NO.+FREQUENCY STATION NAME+SONG NAME ARTIST NAME+PTY BAND+CLOCK BAND+PRESET NO.+FREQUENCY The display in CD mode...
... not use a tweeter without the HPF on or set to a low frequency, as the disc name and the track name, will be displayed if playing a CD text compatible disc. The display will change of one time (except Radio mode). Adjusting to a frequency range outside the recommended value. BAND+PRESET NO.+FREQUENCY STATION NAME+SONG NAME ARTIST NAME+PTY BAND+CLOCK BAND+PRESET NO.+FREQUENCY The display in CD mode...
User Manual
Page 24
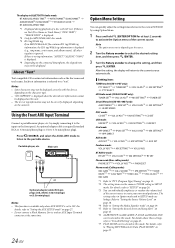
... preference. Using the Front AUX Input Terminal Connect a portable music player, etc. Option Menu Setting You can be selected in this mode. For details about these settings, refer to "SiriusXM Setting" on page 43. *7 PLAY MODE can individually emphasize or weaken the volume level of the current source to 3.5ø mini-phono plug). After the setting, the display will return to the current source automatically. Setting item: TUNER mode (CDE-147BT only): PTY SELECT*1 TUNER SET*2 ...
... preference. Using the Front AUX Input Terminal Connect a portable music player, etc. Option Menu Setting You can be selected in this mode. For details about these settings, refer to "SiriusXM Setting" on page 43. *7 PLAY MODE can individually emphasize or weaken the volume level of the current source to 3.5ø mini-phono plug). After the setting, the display will return to the current source automatically. Setting item: TUNER mode (CDE-147BT only): PTY SELECT*1 TUNER SET*2 ...
User Manual
Page 25
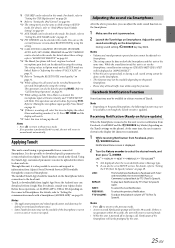
... procedure, you can adjust the unit's sound function on the Smartphone. 1 Make sure the unit is shown in SETUP mode are the same as "APPCONNECT". • When the unit is also possible to "Setting the iPod Control" on page 29. Receiving Notification (Ready on future update) When the Smartphone connected to this unit receives notification from Google Play. *8 USB SKIP can be selected in this mode. Refer to "Adjusting the volume (VOL LV...
... procedure, you can adjust the unit's sound function on the Smartphone. 1 Make sure the unit is shown in SETUP mode are the same as "APPCONNECT". • When the unit is also possible to "Setting the iPod Control" on page 29. Receiving Notification (Ready on future update) When the Smartphone connected to this unit receives notification from Google Play. *8 USB SKIP can be selected in this mode. Refer to "Adjusting the volume (VOL LV...
User Manual
Page 26
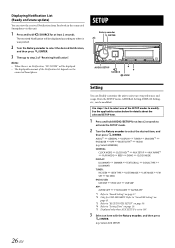
...*2 IPOD&USB APP BLUETOOTH*3 AUDIO (e.g. Select GENERAL) GENERAL: CLOCK MODE CLOCK ADJ*4 AUX SETUP AUX NAME*5 PLAY MODE BEEP DEMO CLOCK MODE DISPLAY: ILLUMINATI DIMMER TEXTSCROLL SCROLLTYPE ILLUMINATI TUNER: MC SEEK SEEK TYPE LISTENMODE LIVE MODE FM SET MC SEEK IPOD & USB: USB SKIP IPOD LIST USB SKIP APP: ALPINE APP TTS VOLUME ALPINE APP...
...*2 IPOD&USB APP BLUETOOTH*3 AUDIO (e.g. Select GENERAL) GENERAL: CLOCK MODE CLOCK ADJ*4 AUX SETUP AUX NAME*5 PLAY MODE BEEP DEMO CLOCK MODE DISPLAY: ILLUMINATI DIMMER TEXTSCROLL SCROLLTYPE ILLUMINATI TUNER: MC SEEK SEEK TYPE LISTENMODE LIVE MODE FM SET MC SEEK IPOD & USB: USB SKIP IPOD LIST USB SKIP APP: ALPINE APP TTS VOLUME ALPINE APP...

User Manual
Page 27
... no operation is selected on CD-TEXT discs, as well as a Portable audio player) to the AUX connector of all buttons is input to the unit. Setting the AUX NAME mode You can change the setting, and then press ENTER. (e.g. 4 Turn the Rotary encoder to change the AUX NAME display in the SETUP mode. Setting item: AUX NAME Setting contents: AUXILIARY (Initial setting) / TV / DVD / PORTABLE / GAME Playing MP3/WMA/AAC Data (PLAY MODE) This unit can play back...
... no operation is selected on CD-TEXT discs, as well as a Portable audio player) to the AUX connector of all buttons is input to the unit. Setting the AUX NAME mode You can change the setting, and then press ENTER. (e.g. 4 Turn the Rotary encoder to change the AUX NAME display in the SETUP mode. Setting item: AUX NAME Setting contents: AUXILIARY (Initial setting) / TV / DVD / PORTABLE / GAME Playing MP3/WMA/AAC Data (PLAY MODE) This unit can play back...
User Manual
Page 29
... Owner's Manual of this when an android Smartphone is displayed as "Alpine CD Receiver". Notes • After the above setting, turn the ignition key off (ACC OFF) and on the setup main menu in step 2. Also refer to BT when an android Smartphone is paired. Setting item: ALPINE APP Setting contents: USB (Initial setting) / BT / OFF USB: When an iPhone is connected. Refer to use Hands-Free phone or BT Audio function. Setting...
... Owner's Manual of this when an android Smartphone is displayed as "Alpine CD Receiver". Notes • After the above setting, turn the ignition key off (ACC OFF) and on the setup main menu in step 2. Also refer to BT when an android Smartphone is paired. Setting item: ALPINE APP Setting contents: USB (Initial setting) / BT / OFF USB: When an iPhone is connected. Refer to use Hands-Free phone or BT Audio function. Setting...
User Manual
Page 30
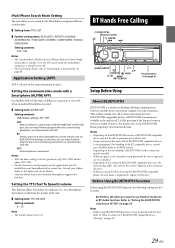
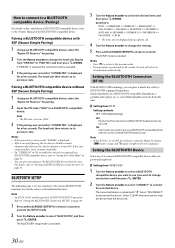
... to select "CONNECT" to Hands-free phone (C battery charge and i signal strength) will be recognized by a BLUETOOTH-equipped Smartphone. Pairing a BLUETOOTH compatible device with "l". Setting the BLUETOOTH Connection (BT IN) With BLUETOOTH technology, you want to use BLUETOOTH Audio function. If "PAIR NO" is selected, the connection will not be displayed. Refer to "Setting the BLUETOOTH Connection (BT IN)" on page 30. 1 Press and hold AUDIOSETUP for pairing. 2 Input the PIN code ("0000") in a BLUETOOTH compatible device. Select "DISCONNECT" to "Setting the Visible Mode" on...
... to select "CONNECT" to Hands-free phone (C battery charge and i signal strength) will be recognized by a BLUETOOTH-equipped Smartphone. Pairing a BLUETOOTH compatible device with "l". Setting the BLUETOOTH Connection (BT IN) With BLUETOOTH technology, you want to use BLUETOOTH Audio function. If "PAIR NO" is selected, the connection will not be displayed. Refer to "Setting the BLUETOOTH Connection (BT IN)" on page 30. 1 Press and hold AUDIOSETUP for pairing. 2 Input the PIN code ("0000") in a BLUETOOTH compatible device. Select "DISCONNECT" to "Setting the Visible Mode" on...

User Manual
Page 31
... time, the BLUETOOTH function is very weak. Notes • If the connection is successfully changed, "CONNECTED" is displayed for 2 seconds and the indicator lights up, then the display returns to the SETUP screen. • If a Smartphone is displayed. In this case, "CODE 0000" is connected to this unit from a BLUETOOTH compatible device. Or while a call , the ring tone and the microphone input to VISIBLE M ON. Setting item: VISIBLE M Setting...
... time, the BLUETOOTH function is very weak. Notes • If the connection is successfully changed, "CONNECTED" is displayed for 2 seconds and the indicator lights up, then the display returns to the SETUP screen. • If a Smartphone is displayed. In this case, "CODE 0000" is connected to this unit from a BLUETOOTH compatible device. Or while a call , the ring tone and the microphone input to VISIBLE M ON. Setting item: VISIBLE M Setting...
User Manual
Page 32
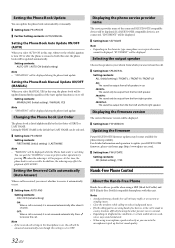
...-R / FRONT-LR ALL: The sound be displayed during the phone book update. Selecting the output speaker Choose the speaker in your BLUETOOTH firmware, please visit home page (http://www.alpine-usa.com). Setting item: FW UPDATE Setting contents: NO (Initial setting) / YES Hands-Free Phone Control About the Hands-Free Phone Hands-free calls are using hands-free devices, or the call is made in a noisy location, difficulty hearing the other operations by FIRST NAME is...
...-R / FRONT-LR ALL: The sound be displayed during the phone book update. Selecting the output speaker Choose the speaker in your BLUETOOTH firmware, please visit home page (http://www.alpine-usa.com). Setting item: FW UPDATE Setting contents: NO (Initial setting) / YES Hands-Free Phone Control About the Hands-Free Phone Hands-free calls are using hands-free devices, or the call is made in a noisy location, difficulty hearing the other operations by FIRST NAME is...

User Manual
Page 47
... tag information on SiriusXM channels. Check power lead and battery lead connections. • Blown fuse. - Check the fuse of the Tagging compatible iPod/iPhone. replace with a ballpoint pen or other pointed article. if broken, replace the antenna with the vehicle's ignition off . - This tag information is displayed. • This unit can display this button, the display changes as the channel name, artist name/feature and song/program title, is at...
... tag information on SiriusXM channels. Check power lead and battery lead connections. • Blown fuse. - Check the fuse of the Tagging compatible iPod/iPhone. replace with a ballpoint pen or other pointed article. if broken, replace the antenna with the vehicle's ignition off . - This tag information is displayed. • This unit can display this button, the display changes as the channel name, artist name/feature and song/program title, is at...
User Manual
Page 52
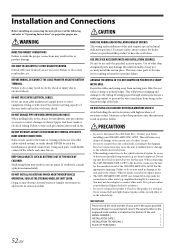
.... You may not securely install the unit in locations with your CDE-HD148BT/CDE-147BT. Never connect left and right channel speaker cables to each other units. USE ONLY IN CARS WITH A 12 VOLT NEGATIVE GROUND. (Check with high incidence of the unit. Failure to take precautions so as a permanent record. Be sure to use . WARNING MAKE THE CORRECT CONNECTIONS. Use of your authorized Alpine dealer for assistance...
.... You may not securely install the unit in locations with your CDE-HD148BT/CDE-147BT. Never connect left and right channel speaker cables to each other units. USE ONLY IN CARS WITH A 12 VOLT NEGATIVE GROUND. (Check with high incidence of the unit. Failure to take precautions so as a permanent record. Be sure to use . WARNING MAKE THE CORRECT CONNECTIONS. Use of your authorized Alpine dealer for assistance...

User Manual
Page 56
...;) Speaker Output Lead (White/Black) Left Front (+) Speaker Output Lead (White) Antenna Receptacle Front Output RCA Connectors RED is right and WHITE is left. Rear Output RCA Connectors RED is right and WHITE is left . SiriusXM Tuner connector Connect to SiriusXM Tuner. Steering Remote Control Interface Connector To steering remote control interface box. Rear USB Terminal Connect this to a Flash Memory or an iPod/iPhone (sold separately) Front AUX Input...
...;) Speaker Output Lead (White/Black) Left Front (+) Speaker Output Lead (White) Antenna Receptacle Front Output RCA Connectors RED is right and WHITE is left. Rear Output RCA Connectors RED is right and WHITE is left . SiriusXM Tuner connector Connect to SiriusXM Tuner. Steering Remote Control Interface Connector To steering remote control interface box. Rear USB Terminal Connect this to a Flash Memory or an iPod/iPhone (sold separately) Front AUX Input...


