
User Manual
Page 2
... HDMI logo and High-Definition Multimedia Interface are recorded on the label affixed to their respective companies. Acer Incorporated. Copyright © 2010. Other companies' product names or trademarks are registered trademarks of Acer Incorporated. The serial number and model number are trademarks or registered trademarks of purchase Acer and the Acer logo are used herein for a particular purpose. All Rights Reserved. Acer Projector P7500 Series Model number Serial number...
... HDMI logo and High-Definition Multimedia Interface are recorded on the label affixed to their respective companies. Acer Incorporated. Copyright © 2010. Other companies' product names or trademarks are registered trademarks of Acer Incorporated. The serial number and model number are trademarks or registered trademarks of purchase Acer and the Acer logo are used herein for a particular purpose. All Rights Reserved. Acer Projector P7500 Series Model number Serial number...
User Manual
Page 5
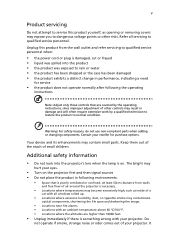
... projector's lens when the lamp is on the projector first and then signal sources • Do not place the product in following the operating instructions Note: Adjust only those controls that is poorly ventilated or confined. v Product servicing Do not attempt to service this product from walls and free flow of air around the projector is necessary. • Locations where temperatures may become excessively high, such as opening or removing covers...
... projector's lens when the lamp is on the projector first and then signal sources • Do not place the product in following the operating instructions Note: Adjust only those controls that is poorly ventilated or confined. v Product servicing Do not attempt to service this product from walls and free flow of air around the projector is necessary. • Locations where temperatures may become excessively high, such as opening or removing covers...
User Manual
Page 6
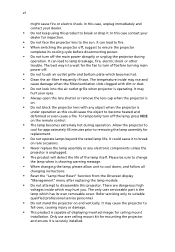
... follow all changing instructions. • Reset the "Lamp Hour Reset" function from the Onscreen display "Management" menu after replacing the lamp module. • Do not attempt to lamp breakage, fire, electric shock or other trouble. It may hurt you. Please be sure to change the lamp when is on the remote control. • The lamp becomes extremely hot during operation. To temporarily turn off . • Do not touch air outlet...
... follow all changing instructions. • Reset the "Lamp Hour Reset" function from the Onscreen display "Management" menu after replacing the lamp module. • Do not attempt to lamp breakage, fire, electric shock or other trouble. It may hurt you. Please be sure to change the lamp when is on the remote control. • The lamp becomes extremely hot during operation. To temporarily turn off . • Do not touch air outlet...
User Manual
Page 8
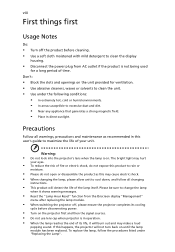
... ensure the projector completes its life, it shows warning messages. • Reset the "Lamp Hour Reset" function from the Onscreen display "Management" menu after replacing the lamp module. • When switching the projector off the product before disconnecting power. • Turn on the projector first and then the signal sources. • Do not use lens cap when projector is in this user's guide to maximize the life of its cooling cycle before cleaning. • Use a soft cloth...
... ensure the projector completes its life, it shows warning messages. • Reset the "Lamp Hour Reset" function from the Onscreen display "Management" menu after replacing the lamp module. • When switching the projector off the product before disconnecting power. • Turn on the projector first and then the signal sources. • Do not use lens cap when projector is in this user's guide to maximize the life of its cooling cycle before cleaning. • Use a soft cloth...
User Manual
Page 9
... Panel 5 Remote Control Layout 6 Getting Started 8 Connecting the Projector 8 Turning the Projector On/Off 9 Turning on the Projector 9 Turning the projector off 10 Adjusting the Projected Image 11 Adjusting the Height of Projected Image 11 How to optimize image size and distance 12 How to get a preferred image size by adjusting distance and zoom 14 How to get a preferred image position by adjusting lens shift 16 User Controls 19 Installation menu 19 Acer Empowering Technology 20 Onscreen Display (OSD) Menus 21 Color 22 Image 24 Management 25 Setting...
... Panel 5 Remote Control Layout 6 Getting Started 8 Connecting the Projector 8 Turning the Projector On/Off 9 Turning on the Projector 9 Turning the projector off 10 Adjusting the Projected Image 11 Adjusting the Height of Projected Image 11 How to optimize image size and distance 12 How to get a preferred image size by adjusting distance and zoom 14 How to get a preferred image position by adjusting lens shift 16 User Controls 19 Installation menu 19 Acer Empowering Technology 20 Onscreen Display (OSD) Menus 21 Color 22 Image 24 Management 25 Setting...

User Manual
Page 11
... power consumption and economy (ECO) mode extends lamp life • Acer EcoProjeciton Technology delivers Intelligent power management approach and physical efficiency improvement • Empowering Key reveals Acer Empowering Technology utilities (Acer eView, eTimer, ePower Management) for easy adjustment of settings • Equipped with HDMITM connection supporting HDCP • Advanced digital keystone correction optimizes presentations • Multi-language on screen display (OSD) menus • Full-function remote control • Manual focus projection lens zooms...
... power consumption and economy (ECO) mode extends lamp life • Acer EcoProjeciton Technology delivers Intelligent power management approach and physical efficiency improvement • Empowering Key reveals Acer Empowering Technology utilities (Acer eView, eTimer, ePower Management) for easy adjustment of settings • Equipped with HDMITM connection supporting HDCP • Advanced digital keystone correction optimizes presentations • Multi-language on screen display (OSD) menus • Full-function remote control • Manual focus projection lens zooms...
User Manual
Page 12
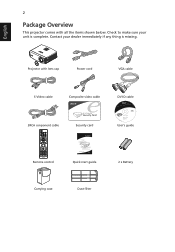
SOURCE MENU TEMP RESYNC LAMP ZOOM Projector with all the items shown below. Contact your unit is missing. English 2 Package Overview This projector comes with lens cap Power cord VGA cable S-Video cable Composite video cable DVI-D cable 3RCA conponent cable Security card Acer Projector Remote control Quick Start Guide Quick start guide User's guide 2 x Battery Carrying case Dust filter Check to make sure your dealer immediately if any thing is complete.
SOURCE MENU TEMP RESYNC LAMP ZOOM Projector with all the items shown below. Contact your unit is missing. English 2 Package Overview This projector comes with lens cap Power cord VGA cable S-Video cable Composite video cable DVI-D cable 3RCA conponent cable Security card Acer Projector Remote control Quick Start Guide Quick start guide User's guide 2 x Battery Carrying case Dust filter Check to make sure your dealer immediately if any thing is complete.

User Manual
Page 15
... projector to the input source. • Press "MENU" to launch the Onscreen display (OSD) menu, back to compensate for the OSD menu operation or exit the OSD menu. • Confirm your selection. English SOURCE 5 Control Panel 1 LAMP 2 6 TEMP 7 8 3 MENU 9 RESYNC 2 10 # 1 LAMP Function 2 KEYSTONE 3 RESYNC 4 MENU 5 POWER 6 Empowering key 7 TEMP 8 Four directional select keys 9 SOURCE 10 IR Recevier 45 Description Lamp Indicator LED Adjusts the image to the previous step for distortion caused by tilting the projector. Remote control...
... projector to the input source. • Press "MENU" to launch the Onscreen display (OSD) menu, back to compensate for the OSD menu operation or exit the OSD menu. • Confirm your selection. English SOURCE 5 Control Panel 1 LAMP 2 6 TEMP 7 8 3 MENU 9 RESYNC 2 10 # 1 LAMP Function 2 KEYSTONE 3 RESYNC 4 MENU 5 POWER 6 Empowering key 7 TEMP 8 Four directional select keys 9 SOURCE 10 IR Recevier 45 Description Lamp Indicator LED Adjusts the image to the previous step for distortion caused by tilting the projector. Remote control...
User Manual
Page 16
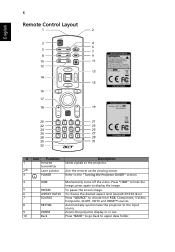
... Momentarily turns off the video. Aim the remote at the viewing screen. Press "HIDE" to hide the image, press again to display the image. 5 FREEZE To pause the screen image. 6 ASPECT RATIO To choose the desired aspect ratio (Auto/4:3/16:9/L.Box) 7 SOURCE Press "SOURCE" to choose from RGB, Component, S-Video, Composite, SCART, HDTV and HDMI™ sources. 8 RESYNC Automatically synchronizes the projector to the input source. 9 ZOOM Zooms the projector display in or...
... Momentarily turns off the video. Aim the remote at the viewing screen. Press "HIDE" to hide the image, press again to display the image. 5 FREEZE To pause the screen image. 6 ASPECT RATIO To choose the desired aspect ratio (Auto/4:3/16:9/L.Box) 7 SOURCE Press "SOURCE" to choose from RGB, Component, S-Video, Composite, SCART, HDTV and HDMI™ sources. 8 RESYNC Automatically synchronizes the projector to the input source. 9 ZOOM Zooms the projector display in or...
User Manual
Page 17
.... MENU • Press "MENU" to launch the Onscreen display (OSD) menu, back to play /pause media file. VOLUME Increases/decreases the volume. Stop Press "Stop" to COMPOSITE VIDEO. VGA S-VIDEO COMPONENT VIDEO SD/USB A USB B HDMI™/DVI LAN/WiFi KeyPad 0~9 Press "VGA" to change source to stop playing media file. Use up, down, left, right buttons to select items or make adjustments to play media file. This connection supports...
.... MENU • Press "MENU" to launch the Onscreen display (OSD) menu, back to play /pause media file. VOLUME Increases/decreases the volume. Stop Press "Stop" to COMPOSITE VIDEO. VGA S-VIDEO COMPONENT VIDEO SD/USB A USB B HDMI™/DVI LAN/WiFi KeyPad 0~9 Press "VGA" to change source to stop playing media file. Use up, down, left, right buttons to select items or make adjustments to play media file. This connection supports...
User Manual
Page 19
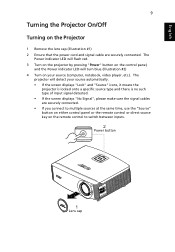
..., video player ,etc.). English 9 Turning the Projector On/Off Turning on the Projector 1 Remove the lens cap.(Illustration #1) 2 Ensure that the power cord and signal cable are securely connected. • If you connect to multiple sources at the same time, use the "Source" button on either control panel or the remote control or direct source key on the remote control to switch between inputs. 2 Power button SOURCE 1 Lens cap MENU TEMP RESYNC LAMP ZOOM The projector will turn blue.(Illustration #2) 4 Turn on your source automatically. • If the screen displays "Lock" and "Source...
..., video player ,etc.). English 9 Turning the Projector On/Off Turning on the Projector 1 Remove the lens cap.(Illustration #1) 2 Ensure that the power cord and signal cable are securely connected. • If you connect to multiple sources at the same time, use the "Source" button on either control panel or the remote control or direct source key on the remote control to switch between inputs. 2 Power button SOURCE 1 Lens cap MENU TEMP RESYNC LAMP ZOOM The projector will turn blue.(Illustration #2) 4 Turn on your source automatically. • If the screen displays "Lock" and "Source...

User Manual
Page 29
... signal input" is displayed on the control pad to launch the OSD for projector installation and maintenance. English 19 User Controls Installation menu The installation menu provides an onscreen display (OSD) for projector installation and maintenance. 3 The background pattern acts as a guide to adjusting the calibration and alignment settings, such as screen size and distance, focus and more . 4 The Installation menu includes the following options: •Projection method •Menu location •Keystone settings •Language settings •Reset to factory default function Use...
... signal input" is displayed on the control pad to launch the OSD for projector installation and maintenance. English 19 User Controls Installation menu The installation menu provides an onscreen display (OSD) for projector installation and maintenance. 3 The background pattern acts as a guide to adjusting the calibration and alignment settings, such as screen size and distance, focus and more . 4 The Installation menu includes the following options: •Projection method •Menu location •Keystone settings •Language settings •Reset to factory default function Use...

User Manual
Page 34
... times. to move the image up. You can project from behind a translucent screen. to move the image right. Rear-Ceiling • When you select this function to display the image using a 4:3 ratio. • 16:9: The image will be scaled to fit the width of the screen and the height adjusted to choose your desired aspect ratio. • Auto: Keep the image with ceiling mounted projection. Box: Keep original signal aspect...
... times. to move the image up. You can project from behind a translucent screen. to move the image right. Rear-Ceiling • When you select this function to display the image using a 4:3 ratio. • 16:9: The image will be scaled to fit the width of the screen and the height adjusted to choose your desired aspect ratio. • Auto: Keep the image with ceiling mounted projection. Box: Keep original signal aspect...

User Manual
Page 35
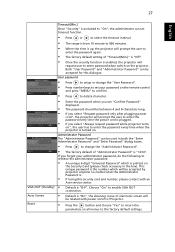
... adjustments. Press the button and choose "Yes" to turn on High Altitude mode. Position", "Frequency" and "Tracking" functions are not supported under HDMI, DVI or Video mode. Activate this function to correct it. If you experience an unstable or flickering image, use this function to display a reminder to enable LAN connection. Position", "V. Reset LAN function. Synchronizes the signal timing of -life. Identify IP and Mask address. Choose "On" to change the lamp 30 hours...
... adjustments. Press the button and choose "Yes" to turn on High Altitude mode. Position", "Frequency" and "Tracking" functions are not supported under HDMI, DVI or Video mode. Activate this function to correct it. If you experience an unstable or flickering image, use this function to display a reminder to enable LAN connection. Position", "V. Reset LAN function. Synchronizes the signal timing of -life. Identify IP and Mask address. Choose "On" to change the lamp 30 hours...

User Manual
Page 36
... "Auto". Note: For 1080P models, to get best quality for you desired image, suggest end-user set PC resolution to 1920x1080 before changing the security settings. • Select "On" to the "User Password" section for the administrator to change the "Security" setting. When source lock is selected, then the user can turn off ", the projector will "lock" the current source channel unless you use this function. When source lock is turned "on the remote control...
... "Auto". Note: For 1080P models, to get best quality for you desired image, suggest end-user set PC resolution to 1920x1080 before changing the security settings. • Select "On" to the "User Password" section for the administrator to change the "Security" setting. When source lock is selected, then the user can turn off ", the projector will "lock" the current source channel unless you use this function. When source lock is turned "on the remote control...
User Manual
Page 37
... enter the password again. • The factory default setting of Projector. • Press the button and choose "Yes" to return the parameters on all menus to the factory default settings. Both "User Password" and "Administrator Password" can be used in the box). 27 English VGA OUT (Standby) Auto Screen Reset Timeout(Min.) Once "Security" is activated to "On", the administrator can set your password on the remote control and press "MENU" to confirm...
... enter the password again. • The factory default setting of Projector. • Press the button and choose "Yes" to return the parameters on all menus to the factory default settings. Both "User Password" and "Administrator Password" can be used in the box). 27 English VGA OUT (Standby) Auto Screen Reset Timeout(Min.) Once "Security" is activated to "On", the administrator can set your password on the remote control and press "MENU" to confirm...
User Manual
Page 40
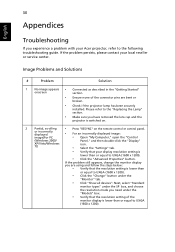
... "Replacing the Lamp" section. • Make sure you have removed the lens cap and the projector is switched on. 2 Partial, scrolling or incorrectly displayed image(For PC • Press "RESYNC" on the remote control or control panel. • For an incorrectly displayed image: • Open "My Computer," open the "Control (Windows 2000/ XP/Vista/Windows 7)) Panel," and then double-click the "Display" icon. • Select the "Settings" tab. • Verify that your display resolution setting...
... "Replacing the Lamp" section. • Make sure you have removed the lens cap and the projector is switched on. 2 Partial, scrolling or incorrectly displayed image(For PC • Press "RESYNC" on the remote control or control panel. • For an incorrectly displayed image: • Open "My Computer," open the "Control (Windows 2000/ XP/Vista/Windows 7)) Panel," and then double-click the "Display" icon. • Select the "Settings" tab. • Verify that your display resolution setting...
User Manual
Page 41
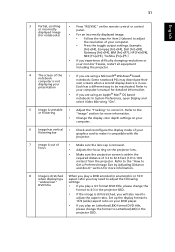
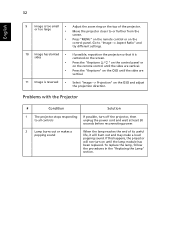
... remote control or control or incorrectly panel. displayed image (for notebooks) • For an incorrectly displayed image: • Follow the steps for more information. • Change the display color depth settings on your computer. 6 Image has vertical • Check and reconfigure the display mode of the • If you are using an Apple® Mac® OS based notebook: In System Preferences, open Display and select Video Mirroring "On". 5 Image is not displaying...
... remote control or control or incorrectly panel. displayed image (for notebooks) • For an incorrectly displayed image: • Follow the steps for more information. • Change the display color depth settings on your computer. 6 Image has vertical • Check and reconfigure the display mode of the • If you are using an Apple® Mac® OS based notebook: In System Preferences, open Display and select Video Mirroring "On". 5 Image is not displaying...
User Manual
Page 42
...; Move the projector closer to all controls unplug the power cord and wait at least 30 seconds before reconnecting power. 2 Lamp burns out or makes a popping sound When the lamp reaches the end of the projector. Problems with the Projector # Condition Solution 1 The projector stops responding If possible, turn on the OSD and adjust the projection direction. 32 English 9 Image is reversed • Select "Image --> Projection" on until...
...; Move the projector closer to all controls unplug the power cord and wait at least 30 seconds before reconnecting power. 2 Lamp burns out or makes a popping sound When the lamp reaches the end of the projector. Problems with the Projector # Condition Solution 1 The projector stops responding If possible, turn on the OSD and adjust the projection direction. 32 English 9 Image is reversed • Select "Image --> Projection" on until...
User Manual
Page 50
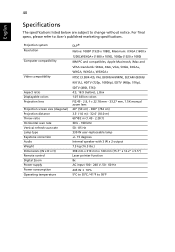
Projection system Resolution Computer compatibility Video compatibility Aspect ratio Displayable colors Projection lens Projection screen size (diagonal) Projection distance Throw ratio Horizontal scan rate Vertical refresh scan rate Lamp type Keystone correction Audio Weight Dimensions (W x D x H) Remote control Digital Zoom Power supply Power consumption Operating temperature DLP® Native: 1080P (1920 x 1080), Maximum: UXGA (1600 x 1200),WSXGA+ (1680 x 1050), 1080p (1920 x 1080) IBM PC and compatibles, Apple Macintosh, iMac and VESA standards: SXGA, XGA, VGA, SVGA, SXGA+, WXGA, WXGA...
Projection system Resolution Computer compatibility Video compatibility Aspect ratio Displayable colors Projection lens Projection screen size (diagonal) Projection distance Throw ratio Horizontal scan rate Vertical refresh scan rate Lamp type Keystone correction Audio Weight Dimensions (W x D x H) Remote control Digital Zoom Power supply Power consumption Operating temperature DLP® Native: 1080P (1920 x 1080), Maximum: UXGA (1600 x 1200),WSXGA+ (1680 x 1050), 1080p (1920 x 1080) IBM PC and compatibles, Apple Macintosh, iMac and VESA standards: SXGA, XGA, VGA, SVGA, SXGA+, WXGA, WXGA...


