User Manual
Page 3
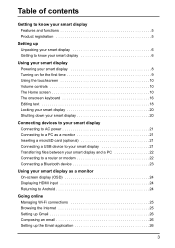
... to know your smart display 6 Using your smart display Powering your smart display 8 Turning on for the first time 9 Using the touchscreen 10 Volume controls 10 The Home screen 10 The onscreen keyboard 16 Editing text 18 Locking your smart display 20 Shutting down your smart ...display 20 Connecting devices to your smart display Connecting to AC power 21 Connecting to a PC as a monitor 21 Inserting a microSD card (optional 21 Connecting a USB device to your smart display 21 Transferring files between your smart display and a PC 22 Connecting to a router or ...
... to know your smart display 6 Using your smart display Powering your smart display 8 Turning on for the first time 9 Using the touchscreen 10 Volume controls 10 The Home screen 10 The onscreen keyboard 16 Editing text 18 Locking your smart display 20 Shutting down your smart ...display 20 Connecting devices to your smart display Connecting to AC power 21 Connecting to a PC as a monitor 21 Inserting a microSD card (optional 21 Connecting a USB device to your smart display 21 Transferring files between your smart display and a PC 22 Connecting to a router or ...
User Manual
Page 6
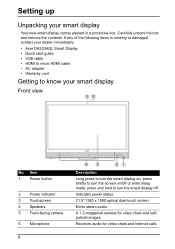
Setting up Unpacking your dealer immediately: • Acer DA220HQL Smart Display • Quick start guide • USB cable • HDMI to micro HDMI cable • AC adapter • Warranty card Getting to turn the ... know your smart display Front view No. A 1.2-megapixel camera for video chats and Internet calls. Indicates power status. 21.5" 1920 x 1080 optical dual-touch screen Emits stereo audio. Item 1 Power button 2 Power indicator 3 Touchscreen 4 Speakers 5 Front-facing camera 6 Microphone 6 Description Long press to turn the smart display on /off . If any of...
Setting up Unpacking your dealer immediately: • Acer DA220HQL Smart Display • Quick start guide • USB cable • HDMI to micro HDMI cable • AC adapter • Warranty card Getting to turn the ... know your smart display Front view No. A 1.2-megapixel camera for video chats and Internet calls. Indicates power status. 21.5" 1920 x 1080 optical dual-touch screen Emits stereo audio. Item 1 Power button 2 Power indicator 3 Touchscreen 4 Speakers 5 Front-facing camera 6 Microphone 6 Description Long press to turn the smart display on /off . If any of...
User Manual
Page 21
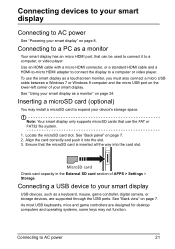
...card to expand your smart display" on the lower-left corner of APPS > Settings > Storage. See "Back view" on page 7. 2. Connecting to a PC as a touchscreen monitor, you must also connect a micro USB cable between a Windows 7 or Windows 8 computer and the micro USB port on page 8. Use an HDMI cable with... a micro HDMI connector, or a standard HDMI cable and a HDMI-to-micro HDMI adapter to connect the display to AC power 21 Note: Your smart display only supports microSD cards that can be used to connect it into the card slot. See "Back panel" on page 7. Ensure...
...card to expand your smart display" on the lower-left corner of APPS > Settings > Storage. See "Back view" on page 7. 2. Connecting to a PC as a touchscreen monitor, you must also connect a micro USB cable between a Windows 7 or Windows 8 computer and the micro USB port on page 8. Use an HDMI cable with... a micro HDMI connector, or a standard HDMI cable and a HDMI-to-micro HDMI adapter to connect the display to AC power 21 Note: Your smart display only supports microSD cards that can be used to connect it into the card slot. See "Back panel" on page 7. Ensure...
User Manual
Page 24
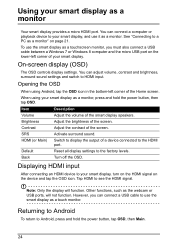
.... Note: Only the display will not function. You can adjust volume, contrast and brightness, surround sound settings and switch to use the smart display as a touchscreen monitor, you can connect a USB cable to HDMI input. On-screen display (OSD) The OSD controls display settings. Item Description Volume Adjust the volume of.... Tap HDMI to the factory levels. However, you must also connect a USB cable between a Windows 7 or Windows 8 computer and the micro USB port on page 21.
.... Note: Only the display will not function. You can adjust volume, contrast and brightness, surround sound settings and switch to use the smart display as a touchscreen monitor, you can connect a USB cable to HDMI input. On-screen display (OSD) The OSD controls display settings. Item Description Volume Adjust the volume of.... Tap HDMI to the factory levels. However, you must also connect a USB cable between a Windows 7 or Windows 8 computer and the micro USB port on page 21.
