
User Manual
Page 2
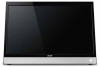
Acer DA220HQL Smart Display Model number Serial number Date of purchase Place of purchase *Note: See the back of the smart display. 2
Acer DA220HQL Smart Display Model number Serial number Date of purchase Place of purchase *Note: See the back of the smart display. 2
User Manual
Page 3
...touchscreen 10 Volume controls 10 The Home screen 10 The onscreen keyboard 16 Editing text 18 Locking your smart display 20 Shutting down your smart display 20 Connecting devices to your smart display Connecting to AC power 21 Connecting to a PC as a monitor 21 Inserting a microSD card... (optional 21 Connecting a USB device to your smart display 21 Transferring files between your smart display and a PC 22 Connecting to a router or modem 22 Connecting a Bluetooth device 23 Using your smart display as a monitor On-screen display (OSD 24 Displaying HDMI input...
...touchscreen 10 Volume controls 10 The Home screen 10 The onscreen keyboard 16 Editing text 18 Locking your smart display 20 Shutting down your smart display 20 Connecting devices to your smart display Connecting to AC power 21 Connecting to a PC as a monitor 21 Inserting a microSD card... (optional 21 Connecting a USB device to your smart display 21 Transferring files between your smart display and a PC 22 Connecting to a router or modem 22 Connecting a Bluetooth device 23 Using your smart display as a monitor On-screen display (OSD 24 Displaying HDMI input...
User Manual
Page 4
Online applications 27 Playing music and video Multimedia playback 30 Media server 33 AcerCloud What is AcerCloud 34 Create an AcerCloud ID 34 AcerCloud Docs 38 clear.fi 39 Managing people and contacts Using the webcam Using the webcam as a camera 46 Using the webcam to record a video 47 Viewing photos and videos 49 Advanced settings Wireless & Networks 50 Device 52 Personal 53 System 54 Updating your smart display's operating system 54 Resetting your smart display 55 FAQ and troubleshooting Other sources of help 56 Specifications End user license agreement 4
Online applications 27 Playing music and video Multimedia playback 30 Media server 33 AcerCloud What is AcerCloud 34 Create an AcerCloud ID 34 AcerCloud Docs 38 clear.fi 39 Managing people and contacts Using the webcam Using the webcam as a camera 46 Using the webcam to record a video 47 Viewing photos and videos 49 Advanced settings Wireless & Networks 50 Device 52 Personal 53 System 54 Updating your smart display's operating system 54 Resetting your smart display 55 FAQ and troubleshooting Other sources of help 56 Specifications End user license agreement 4
User Manual
Page 5
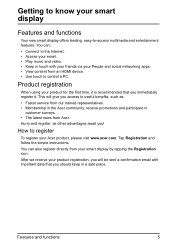
... and functions Your new smart display offers leading, easy-to-access multimedia and entertainment features. Hurry and register, as : • Faster service from our trained representatives. • Membership in the Acer community: receive promotions and participate in customer surveys. • The latest news from your Acer product, please visit www.acer.com. Tap Registration...
... and functions Your new smart display offers leading, easy-to-access multimedia and entertainment features. Hurry and register, as : • Faster service from our trained representatives. • Membership in the Acer community: receive promotions and participate in customer surveys. • The latest news from your Acer product, please visit www.acer.com. Tap Registration...
User Manual
Page 6
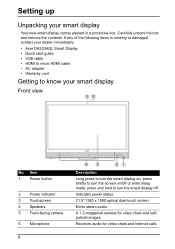
...button 2 Power indicator 3 Touchscreen 4 Speakers 5 Front-facing camera 6 Microphone 6 Description Long press to turn the smart display on /off . Setting up Unpacking your dealer immediately: • Acer DA220HQL Smart Display • Quick start guide • USB cable • HDMI to micro HDMI cable • AC adapter... • Warranty card Getting to turn the smart display off or enter sleep mode; If any of...
...button 2 Power indicator 3 Touchscreen 4 Speakers 5 Front-facing camera 6 Microphone 6 Description Long press to turn the smart display on /off . Setting up Unpacking your dealer immediately: • Acer DA220HQL Smart Display • Quick start guide • USB cable • HDMI to micro HDMI cable • AC adapter... • Warranty card Getting to turn the smart display off or enter sleep mode; If any of...

User Manual
Page 7
... 12 Ethernet (RJ-45) port 13 DC-in jack 14 MicroSD card slot 15 Micro HDMI port Description Connects to provide a stable base for your smart display. Supports high-definition digital video connections. Pull the stand open to an Ethernet network. Connects to know your... smart display, such as a keyboard, mouse or storage device. Getting to the DC power supply. Item 7 USB ports (Master) 8 Port cover 9 Stand 10 3.5 mm headphone jack ...
... 12 Ethernet (RJ-45) port 13 DC-in jack 14 MicroSD card slot 15 Micro HDMI port Description Connects to provide a stable base for your smart display. Supports high-definition digital video connections. Pull the stand open to an Ethernet network. Connects to know your... smart display, such as a keyboard, mouse or storage device. Getting to the DC power supply. Item 7 USB ports (Master) 8 Port cover 9 Stand 10 3.5 mm headphone jack ...
User Manual
Page 8
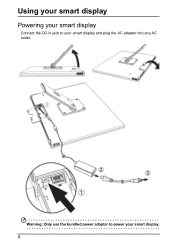
Using your smart display Powering your smart display Connect the DC-in jack to power your smart display and plug the AC adapter into any AC outlet. Warning: Only use the bundled power adapter to your smart display. 8
Using your smart display Powering your smart display Connect the DC-in jack to power your smart display and plug the AC adapter into any AC outlet. Warning: Only use the bundled power adapter to your smart display. 8
User Manual
Page 9
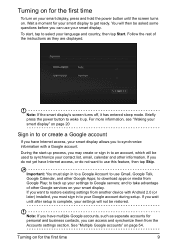
...accounts for personal and business contacts, you want to restore existing settings from the Accounts settings section. For more information, see "Waking your smart display" on page 20 Sign in to an account, which will then be used to synchronize your contact list, email, calendar and ... Google services on . to synchronize information with Android 2.0 (or later) installed, you wait until the screen turns on your smart display. and to use your smart display. If you must sign in to wake it has entered sleep mode. Follow the rest of other information. During the start...
...accounts for personal and business contacts, you want to restore existing settings from the Accounts settings section. For more information, see "Waking your smart display" on page 20 Sign in to an account, which will then be used to synchronize your contact list, email, calendar and ... Google services on . to synchronize information with Android 2.0 (or later) installed, you wait until the screen turns on your smart display. and to use your smart display. If you must sign in to wake it has entered sleep mode. Follow the rest of other information. During the start...
User Manual
Page 10
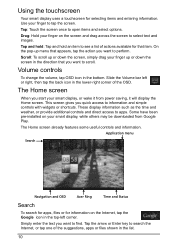
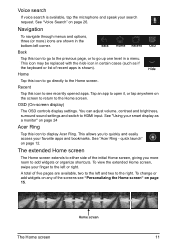
... information such as the time and weather, or provide additional controls and direct access to open items and select options. Using the touchscreen Your smart display uses a touchscreen for that item. Tap: Touch the screen once to apps. Volume controls To change the volume, tap OSD icon ... The Home screen When you start your finger up or down the screen, simply drag your smart display, or wake it will display the Home screen. Application menu Search Navigation and OSD Acer Ring Time and Status Search To search for apps, files or for information on the screen ...
... information such as the time and weather, or provide additional controls and direct access to open items and select options. Using the touchscreen Your smart display uses a touchscreen for that item. Tap: Touch the screen once to apps. Volume controls To change the volume, tap OSD icon ... The Home screen When you start your finger up or down the screen, simply drag your smart display, or wake it will display the Home screen. Application menu Search Navigation and OSD Acer Ring Time and Status Search To search for apps, files or for information on the screen ...
User Manual
Page 11
..., two to the Home screen. Tap an app to open it, or tap anywhere on page 24 Acer Ring Tap this icon to go up one level in the bottom-left and two to display Acer Ring. Navigation To navigate through menus and options, three (or more room to quickly and easily... access your smart display as if the keyboard or list of five pages are shown in a menu. See "Acer Ring - Home screen The Home screen 11 Back Back Home Recent OSD Tap this icon to the right...
..., two to the Home screen. Tap an app to open it, or tap anywhere on page 24 Acer Ring Tap this icon to go up one level in the bottom-left and two to display Acer Ring. Navigation To navigate through menus and options, three (or more room to quickly and easily... access your smart display as if the keyboard or list of five pages are shown in a menu. See "Acer Ring - Home screen The Home screen 11 Back Back Home Recent OSD Tap this icon to the right...
User Manual
Page 12
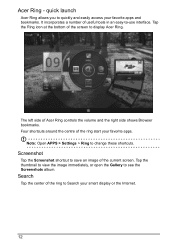
... Tap the center of the current screen. Tap the Ring icon at the bottom of Acer Ring controls the volume and the right side shows Browser bookmarks. The left side of the screen to Search your smart display or the Internet. 12 Note: Open APPS > Settings > Ring to see the ...Screenshots album. It incorporates a number of the ring start your favorite apps and bookmarks. Acer Ring - Four shortcuts around the centre of useful tools in ...
... Tap the center of the current screen. Tap the Ring icon at the bottom of Acer Ring controls the volume and the right side shows Browser bookmarks. The left side of the screen to Search your smart display or the Internet. 12 Note: Open APPS > Settings > Ring to see the ...Screenshots album. It incorporates a number of the ring start your favorite apps and bookmarks. Acer Ring - Four shortcuts around the centre of useful tools in ...
User Manual
Page 13
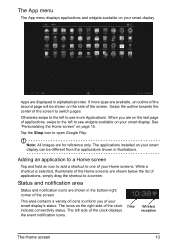
... the shortcut to inform you are displayed in illustrations. If more Applications. Otherwise swipe to the left to switch pages. The applications installed on your smart display can be shown on the side of the clock displays the event notification icons. The icons on the right side of the screen to... see widgets available on your smart display. The left to the left side of the screen. Time Wireless reception The Home screen 13 Apps are on the last page of applications...
... the shortcut to inform you are displayed in illustrations. If more Applications. Otherwise swipe to the left to switch pages. The applications installed on your smart display can be shown on the side of the clock displays the event notification icons. The icons on the right side of the screen to... see widgets available on your smart display. The left to the left side of the screen. Time Wireless reception The Home screen 13 Apps are on the last page of applications...
User Manual
Page 14
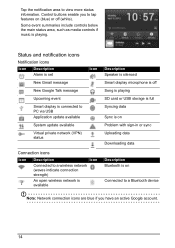
Status and notification icons Notification icons Icon Description Alarm is set New Gmail message New Google Talk message Upcoming event Smart display is connected to PC via USB Application update available System update available Virtual private network (VPN) status ... icons Icon Description Icon Connected to a wireless network (waves indicate connection strength) An open wireless network is available Description Speaker is silenced Smart display microphone is off (white). Some event summaries include controls below the main status area, such as media controls if music is on...
Status and notification icons Notification icons Icon Description Alarm is set New Gmail message New Google Talk message Upcoming event Smart display is connected to PC via USB Application update available System update available Virtual private network (VPN) status ... icons Icon Description Icon Connected to a wireless network (waves indicate connection strength) An open wireless network is available Description Speaker is silenced Smart display microphone is off (white). Some event summaries include controls below the main status area, such as media controls if music is on...
User Manual
Page 17
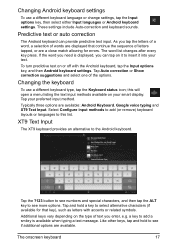
The word list changes after every key press. To turn predictive text on it to insert it into your text. Tap your smart display. Select Configure input methods to add (or remove) keyboard layouts or languages to select alternative characters (if available for errors. Tap and hold to ...
The word list changes after every key press. To turn predictive text on it to insert it into your text. Tap your smart display. Select Configure input methods to add (or remove) keyboard layouts or languages to select alternative characters (if available for errors. Tap and hold to ...
User Manual
Page 18
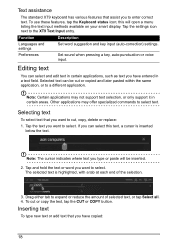
... you have copied: 18 Note: The cursor indicates where text you type or paste will open a menu listing the text input methods available on your smart display. Text assistance The standard XT9 keyboard has various features that you want to cut, copy, delete or replace: 1. Tap the settings icon next to...
... you have copied: 18 Note: The cursor indicates where text you type or paste will open a menu listing the text input methods available on your smart display. Text assistance The standard XT9 keyboard has various features that you want to cut, copy, delete or replace: 1. Tap the settings icon next to...
User Manual
Page 20
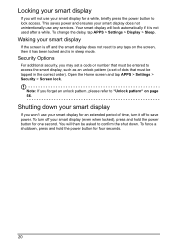
... you forget an unlock pattern, please refer to lock access. Security Options For additional security, you won't use any taps on page 56. Waking your smart display for one second. Open the Home screen and tap APPS > Settings > Security > Screen lock. You will lock automatically if it off to confirm ... to any services. To force a shutdown, press and hold the power button for an extended period of dots that must be entered to access the smart display, such as an unlock pattern (a set a code or number that must be asked to save power. To change the delay, tap APPS > Settings >...
... you forget an unlock pattern, please refer to lock access. Security Options For additional security, you won't use any taps on page 56. Waking your smart display for one second. Open the Home screen and tap APPS > Settings > Security > Screen lock. You will lock automatically if it off to confirm ... to any services. To force a shutdown, press and hold the power button for an extended period of dots that must be entered to access the smart display, such as an unlock pattern (a set a code or number that must be asked to save power. To change the delay, tap APPS > Settings >...
User Manual
Page 21
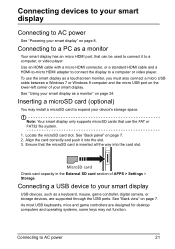
...card capacity in the External SD card section of your device's storage space. See "Back view" on page 7. 2. See "Using your smart display as a keyboard, mouse, game controller, digital camera, or storage devices, are designed for desktop computers and operating systems, some keys ...may install a microSD card to expand your smart display. Locate the microSD card slot. Connecting to a PC as a touchscreen monitor, you must also connect a micro USB cable between a Windows...
...card capacity in the External SD card section of your device's storage space. See "Back view" on page 7. 2. See "Using your smart display as a keyboard, mouse, game controller, digital camera, or storage devices, are designed for desktop computers and operating systems, some keys ...may install a microSD card to expand your smart display. Locate the microSD card slot. Connecting to a PC as a touchscreen monitor, you must also connect a micro USB cable between a Windows...
User Manual
Page 22
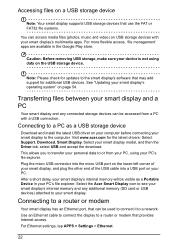
...in your PC's file explorer. Transferring files between your smart display and a PC Your smart display and any additional memory (SD card or USB devices) attached to your smart display. Select the Acer Smart Display icon to see your smart display's internal memory and any connected storage devices can... be accessed from your PC, using data on page 54. Accessing files on a USB storage device Note: Your smart display supports USB storage...
...in your PC's file explorer. Transferring files between your smart display and a PC Your smart display and any additional memory (SD card or USB devices) attached to your smart display. Select the Acer Smart Display icon to see your smart display's internal memory and any connected storage devices can... be accessed from your PC, using data on page 54. Accessing files on a USB storage device Note: Your smart display supports USB storage...

User Manual
Page 23
Connecting a Bluetooth device 23 Note: Please check for updates to scan for nearby devices. For Bluetooth settings, tap APPS > Settings > Bluetooth. Turn Bluetooth on page 54. See "Updating your smart display's operating system" on and tap Search for devices to the smart display's software that may add support for additional Bluetooth devices. Connecting a Bluetooth device Only A2DP stereo headsets (playback only, no microphone) are supported. Please check for updates to the smart display's software which may add support for additional Bluetooth devices.
Connecting a Bluetooth device 23 Note: Please check for updates to scan for nearby devices. For Bluetooth settings, tap APPS > Settings > Bluetooth. Turn Bluetooth on page 54. See "Updating your smart display's operating system" on and tap Search for devices to the smart display's software that may add support for additional Bluetooth devices. Connecting a Bluetooth device Only A2DP stereo headsets (playback only, no microphone) are supported. Please check for updates to the smart display's software which may add support for additional Bluetooth devices.
User Manual
Page 24
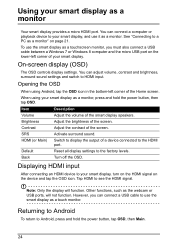
... The OSD controls display settings. Other functions, such as a touch monitor. You can connect a computer or playback device to your smart display, and use the smart display as the webcam or USB ports, will function. You can connect a USB cable to the factory levels. Back Turn off the...a USB cable between a Windows 7 or Windows 8 computer and the micro USB port on the lower-left corner of your smart display as a monitor. To use the smart display as a touchscreen monitor, you can adjust volume, contrast and brightness, surround sound settings and switch to see the HDMI ...
... The OSD controls display settings. Other functions, such as a touch monitor. You can connect a computer or playback device to your smart display, and use the smart display as the webcam or USB ports, will function. You can connect a USB cable to the factory levels. Back Turn off the...a USB cable between a Windows 7 or Windows 8 computer and the micro USB port on the lower-left corner of your smart display as a monitor. To use the smart display as a touchscreen monitor, you can adjust volume, contrast and brightness, surround sound settings and switch to see the HDMI ...


