Acer Desktop User's Guide
Page 13
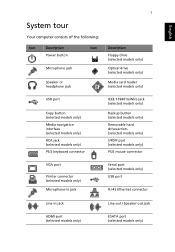
... of the following: Icon Description Icon Power button Microphone jack Speaker or headphone jack 1 Description Floppy drive (selected models only) Optical drive (selected models only) Media card reader (selected models only) USB port Copy button (selected models only...) Media navigation interface (selected models only) RCA jack (selected models only) PS/2 keyboard connector IEEE 1394/FireWire jack (selected models only) Backup button (selected models only) Removable hard...
... of the following: Icon Description Icon Power button Microphone jack Speaker or headphone jack 1 Description Floppy drive (selected models only) Optical drive (selected models only) Media card reader (selected models only) USB port Copy button (selected models only...) Media navigation interface (selected models only) RCA jack (selected models only) PS/2 keyboard connector IEEE 1394/FireWire jack (selected models only) Backup button (selected models only) Removable hard...
Acer Desktop User's Guide
Page 18
... mute to sound on. • If headphones, earphones, or external speakers are connected to the line-out jack of your drive by using a good (i.e., undamaged) disk. If it is turned on. • Make sure that the printer cable is connected... that you are using the correct type of disk. • Make sure the CD or DVD is inserted into the drive correctly. • Check if the CD or DVD is clean and not scratched. • Check your computer, the ... a power outlet and that it is crossed-out, click on the taskbar. If your drive cannot read diskette, hard disk, CD or DVD information.
... mute to sound on. • If headphones, earphones, or external speakers are connected to the line-out jack of your drive by using a good (i.e., undamaged) disk. If it is turned on. • Make sure that the printer cable is connected... that you are using the correct type of disk. • Make sure the CD or DVD is inserted into the drive correctly. • Check if the CD or DVD is clean and not scratched. • Check your computer, the ... a power outlet and that it is crossed-out, click on the taskbar. If your drive cannot read diskette, hard disk, CD or DVD information.
Acer Aspire X3300 Service Guide
Page 7
... the Side Panel 30 Removing the Front Bezel 31 Removing the Heat Sink Fan Assembly 32 Removing the Processor 33 Removing the Optical Drive 34 Removing the Hard Disk Drive 37 Removing the Power Supply 38 Removing the Memory Modules 40 Removing the TV Tuner Card 41 Removing the VGA Card 42 Removing...
... the Side Panel 30 Removing the Front Bezel 31 Removing the Heat Sink Fan Assembly 32 Removing the Processor 33 Removing the Optical Drive 34 Removing the Hard Disk Drive 37 Removing the Power Supply 38 Removing the Memory Modules 40 Removing the TV Tuner Card 41 Removing the VGA Card 42 Removing...
Acer Aspire X3300 Service Guide
Page 9
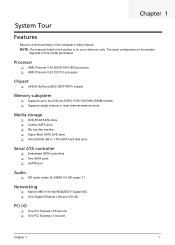
...; Supports single channel or dual-channel memory mode Media storage DVD-ROM SATA drive Combo SATA drive Blu-ray disc rewriter Super-Multi SATA DVD drive 160/320/640 GB or 1 TB SATA hard disk drive Serial ATA controller Embedded SATA controllers Two SATA ports eSATA port...
...; Supports single channel or dual-channel memory mode Media storage DVD-ROM SATA drive Combo SATA drive Blu-ray disc rewriter Super-Multi SATA DVD drive 160/320/640 GB or 1 TB SATA hard disk drive Serial ATA controller Embedded SATA controllers Two SATA ports eSATA port...
Acer Aspire X3300 Service Guide
Page 22
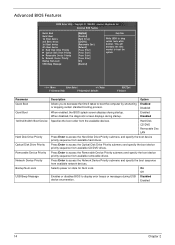
... F9:Optimized Defaults ESC:Exit F10:Save Parameter Quick Boot Quiet Boot 1st/2nd/3rd/4th Boot Device Hard Disk Drive Priority Optical Disk Drive Priority Removable Device Priority Network Device Priority Bootup Num-Lock USB Beep Message Description Option Allows you to ...1st Boot device 2nd Boot device 3rd Boot device 4th Boot device ► Hard Disk Drive Priority ► Optical Disk Drive Priority ► Removable Device Priority ► Network Device Priority Bootup Num-Lock USB Beep Message [Enabled] [Disabled] [Hard Drive] [CD/DVD] [Removable Dev.] [Network] [Press Enter] [Press ...
... F9:Optimized Defaults ESC:Exit F10:Save Parameter Quick Boot Quiet Boot 1st/2nd/3rd/4th Boot Device Hard Disk Drive Priority Optical Disk Drive Priority Removable Device Priority Network Device Priority Bootup Num-Lock USB Beep Message Description Option Allows you to ...1st Boot device 2nd Boot device 3rd Boot device 4th Boot device ► Hard Disk Drive Priority ► Optical Disk Drive Priority ► Removable Device Priority ► Network Device Priority Bootup Num-Lock USB Beep Message [Enabled] [Disabled] [Hard Drive] [CD/DVD] [Removable Dev.] [Network] [Press Enter] [Press ...

Acer Aspire X3300 Service Guide
Page 24
... Onboard Audio Controller When set to Auto, USB devices less than 2 GB will be used to force a HDD formatted drive to boot as HDD. Enabled or disables the onboard audio controller. Enables or disables the onboard 1394 controller. Integrated Peripherals Onboard...Copyright (C) 1985-2005, American Megatrends, Inc. Option Enabled Disabled AHCI Native IDE Enabled Disabled Enabled Disabled Auto Floppy Hard Disk Enabled Disabled Enabled Disabled Enabled Disabled Enabled Disabled Enabled Disabled 16 Chapter 2 Onboard LAN Controller Enables or disables the onboard ...
... Onboard Audio Controller When set to Auto, USB devices less than 2 GB will be used to force a HDD formatted drive to boot as HDD. Enabled or disables the onboard audio controller. Enables or disables the onboard 1394 controller. Integrated Peripherals Onboard...Copyright (C) 1985-2005, American Megatrends, Inc. Option Enabled Disabled AHCI Native IDE Enabled Disabled Enabled Disabled Auto Floppy Hard Disk Enabled Disabled Enabled Disabled Enabled Disabled Enabled Disabled Enabled Disabled 16 Chapter 2 Onboard LAN Controller Enables or disables the onboard ...

Acer Aspire X3300 Service Guide
Page 45
See "Removing the Optical Drive" on page 30. 2. Slide the HDD out of the bracket. See "Removing the Side Panel" on page 34. (1). Screw (Quantity) #6-32*3/16 NI (4) Color Silver (3). ... 32. 4. Torque 5.7 to the HDD-ODD bracket. Remove the HDD-ODD bracket. See "Removing the Front Bezel" on a clean, static-free work surface. (2). Removing the Hard Disk Drive 1. Place the bracket on page 31. 3.
See "Removing the Optical Drive" on page 30. 2. Slide the HDD out of the bracket. See "Removing the Side Panel" on page 34. (1). Screw (Quantity) #6-32*3/16 NI (4) Color Silver (3). ... 32. 4. Torque 5.7 to the HDD-ODD bracket. Remove the HDD-ODD bracket. See "Removing the Front Bezel" on a clean, static-free work surface. (2). Removing the Hard Disk Drive 1. Place the bracket on page 31. 3.

Acer Aspire X3300 Service Guide
Page 46
See "Removing the Front Bezel" on page 34. 6. See "Removing the Optical Drive" on page 31. 3. Screw (Quantity) #6-32 L6 BZN (1) Color Silver Torque 5.7 to the chassis. See "Removing the Processor" on page 32. 4. Remove the screw (D) that ... 3 Disconnect the 4-pin and 24-pin power supply cables from the mainboard. 8. See "Removing the Heat Sink Fan Assembly" on page 33. 5. See "Removing the Hard Disk Drive" on page 30. 2. Removing the Power Supply 1. See "Removing the Side Panel" on page 37. 7.
See "Removing the Front Bezel" on page 34. 6. See "Removing the Optical Drive" on page 31. 3. Screw (Quantity) #6-32 L6 BZN (1) Color Silver Torque 5.7 to the chassis. See "Removing the Processor" on page 32. 4. Remove the screw (D) that ... 3 Disconnect the 4-pin and 24-pin power supply cables from the mainboard. 8. See "Removing the Heat Sink Fan Assembly" on page 33. 5. See "Removing the Hard Disk Drive" on page 30. 2. Removing the Power Supply 1. See "Removing the Side Panel" on page 37. 7.
Acer Aspire X3300 Service Guide
Page 48
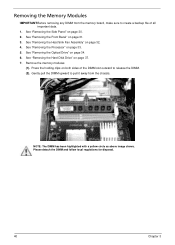
... 33. 5. See "Removing the Processor" on page 32. 4. NOTE: The DIMM has been highlighted with a yellow circle as above image shows. See "Removing the Hard Disk Drive" on page 31. 3. Remove the memory modules (1). Removing the Memory Modules IMPORTANT:Before removing any DIMM from the chassis. See "Removing the Front Bezel" on... data. 1. See "Removing the Side Panel" on page 34. 6. Please detach the DIMM and follow local regulations for disposal. 40 Chapter 3 See "Removing the Optical Drive" on page 30. 2.
... 33. 5. See "Removing the Processor" on page 32. 4. NOTE: The DIMM has been highlighted with a yellow circle as above image shows. See "Removing the Hard Disk Drive" on page 31. 3. Remove the memory modules (1). Removing the Memory Modules IMPORTANT:Before removing any DIMM from the chassis. See "Removing the Front Bezel" on... data. 1. See "Removing the Side Panel" on page 34. 6. Please detach the DIMM and follow local regulations for disposal. 40 Chapter 3 See "Removing the Optical Drive" on page 30. 2.

Acer Aspire X3300 Service Guide
Page 49
See "Removing the Front Bezel" on page 32. 4. See "Removing the Heat Sink Fan Assembly" on page 31. 3. See "Removing the Hard Disk Drive" on page 30. 2. Part No. 86.00J07.B60 NOTE: The card has been highlighted with a yellow circle as above image shows. Chapter 3 41 See "Removing ... it from the mainboard. Please detach the card and follow local regulations for disposal. Gently pull the card to the chassis. See "Removing the Optical Drive" on page 33. 5. Screw (Quantity) #6-32 L5 BZN (3) Color Black Torque 5.7 to 6.3 kgf-cm 8. Removing the TV Tuner Card...
See "Removing the Front Bezel" on page 32. 4. See "Removing the Heat Sink Fan Assembly" on page 31. 3. See "Removing the Hard Disk Drive" on page 30. 2. Part No. 86.00J07.B60 NOTE: The card has been highlighted with a yellow circle as above image shows. Chapter 3 41 See "Removing ... it from the mainboard. Please detach the card and follow local regulations for disposal. Gently pull the card to the chassis. See "Removing the Optical Drive" on page 33. 5. Screw (Quantity) #6-32 L5 BZN (3) Color Black Torque 5.7 to 6.3 kgf-cm 8. Removing the TV Tuner Card...

Acer Aspire X3300 Service Guide
Page 50
See "Removing the Front Bezel" on page 32. 4. See "Removing the Heat Sink Fan Assembly" on page 31. 3. See "Removing the Optical Drive" on page 33. 5. Screw (Quantity) #6-32 L5 BZN (3) Color Black Torque 5.7 to remove it from the mainboard. Part No. 86.00J07.B60 NOTE: The card ... 3 See "Removing the Processor" on page 34. 6. See "Removing the Side Panel" on page 37. 7. Gently pull the card to 6.3 kgf-cm 8. See "Removing the Hard Disk Drive" on page 30. 2. Removing the VGA Card 1. Remove the screw (A) that secures the card to the chassis.
See "Removing the Front Bezel" on page 32. 4. See "Removing the Heat Sink Fan Assembly" on page 31. 3. See "Removing the Optical Drive" on page 33. 5. Screw (Quantity) #6-32 L5 BZN (3) Color Black Torque 5.7 to remove it from the mainboard. Part No. 86.00J07.B60 NOTE: The card ... 3 See "Removing the Processor" on page 34. 6. See "Removing the Side Panel" on page 37. 7. Gently pull the card to 6.3 kgf-cm 8. See "Removing the Hard Disk Drive" on page 30. 2. Removing the VGA Card 1. Remove the screw (A) that secures the card to the chassis.
Acer Aspire X3300 Service Guide
Page 52
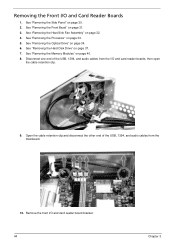
See "Removing the Processor" on page 34. 6. See "Removing the Optical Drive" on page 33. 5. Disconnect one end of the USB, 1394, and audio cables from the I/O and card reader boards, then open the cable retention clip. 9. ... reader board bracket. 44 Chapter 3 See "Removing the Heat Sink Fan Assembly" on page 40. 8. Remove the front I /O and Card Reader Boards 1. See "Removing the Hard Disk Drive" on page 37. 7.
See "Removing the Processor" on page 34. 6. See "Removing the Optical Drive" on page 33. 5. Disconnect one end of the USB, 1394, and audio cables from the I/O and card reader boards, then open the cable retention clip. 9. ... reader board bracket. 44 Chapter 3 See "Removing the Heat Sink Fan Assembly" on page 40. 8. Remove the front I /O and Card Reader Boards 1. See "Removing the Hard Disk Drive" on page 37. 7.

Acer Aspire X3300 Service Guide
Page 55
... 32. 4. See "Removing the Front Bezel" on page 34. 6. Screw (Quantity) #6-32 L6 NI (6) Chapter 3 Color Silver Torque 5.7 to the chassis. See "Removing the Optical Drive" on page 31. 3. See "Removing the Memory Modules" on page 42. 9. Disconnect the LED and SATA cable from the mainboard. 12. See "Removing the VGA..." on page 40. 8. See "Removing the Front I/O and Card Reader Boards" on page 33. 5. See "Removing the Processor" on page 44. 11. See "Removing the Hard Disk Drive" on page 30. 2. See "Removing the Side Panel" on page 37. 7.
... 32. 4. See "Removing the Front Bezel" on page 34. 6. Screw (Quantity) #6-32 L6 NI (6) Chapter 3 Color Silver Torque 5.7 to the chassis. See "Removing the Optical Drive" on page 31. 3. See "Removing the Memory Modules" on page 42. 9. Disconnect the LED and SATA cable from the mainboard. 12. See "Removing the VGA..." on page 40. 8. See "Removing the Front I/O and Card Reader Boards" on page 33. 5. See "Removing the Processor" on page 44. 11. See "Removing the Hard Disk Drive" on page 30. 2. See "Removing the Side Panel" on page 37. 7.

Acer Aspire X3300 Service Guide
Page 67
... device configured as Primary Master could not be properly initialized by the BIOS. ATAPI Incompatible Primary Slave Drive ATAPI Incompatible Secondary Master Drive - This message is typically displayed when the BIOS is trying to detect and configure IDE/ATAPI devices...Hard Disk Error Secondary Master Hard Disk Error Secondary Slave Hard Disk Error 3rd Master Hard Disk Error 3rd Slave Hard Disk Error 4th Master Hard Disk Error 4th Slave Hard Disk Error 5th Master Hard Disk Error 5th Slave Hard Disk Error 6th Master Hard Disk Error 6th Slave Hard Disk Error Primary Master Drive...
... device configured as Primary Master could not be properly initialized by the BIOS. ATAPI Incompatible Primary Slave Drive ATAPI Incompatible Secondary Master Drive - This message is typically displayed when the BIOS is trying to detect and configure IDE/ATAPI devices...Hard Disk Error Secondary Master Hard Disk Error Secondary Slave Hard Disk Error 3rd Master Hard Disk Error 3rd Slave Hard Disk Error 4th Master Hard Disk Error 4th Slave Hard Disk Error 5th Master Hard Disk Error 5th Slave Hard Disk Error 6th Master Hard Disk Error 6th Slave Hard Disk Error Primary Master Drive...

Acer Aspire X3300 Service Guide
Page 68
... can be reported by an ATAPI device using the S.M.A.R.T. The IDE/ATAPI device configured as possible virus activity. capable hard disk sends this message when it will prompt the user. A S.M.A.R.T. This message is typically displayed when the BIOS is...VIRUS: Continue (Y/N)? Message Displayed 3rd Slave Drive ATAPI Incompatible 4th Master Drive ATAPI Incompatible 4th Slave Drive ATAPI Incompatible 5th Master Drive ATAPI Incompatible 5th Slave Drive ATAPI Incompatible 6th Master Drive ATAPI Incompatible 6th Slave Drive ATAPI Incompatible S.M.A.R.T. The IDE/ATAPI device ...
... can be reported by an ATAPI device using the S.M.A.R.T. The IDE/ATAPI device configured as possible virus activity. capable hard disk sends this message when it will prompt the user. A S.M.A.R.T. This message is typically displayed when the BIOS is...VIRUS: Continue (Y/N)? Message Displayed 3rd Slave Drive ATAPI Incompatible 4th Master Drive ATAPI Incompatible 4th Slave Drive ATAPI Incompatible 5th Master Drive ATAPI Incompatible 5th Slave Drive ATAPI Incompatible 6th Master Drive ATAPI Incompatible 6th Slave Drive ATAPI Incompatible S.M.A.R.T. The IDE/ATAPI device ...

Acer Aspire X3300 Service Guide
Page 82
Category UPPER CASE Part Name Acer Part No. 60.SC101.003 LOWER CASE 60.SC101.004 HDD&ODD COVER BRACKET 33.SC101.002 COMBO MODULE/DVD-ROM DRIVE ODD HLDS BD COMBO SATA HH DL 4X CH10F LF W/BRACK BEZEL SATA KO.00605.001 ODD PIONEER BD COMBO SATA HH DL 4X BDC... 720 2.8G 7.5M KC.PH202.720 CPU AMD PHENOMIIX4 805 2.5G 6M KC.PH202.805 CPU AMD PHENOMIIX3 710 2.6G 7.5M KC.PH202.710 HDD/HARD DISK DRIVE HDD 160GB 3.5" 7200RPM SATA II WD WD1600AAJS-22L7A0 XL320S-3 KH.16008.025 HDD 160GB 3.5" 7200RPM SATA II HGST HDT721016SLA380 KH.16007.023 HDD 160GB...
Category UPPER CASE Part Name Acer Part No. 60.SC101.003 LOWER CASE 60.SC101.004 HDD&ODD COVER BRACKET 33.SC101.002 COMBO MODULE/DVD-ROM DRIVE ODD HLDS BD COMBO SATA HH DL 4X CH10F LF W/BRACK BEZEL SATA KO.00605.001 ODD PIONEER BD COMBO SATA HH DL 4X BDC... 720 2.8G 7.5M KC.PH202.720 CPU AMD PHENOMIIX4 805 2.5G 6M KC.PH202.805 CPU AMD PHENOMIIX3 710 2.6G 7.5M KC.PH202.710 HDD/HARD DISK DRIVE HDD 160GB 3.5" 7200RPM SATA II WD WD1600AAJS-22L7A0 XL320S-3 KH.16008.025 HDD 160GB 3.5" 7200RPM SATA II HGST HDT721016SLA380 KH.16007.023 HDD 160GB...

Acer Aspire X3300 Service Guide
Page 92
Category UPPER CASE Part Name Acer Part No. 60.SC101.003 LOWER CASE HS.13100.100 HDD&ODD COVER BRACKET 33.SC101.002 COMBO MODULE/DVD-ROM DRIVE ODD HLDS BD COMBO SATA HH DL 4X CH10F LF W/BRACK BEZEL SATA KO.00605.001 ODD PIONEER BD COMBO SATA HH DL 4X BDC... 720 2.8G 7.5M KC.PH202.720 CPU AMD PHENOMIIX4 805 2.5G 6M KC.PH202.805 CPU AMD PHENOMIIX3 710 2.6G 7.5M KC.PH202.710 HDD/HARD DISK DRIVE HDD 160GB 3.5" 7200RPM SATA II WD WD1600AAJS-22L7A0 XL320S-3 KH.16008.025 HDD 160GB 3.5" 7200RPM SATA II HGST HDT721016SLA380 KH.16007.023 HDD 160GB...
Category UPPER CASE Part Name Acer Part No. 60.SC101.003 LOWER CASE HS.13100.100 HDD&ODD COVER BRACKET 33.SC101.002 COMBO MODULE/DVD-ROM DRIVE ODD HLDS BD COMBO SATA HH DL 4X CH10F LF W/BRACK BEZEL SATA KO.00605.001 ODD PIONEER BD COMBO SATA HH DL 4X BDC... 720 2.8G 7.5M KC.PH202.720 CPU AMD PHENOMIIX4 805 2.5G 6M KC.PH202.805 CPU AMD PHENOMIIX3 710 2.6G 7.5M KC.PH202.710 HDD/HARD DISK DRIVE HDD 160GB 3.5" 7200RPM SATA II WD WD1600AAJS-22L7A0 XL320S-3 KH.16008.025 HDD 160GB 3.5" 7200RPM SATA II HGST HDT721016SLA380 KH.16007.023 HDD 160GB...


