User Manual
Page 8
... instructions. Note: Adjust only those controls that are covered by a qualified technician to restore the product to normal condition. Do not pierce, open or disassemble the computer or battery.
... instructions. Note: Adjust only those controls that are covered by a qualified technician to restore the product to normal condition. Do not pierce, open or disassemble the computer or battery.
User Manual
Page 9
...should position the device the above-stated distance from the battery, which could affect performance. Note: Please refer to www.acer.com for this device. Do not dispose of them away from your body. Use the device only in temperatures well below freezing. ...Warning! This device meets RF exposure guidelines when used batteries. The full performance of batteries according to local regulations. Do not disassemble or dispose of batteries in fire. To successfully transmit Safety and comfort - 9 The battery can be susceptible to interference from your ...
...should position the device the above-stated distance from the battery, which could affect performance. Note: Please refer to www.acer.com for this device. Do not dispose of them away from your body. Use the device only in temperatures well below freezing. ...Warning! This device meets RF exposure guidelines when used batteries. The full performance of batteries according to local regulations. Do not disassemble or dispose of batteries in fire. To successfully transmit Safety and comfort - 9 The battery can be susceptible to interference from your ...

Acer Aspire M5-481T, PT, and TG Notebook Service Guide
Page 5
... 2-20 Removing BIOS Password 2-21 Miscellaneous Tools 2-23 Using DMI Tools 2-23 CHAPTER 3 Maintenance Procedures Introduction 3-3 General Information 3-3 Recommended Equipment 3-3 Screw Table 3-3 Maintenance Flowchart 3-4 Machine Disassembly 3-5 Getting Started 3-5 ODD Module Removal 3-6 Lower Cover Removal 3-8 Keyboard Backlight Removal 3-10 Keyboard Removal 3-11 Touch Pad Bracket Removal 3-12 Audio Board Removal 3-14 Audio...
... 2-20 Removing BIOS Password 2-21 Miscellaneous Tools 2-23 Using DMI Tools 2-23 CHAPTER 3 Maintenance Procedures Introduction 3-3 General Information 3-3 Recommended Equipment 3-3 Screw Table 3-3 Maintenance Flowchart 3-4 Machine Disassembly 3-5 Getting Started 3-5 ODD Module Removal 3-6 Lower Cover Removal 3-8 Keyboard Backlight Removal 3-10 Keyboard Removal 3-11 Touch Pad Bracket Removal 3-12 Audio Board Removal 3-14 Audio...
Acer Aspire M5-481T, PT, and TG Notebook Service Guide
Page 87
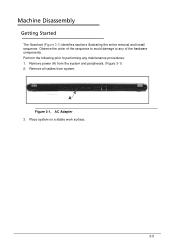
AC Adapter 3. Place system on a stable work surface. 3-5 Remove all cables from the system and peripherals. (Figure 3-1) 2. Machine Disassembly 0 Getting Started 0 The flowchart (Figure 3-1) identifies sections illustrating the entire removal and install sequence. Perform the following prior to any maintenance procedures: 1. A Figure 3-1. Remove power (A) from system. Observe the order of the sequence to avoid damage to performing any of the hardware components.
AC Adapter 3. Place system on a stable work surface. 3-5 Remove all cables from the system and peripherals. (Figure 3-1) 2. Machine Disassembly 0 Getting Started 0 The flowchart (Figure 3-1) identifies sections illustrating the entire removal and install sequence. Perform the following prior to any maintenance procedures: 1. A Figure 3-1. Remove power (A) from system. Observe the order of the sequence to avoid damage to performing any of the hardware components.


