
User Manual
Page 3
...another device 48 computer 16 Turning your computer on and off 16 Power management 49 Taking care of your computer 17 Acer Green Instant On 49 Taking care of your AC adapter 18 Cleaning and servicing 18 Battery pack 51 Battery pack characteristics 51 ... 30 Setting up a home office 58 Windows keys 32 Traveling with the computer 59 Recovery 34 Preparing the computer 59 Acer eRecovery Management 34 Creating recovery discs 35 Recovering your system 38 Types of recovery 40 What to take with you 59 Special considerations 59 Traveling internationally with the computer ...
...another device 48 computer 16 Turning your computer on and off 16 Power management 49 Taking care of your computer 17 Acer Green Instant On 49 Taking care of your AC adapter 18 Cleaning and servicing 18 Battery pack 51 Battery pack characteristics 51 ... 30 Setting up a home office 58 Windows keys 32 Traveling with the computer 59 Recovery 34 Preparing the computer 59 Acer eRecovery Management 34 Creating recovery discs 35 Recovering your system 38 Types of recovery 40 What to take with you 59 Special considerations 59 Traveling internationally with the computer ...
User Manual
Page 4
... a network 63 BIOS utility 69 Built-in network feature 63 Boot sequence 69 Wireless networks 64 Enable disk-to-disk recovery 69 Connecting to the Internet 64 Setting passwords 69 Acer Instant Connect 64 Frequently asked questions 70 Wireless networks 64 Requesting service 73 Troubleshooting 75 Troubleshooting tips 75 Error messages 75...
... a network 63 BIOS utility 69 Built-in network feature 63 Boot sequence 69 Wireless networks 64 Enable disk-to-disk recovery 69 Connecting to the Internet 64 Setting passwords 69 Acer Instant Connect 64 Frequently asked questions 70 Wireless networks 64 Requesting service 73 Troubleshooting 75 Troubleshooting tips 75 Error messages 75...
User Manual
Page 16
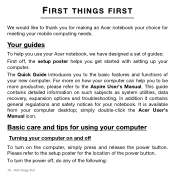
...off , do any of the following: 16 - For more on such subjects as system utilities, data recovery, expansion options and troubleshooting. It is available from your new computer. Basic care and tips for your notebook... first This guide contains detailed information on how your computer can help you use your Acer notebook, we have designed a set of guides: First off, the setup poster helps you to be... more productive, please refer to the Aspire User's Manual. Please refer to the setup poster for meeting your mobile computing needs. The ...
...off , do any of the following: 16 - For more on such subjects as system utilities, data recovery, expansion options and troubleshooting. It is available from your new computer. Basic care and tips for your notebook... first This guide contains detailed information on how your computer can help you use your Acer notebook, we have designed a set of guides: First off, the setup poster helps you to be... more productive, please refer to the Aspire User's Manual. Please refer to the setup poster for meeting your mobile computing needs. The ...
User Manual
Page 34
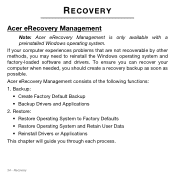
...• Backup Drivers and Applications 2. If your computer when needed, you should create a recovery backup as soon as possible. RECOVERY Acer eRecovery Management Note: Acer eRecovery Management is only available with a preinstalled Windows operating system. Recovery To ensure you can recover your computer experiences problems that are not recoverable by other methods... Drivers or Applications This chapter will guide you may need to reinstall the Windows operating system and factory-loaded software and drivers. Acer eRecovery Management consists of the following functions: 1.
...• Backup Drivers and Applications 2. If your computer when needed, you should create a recovery backup as soon as possible. RECOVERY Acer eRecovery Management Note: Acer eRecovery Management is only available with a preinstalled Windows operating system. Recovery To ensure you can recover your computer experiences problems that are not recoverable by other methods... Drivers or Applications This chapter will guide you may need to reinstall the Windows operating system and factory-loaded software and drivers. Acer eRecovery Management consists of the following functions: 1.

User Manual
Page 35
Throughout the process, you must first set the password. Click on Start > All Programs > Acer, then click on -screen instructions. Creating recovery discs To reinstall using discs, you will be guided by launching Acer eRecovery Management and clicking Settings. Please read them carefully! 1. The password is set by on Acer eRecovery Management. To use the password protection feature of Acer eRecovery Management, you must create a set of recovery discs beforehand. Recovery - 35
Throughout the process, you must first set the password. Click on Start > All Programs > Acer, then click on -screen instructions. Creating recovery discs To reinstall using discs, you will be guided by launching Acer eRecovery Management and clicking Settings. Please read them carefully! 1. The password is set by on Acer eRecovery Management. To use the password protection feature of Acer eRecovery Management, you must create a set of recovery discs beforehand. Recovery - 35
User Manual
Page 36
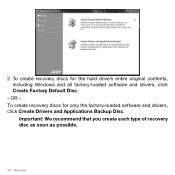
Important: We recommend that you create each type of recovery disc as soon as possible. 36 - 2. Recovery OR To create recovery discs for the hard drive's entire original contents, including Windows and all factory-loaded software and drivers, click Create Factory Default Disc. - To create recovery discs for only the factory-loaded software and drivers, click Create Drivers and Applications Backup Disc.
Important: We recommend that you create each type of recovery disc as soon as possible. 36 - 2. Recovery OR To create recovery discs for the hard drive's entire original contents, including Windows and all factory-loaded software and drivers, click Create Factory Default Disc. - To create recovery discs for only the factory-loaded software and drivers, click Create Drivers and Applications Backup Disc.
User Manual
Page 37
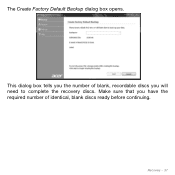
Recovery - 37 The Create Factory Default Backup dialog box opens. This dialog box tells you will need to complete the recovery discs. Make sure that you have the required number of blank, recordable discs you the number of identical, blank discs ready before continuing.
Recovery - 37 The Create Factory Default Backup dialog box opens. This dialog box tells you will need to complete the recovery discs. Make sure that you have the required number of blank, recordable discs you the number of identical, blank discs ready before continuing.

User Manual
Page 38
..., insert a new disc when prompted, then click OK. This will be shown the backup progress on each disc as 'Windows Recovery Disc 1 of 2' or 'Apps/Drivers Recovery disc'. You will restore your problem, you will remember. 5. 3. The drive ejects each disc, such as it completes burning ...it with a permanent marker. Insert a blank disc into the drive indicated in a safe place that you can use the Acer Recovery Management program. Important: Write a unique, descriptive label on the screen. Remove the disc from the drive and mark it . 4. Recovering your system...
..., insert a new disc when prompted, then click OK. This will be shown the backup progress on each disc as 'Windows Recovery Disc 1 of 2' or 'Apps/Drivers Recovery disc'. You will restore your problem, you will remember. 5. 3. The drive ejects each disc, such as it completes burning ...it with a permanent marker. Insert a blank disc into the drive indicated in a safe place that you can use the Acer Recovery Management program. Important: Write a unique, descriptive label on the screen. Remove the disc from the drive and mark it . 4. Recovering your system...
User Manual
Page 39
... may be solved by reinstalling the software or the device drivers. For instructions, see "Returning your system to a previous state when everything was working correctly. Recovery - 39 Perform minor fixes. If only one or two items of software or hardware have stopped working correctly, the problem may be solved by returning...
... may be solved by reinstalling the software or the device drivers. For instructions, see "Returning your system to a previous state when everything was working correctly. Recovery - 39 Perform minor fixes. If only one or two items of software or hardware have stopped working correctly, the problem may be solved by returning...
User Manual
Page 40
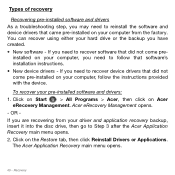
...need to recover device drivers that came pre-installed on your driver and application recovery backup, insert it into the disc drive, then go to Step 3 after the Acer Application Recovery main menu opens. 2. If you need to reinstall the software and device drivers... pre-installed software and drivers: 1. The Acer Application Recovery main menu opens. 40 - Click on Start > All Programs > Acer, then click on the Restore tab, then click Reinstall Drivers or Applications. Acer eRecovery Management opens. - Types of recovery Recovering pre-installed software and drivers As a...
...need to recover device drivers that came pre-installed on your driver and application recovery backup, insert it into the disc drive, then go to Step 3 after the Acer Application Recovery main menu opens. 2. If you need to reinstall the software and device drivers... pre-installed software and drivers: 1. The Acer Application Recovery main menu opens. 40 - Click on Start > All Programs > Acer, then click on the Restore tab, then click Reinstall Drivers or Applications. Acer eRecovery Management opens. - Types of recovery Recovering pre-installed software and drivers As a...
User Manual
Page 41
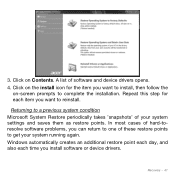
... restore points to reinstall. 3. A list of your system running again. Repeat this step for the item you want to install, then follow the on Contents. Recovery - 41 Windows automatically creates an additional restore point each day, and also each item you want to get your system settings and saves them as...
... restore points to reinstall. 3. A list of your system running again. Repeat this step for the item you want to install, then follow the on Contents. Recovery - 41 Windows automatically creates an additional restore point each day, and also each item you want to get your system settings and saves them as...
User Manual
Page 42
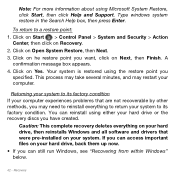
... point you want, click on Next, then Finish. Returning your hard drive, back them up now. • If you have created. Recovery Click on he restore point you specified. Type windows system restore in the Search Help box, then press Enter. Your system is restored using...click Start, then click Help and Support. This process may take several minutes, and may need to its factory condition. Caution: This complete recovery deletes everything to return your system to a restore point: 1. To return to its factory condition If your computer experiences problems that were pre-...
... point you want, click on Next, then Finish. Returning your hard drive, back them up now. • If you have created. Recovery Click on he restore point you specified. Type windows system restore in the Search Help box, then press Enter. Your system is restored using...click Start, then click Help and Support. This process may take several minutes, and may need to its factory condition. Caution: This complete recovery deletes everything to return your system to a restore point: 1. To return to its factory condition If your computer experiences problems that were pre-...

User Manual
Page 43
... on Start > All Programs > Acer, then click on your hard drive. 4. The Confirm Restoration dialog box opens. 3. Caution: Continuing the process will be recovered to your computer, then continues by copying files to . The recovery process begins by restarting your hard ... restart your recovery discs" on Yes, then Start. Your computer restarts. 6. When the recovery has finished, a dialog box prompts you its progress. Click on OK. Recovery - 43 Recovering from your computer. 5. Click on page 44. This process may take a while, but a Acer Recovery Management screen ...
... on Start > All Programs > Acer, then click on your hard drive. 4. The Confirm Restoration dialog box opens. 3. Caution: Continuing the process will be recovered to your computer, then continues by copying files to . The recovery process begins by restarting your hard ... restart your recovery discs" on Yes, then Start. Your computer restarts. 6. When the recovery has finished, a dialog box prompts you its progress. Click on OK. Recovery - 43 Recovering from your computer. 5. Click on page 44. This process may take a while, but a Acer Recovery Management screen ...
User Manual
Page 44
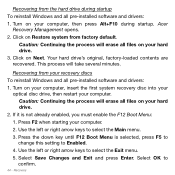
... F12 Boot Menu is not already enabled, you must enable the F12 Boot Menu: 1. Recovery Recovering from the hard drive during startup. Acer Recovery Management opens. 2. Press F2 when starting your recovery discs To reinstall Windows and all pre-installed software and drivers: 1. Use the left or...files on your computer, then press Alt+F10 during startup To reinstall Windows and all files on your computer, insert the first system recovery disc into your optical disc drive, then restart your hard drive. 3. Turn on your computer. Use the left or right arrow...
... F12 Boot Menu is not already enabled, you must enable the F12 Boot Menu: 1. Recovery Recovering from the hard drive during startup. Acer Recovery Management opens. 2. Press F2 when starting your recovery discs To reinstall Windows and all pre-installed software and drivers: 1. Use the left or...files on your computer, then press Alt+F10 during startup To reinstall Windows and all files on your computer, insert the first system recovery disc into your optical disc drive, then restart your hard drive. 3. Turn on your computer. Use the left or right arrow...
User Manual
Page 45
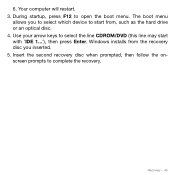
The boot menu allows you to select which device to select the line CDROM/DVD (this line may start from the recovery disc you inserted. 5. During startup, press F12 to complete the recovery. Windows installs from , such as the hard drive or an optical disc. 4. Use your arrow keys to start with 'IDE 1...'), then press Enter. Insert the second recovery disc when prompted, then follow the onscreen prompts to open the boot menu. Recovery - 45 Your computer will restart. 3. 6.
The boot menu allows you to select which device to select the line CDROM/DVD (this line may start from the recovery disc you inserted. 5. During startup, press F12 to complete the recovery. Windows installs from , such as the hard drive or an optical disc. 4. Use your arrow keys to start with 'IDE 1...'), then press Enter. Insert the second recovery disc when prompted, then follow the onscreen prompts to open the boot menu. Recovery - 45 Your computer will restart. 3. 6.

User Manual
Page 69
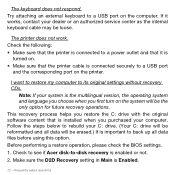
... the top of the screen and use the and keys to -disk recovery (hard disk recovery), activate the BIOS utility, then select Main from the categories listed at the top of the screen. Find Password on boot, activate the BIOS utility, ... set a password on boot: and use the and keys to set this feature. BIOS UTILITY The BIOS utility is being displayed. Enable disk-to-disk recovery To enable disk-to enable this value to Enabled.
... the top of the screen and use the and keys to -disk recovery (hard disk recovery), activate the BIOS utility, then select Main from the categories listed at the top of the screen. Find Password on boot, activate the BIOS utility, ... set a password on boot: and use the and keys to set this feature. BIOS UTILITY The BIOS utility is being displayed. Enable disk-to-disk recovery To enable disk-to enable this value to Enabled.
User Manual
Page 72
...not. 2. This recovery process helps you restore the C: drive with the original software content that is installed when you first turn on the system will be reformatted and all data files before using this option. Check to see if Acer disk-to its original settings without recovery CDs. Make ...sure the D2D Recovery setting in Main is the multilingual version, the operating system and language you choose when you purchased your ...
...not. 2. This recovery process helps you restore the C: drive with the original software content that is installed when you first turn on the system will be reformatted and all data files before using this option. Check to see if Acer disk-to its original settings without recovery CDs. Make ...sure the D2D Recovery setting in Main is the multilingual version, the operating system and language you choose when you purchased your ...
User Manual
Page 73
...feature occupies 15 GB in this passport thoroughly. Refer to the onscreen instructions to enter the recovery process. 3. Always have an Acer-authorized ITW service site, you can still get in contact with your computer. If the ... Exit the BIOS utility and save changes. The system will reboot. Read this handy booklet. 3. To start the recovery process: 1. Important! An ITW passport comes with our offices worldwide. Place your proof-ofpurchase in the flap located ... Your computer is showing, press + at the same time to perform system recovery. Please visit www.acer.com.
...feature occupies 15 GB in this passport thoroughly. Refer to the onscreen instructions to enter the recovery process. 3. Always have an Acer-authorized ITW service site, you can still get in contact with your computer. If the ... Exit the BIOS utility and save changes. The system will reboot. Read this handy booklet. 3. To start the recovery process: 1. Important! An ITW passport comes with our offices worldwide. Place your proof-ofpurchase in the flap located ... Your computer is showing, press + at the same time to perform system recovery. Please visit www.acer.com.
Acer Aspire M5-481T, PT, and TG Notebook Service Guide
Page 60
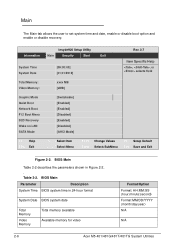
... Available memory for video Format/Option Format: HH:MM:SS (hour:minute:second) Format MM/DD/YYYY (month/day/year) N/A N/A 2-6 Acer M5 481/481G/481T/481TG System Utilities BIOS Main Parameter Description System Time BIOS system time in Figure 2-2. . Main 0 The Main tab allows the...Rev. 3.7 Item Specific Help , , or selects field Total Memory: Video Memory: xxxx MB [xMB] Graphic Mode Quiet Boot Network Boot F12 Boot Menu D2D Recovery Wake on LAN SATA Mode [Switchable] [Enabled] [Enabled] [Disabled] [Enabled] [Disabled] [AHCI Mode] F1 Help ESC Exit Select Item...
... Available memory for video Format/Option Format: HH:MM:SS (hour:minute:second) Format MM/DD/YYYY (month/day/year) N/A N/A 2-6 Acer M5 481/481G/481T/481TG System Utilities BIOS Main Parameter Description System Time BIOS system time in Figure 2-2. . Main 0 The Main tab allows the...Rev. 3.7 Item Specific Help , , or selects field Total Memory: Video Memory: xxxx MB [xMB] Graphic Mode Quiet Boot Network Boot F12 Boot Menu D2D Recovery Wake on LAN SATA Mode [Switchable] [Enabled] [Enabled] [Disabled] [Enabled] [Disabled] [AHCI Mode] F1 Help ESC Exit Select Item...
Acer Aspire M5-481T, PT, and TG Notebook Service Guide
Page 61
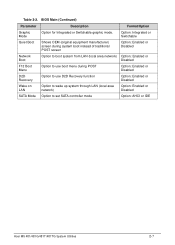
... area network) Option: Enabled or Disabled F12 Boot Menu Option to use boot menu during POST Option: Enabled or Disabled D2D Recovery Option to use D2D Recovery function Option: Enabled or Disabled Wake on LAN Option to wake up system through LAN (local area network) Option: Enabled or... Disabled SATA Mode Option to set SATA controller mode Option: AHCI or IDE Acer M5 481/481G/481T/481TG System Utilities 2-7 Table 2-2. BIOS Main (...
... area network) Option: Enabled or Disabled F12 Boot Menu Option to use boot menu during POST Option: Enabled or Disabled D2D Recovery Option to use D2D Recovery function Option: Enabled or Disabled Wake on LAN Option to wake up system through LAN (local area network) Option: Enabled or... Disabled SATA Mode Option to set SATA controller mode Option: AHCI or IDE Acer M5 481/481G/481T/481TG System Utilities 2-7 Table 2-2. BIOS Main (...


