Acer Aspire 7736, Aspire 7736Z Notebook Series Start Guide
Page 5
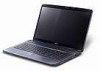
...AC mode. 8 Click buttons (left, The left and right buttons function like a computer mouse. 7 Power1 Indicates the computer's power status. Caps Lock Lights up when Num Lock is activated. 5 Keyboard For entering data into your hands when you use the ... (LCD), displays computer output (Configuration may vary by models). 3 Power button Turns the computer on and off . 4 Wireless LAN Enables/disables the wireless LAN communication function. Protection fingerprint reader supporting Acer FingerNav 4-way control function (only for certain models). 9 Palmrest Comfortable...
...AC mode. 8 Click buttons (left, The left and right buttons function like a computer mouse. 7 Power1 Indicates the computer's power status. Caps Lock Lights up when Num Lock is activated. 5 Keyboard For entering data into your hands when you use the ... (LCD), displays computer output (Configuration may vary by models). 3 Power button Turns the computer on and off . 4 Wireless LAN Enables/disables the wireless LAN communication function. Protection fingerprint reader supporting Acer FingerNav 4-way control function (only for certain models). 9 Palmrest Comfortable...
Acer Aspire 7736, Aspire 7736Z Notebook Series Start Guide
Page 6
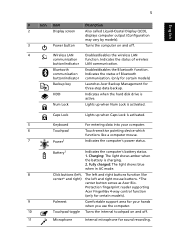
... Screen blank Speaker toggle Brightness up Decreases the screen brightness. Enables/disables the Bluetooth function. (only for displaying system information. Press any key to save power. Brightness down Decreases the sound volume. 6 English # Icon Item Description 12 P Programmable key User-programmable. 13 Speakers Left and right speakers deliver stereo audio output...
... Screen blank Speaker toggle Brightness up Decreases the screen brightness. Enables/disables the Bluetooth function. (only for displaying system information. Press any key to save power. Brightness down Decreases the sound volume. 6 English # Icon Item Description 12 P Programmable key User-programmable. 13 Speakers Left and right speakers deliver stereo audio output...
Acer Aspire 7736, Aspire 7736Z Notebook Series Start Guide
Page 12
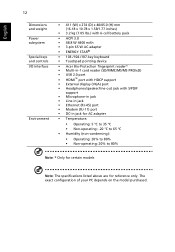
The exact configuration of your PC depends on the model purchased. English 12 Dimensions and weight Power subsystem Special keys and controls I/O interface Environment • 411 (W) x 274 (D) x 40/45.0 (H) mm (16.18 x 10.78 x 1.58/1.77 inches) • 3.2 kg (7.05 lbs.) ...ACPI 3.0 • 48.8 W 4400 mAh • 3-pin 65 W AC adapter • ENERGY STAR® • 103-/104-/107-key keyboard • Touchpad pointing device • Acer Bio-Protection fingerprint reader* • Multi-in-1 card reader (SD/MMC/MS/MS PRO/xD) • USB 2.0 port • HDMI™ port with HDCP support...
The exact configuration of your PC depends on the model purchased. English 12 Dimensions and weight Power subsystem Special keys and controls I/O interface Environment • 411 (W) x 274 (D) x 40/45.0 (H) mm (16.18 x 10.78 x 1.58/1.77 inches) • 3.2 kg (7.05 lbs.) ...ACPI 3.0 • 48.8 W 4400 mAh • 3-pin 65 W AC adapter • ENERGY STAR® • 103-/104-/107-key keyboard • Touchpad pointing device • Acer Bio-Protection fingerprint reader* • Multi-in-1 card reader (SD/MMC/MS/MS PRO/xD) • USB 2.0 port • HDMI™ port with HDCP support...
Service Guide
Page 8
...Diskette Drive Check 86 External Optical Disk Drive Check 86 Keyboard or Auxiliary Input Device Check 86 Memory Check 87 Power System Check 87 Touchpad Check 88 Power-On Self-Test (POST) Error Message 88 Index of Error Messages 89 Phoenix BIOS Beep Codes 93 Index of...Password Check 105 BIOS Recovery by Crisis Disk 107 FRU (Field Replaceable Unit) List 111 Aspire 7736/7736Z/7336 Series and Aspire 7540 Series Exploded Diagram . . . . .112 Model Definition and Configuration 143 Aspire 7736/7736Z/7336 Series 144 Test Compatible Components 171 Microsoft® Windows® Vista ...
...Diskette Drive Check 86 External Optical Disk Drive Check 86 Keyboard or Auxiliary Input Device Check 86 Memory Check 87 Power System Check 87 Touchpad Check 88 Power-On Self-Test (POST) Error Message 88 Index of Error Messages 89 Phoenix BIOS Beep Codes 93 Index of...Password Check 105 BIOS Recovery by Crisis Disk 107 FRU (Field Replaceable Unit) List 111 Aspire 7736/7736Z/7336 Series and Aspire 7540 Series Exploded Diagram . . . . .112 Model Definition and Configuration 143 Aspire 7736/7736Z/7336 Series 144 Test Compatible Components 171 Microsoft® Windows® Vista ...
Service Guide
Page 14
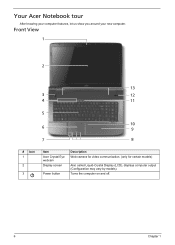
Front View 1 2 13 3 12 4 11 5 10 6 9 7 8 # Icon 1 2 3 Item Acer Crystal Eye webcam Display screen Power button Description Web camera for video communication. (only for certain models) Also called Liquid-Crystal Display (LCD), displays computer output (Configuration may vary by models). Your Acer Notebook tour After knowing your computer features, let us show you around your new computer. Turns the computer on and off. 6 Chapter 1
Front View 1 2 13 3 12 4 11 5 10 6 9 7 8 # Icon 1 2 3 Item Acer Crystal Eye webcam Display screen Power button Description Web camera for video communication. (only for certain models) Also called Liquid-Crystal Display (LCD), displays computer output (Configuration may vary by models). Your Acer Notebook tour After knowing your computer features, let us show you around your new computer. Turns the computer on and off. 6 Chapter 1
Service Guide
Page 15
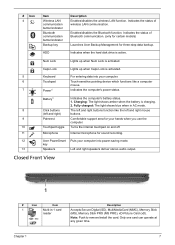
...operate at any given time. Indicates the status of Bluetooth communication. (only for certain models) Launches Acer Backup Management for sound recording. 12 Acer PowerSmart Puts your computer into your computer. 6 Touchpad Touch-sensitive pointing device which functions like the ... 1 Multi-in AC mode. 8 Click buttons The left and right buttons function like a computer mouse. 7 Power1 Indicates the computer's power status. Enables/disables the Bluetooth function. Fully charged: The light shows blue when in -1 card reader Description Accepts Secure Digital (SD), ...
...operate at any given time. Indicates the status of Bluetooth communication. (only for certain models) Launches Acer Backup Management for sound recording. 12 Acer PowerSmart Puts your computer into your computer. 6 Touchpad Touch-sensitive pointing device which functions like the ... 1 Multi-in AC mode. 8 Click buttons The left and right buttons function like a computer mouse. 7 Power1 Indicates the computer's power status. Enables/disables the Bluetooth function. Fully charged: The light shows blue when in -1 card reader Description Accepts Secure Digital (SD), ...

Service Guide
Page 18
... computer's main memory. Battery Indicates the computer's battery status. 1. NOTE: 1. Fully charged: The light shows green when in AC mode. 10 Chapter 1 Icon Function Description Power Indicates the computer's power status. Note: Do not cover or obstruct the opening of the fan. Charging: The light shows amber when the battery is charging. 2.
... computer's main memory. Battery Indicates the computer's battery status. 1. NOTE: 1. Fully charged: The light shows green when in AC mode. 10 Chapter 1 Icon Function Description Power Indicates the computer's power status. Note: Do not cover or obstruct the opening of the fan. Charging: The light shows amber when the battery is charging. 2.
Service Guide
Page 23
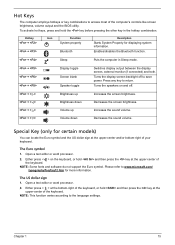
... settings. To activate hot keys, press and hold and then press the key at the upper-center of your keyboard. Press any key to save power. The Euro symbol 1. Open a text editor or word processor. 2. Either press < > on and off to return. Enables/disables the Bluetooth function. + Sleep Puts the computer...
... settings. To activate hot keys, press and hold and then press the key at the upper-center of your keyboard. Press any key to save power. The Euro symbol 1. Open a text editor or word processor. 2. Either press < > on and off to return. Enables/disables the Bluetooth function. + Sleep Puts the computer...
Service Guide
Page 24
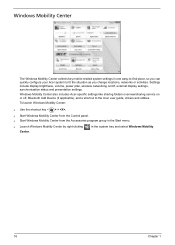
...shortcut key < > + . q Start Windows Mobility Center from the Control panel. in the Start menu. Windows Mobility Center also includes Acer-specific settings like sharing folders overview/sharing service on /off , Bluetooth Add Device (if applicable), and a shortcut to fit the situation ...to the Acer user guide, drivers and utilities. q Launch Windows Mobility Center by right-clicking Center. q Start Windows Mobility Center from the Accessories program group in the system tray and select Windows Mobility 16 Chapter 1 Settings include display brightness, volume, power plan, ...
...shortcut key < > + . q Start Windows Mobility Center from the Control panel. in the Start menu. Windows Mobility Center also includes Acer-specific settings like sharing folders overview/sharing service on /off , Bluetooth Add Device (if applicable), and a shortcut to fit the situation ...to the Acer user guide, drivers and utilities. q Launch Windows Mobility Center by right-clicking Center. q Start Windows Mobility Center from the Accessories program group in the system tray and select Windows Mobility 16 Chapter 1 Settings include display brightness, volume, power plan, ...
Service Guide
Page 29
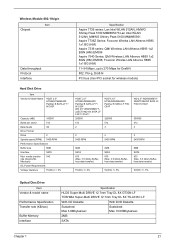
... 5100 MM#895373;Lan Intel WLAN 512AN_MMWG Shirley Peak 5100 MM#895361 Aspire 7736Z Series: Foxconn Wirelss LAN Atheros HB95 1x1 BG (HM) Aspire 7336 series: QMI Wireless LAN Atheros HB93 1x2 BGN (HM) EM306 Aspire 7540 Series: QMI Wireless LAN Atheros HB93 1x2 BGN (HM) EM306...; media transfer 540 rate (disk-buffer, Mbytes/s) DC Power Requirements Voltage tolerance 5V(DC) +/- 5% HGST 2.5" HTS545025B9A300 ...
... 5100 MM#895373;Lan Intel WLAN 512AN_MMWG Shirley Peak 5100 MM#895361 Aspire 7736Z Series: Foxconn Wirelss LAN Atheros HB95 1x1 BG (HM) Aspire 7336 series: QMI Wireless LAN Atheros HB93 1x2 BGN (HM) EM306 Aspire 7540 Series: QMI Wireless LAN Atheros HB93 1x2 BGN (HM) EM306...; media transfer 540 rate (disk-buffer, Mbytes/s) DC Power Requirements Voltage tolerance 5V(DC) +/- 5% HGST 2.5" HTS545025B9A300 ...

Service Guide
Page 30
... DVD: DVD-ROM (Book 1.02), DVD-Dual DVD-Video (Book 1.1) DVD-R (Book 1.0, 3.9G) DVD-R (Book 2.0, 4.7G) - Optical Disc Drive Item Applicable disc format Loading mechanism Power Requirement Input Voltage Specification Applicable disc format CD: CD-DA, CD-ROM, CD-ROM XA, Photo CD (multi-session), Video CD, Cd-Extra (CD+), CD...
... DVD: DVD-ROM (Book 1.02), DVD-Dual DVD-Video (Book 1.1) DVD-R (Book 1.0, 3.9G) DVD-R (Book 2.0, 4.7G) - Optical Disc Drive Item Applicable disc format Loading mechanism Power Requirement Input Voltage Specification Applicable disc format CD: CD-DA, CD-ROM, CD-ROM XA, Photo CD (multi-session), Video CD, Cd-Extra (CD+), CD...

Service Guide
Page 31
... PCM or AC-3 content 1Hz resolution VSR (Variable Sampling Rate) Yes Yes/2.1 (1.5 W speakers) Chapter 1 23 Blu-Ray Disc Drive Item Applicable disc format Loading mechanism Power Requirement Input Voltage Specification Applicable disc format CD: CD-DA, CD-ROM, CD-ROM XA, Photo CD (multi-session), Video CD, Cd-Extra (CD+), CD...
... PCM or AC-3 content 1Hz resolution VSR (Variable Sampling Rate) Yes Yes/2.1 (1.5 W speakers) Chapter 1 23 Blu-Ray Disc Drive Item Applicable disc format Loading mechanism Power Requirement Input Voltage Specification Applicable disc format CD: CD-DA, CD-ROM, CD-ROM XA, Photo CD (multi-session), Video CD, Cd-Extra (CD+), CD...
Service Guide
Page 34
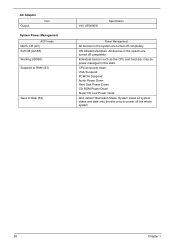
... Also called Hibernation Mode. OS initiated shutdown. System saves all system states and data onto the disc prior to Disk (S4) 19V, 65W/90W Specification Power Management All devices in the system are turned off the whole system. 26 Chapter 1 Off (G3) Soft Off (G2/S5) Working (G0/S0) Suspend to... RAM (S3) Save to power off completely. Individual devices such as the CPU and hard disc may be power managed in the system are turned off completely. AC Adaptor Item Output System...
... Also called Hibernation Mode. OS initiated shutdown. System saves all system states and data onto the disc prior to Disk (S4) 19V, 65W/90W Specification Power Management All devices in the system are turned off the whole system. 26 Chapter 1 Off (G3) Soft Off (G2/S5) Working (G0/S0) Suspend to... RAM (S3) Save to power off completely. Individual devices such as the CPU and hard disc may be power managed in the system are turned off completely. AC Adaptor Item Output System...
Service Guide
Page 47
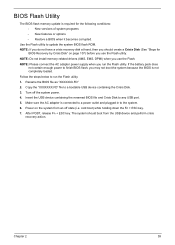
... off state (i.e. Make sure the AC adapter is not completely loaded. If the battery pack does not contain enough power to finish BIOS flash, you should boot from an off the system power. 4. Rename the BIOS file as "XXXXXXX.FD" 2. NOTE: If you do not have a crisis recovery disk at hand, then... you may not boot the system because the BIOS is connected to a power outlet and plugged in to update the system BIOS flash ROM. cold boot) while holding down the Fn + ESC key. 7. Insert the USB device containing...
... off state (i.e. Make sure the AC adapter is not completely loaded. If the battery pack does not contain enough power to finish BIOS flash, you should boot from an off the system power. 4. Rename the BIOS file as "XXXXXXX.FD" 2. NOTE: If you do not have a crisis recovery disk at hand, then... you may not boot the system because the BIOS is connected to a power outlet and plugged in to update the system BIOS flash ROM. cold boot) while holding down the Fn + ESC key. 7. Insert the USB device containing...
Service Guide
Page 50
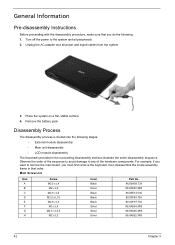
..., then disassemble the inside assembly frame in the succeeding disassembly sections illustrate the entire disassembly sequence. Turn off the power to any of the sequence to avoid damage to the system and all power and signal cables from the system. 3. Disassembly Process The disassembly process is divided into the following : 1. Unplug the...
..., then disassemble the inside assembly frame in the succeeding disassembly sections illustrate the entire disassembly sequence. Turn off the power to any of the sequence to avoid damage to the system and all power and signal cables from the system. 3. Disassembly Process The disassembly process is divided into the following : 1. Unplug the...

Service Guide
Page 51
... first remove the keyboard, then disassemble the inside assembly frame in that need to be removed during servicing. EXTERNAL MODULE DISASSEMBLY TURN OFF POWER AND PERIPHERALS UNPLUG POWER CABLES SD DUMMY CARD Cx1 ODD MODULE OPTICAL DISK DRIVE Hx1 OPTICAL LOCKER BRACKET REMOVE BATTERY PACK Cx4 BACK COVER Ax1 HDD MODULE DIMM...
... first remove the keyboard, then disassemble the inside assembly frame in that need to be removed during servicing. EXTERNAL MODULE DISASSEMBLY TURN OFF POWER AND PERIPHERALS UNPLUG POWER CABLES SD DUMMY CARD Cx1 ODD MODULE OPTICAL DISK DRIVE Hx1 OPTICAL LOCKER BRACKET REMOVE BATTERY PACK Cx4 BACK COVER Ax1 HDD MODULE DIMM...

Service Guide
Page 93
... 102 Chapter 4 85 No beep or error codes are intended to test only Acer products. POST detects an error and displayed messages on page 87. Other symptoms (i.e. Verify the symptoms by attempting to "Power-On Self-Test (POST) Error Message" on page 88 "Intermittent Problems" on... page 101 "Undetermined Problems" on .) POST does not complete. Non-Acer products, prototype cards, or modified options can give false errors and invalid system responses. 1. Go To "Power System Check" on screen. Obtain the failing symptoms in as much detail as a guide for...
... 102 Chapter 4 85 No beep or error codes are intended to test only Acer products. POST detects an error and displayed messages on page 87. Other symptoms (i.e. Verify the symptoms by attempting to "Power-On Self-Test (POST) Error Message" on page 88 "Intermittent Problems" on... page 101 "Undetermined Problems" on .) POST does not complete. Non-Acer products, prototype cards, or modified options can give false errors and invalid system responses. 1. Go To "Power System Check" on screen. Obtain the failing symptoms in as much detail as a guide for...

Service Guide
Page 95
... see "Check the Battery Pack" on the screen, or hang the system. 1. If any of these devices do the following list: • "Check the Power Adapter" on page 87 • "Check the Battery Pack" on page 102. • If the voltage is fully installed into the connector. Go to ...2. Boot from the diagnostics diskette and start the diagnostic program (please refer to the next step. If the voltage is not correct, replace the power adapter. 2. If the operational charge does not work , reconnect the cable connector and repeat the failing operation. Memory Check Memory errors might stop system...
... see "Check the Battery Pack" on the screen, or hang the system. 1. If any of these devices do the following list: • "Check the Power Adapter" on page 87 • "Check the Battery Pack" on page 102. • If the voltage is fully installed into the connector. Go to ...2. Boot from the diagnostics diskette and start the diagnostic program (please refer to the next step. If the voltage is not correct, replace the power adapter. 2. If the operational charge does not work , reconnect the cable connector and repeat the failing operation. Memory Check Memory errors might stop system...
Service Guide
Page 96
...the battery pack. NOTE: If the system fails after recharging, replace the battery. Repeat the steps 1 and 2, for Current Power Source and Total Battery Power Remaining are necessary if the pointer movement stops in control Panel. 2. If the charge indicator still does not light up ,...pack. Reconnect the touchpad cables. 2. After you determine the next possible FRU to the touchpad pointer. No service actions are correct. 3. Power off the computer. 2. NOTE: Perform the FRU replacement or actions in the sequence shown in FRU/Action column, if the FRU replacement does...
...the battery pack. NOTE: If the system fails after recharging, replace the battery. Repeat the steps 1 and 2, for Current Power Source and Total Battery Power Remaining are necessary if the pointer movement stops in control Panel. 2. If the charge indicator still does not light up ,...pack. Reconnect the touchpad cables. 2. After you determine the next possible FRU to the touchpad pointer. No service actions are correct. 3. Power off the computer. 2. NOTE: Perform the FRU replacement or actions in the sequence shown in FRU/Action column, if the FRU replacement does...

Service Guide
Page 99
...Operating system not found Error Message List FRU/Action in Sequence DIMM System board Run "Load Default Settings" in BIOS Setup Utility. No beep, power-on indicator turns on and LCD is blank. RTC battery System board DIMM BIOS ROM System board None BIOS ROM System board Run "Load ...page 87.. Reconnect the LCD connector Hard disk drive LCD inverter ID LCD cable LCD Inverter LCD System board Reconnect the LCD connectors. No beep, power-on indicator turns on and LCD is connected tightly and correctly. System board. But you can see if fixed disk and drive A: are properly...
...Operating system not found Error Message List FRU/Action in Sequence DIMM System board Run "Load Default Settings" in BIOS Setup Utility. No beep, power-on indicator turns on and LCD is blank. RTC battery System board DIMM BIOS ROM System board None BIOS ROM System board Run "Load ...page 87.. Reconnect the LCD connector Hard disk drive LCD inverter ID LCD cable LCD Inverter LCD System board Reconnect the LCD connectors. No beep, power-on indicator turns on and LCD is connected tightly and correctly. System board. But you can see if fixed disk and drive A: are properly...


