Aspire 7736Z Will Not Turn On - Acer
Aspire 7736Z Will Not Turn On

Related Manual Pages


Similar Questions


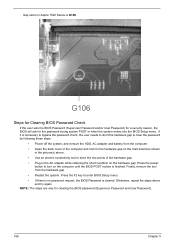
My Nephew Has Somehow Locked Me Out When I Turn On Now It Says Enter Hdd Pasword
Is there a way to fix this myself?
Is there a way to fix this myself?
(Posted by KevinImmel 10 years ago)

How To Turn On Wi-fi In Aspire 4752g Laptap
How to turn on wi-fi in aspire 4752g laptap
How to turn on wi-fi in aspire 4752g laptap
(Posted by blreddi 10 years ago)

I Have An Acer Aspire 7750g, How Do I Turn On The Vga Camera???
I Have An Acer Aspire 7750g, How Do I Turn On The vga camera???
I Have An Acer Aspire 7750g, How Do I Turn On The vga camera???
(Posted by jadrankocapor 11 years ago)
Related Terms
The following terms were also used when searching for Aspire 7736Z Will Not Turn On - Acer:- acer aspire 7736z
- aspire 7736z
- aspire 7736zg
- acer aspire 7736z-4088
- acer aspire 7736z 4088
- aspire 7736z-4088
- aspire 7736z 4088
- aspire 7736z 4809
- aspire 7736z-4809
- acer aspire 7736z 4809
- aspire 7736z 4905
- acer aspire7736z 4088
- aspire 7736z keyboard
- acer aspire 7736z 4905
- acer aspire 7736z keyboard
- aspire 7736z bluetooth
- aspire7736z-4088
- acer aspire 7736z review
- aspire 7736z drivers
- aspire 7736z memory
- aspire 7736z parts
- aspire 7736z price
- aspire 7736z review
- acer aspire 7736z motherboard
- aspire 7736z 4088 laptop
- aspire 7736z 4088 manual
- aspire 7736z disassembly
- aspire 7736z hard drive
- aspire 7736z keyboard replacement
- aspire 7736z manual
- aspire 7736z motherboard
- aspire 7736z specs
- aspire 7736z user guide
- acer aspir 7736z-4088 replacement screen
- acer aspire 7736z 4088 battery
- acer aspire 7736z 4088 drivers
- acer aspire 7736z 4088 hard drive
- acer aspire 7736z 4088 laptop
- acer aspire 7736z 4088 manual
- acer aspire 7736z 4088 motherboard
- acer aspire 7736z 4088 parts
- acer aspire 7736z 4088 remove keyboard
- acer aspire 7736z 4088 screen
- acer aspire 7736z 4088 specs
- acer aspire 7736z battery
- acer aspire 7736z battery not charging
- acer aspire 7736z battery problem
- acer aspire 7736z bios
- acer aspire 7736z bios update
- acer aspire 7736z black screen
- acer aspire 7736z bluetooth
- acer aspire 7736z charger
- acer aspire 7736z cmos battery location
- acer aspire 7736z disassembly
- acer aspire 7736z driver updates
- acer aspire 7736z drivers
- acer aspire 7736z graphics card
- acer aspire 7736z hard drive
- acer aspire 7736z how recovery
- acer aspire 7736z keyboard replacement
- acer aspire 7736z laptop
- acer aspire 7736z laptop lid
- acer aspire 7736z long beeping before booting
- acer aspire 7736z manual
- acer aspire 7736z memory
- acer aspire 7736z microphone driver
- acer aspire 7736z motherboard repair
- acer aspire 7736z motherboard replacement
- acer aspire 7736z no lights no power
- acer aspire 7736z no power
- acer aspire 7736z no power white screen
- acer aspire 7736z no-power
- acer aspire 7736z not turning on
- acer aspire 7736z parts
- acer aspire 7736z password reset
- acer aspire 7736z power cord
- acer aspire 7736z power cord problems
- acer aspire 7736z power jack
- acer aspire 7736z power problem
- acer aspire 7736z power problems
- acer aspire 7736z power supply
- acer aspire 7736z price
- acer aspire 7736z programmable key
- acer aspire 7736z ram
- acer aspire 7736z ram upgrade
- acer aspire 7736z recovery disk
- acer aspire 7736z repair manual
- acer aspire 7736z restore disk
- acer aspire 7736z screen
- acer aspire 7736z service guide
- acer aspire 7736z service guide pdf
- acer aspire 7736z service manual
- acer aspire 7736z specifications
- acer aspire 7736z specs
- acer aspire 7736z touchpad problems
- acer aspire 7736z user guide
- acer aspire 7736z will not charge
- acer aspire 7736z will not power on
- acer aspire 7736z will not turn on
- acer aspire 7736z windows 8
- acer aspire 7736z won't turn on
- acer aspire 7736z wont power on
- acer aspire 7736z wont power up
- acer aspire 7736z wont turn on
- acer aspire 7736z-4088 battery
- acer aspire 7736z-4088 bios
- acer aspire 7736z-4088 disassembly
- acer aspire 7736z-4088 drivers
- acer aspire 7736z-4088 drivers for windows 7
- acer aspire 7736z-4088 hard drive
- acer aspire 7736z-4088 has no power
- acer aspire 7736z-4088 keyboard
- acer aspire 7736z-4088 laptop
- acer aspire 7736z-4088 laptop computer
- acer aspire 7736z-4088 manual
- acer aspire 7736z-4088 motherboard
- acer aspire 7736z-4088 no power
- acer aspire 7736z-4088 screen
- acer aspire 7736z-4088 screen replacement
- acer aspire 7736z-4088 specs
- acer aspire 7736z-4088 system recovery
- acer aspire 7736z-4088 user manual
- acer aspire 7736z-4088 will not power on
- acer aspire 7736z-4088 won't power on
- acer aspire 7736z-4088 won't turn on
- acer aspire 7736z-4088 wont turn on
- acer aspire 7736z-4809
- acer aspire 7736z-4809 battery
- acer aspire 7736z-4809 drivers
- acer aspire 7736z-4809 motherboard
- acer aspire 7736z-4809 no power
- acer aspire 7736z-4905
- acer aspire 7736zg
- acer aspire7736z
- acer aspire7736z-4088
- aspir 7736z-4088 replacement screen
- aspire 7736z -4088
- aspire 7736z 4088 battery
- aspire 7736z 4088 drivers
- aspire 7736z 4088 hard drive
- aspire 7736z 4088 motherboard
- aspire 7736z 4088 parts
- aspire 7736z 4088 remove keyboard
- aspire 7736z 4088 screen
- aspire 7736z 4088 specs
- aspire 7736z 4448
- aspire 7736z acer
- aspire 7736z battery
- aspire 7736z battery not charging
- aspire 7736z battery problem
- aspire 7736z bios
- aspire 7736z bios update
- aspire 7736z black screen
- aspire 7736z bluetooth driver
- aspire 7736z charger
- aspire 7736z cmos battery location
- aspire 7736z driver updates
- aspire 7736z factory restore
- aspire 7736z freezes playing video
- aspire 7736z graphics card
- aspire 7736z how recovery
- aspire 7736z laptop
- aspire 7736z laptop lid
- aspire 7736z long beeping before booting
- aspire 7736z microphone driver
- aspire 7736z motherboard repair
- aspire 7736z motherboard replacement
- aspire 7736z no lights no power
- aspire 7736z no power
- aspire 7736z no power white screen
- aspire 7736z no-power
- aspire 7736z not turning on
- aspire 7736z password reset
- aspire 7736z power adaptor
- aspire 7736z power cord
- aspire 7736z power cord problems
- aspire 7736z power jack
- aspire 7736z power problem
- aspire 7736z power problems
- aspire 7736z power supply
- aspire 7736z programmable key
- aspire 7736z ram
- aspire 7736z ram upgrade
- aspire 7736z recovery
- aspire 7736z recovery disk
- aspire 7736z recovery download
- aspire 7736z repair manual
- aspire 7736z replace keyboard
- aspire 7736z restore disk
- aspire 7736z screen
- aspire 7736z series motherboard
- aspire 7736z service guide
- aspire 7736z service guide pdf
- aspire 7736z service manual
- aspire 7736z services manual
- aspire 7736z specifications
- aspire 7736z system factory restore
- aspire 7736z system recovery
- aspire 7736z turn on wireless
- aspire 7736z will not charge
- aspire 7736z will not power on
- aspire 7736z will not turn on
- aspire 7736z windows 8
- aspire 7736z wireless card driver
- aspire 7736z wireless drivers for xp
- aspire 7736z won't turn on
- aspire 7736z wont power on
- aspire 7736z wont power up
- aspire 7736z wont turn on
- aspire 7736z-4088 battery
- aspire 7736z-4088 bios
- aspire 7736z-4088 disassembly
- aspire 7736z-4088 drivers
- aspire 7736z-4088 drivers for windows 7
- aspire 7736z-4088 hard drive
- aspire 7736z-4088 has no power
- aspire 7736z-4088 keyboard
- aspire 7736z-4088 laptop
- aspire 7736z-4088 laptop computer
- aspire 7736z-4088 manual
- aspire 7736z-4088 motherboard
- aspire 7736z-4088 no power
- aspire 7736z-4088 screen
- aspire 7736z-4088 screen replacement
- aspire 7736z-4088 specs
- aspire 7736z-4088 system recovery
- aspire 7736z-4088 user manual
- aspire 7736z-4088 will not power on
- aspire 7736z-4088 won't power on
- aspire 7736z-4088 won't turn on
- aspire 7736z-4088 wont turn on
- aspire 7736z-4809 battery
- aspire 7736z-4809 drivers
- aspire 7736z-4809 motherboard
- aspire 7736z-4809 no power
- aspire 7736z-4905
- aspire 7736z4088